2016 MERCEDES-BENZ E-SEDAN light
[x] Cancel search: lightPage 108 of 350
Problems with the side windows
GWARNING
If you close a side window again immediately after it has been blocked or reset, the side window
closes with increased or maximum force. The reversing feature is then not active. Parts of the
body could be trapped in the closing area in the process. This poses an increased risk of injury or
even fatal injury.
Make sure that no parts of the body are in the closing area. To stop the closing process, release
the switch or push the switch again to reopen the side window.
ProblemPossible causes/consequences and MSolutions
A side window cannot
be closed because it is
blocked by objects, e.g.
leaves in the window
guide.XRemove the objects.
XClose the side window.
A side window cannot
be closed and you can-
not see the cause.If a side window is obstructed during closing and reopens again
slightly:
XImmediately after the window blocks, pull the corresponding
switch again until the side window has closed.
The side window is closed with increased force.
If a side window is obstructed again during closing and reopens
again slightly:
XImmediately after the window blocks, pull the corresponding
switch again until the side window has closed.
The side window is closed without the anti-entrapment feature.
Sliding sunroof
Important safety notes
Your vehicle may be equipped with a sliding
sunroof or a panorama roof with power tilt/
sliding panel. In this section, the term "sliding
sunroof" refers to both types of sliding sun-
roof.
GWARNING
While opening and closing the sliding sunroof, body parts in close proximity could become
trapped. There is a risk of injury.
Make sure that no body parts are in close
proximity during the opening and closing pro-
cedures.
If somebody becomes trapped:
Rrelease the switch immediately, or
Rduring automatic operation, push the
switch briefly in any direction
The opening or closing procedure will be stop-
ped.
GWARNING
If children operate the sliding sunroof they
could become trapped, particularly if they are left unsupervised. There is a risk of injury.
When leaving the vehicle, always take the
SmartKey with you and lock the vehicle. Never
leave children unsupervised in the vehicle.
106Sliding sunroof
Opening and closing
Page 109 of 350
!Only open the sliding sunroof if it is free of
snow and ice. Otherwise, malfunctions may
occur.
Do not allow anything to protrude from the
sliding sunroof. Otherwise, the seals could
be damaged.
!The weather can change abruptly. It could
start to rain or snow. Make sure that the
sliding sunroof is closed when you leave the
vehicle. The vehicle electronics can be
damaged if water enters the vehicle inte-
rior.
iResonance noises can occur in addition to
the usual airflow noises when the sliding
sunroof is open. They are caused by minor
pressure fluctuations in the vehicle interior.
Change the position of the sliding sunroof
or open a side window slightly to reduce or
eliminate these noises.
Sliding sunroof reversing feature
Your vehicle may be equipped with a sliding
sunroof or a panorama roof with power tilt/
sliding panel. In this section, the term "sliding
sunroof" refers to both types of sliding sun-
roof.
The sliding sunroof is equipped with an auto-
matic reversing feature. If a solid object
blocks or restricts the sliding sunroof during
the closing process, the sliding sunroof opens
again automatically. However, the automatic
reversing feature is only an aid and does not
relieve you of the responsibility of paying
attention when closing the sliding sunroof.
GWARNING
The reversing feature does not react:
Rto soft, light and thin objects, e.g. small fin-
gers
Rover the last 1/6 in (4 mm) of the closing
movement
Rduring resetting
Rwhen closing the sliding sunroof again man- ually immediately after automatic reversing
This means that the reversing feature cannot
prevent someone being trapped in these sit-
uations. There is a risk of injury.
Make sure that no body parts are in close
proximity during the closing procedure.
If somebody becomes trapped:
Rrelease the switch immediately, or
Rpress the switch in any direction during the
automatic closing process
The closing process is stopped.
Operating the sliding sunroof
Opening and closing
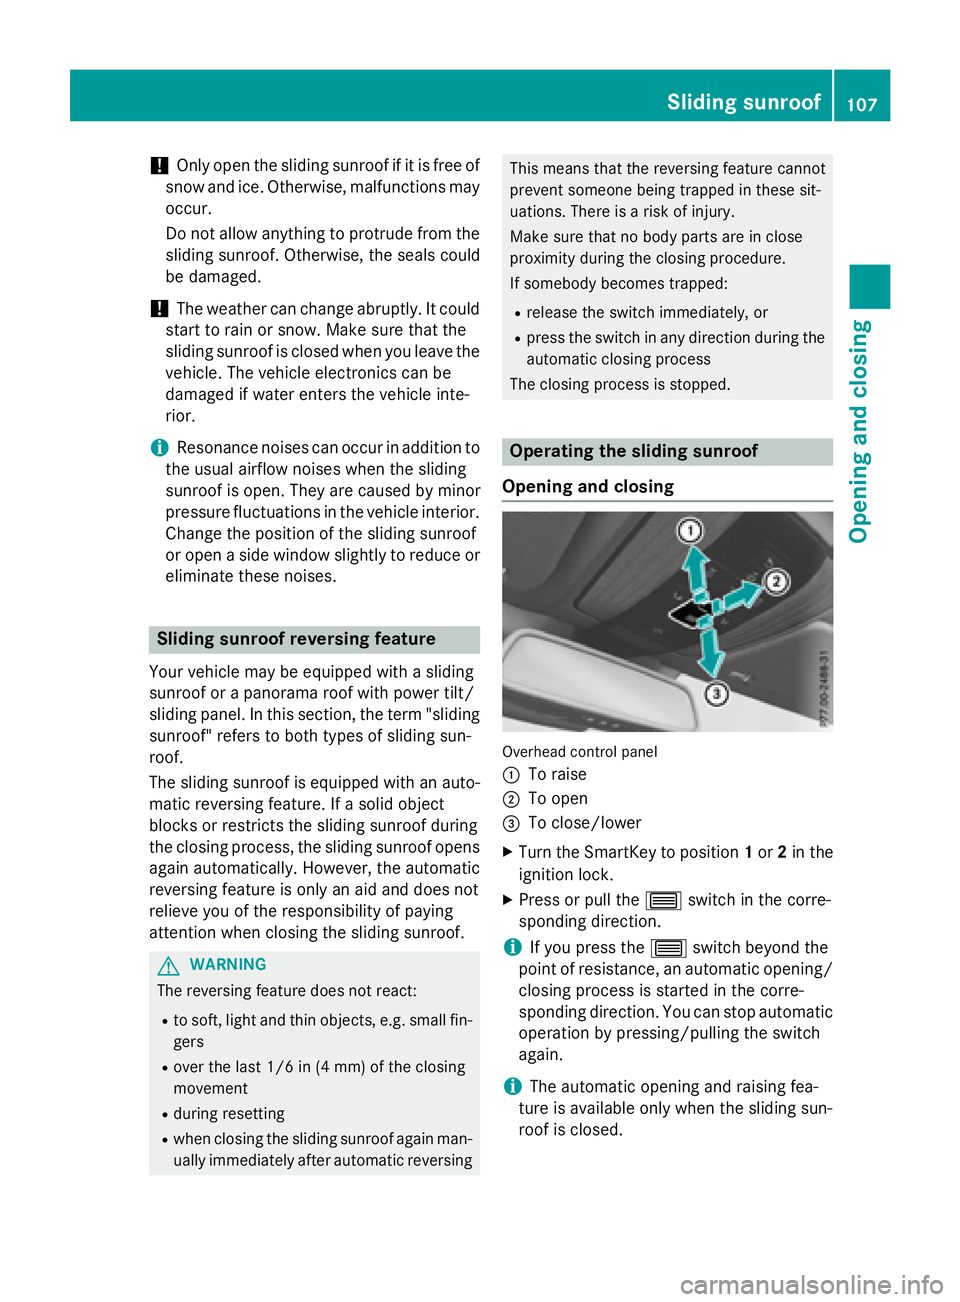
Overhead control panel
:
To raise
;To open
=To close/lower
XTurn the SmartKey to position 1or 2in the
ignition lock.
XPress or pull the 3switch in the corre-
sponding direction.
iIf you press the 3switch beyond the
point of resistance, an automatic opening/
closing process is started in the corre-
sponding direction. You can stop automatic
operation by pressing/pulling the switch
again.
iThe automatic opening and raising fea-
ture is available only when the sliding sun-
roof is closed.
Sliding sunroof107
Opening and closing
Z
Page 111 of 350
If somebody becomes trapped:
Rrelease the switch immediately, or
Rduring automatic operation, push the
switch briefly in any direction
The opening/closing process is briefly stop-
ped. The roller sunblind then returns to its ini-
tial position.
The roller sunblind shields the vehicle interior
from sunlight. The two roller sunblinds can
only be opened and closed together when the
panorama roof with power tilt/sliding panel is closed.
Roller sunblind reversing feature
The roller sunblind is equipped with an auto-
matic reversing feature. If a solid object
blocks or restricts the roller sunblind during
the closing process, the roller sunblind opensagain automatically. The automatic reversing
feature is only an aid and is not a substitute
for your attentiveness to the roller sunblind
while it is closing.
GWARNING
The reversing function does not react in par-
ticular to soft, light and thin objects, e.g. small
fingers. This means that the reversing feature
cannot prevent someone being trapped in
these situations. There is a risk of injury.
When closing the roller sunblind, make sure
that no body parts are in the sweep area.
If somebody becomes trapped:
Rrelease the switch immediately, or
Rpress the switch in any direction during the
automatic closing process
The closing process is briefly stopped. The
roller sunblind then returns to its initial posi-
tion.
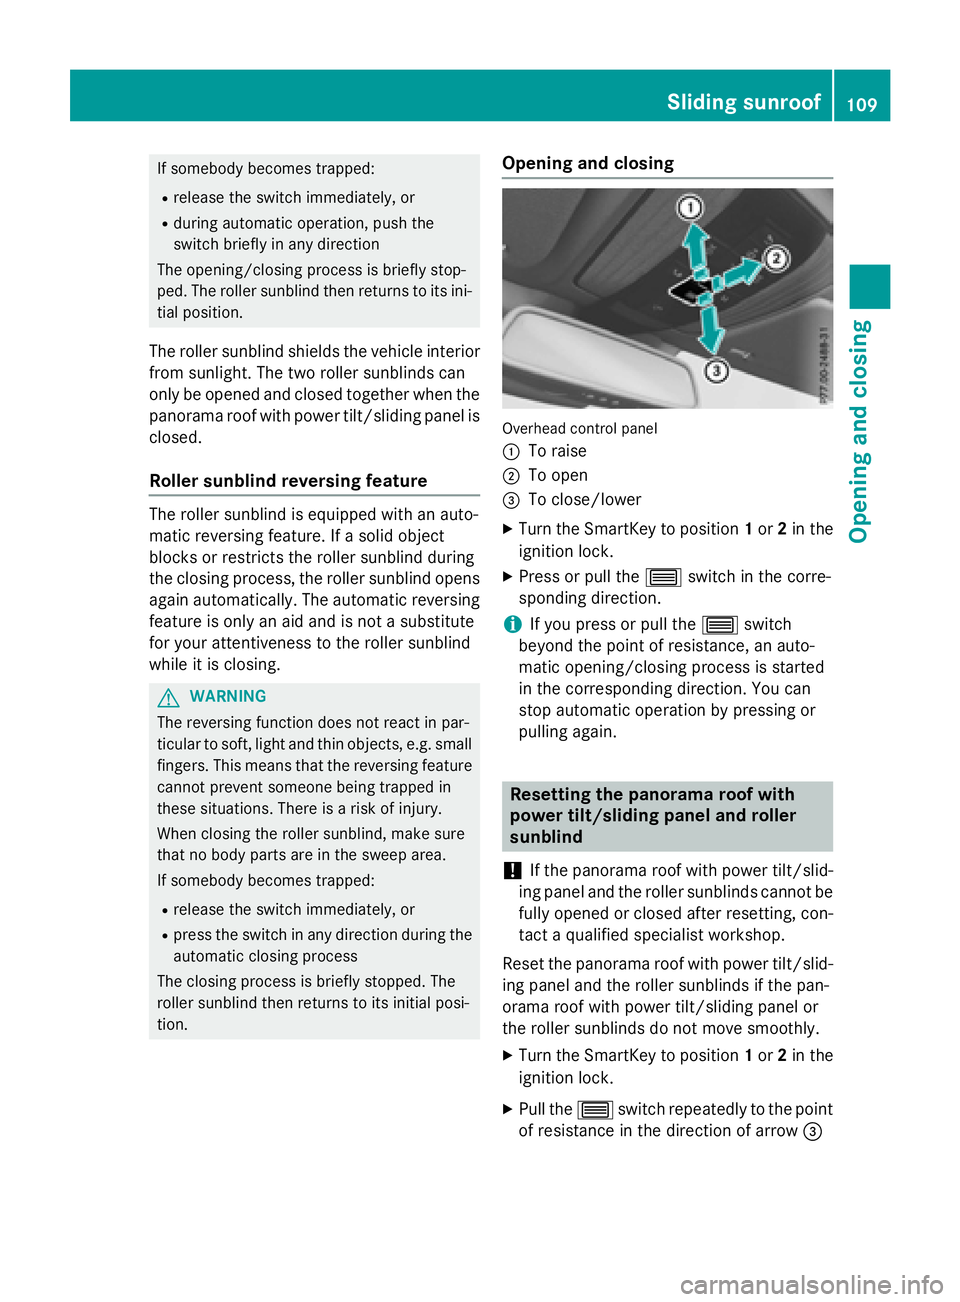
Opening and closing
Overhead control panel
:
To raise
;To open
=To close/lower
XTurn the SmartKey to position 1or 2in the
ignition lock.
XPress or pull the 3switch in the corre-
sponding direction.
iIf you press or pull the 3switch
beyond the point of resistance, an auto-
matic opening/closing process is started
in the corresponding direction. You can
stop automatic operation by pressing or
pulling again.
Resetting the panorama roof with
power tilt/sliding panel and roller
sunblind
!
If the panorama roof with power tilt/slid-
ing panel and the roller sunblinds cannot be
fully opened or closed after resetting, con-
tact a qualified specialist workshop.
Reset the panorama roof with power tilt/slid-
ing panel and the roller sunblinds if the pan-
orama roof with power tilt/sliding panel or
the roller sunblinds do not move smoothly.
XTurn the SmartKey to position 1or 2in the
ignition lock.
XPull the 3switch repeatedly to the point
of resistance in the direction of arrow =
Sliding sunroof109
Opening and closing
Z
Page 113 of 350
Problems with the sliding sunroof
Your vehicle may be equipped with a sliding sunroof or a panorama roof with power tilt/sliding
panel. In this section, the term "sliding sunroof" refers to both types of sliding sunroof.
GWARNING
If you close the sliding sunroof again immediately after it has been blocked or reset, the sliding
sunroof closes with increased or maximum force. The reversing feature is then not active. Parts
of the body could be trapped in the closing area in the process. This poses an increased risk of
injury or even fatal injury.
Make sure that no parts of the body are in the closing area.
If somebody becomes trapped:
Rrelease the switch immediately, or
Rpress the switch in any direction during the automatic closing process
The closing process is stopped.
!If the sliding sunroof still cannot be opened or closed as a result of a malfunction, contact
a qualified specialist workshop.
ProblemPossible causes/consequences and MSolutions
The sliding sunroof can-
not be closed and you
cannot see the cause.If the sliding sunroof is obstructed during closing and reopens
again slightly:
XImmediately after the sliding sunroof blocks, pull the 3
switch in the overhead control panel down to the point of resist-
ance and hold it until the sliding sunroof is closed.
The sliding sunroof is closed with increased force.
If the sliding sunroof is obstructed again during closing and then
reopens slightly:
XImmediately after the sliding sunroof blocks, pull the 3
switch in the overhead control panel down to the point of resist-
ance and hold it until the sliding sunroof is closed.
The sliding sunroof is closed without the anti-entrapment fea-
ture.
Sliding sunroof111
Opening and closing
Z
Page 117 of 350
Adjusting the steering wheel electrically
(
Ypage 117)
When adjusting the steering wheel, make
sure that:
Ryou can hold the steering wheel with your
arms slightly bent
Ryou can move your legs freely
Ryou can see all the displays in the instru-
ment cluster clearly
XObserve the safety guidelines for seat belts
(
Ypage 50).
XCheck whether you have fastened seat
belt ;properly (
Ypage 52).
The seat belt should:
Rfit snugly across your body
Rbe routed across the middle of your shoul-
der
Rbe routed in your pelvic area across the hip
joints
XBefore starting off, adjust the rear-view mir-
ror and the exterior mirrors in such a way
that you have a good view of road and traf-
fic conditions (
Ypage 117).
XVehicles with a memory function: save
the seat, steering wheel and exterior mirror
settings with the memory function
(
Ypage 117).
Seats
Important safety notes
GWARNING
Children could become trapped if they adjust
the seats, particularly when unattended.
There is a risk of injury.
When leaving the vehicle, always take the
SmartKey with you and lock the vehicle. Never
leave children unsupervised in the vehicle.
The seats can still be adjusted when there is
no SmartKey in the ignition lock.
GWARNING
If the head restraints are not installed or not
adjusted correctly, they cannot provide pro-
tection as intended. There is an increased risk
of injury in the head and neck area, e.g. in the event of an accident or when braking.
Always drive with the head restraints instal-
led. Before driving off, make sure for every
vehicle occupant that the center of the head
restraint supports the back of the head at
about eye level.
Observe the safety notes on "Air bags"
(
Ypage 54) and "Children in the Vehicle"
(
Ypage 68).
GWARNING
You could lose control of your vehicle if you do the following while driving:
Radjust the driver's seat, head restraint,
steering wheel or mirrors
Rfasten the seat belt
There is a risk of an accident.
Adjust the driver's seat, head restraint, steer-
ing wheel and mirror and fasten your seat belt before starting the engine.
GWARNING
If you adjust the seat height carelessly, you or
other vehicle occupants could be trapped and
thereby injured. Children in particular could
accidentally press the electrical seat adjust-
ment buttons and become trapped. There is a
risk of injury.
While moving the seats, make sure that your
hands or other body parts do not get under the
lever assembly of the seat adjustment sys-
tem.
GWARNING
When you adjust a seat, you or other vehicle
occupants could become trapped, e.g. on the seat guide rail. There is a risk of injury.
Make sure when adjusting a seat that no one
has any body parts in the sweep of the seat.
Seats115
Seats, steering wheel and mirrors
Z
Page 121 of 350

Useful information............................120
Exterior lighting ................................ 120
Interior lighting ................................. 123
Replacing bulbs ................................. 123
Windshield wipers ............................125
119
Lights and windshield wipers
Page 122 of 350
Useful information
i
This Operator's Manual describes all
models and all standard and optional equip-
ment of your vehicle available at the time of
publication of the Operator's Manual.
Country-specific differences are possible.
Please note that your vehicle may not be
equipped with all features described. This
also applies to safety-related systems and
functions.
iRead the information on qualified special-
ist workshops (
Ypage 31).
Exterior lighting
General notes
For reasons of safety, Mercedes-Benz recom-
mends that you drive with the lights switched
on even during the daytime. Therefore, your
vehicle is equipped with special daytime run-
ning lamps. In some countries, operation of
the headlamps varies due to legal require-
ments and self-imposed obligations.
If you wish to drive during the daytime without
lights, switch off the daytime running lamps
function in the on-board computer
(
Ypage 190).
Information in the Digital Operator's
Manual
In the Digital Operator's Manual you will find
information on the following topics:
RHazard warning lamps
RHeadlamps fogged up on the inside
Setting the exterior lighting
Setting options
Exterior lighting can be set using:
Rthe light switch
Rthe combination switch (Ypage 121)
Rthe on-board computer (Ypage 190)
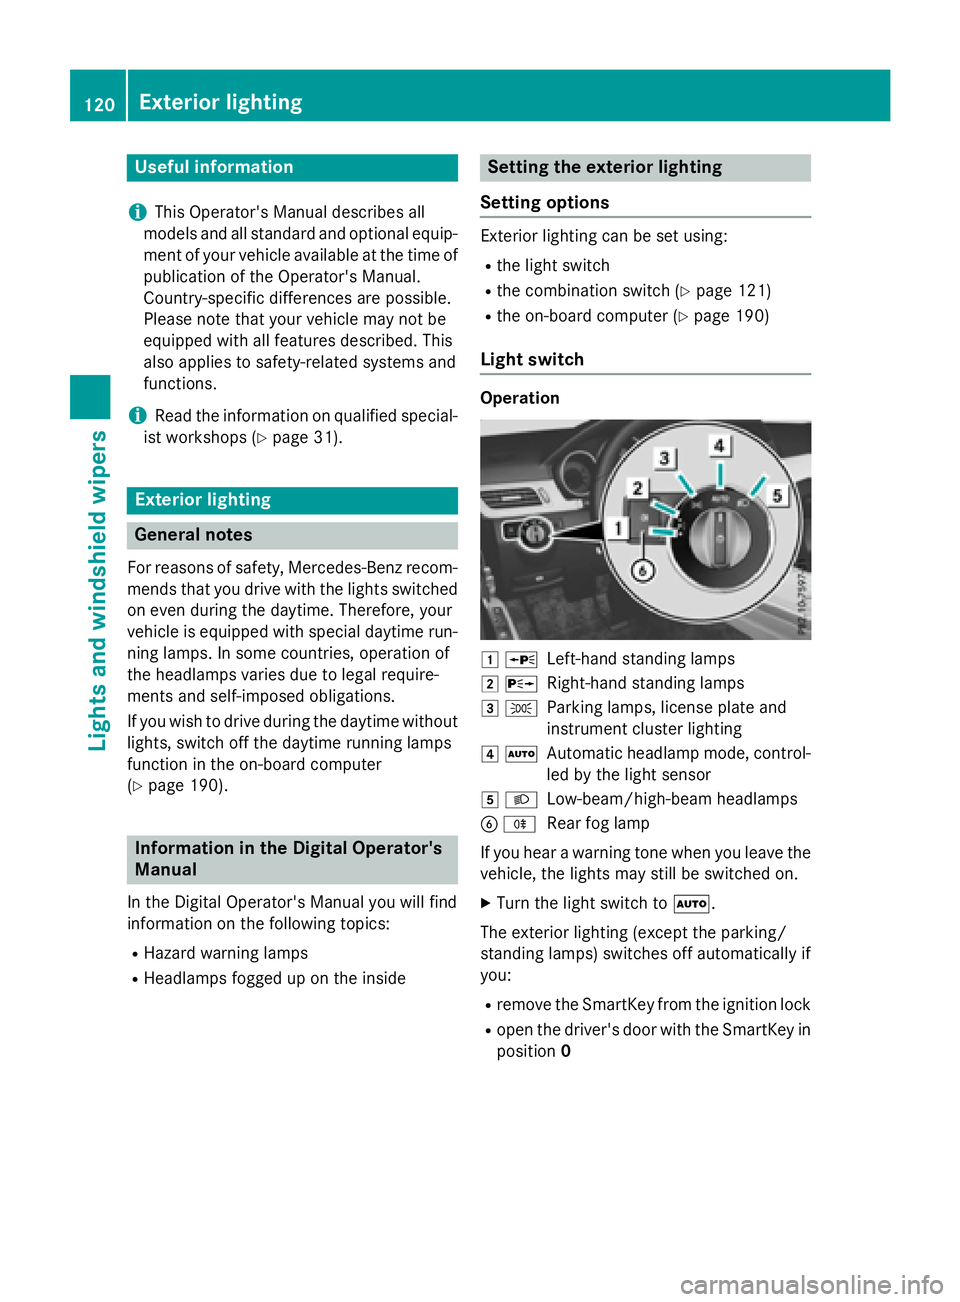
Light switch
Operation
1 WLeft-hand standing lamps
2XRight-hand standing lamps
3TParking lamps, license plate and
instrument cluster lighting
4ÃAutomatic headlamp mode, control-
led by the light sensor
5LLow-beam/high-beam headlamps
BRRear fog lamp
If you hear a warning tone when you leave the
vehicle, the lights may still be switched on.
XTurn the light switch to Ã.
The exterior lighting (except the parking/
standing lamps) switches off automatically if
you:
Rremove the SmartKey from the ignition lock
Ropen the driver's door with the SmartKey in
position 0
120Exterior lighting
Lights and windshield wipers
Page 123 of 350
Information in the Digital Operator's
Manual
Inthe Digital Operator's Manual you willfind
information on the following topics:
RAutomat icheadlamp mode
RDaytime running lamps
RLow-beam headlamps
RRear fog lamp
RParking lamps
RStanding lamps
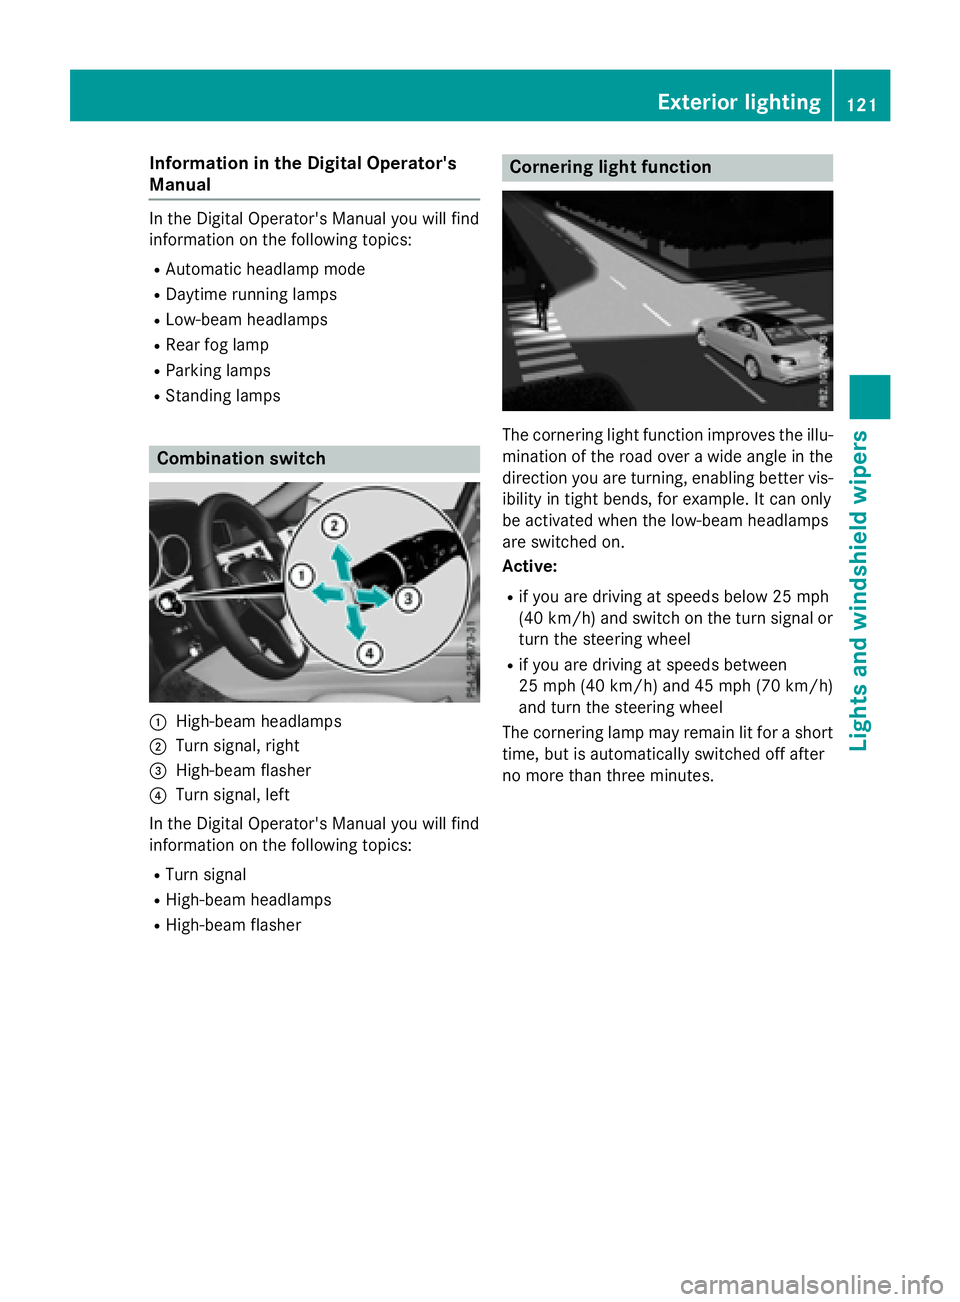
Combination switch
:High-beam headlamps
;Turn signal, right
=High-beam flasher
?Turn signal, left
In the Digital Operator's Manual you willfind
information on the fol lowing topics:
RTurn signal
RHigh-beam headlamps
RHigh-beam flasher
Cornering light function
The cornering light function improves the illu-
mination of the road over a wideangle in the
dire ction you are turning, enabling better vis-
ibilit yin tight bends, for example. Itcan only
be activated when the low-beam headlamps
are switched on.
Acti ve:
Rifyou are driving at speeds below 25 mph
(40 km /h) and switch on the turn signal or
turn the steering wheel
Rif you are driving at speeds between
25 mph (40 km/ h)and 45 mph (70 km/h)
and turn the steering wheel
The cornering lamp may remain lit for a short
time, but is automatically switched off after
no more than three minutes.
Exterior lighting121
Lights and windshield wipers