2016 MERCEDES-BENZ E-SEDAN audio
[x] Cancel search: audioPage 235 of 350
the first time, you must enable the connected
mobile phone for Internet access
(
Ypage 233). If the connected mobile phone
supports the Bluetooth®PAN profile, you do
not need to make additional settings. The
Internet connection is established. If the con-
nected mobile phone does not support the
named Bluetooth
®profile, predefined
(
Ypage 233) or manual access data
(
Ypage 233) must be set.
Enabling the mobile phone for Internet
access
XTo call up the telephone menu: press the
% button.
XTo switch to the main function bar: slide
5the controller.
XTo select TEL/®: press the controller.
XTo selectInternet: turn and press the
controller.
The menu with the Internet functions is dis-
played.
XTo switch to the menu bar: slide 6the
controller.
XTo select Settings: turn and press the
controller.
XTo select Configure Internet Set‐
tings: turn and press the controller.
The device list is displayed.
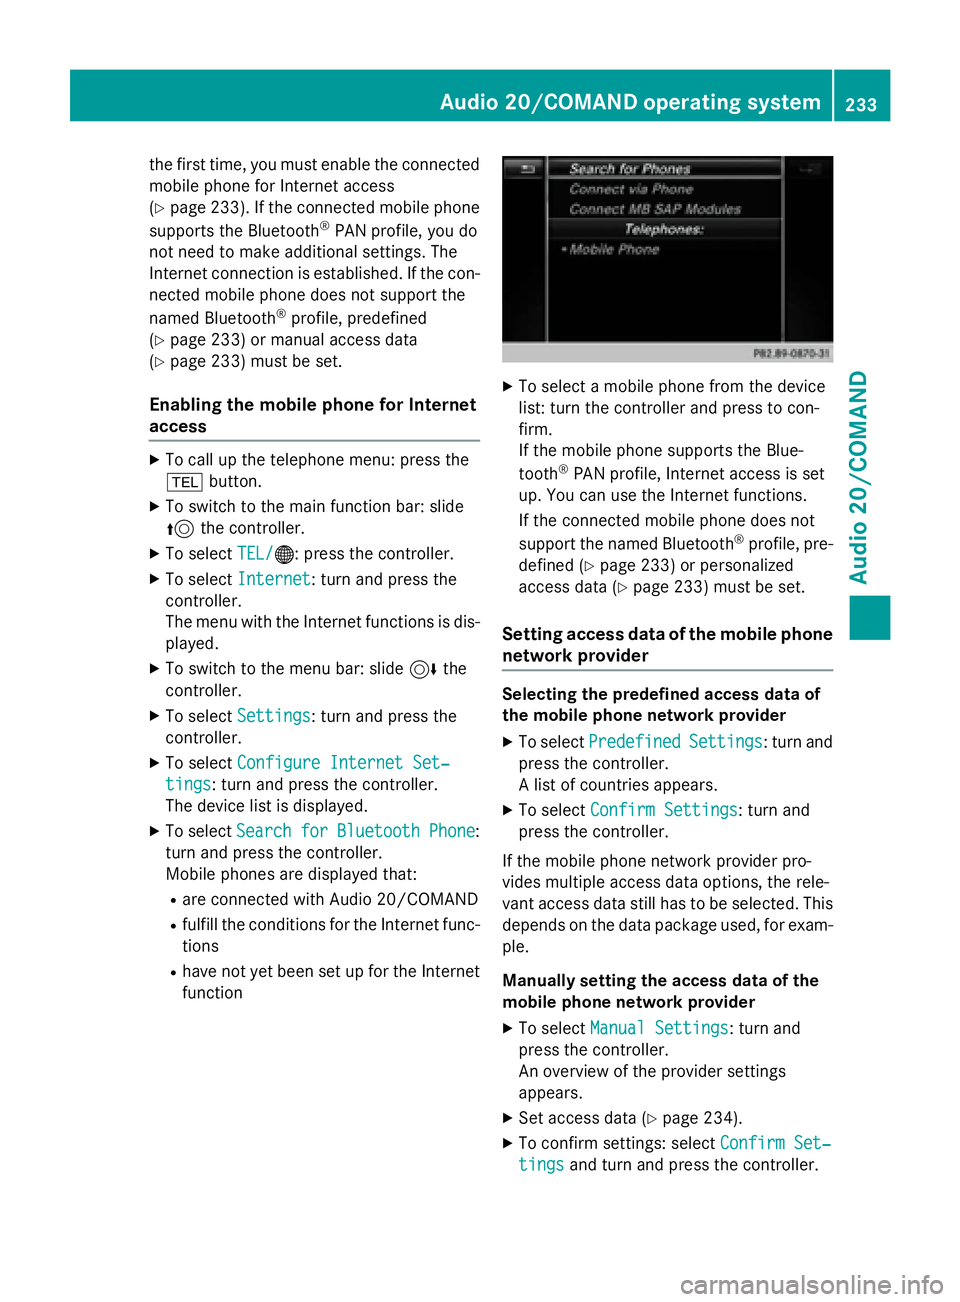
XTo select SearchforBluetoothPhone:
turn and press the controller.
Mobile phones are displayed that:
Rare connected with Audio 20/COMAND
Rfulfill the conditions for the Internet func-
tions
Rhave not yet been set up for the Internet
function
XTo select a mobile phone from the device
list: turn the controller and press to con-
firm.
If the mobile phone supports the Blue-
tooth
®PAN profile, Internet access is set
up. You can use the Internet functions.
If the connected mobile phone does not
support the named Bluetooth
®profile, pre-
defined (
Ypage 233) or personalized
access data (
Ypage 233) must be set.
Setting access data of the mobile phone
network provider
Selecting the predefined access data of
the mobile phone network provider
XTo select PredefinedSettings: turn and
press the controller.
A list of countries appears.
XTo select Confirm Settings: turn and
press the controller.
If the mobile phone network provider pro-
vides multiple access data options, the rele-
vant access data still has to be selected. This
depends on the data package used, for exam-
ple.
Manually setting the access data of the
mobile phone network provider
XTo select Manual Settings: turn and
press the controller.
An overview of the provider settings
appears.
XSet access data (Ypage 234).
XTo confirm settings: select Confirm Set‐
tingsand turn and press the controller.
Audio 20/COMAND operating system233
Audio 20/COMAND
Z
Page 236 of 350
The access data for the mobile phone net-
work provider is selected once for the mobile
phone connected and is loaded again each
time the mobile phone is connected.
You must set the access data of the mobile
phone network provider who provides the
SIM card and the associated data package
(access settings) for the connected mobile
phone. The access data remains the same
when you are in a different country (roaming).
The access data of another network isnot
selected.
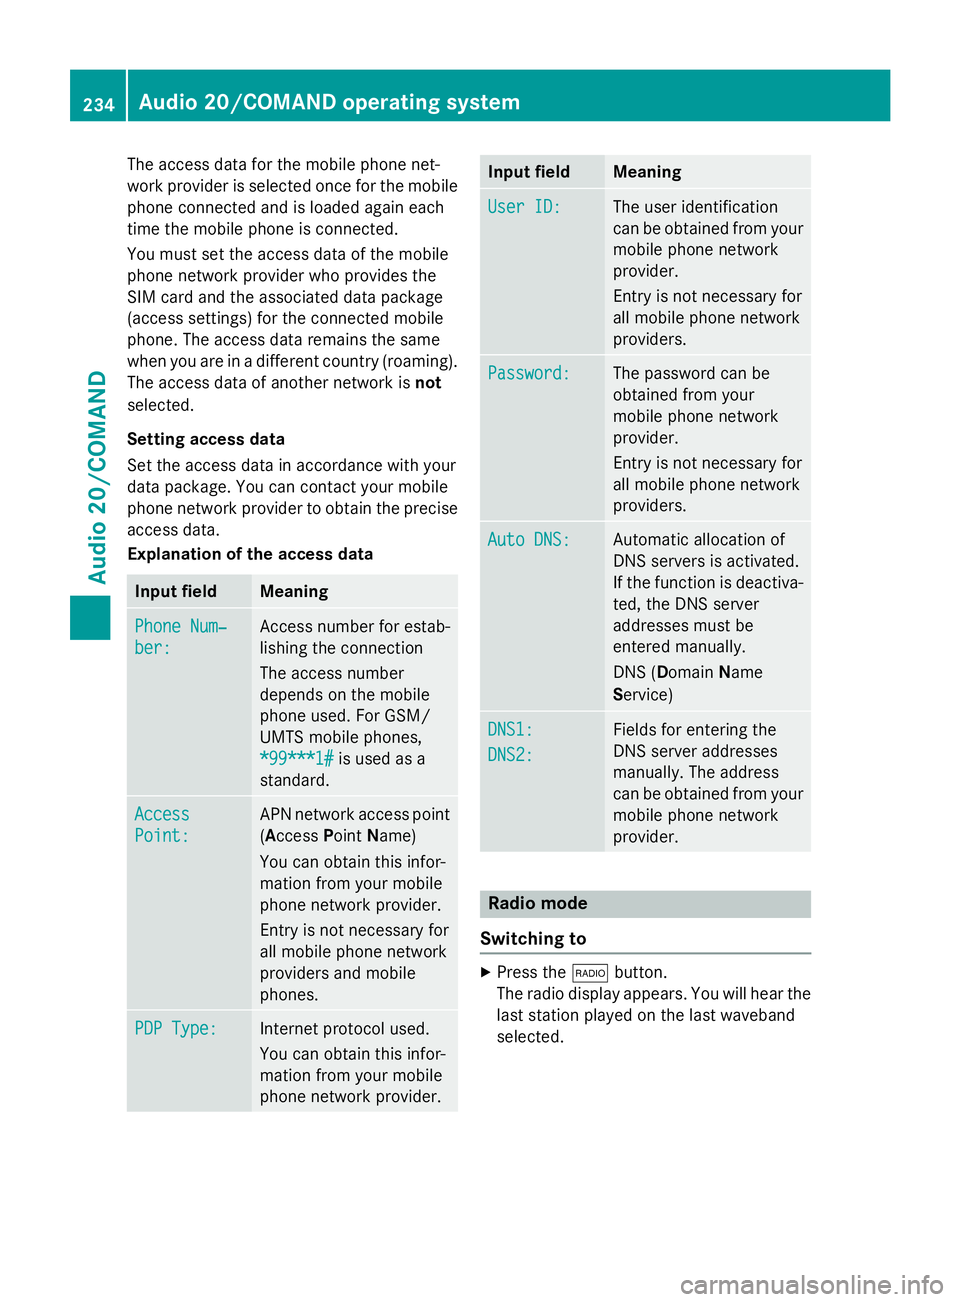
Setting access data
Set the access data in accordance with your
data package. You can contact your mobile
phone network provider to obtain the precise
access data.
Explanation of the access data
Input fieldMeaning
Phone Num‐
ber:
Access number for estab-
lishing the connection
The access number
depends on the mobile
phone used. For GSM/
UMTS mobile phones,
*99***1#
is used as a
standard.
Access
Point:
APN network access point
(Access PointName)
You can obtain this infor-
mation from your mobile
phone network provider.
Entry is not necessary for
all mobile phone network
providers and mobile
phones.
PDP Type:Internet protocol used.
You can obtain this infor-
mation from your mobile
phone network provider.
Input fieldMeaning
User ID:The user identification
can be obtained from your
mobile phone network
provider.
Entry is not necessary for
all mobile phone network
providers.
Password:The password can be
obtained from your
mobile phone network
provider.
Entry is not necessary for
all mobile phone network
providers.
Auto DNS:Automatic allocation of
DNS servers is activated.
If the function is deactiva-
ted, the DNS server
addresses must be
entered manually.
DNS ( Domain Name
Service)
DNS1:
DNS2:
Fields for entering the
DNS server addresses
manually. The address
can be obtained from your
mobile phone network
provider.
Radio mode
Switching to
XPress the $button.
The radio display appears. You will hear the
last station played on the last waveband
selected.
234Audio 20/COMAND operating system
Audio 20/COMAND
Page 237 of 350
Overview
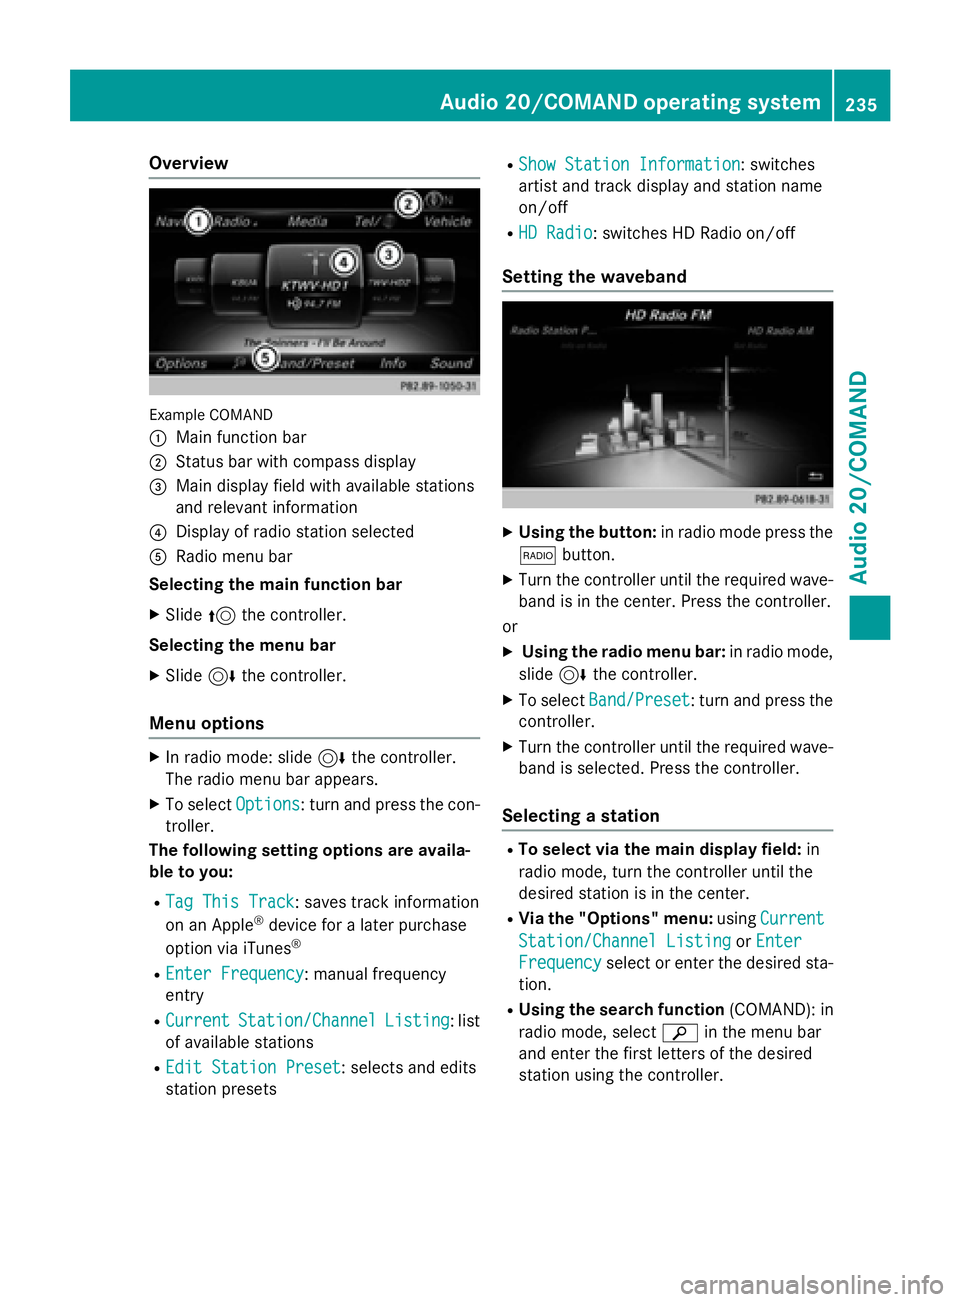
Example COMAND
:
Main function bar
;Status bar with compass display
=Main display field with available stations
and relevant information
?Display of radio station selected
ARadio menu bar
Selecting the main function bar
XSlide 5the controller.
Selecting the menu bar
XSlide 6the controller.
Menu options
XIn radio mode: slide 6the controller.
The radio menu bar appears.
XTo select Options: turn and press the con-
troller.
The following setting options are availa-
ble to you:
RTag This Track: saves track information
on an Apple®device for a later purchase
option via iTunes®
REnter Frequency: manual frequency
entry
RCurrentStation/ChannelListing: list
of available stations
REdit Station Preset: selects and edits
station presets
RShow Station Information: switches
artist and track display and station name
on/off
RHD Radio: switches HD Radio on/off
Setting the waveband
XUsing the button: in radio mode press the
$ button.
XTurn the controller until the required wave-
band is in the center. Press the controller.
or
XUsing the radio menu bar: in radio mode,
slide 6the controller.
XTo select Band/Preset: turn and press the
controller.
XTurn the controller until the required wave-
band is selected. Press the controller.
Selecting a station
RTo select via the main display field: in
radio mode, turn the controller until the
desired station is in the center.
RVia the "Options" menu: usingCurrent
Station/Channel ListingorEnter
Frequencyselect or enter the desired sta-
tion.
RUsing the search function (COMAND): in
radio mode, select èin the menu bar
and enter the first letters of the desired
station using the controller.
Audio 20/COMAND operating system235
Audio 20/COMAND
Z
Page 238 of 350
Radio text/radio text plus
This function is not available in all countries.
XTo switch on radio text:in radio mode,
select Info
in the menu bar.
Additional information from the current
station is displayed.
236Audio 20/COMAND operating system
Audio 20/COMAND
Page 255 of 350
A malfunction in the system has been detec-
ted if one of the following occurs:
RThe indicator lamp in the SOS button doesnot come on during the system self-test.
RThe indicator lamp in the FRoadside
Assistance button does not light up during
self-diagnosis of the system.
RThe indicator lamp in the ïMB Info call
button does not light up during self-diag-
nosis of the system.
RThe indicator lamp in one or more of the
following buttons continues to light up red
after the system self-diagnosis:
-SOS button
-F Roadside Assistance call button
-ïMB Info call button
RTheInoperativeor the Service Not
Activatedmessage appears in the multi-
function display after the system self-diag-
nosis.
If a malfunction is indicated as outlined
above, the system may not operate as expec-
ted. In the event of an emergency, help will
have to be summoned by other means.
Have the system checked at the nearest
authorized Mercedes-Benz Center or contact the following service hotlines:
Mercedes-Benz Customer Assistance Center
at 1-800-FOR-MERCedes (1-800-367-6372)
or 1-866-990-9007
Emergency call
Important safety notes
GWARNING
It can be dangerous to remain in the vehicle,
even if you have pressed the SOS button in an emergency if:
Ryou see smoke inside or outside of the vehi-
cle, e.g. if there is a fire after an accident
Rthe vehicle is on a dangerous section of
road
Rthe vehicle is not visible or cannot easily beseen by other road users, particularly when
dark or in poor visibility conditions
There is a risk of an accident and injury.
Leave the vehicle immediately in this or simi-
lar situations as soon as it is safe to do so.
Move to a safe location along with other vehi-
cle occupants. In such situations, secure the
vehicle in accordance with national regula-
tions, e. g. with a warning triangle.
General notes
Observe the notes on system activation
(
Ypage 252).
An emergency call is dialed automatically if an
air bag or Emergency Tensioning Device is
triggered. You cannot end an automatically
triggered emergency call yourself.
An emergency call can also be initiated man-
ually.
As soon as the emergency call has been ini-
tiated, the indicator lamp in the SOS button
flashes. The Connecting Call
message
appears in the multifunction display.
The audio output is muted.
Once the connection has been made, the
Call Connected
message appears in the
multifunction display.
Features253
Stowag ean d features
Z
Page 256 of 350
All important information on the emergency is
transmitted, for example:
Rcurrent location of the vehicle (as deter-
mined by the GPS system)
Rvehicle identification number
Rinformation on the severity of the accident
Shortly after the emergency call has been ini- tiated, a voice connection is automatically
established between the Customer Assis-
tance Center and the vehicle occupants.
RIf the vehicle occupants respond, the
Mercedes-Benz Customer Assistance Cen-
ter attempts to get more information on the
emergency.
RIf there is no response from the vehicle
occupants, an ambulance is immediately
sent to the vehicle.
If no voice connection can be established to
the Mercedes-Benz Customer Assistance
Center, the system has been unable to initiate
an emergency call.
This can occur, for example, if the relevant
mobile phone network is not available. The
indicator lamp in the SOS button flashes con- tinuously.
The Call Failed
message appears in the
multifunction display and must be confirmed.
In this case, summon assistance by other
means.
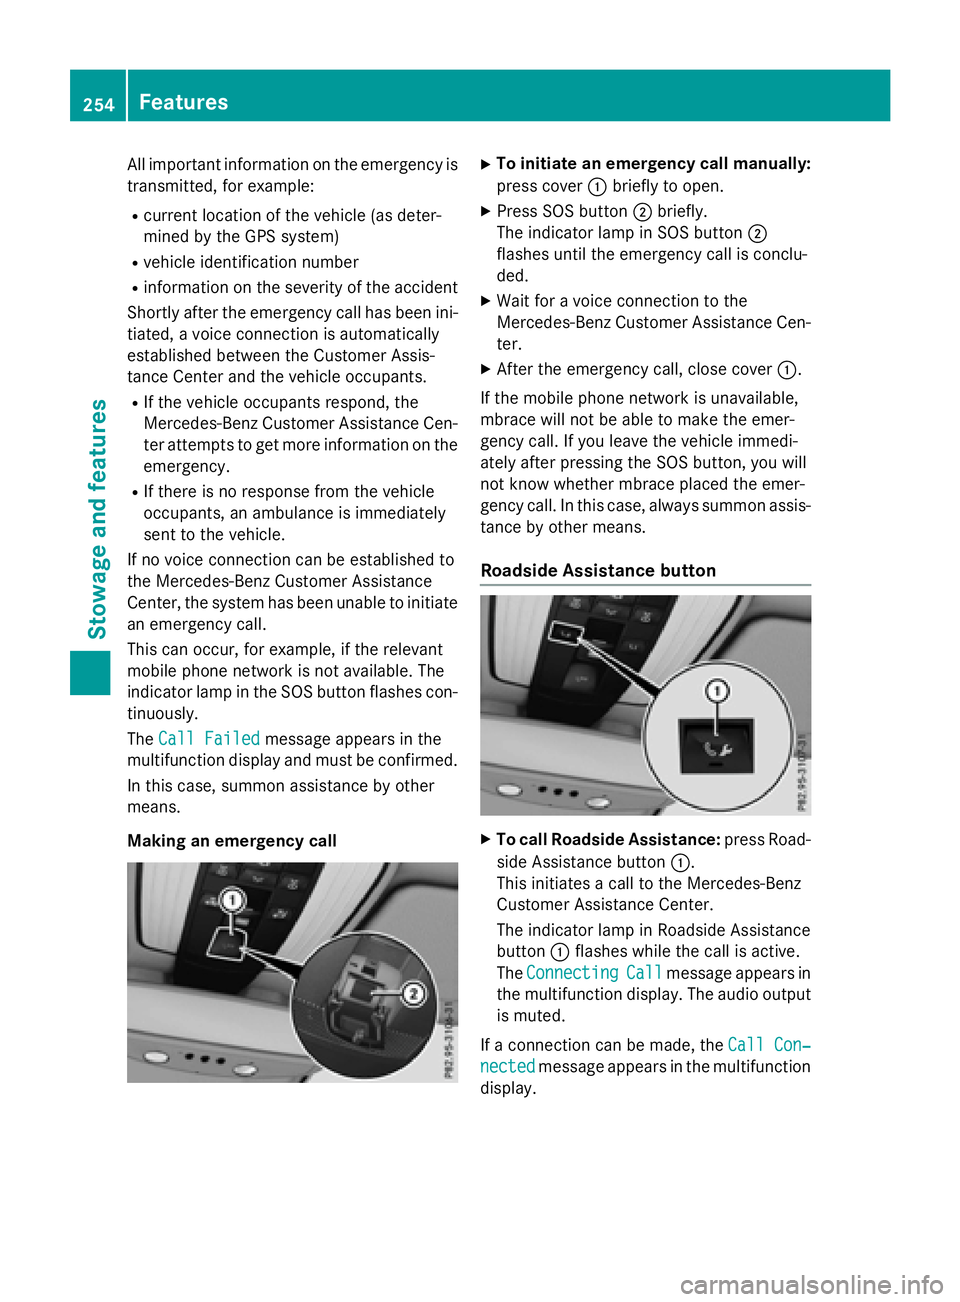
Making an emergency call
XTo initiate an emergency call manually:
press cover :briefly to open.
XPress SOS button ;briefly.
The indicator lamp in SOS button ;
flashes until the emergency call is conclu-
ded.
XWait for a voice connection to the
Mercedes-Benz Customer Assistance Cen-
ter.
XAfter the emergency call, close cover :.
If the mobile phone network is unavailable,
mbrace will not be able to make the emer-
gency call. If you leave the vehicle immedi-
ately after pressing the SOS button, you will
not know whether mbrace placed the emer-
gency call. In this case, always summon assis-
tance by other means.
Roadside Assistance button
XTo call Roadside Assistance: press Road-
side Assistance button :.
This initiates a call to the Mercedes-Benz
Customer Assistance Center.
The indicator lamp in Roadside Assistance
button :flashes while the call is active.
The Connecting
Callmessage appears in
the multifunction display. The audio output is muted.
If a connection can be made, the Call Con‐
nectedmessage appears in the multifunction
display.
254Features
Stowag ean d features
Page 257 of 350
If a mobile phone network and GPS reception
are available, the system transfers data to the
Mercedes-Benz Customer Assistance Center,
for example:
Rcurrent location of the vehicle
Rvehicle identification number
The COMAND/Audio 20 display indicates
that a call is active. During the call, you can
change to the navigation menu by pressing
the NAVI button in COMAND/Audio 20, for
example.
Voice output is not available in this case.
A voice connection is established between
the Mercedes-Benz Customer Assistance
Center and the vehicle occupants.
From the remote malfunction diagnosis, the
Mercedes-Benz Customer Assistance Center
can ascertain the nature of the problem. In
the Digital Operator's Manual, you will find
information on remote malfunction diagno-
sis.
The Mercedes-Benz Customer Assistance
Center either sends a qualified Mercedes-
Benz technician or makes arrangements for
your vehicle to be transported to the nearest
authorized Mercedes-Benz Center.
You may be charged for services such as
repair work and/or towing.
You can find more information in the separate
mbrace manual.
The system has not been able to initiate a
Roadside Assistance call, if:
Rthe indicator lamp for Roadside Assistance
call button Fis flashing continuously.
Rno voice connection to the Mercedes-Benz
Customer Assistance Center was estab-
lished.
This can occur if the relevant mobile phone
network is not available, for example.
The Call Failed
message appears in the
multifunction display.
XTo end a call: press the~button on the
multifunction steering wheel.
or
XPress the corresponding COMAND/Audio
20 button for ending a phone call.
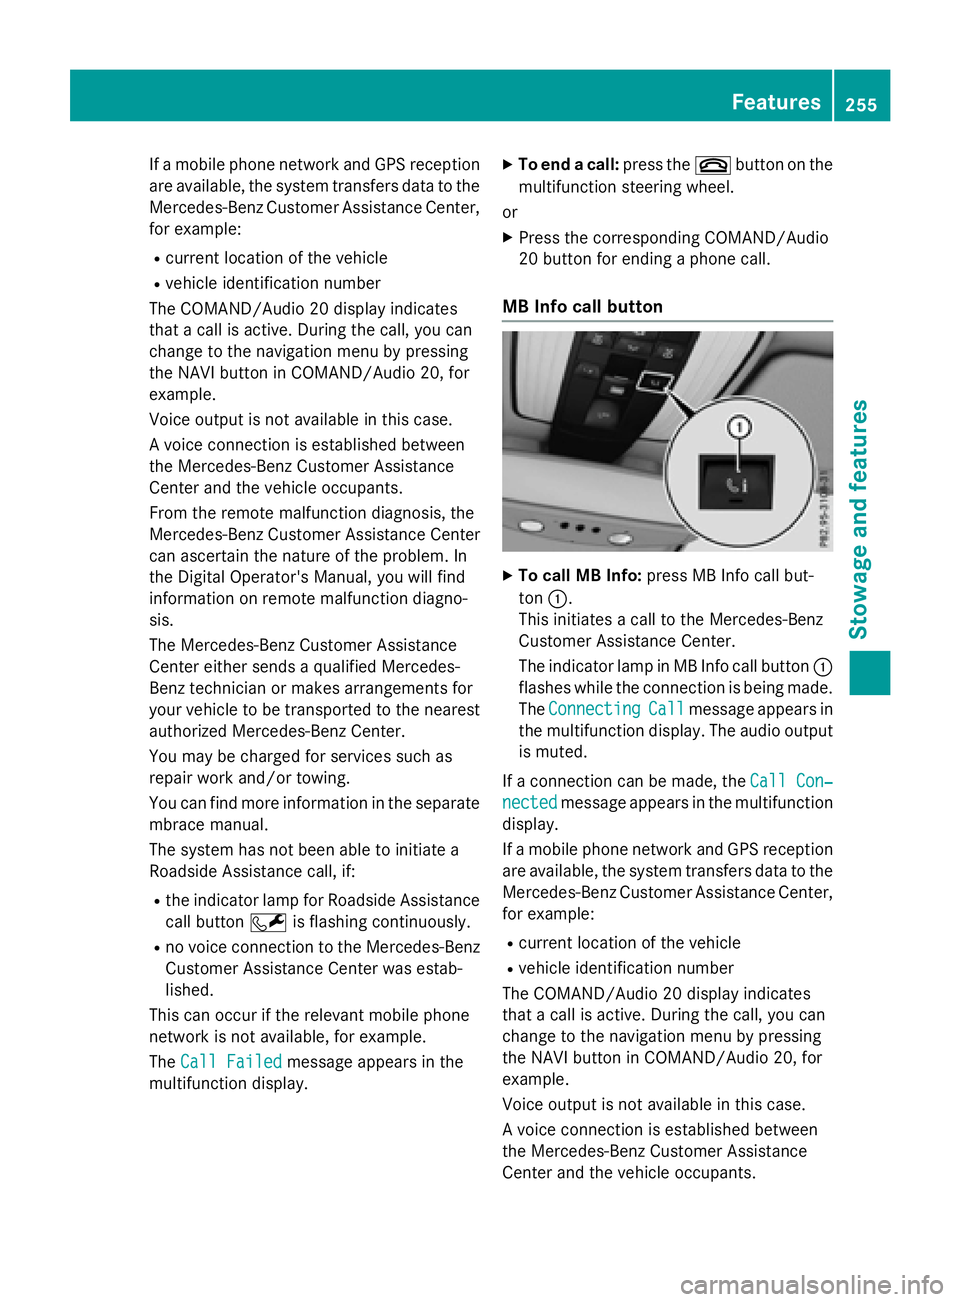
MB Info call button
XTo call MB Info: press MB Info call but-
ton :.
This initiates a call to the Mercedes-Benz
Customer Assistance Center.
The indicator lamp in MB Info call button :
flashes while the connection is being made.
The Connecting
Callmessage appears in
the multifunction display. The audio output
is muted.
If a connection can be made, the Call Con‐
nectedmessage appears in the multifunction
display.
If a mobile phone network and GPS reception
are available, the system transfers data to the
Mercedes-Benz Customer Assistance Center,
for example:
Rcurrent location of the vehicle
Rvehicle identification number
The COMAND/Audio 20 display indicates
that a call is active. During the call, you can
change to the navigation menu by pressing
the NAVI button in COMAND/Audio 20, for
example.
Voice output is not available in this case.
A voice connection is established between
the Mercedes-Benz Customer Assistance
Center and the vehicle occupants.
Features255
Stowage and features
Z
Page 258 of 350
You receive information about operating your
vehicle, about the nearest authorized
Mercedes-Benz Center and about other prod-
ucts and services from Mercedes-Benz.
You can find further information on the
mbrace system under "Owners Online" at
http://www.mbusa.com.
The system has not been able to initiate an
MB Info call, if:
Rthe indicator lamp in MB Info call button
ïis flashing continuously.
Rno voice connection to the Mercedes-Benz
Customer Assistance Center was estab-
lished.
This can occur if the relevant mobile phone
network is not available, for example.
The Call Failed
message appears in the
multifunction display.
XTo end a call: press the~button on the
multifunction steering wheel.
or
XPress the corresponding COMAND/Audio
20 button for ending a phone call.
Call priority
When service calls are active, e.g. Roadside
Assistance or MB Info calls, an emergency
call can still be initiated. In this case, an emer-
gency call will take priority and override all
other active calls.
The indicator lamp of the respective button
flashes until the call is ended.
An emergency call can only be terminated by the Mercedes-Benz Customer Assistance
Center.
All other calls can be ended by pressing:
Rthe ~ button on the multifunction steer-
ing wheel
Rthe corresponding button in COMAND/
Audio 20 to end the voice call
When a call is initiated, the audio system is
muted. The mobile phone is no longer connected to
COMAND/Audio 20.
However, if you want to use your mobile
phone, do so only when the vehicle is station-
ary and in a safe location.
Garage door opener
General notes
The HomeLink®garage door opener integra-
ted in the rear-view mirror allows you to oper-
ate up to three different door and gate sys-
tems.
Use the integrated garage door opener only
on garage doors that:
Rhave safety stop and reverse features and
Rmeet current U.S. federal safety standards
Once programed, the integrated garage door
opener in the rear-view mirror will assume the
function of the garage door system's remote
control. Please also read the operating
instructions for the garage door system.
When programming a garage door opener,
park the vehicle outside the garage. Do not
run the engine while programming.
Certain garage door drives are incompatible
with the integrated garage door opener. If you
have difficulty programing the integrated
garage door opener, contact an authorized
Mercedes-Benz Center.
Alternatively, you can call the following tele-
phone assistance services:
RUSA: Mercedes-Benz Customer Assistance
Center at 1-800-FOR-MERCedes
RCanada: Customer Service at
1-800-387-0100
RHomeLink®hotline 1-800-355-3515 (free
of charge)
More information on HomeLink
®and/or
compatible products is also available online
at http://www.homelink.com.
Notes on the declaration of conformity
(
Ypage 31).
256Features
Stowage and features