2016 MERCEDES-BENZ E-SEDAN ESP
[x] Cancel search: ESPPage 213 of 350
Tires
ProblemPossible causes/consequences andMSolutions
h
The yellow tire pressure
monitor warning lamp
(pressure loss/
malfunction) is lit.The tire pressure monitor has detected a loss of pressure in at
least one of the tires.
GWARNING
With tire pressures which are too low, there is a risk of the fol-
lowing hazards:
Rthey may burst, especially as the load and vehicle speed
increase.
Rthey may wear excessively and/or unevenly, which may greatly
impair tire traction.
Rthe driving characteristics, as well as steering and braking, may
be greatly impaired.
There is a risk of an accident.
XStop the vehicle without making any sudden steering or braking maneuvers. Pay attention to the traffic conditions as you do so.
XSecure the vehicle against rolling away (Ypage 151).
XObserve the additional display messages in the multifunction
display.
XCheck the tires and, if necessary, follow the instructions for a
flat tire (
Ypage 271).
XCheck the tire pressure (Ypage 294).
XIf necessary, correct the tire pressure.
h
The yellow tire pressure
monitor warning lamp
(pressure loss/
malfunction) flashes for
approximately one
minute and then
remains lit.The tire pressure monitor is faulty.
GWARNING
The system is possibly unable to recognize or register low tire
pressure.
There is a risk of an accident.
XObserve the additional display messages in the multifunction
display.
XVisit a qualified specialist workshop.
Warning and indicator lamps in the instrument cluster211
On-board computer and displays
Z
Page 216 of 350
General notes
The Audio 20/COMAND section in these
operating instructions describes the basic
operating principles. More information can be
found in the Digital Operator's Manual.
Important safety notes
GWARNING
Modifications to electronic components, their software as well as wiring can impair their
function and/or the function of other net-
worked components. In particular, systems
relevant to safety could also be affected. As a
result, these may no longer function as inten-
ded and/or jeopardize the operating safety of
the vehicle. There is an increased risk of an
accident and injury.
Never tamper with the wiring as well as elec-
tronic components or their software. You
should have all work to electrical and elec-
tronic equipment carried out at a qualified
specialist workshop.
If you make any changes to the vehicle elec-
tronics, the general operating permit is ren-
dered invalid.
GWARNING
If you operate information systems and com-
munication equipment integrated in the vehi-
cle while driving, you will be distracted from
traffic conditions. You could also lose control
of the vehicle. There is a risk of an accident.
Only operate the equipment when the traffic
situation permits. If you are not sure that this
is possible, park the vehicle paying attention
to traffic conditions and operate the equip-
ment when the vehicle is stationary.
You must observe the legal requirements for
the country in which you are currently driving
when operating Audio 20/COMAND. Audio 20/COMAND calculates the route to
the destination without taking account of the
following, for example:
Rtraffic lights
Rstop and yield signs
Rmerging lanes
Rparking or stopping in a no parking/no
stopping zone
Rother road and traffic rules and regulations
Rnarrow bridges
Audio 20/COMAND can give incorrect navi-
gation commands if the actual street/traffic
situation does not correspond with the digital map's data. Digital maps do not cover all
areas nor all routes in an area. For example, a
route may have been diverted or the direction
of a one-way street may have changed.
For this reason, you must always observe
road and traffic rules and regulations during
your journey. Road and traffic rules and reg-
ulations always have priority over the sys-
tem's driving recommendations.
Navigation announcements are intended to
direct you while driving without diverting your
attention from the road and driving.
Please always use this feature instead of con-
sulting the map display for directions. Look-
ing at the icons or map display can distract
you from traffic conditions and driving, and
increase the risk of an accident.
Bear in mind that at a speed of only 30 mph
(approximately 50 km/h) your vehicle covers
a distance of 44 feet (approximately 14 m)
per second.
This equipment complies with FCC radiation
exposure limits set forth for uncontrolled
equipment and meets the FC
C radio fre-
quency (RF) Exposure Guidelines in Supple-
ment C to OET65.
This equipment has very low levels of RF
energy that is deemed to comply without
maximum permissive exposure evaluation
(MPE). But it is desirable that it should be
installed and operated with at least 8inches
(20 cm) and more between the radiator and a
214Important safety notes
Audio 20/COMAND
Page 225 of 350
Display off button
You can switch thedisplay on and of fwit hth e
_ button.
Favorites
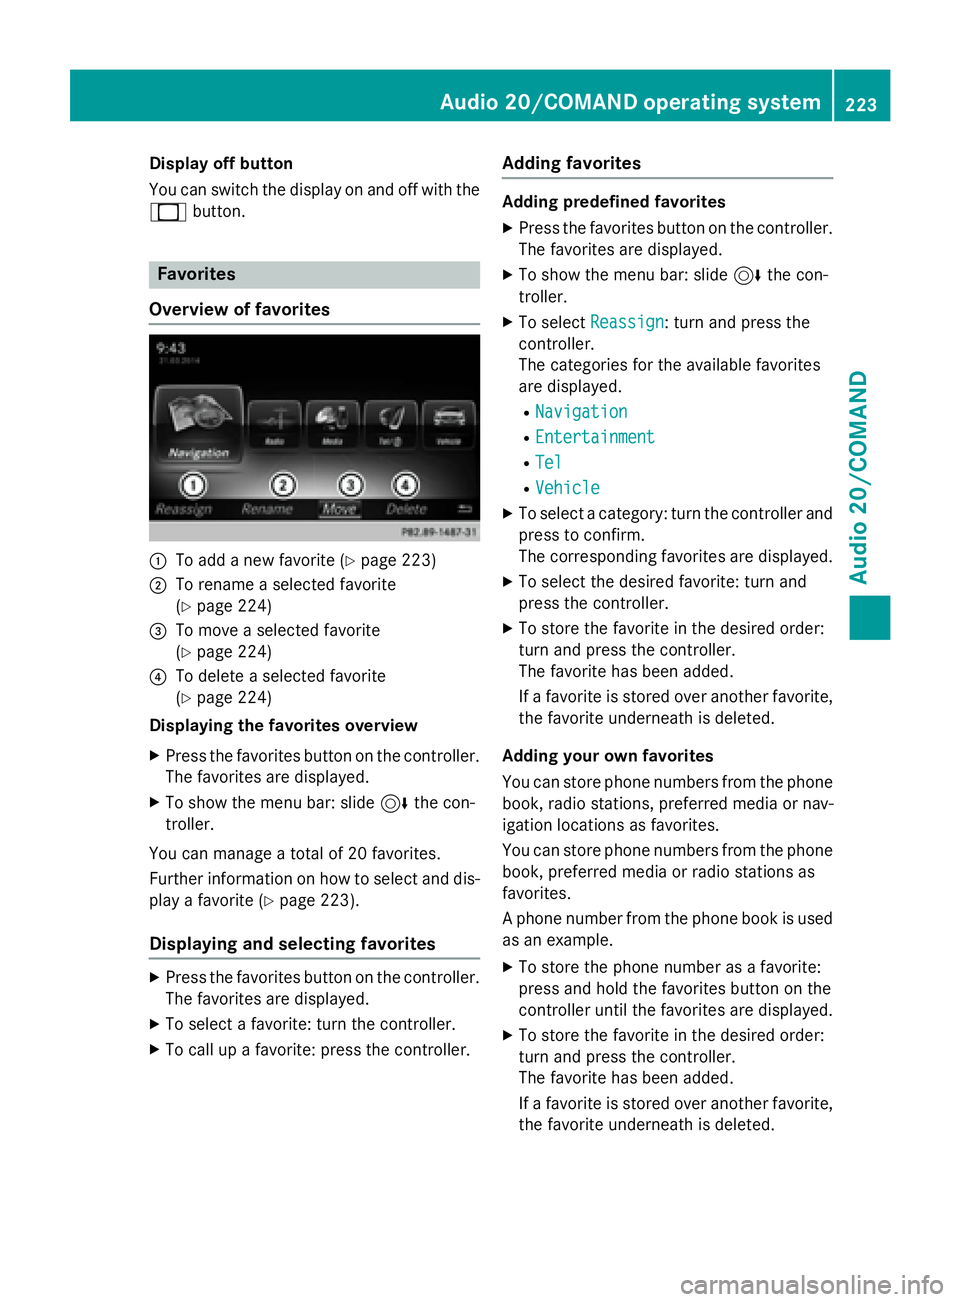
Overview of favorites
:To add ane wfavorite (Ypage 223)
;To rename aselected favorite
(
Ypage 224)
=To mov e aselected favorite
(
Ypage 224)
?To delete aselected favorite
(
Ypage 224)
Displaying th efavorites overview
XPress th efavorite sbutto non th econtroller .
The favorite sare displayed.
XTo sho wthemen ubar: slid e6 thecon-
troller.
You can manage atotal of 20 favorites.
Further information on how to select and dis-
play afavorite (
Ypage 223).
Displaying and selecting favorites
XPress thefavorite sbutto non th econtroller .
The favorite sare displayed.
XTo select afavorite :tur nth econtroller .
XTo callup afavorite :press th econtroller .
Adding favorites
Adding predefined favorites
XPress thefavorite sbutto non th econtroller .
The favorite sare displayed.
XTo sho wthemen ubar: slid e6 thecon-
troller.
XTo select Reassign:tur nand press th e
controller .
The categorie sfo rth eavailable favorite s
are displayed.
RNavigatio n
REntertainmen t
RTel
RVehicle
XTo select acategory: tur nth econtroller and
press to confirm .
The correspondin gfavorite sare displayed.
XTo select th edesire dfavorite :tur nand
press th econtroller .
XTo store th efavorite in th edesire dorder:
tur nand press th econtroller .
The favorite has been added .
If afavorite is store dove ranother favorite ,
th efavorite underneat his deleted.
Adding you rown favorites
You can store phone number sfrom th ephone
book, radi ostations, preferred media or nav -
igation location sas favorites.
You can store phone number sfrom th ephone
book, preferred media or radi ostation sas
favorites.
A phone number from th ephone boo kis used
as an example.
XTo store th ephone number as afavorite :
press and hold th efavorite sbutto non th e
controller until th efavorite sare displayed.
XTo store th efavorite in th edesire dorder:
tur nand press th econtroller .
The favorite has been added .
If afavorite is store dove ranother favorite ,
th efavorite underneat his deleted.
Audio 20/COMAND operating system223
Audio 20/COMAND
Z
Page 228 of 350
Calculating the route
XTo confirmStart: press the controller.
The route is calculated with the current
route type.
Selecting a route type
XShow the menu (Ypage 225).
XTo select Settings: turn and press the
controller.
XSelect Route Settings.
XSelect a route type.
The route type is used for the next route
calculation. If Dynamic Traffic Route
,
Dynamic
TRF.RouteAfterRequestor
Eco Route
has been selected, traffic
reports on the route are taken into account.
iYou can map the route to the destination
yourself with up to four intermediate stops.
Route guidance
Navigation announcements and route guid-
ance displays guide you to your destination.
The information given relating to destination
entry applies to COMAND. For information on
Audio 20, see the manufacturer's operating
instructions.
iAudio 20/COMAND can give incorrect
navigation commands if the actual street/
traffic situation does not correspond with
the digital map's data. Road and traffic
rules and regulations always have priority
over system driving recommendations.
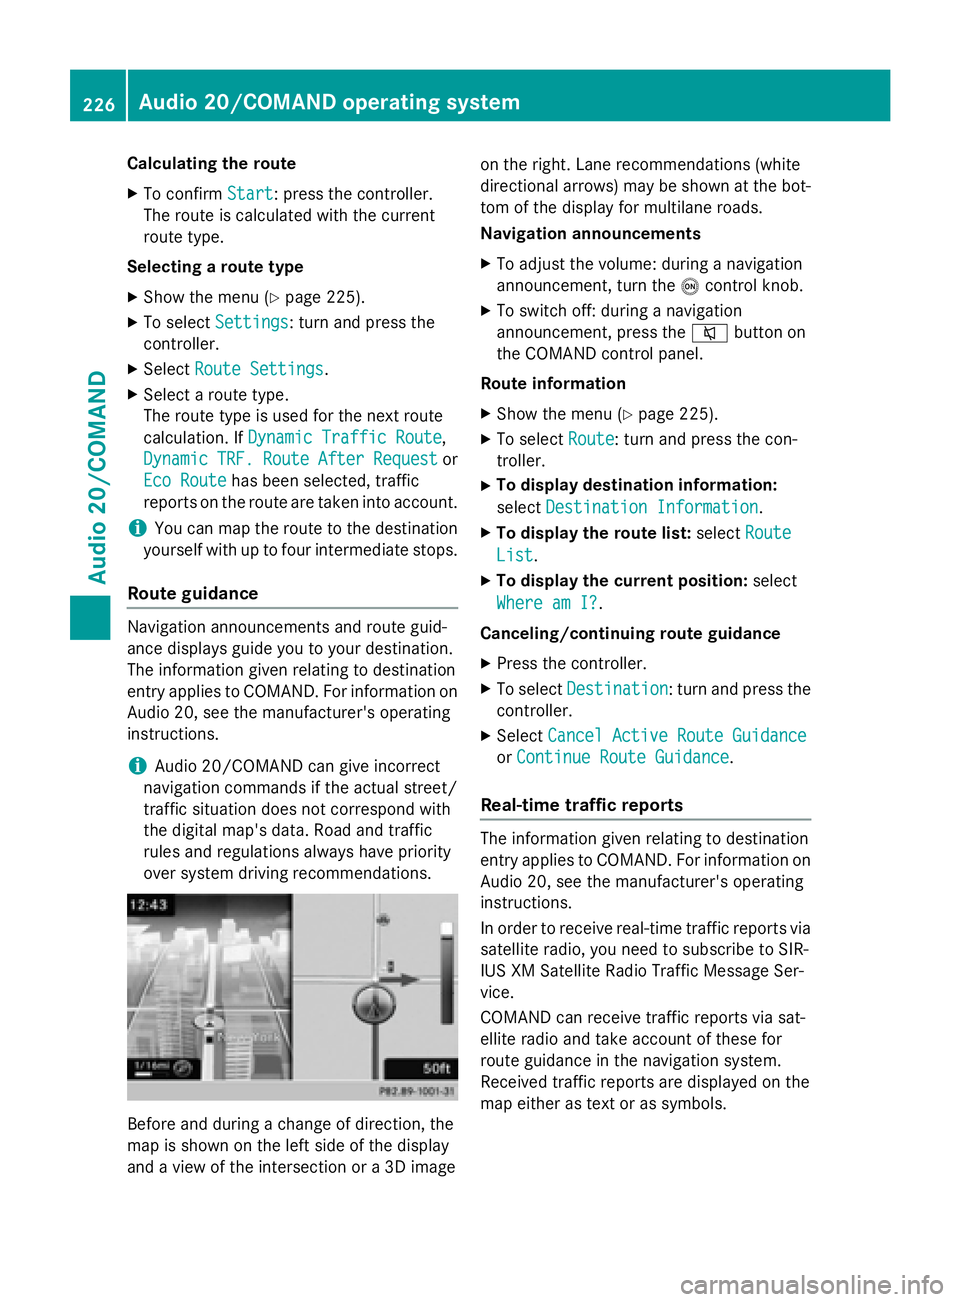
Before and during a change of direction, the
map is shown on the left side of the display
and a view of the intersection or a 3D image on the right. Lane recommendations (white
directional arrows) may be shown at the bot-
tom of the display for multilane roads.
Navigation announcements
XTo adjust the volume: during a navigation
announcement, turn the
ocontrol knob.
XTo switch off: during a navigation
announcement, press the 8button on
the COMAND control panel.
Route information
XShow the menu (Ypage 225).
XTo select Route: turn and press the con-
troller.
XTo display destination information:
select Destination Information
.
XTo display the route list: selectRoute
List.
XTo display the current position: select
Where am I?
.
Canceling/continuing route guidance
XPress the controller.
XTo select Destination: turn and press the
controller.
XSelect Cancel Active Route Guidance
orContinue Route Guidance.
Real-time traffic reports
The information given relating to destination
entry applies to COMAND. For information on
Audio 20, see the manufacturer's operating
instructions.
In order to receive real-time traffic reports via
satellite radio, you need to subscribe to SIR-
IUS XM Satellite Radio Traffic Message Ser-
vice.
COMAND can receive traffic reports via sat-
ellite radio and take account of these for
route guidance in the navigation system.
Received traffic reports are displayed on the
map either as text or as symbols.
226Audio 20/COMAND operating system
Audio 20/COMAND
Page 229 of 350
XTo switch to navigation mode: press the
Øbutton.
XTo show the menu: slide 6the controller.
XTo select Traffic: turn and press the con-
troller.
If satellite signals cannot be received or
there are no traffic reports, you will see a
message to this effect.
XTo close the report: press the controller.
Map functions
General notes
The information given relating to destination
entry applies to COMAND. For information on
Audio 20, see the manufacturer's operating
instructions.
Setting the map scale
Requirement: the map is in full screen mode, the menu is faded out (
Ypage 225).
XTurn the controller until the desired scale isset.
Moving the map
Requirement: the map is in full screen mode,
the menu is faded out (
Ypage 225).
XSlide 1, 4or2 the controller.
The crosshair is shown. The map moves in
the corresponding direction under the
crosshair.
iPressing the controller selects a destina-
tion in the map.
Selecting map orientation
XShow the menu (Ypage 225).
XTo select Options: turn and press the con-
troller.
XSelect Map Orientation.
The #dot indicates the current setting.
XTurn and press the controller.
The map orientation is set. Building images and elevation modeling
In small map scales
(20m, 50 m), importan t
buildi ngs are depicted realistically on the
map; other buildings are shown as models.
Selected cities are realistically depicted using
elevation modeling.
Calling up the online map display
Requirement: a mobile phone with a data
package must be connected to COMAND.
XShow the menu (Ypage 225).
XSlide 5the controller twice.
XPress the controller.
The navigation menu appears.
XTurn the controller until OnlineMapDis‐
playis brought to the front.
XPress the controller.
The online connection is established. Once
the connection is established, the Google™
Maps map shows the vicinity of the current
vehicle position.
Connecting and disconnecting a
mobile phone
Prerequisites
For telephony via the Bluetooth®interface,
you require a Bluetooth®-capable mobile
phone. The mobile phone must support
Hands-Free Profile 1.0 or above.
Activating Bluetooth
®in Audio 20/
COMAND
XPress the Øbutton in the center con-
sole.
The Vehicle
menu appears.
XTo select System Settings: slide6,
turn and press the controller to confirm.
XTo select Activate Bluetooth: turn and
press the controller.
This switches Bluetooth
®on O or off ª.
Audio 20/COMAND operating system227
Audio 20/COMAND
Z
Page 240 of 350
Useful information
i
This Operator's Manual describes all
models and all standard and optional equip-
ment of your vehicle available at the time of
publication of the Operator's Manual.
Country-specific differences are possible.
Please note that your vehicle may not be
equipped with all features described. This
also applies to safety-related systems and
functions.
iRead the information on qualified special-
ist workshops (
Ypage 31).
Stowage areas
Loading guidelines
GWARNING
If objects, luggage or loads are not secured or
not secured sufficiently, they could slip, tip
over or be flung around and thereby hit vehicle
occupants. There is a risk of injury, particu-
larly in the event of sudden braking or a sud-
den change in direction.
Always store objects so that they cannot be
flung around. Secure objects, luggage or
loads against slipping or tipping before the
journey.
GWARNING
Combustion engines emit poisonous exhaust
gases such as carbon monoxide. Exhaust
gases can enter the vehicle interior if the
trunk lid/tailgate is open when the engine is
running, especially if the vehicle is in motion.
There is a risk of poisoning.
Always switch off the engine before opening
the trunk lid/tailgate. Never drive with the
trunk lid/tailgate open.
GWARNING
The exhaust tail pipe and tail pipe trim can
become very hot. If you come into contact
with these parts of the vehicle, you could burn
yourself. There is a risk of injury.
Always be particularly careful around the
exhaust tail pipe and the tail pipe trim. Allow
these components to cool down before touch-
ing them.
The handling characteristics of a laden vehi-
cle are dependent on the distribution of the
load within the vehicle. For this reason, you
should observe the following notes when
transporting a load:
RNever exceed the maximum permissible
gross vehicle mass or the gross axle weight
rating for the vehicle (including occupants).
The values are specified on the vehicle
identification plate on the B-pillar of the
driver's door.
RThe trunk/cargo compartment is the pre-
ferred place to store objects.
RPosition heavy loads as far forwards as pos-
sible and as low down in the trunk/cargo
compartment as possible.
RThe load must not protrude above the
upper edge of the seat backrests.
RAlways place the load against the rear or
front seat backrests. Make sure that the
seat backrests are securely locked into
place.
RAlways place the load behind unoccupied
seats if possible.
RUse the cargo tie-down rings and the parcel
nets to transport loads and luggage.
RUse cargo tie-down rings and fastening
materials appropriate for the weight and
size of the load.
RWhen transporting objects in the cargo
compartment, the combined cargo cover
and net must always be installed (cargo
compartment cover and cargo net).
RSecure the load with sufficiently strong and
wear-resistant tie-downs. Pad sharp edges
for protection.
238Stowage areas
Stowage and features
Page 242 of 350
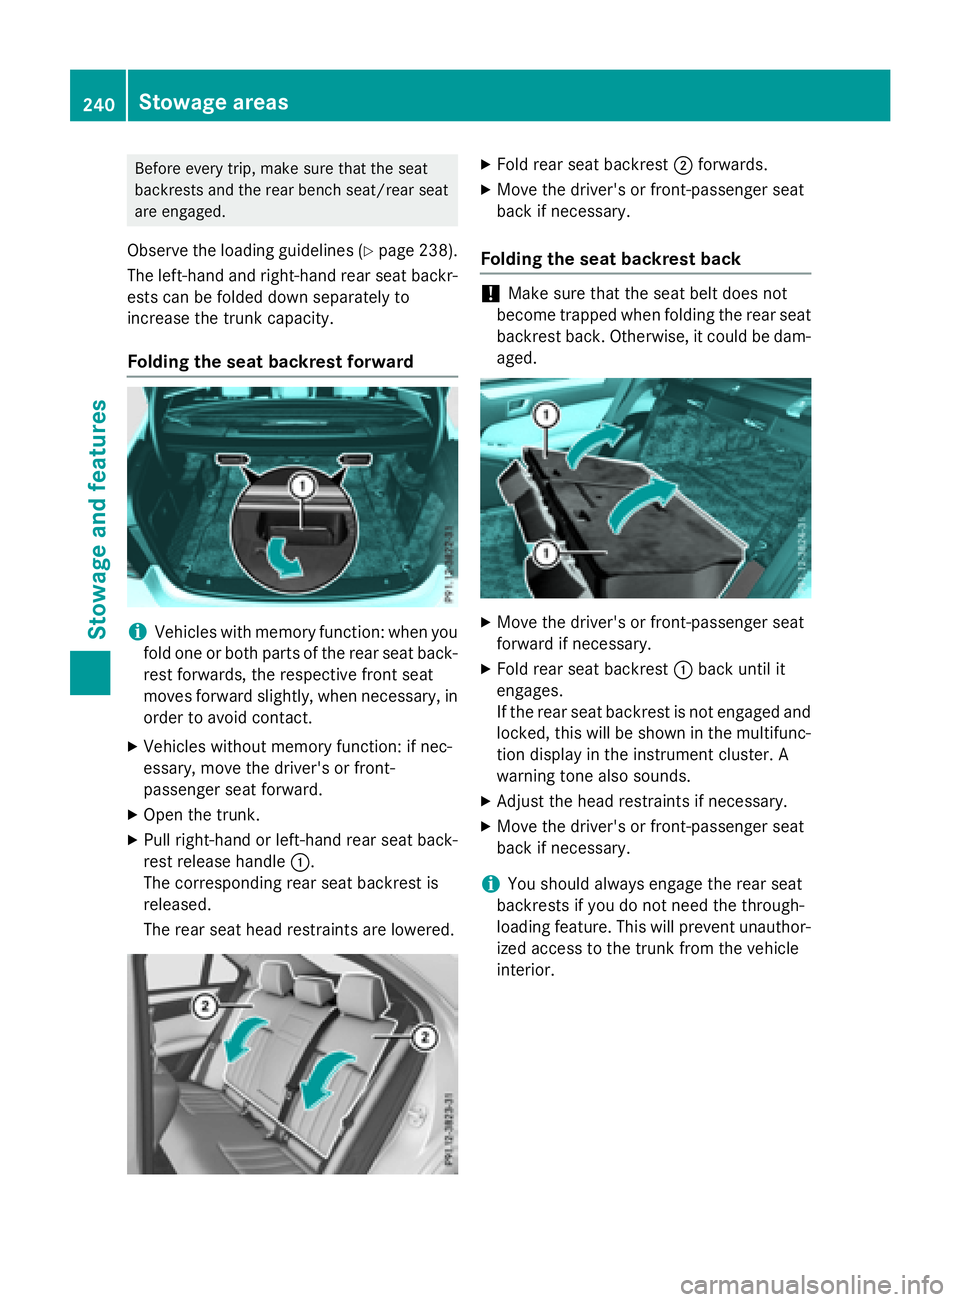
Before every trip, make sure that the seat
backrests and the rear bench seat/rear seat
are engaged.
Observe the loading guidelines (Ypage 238).
The left-hand and right-hand rear seat backr-
ests can be folded down separately to
increase the trunk capacity.
Folding the seat backrest forward
iVehicles with memory function: when you
fold one or both parts of the rear seat back-
rest forwards, the respective front seat
moves forward slightly, when necessary, in
order to avoid contact.
XVehicles without memory function: if nec-
essary, move the driver's or front-
passenger seat forward.
XOpen the trunk.
XPull right-hand or left-hand rear seat back-
rest release handle :.
The corresponding rear seat backrest is
released.
The rear seat head restraints are lowered.
XFold rear seat backrest ;forwards.
XMove the driver's or front-passenger seat
back if necessary.
Folding the seat backrest back
!Make sure that the seat belt does not
become trapped when folding the rear seat
backrest back. Otherwise, it could be dam-
aged.
XMove the driver's or front-passenger seat
forward if necessary.
XFold rear seat backrest :back until it
engages.
If the rear seat backrest is not engaged and
locked, this will be shown in the multifunc-
tion display in the instrument cluster. A
warning tone also sounds.
XAdjust the head restraints if necessary.
XMove the driver's or front-passenger seat
back if necessary.
iYou should always engage the rear seat
backrests if you do not need the through-
loading feature. This will prevent unauthor-
ized access to the trunk from the vehicle
interior.
240Stowage areas
Stowage and features
Page 243 of 350
EASY-PACK through-loading facility in
the rear bench seat (Wagon)
Important safety notes
GWARNING
If the rear bench seat/rear seat and seat
backrest are not engaged they could fold for-
wards, e.g. when braking suddenly or in the
event of an accident.
RThe vehicle occupant would thereby be
pushed into the seat belt by the rear bench
seat/rear seat or by the seat backrest. The
seat belt can no longer offer the intended
level of protection and could even cause
injuries.
RObjects or loads in the trunk/cargo com-
partment cannot be restrained by the seat
backrest.
There is an increased risk of injury.
Before every trip, make sure that the seat
backrests and the rear bench seat/rear seat
are engaged.
Observe the loading guidelines (Ypage 238).
Folding the rear seat backrests forward
!When folding the rear seat backrest for-
wards, ensure that there are no items lying
on the seat cushions. These items could
otherwise be damaged or could themselves
damage the rear seats.
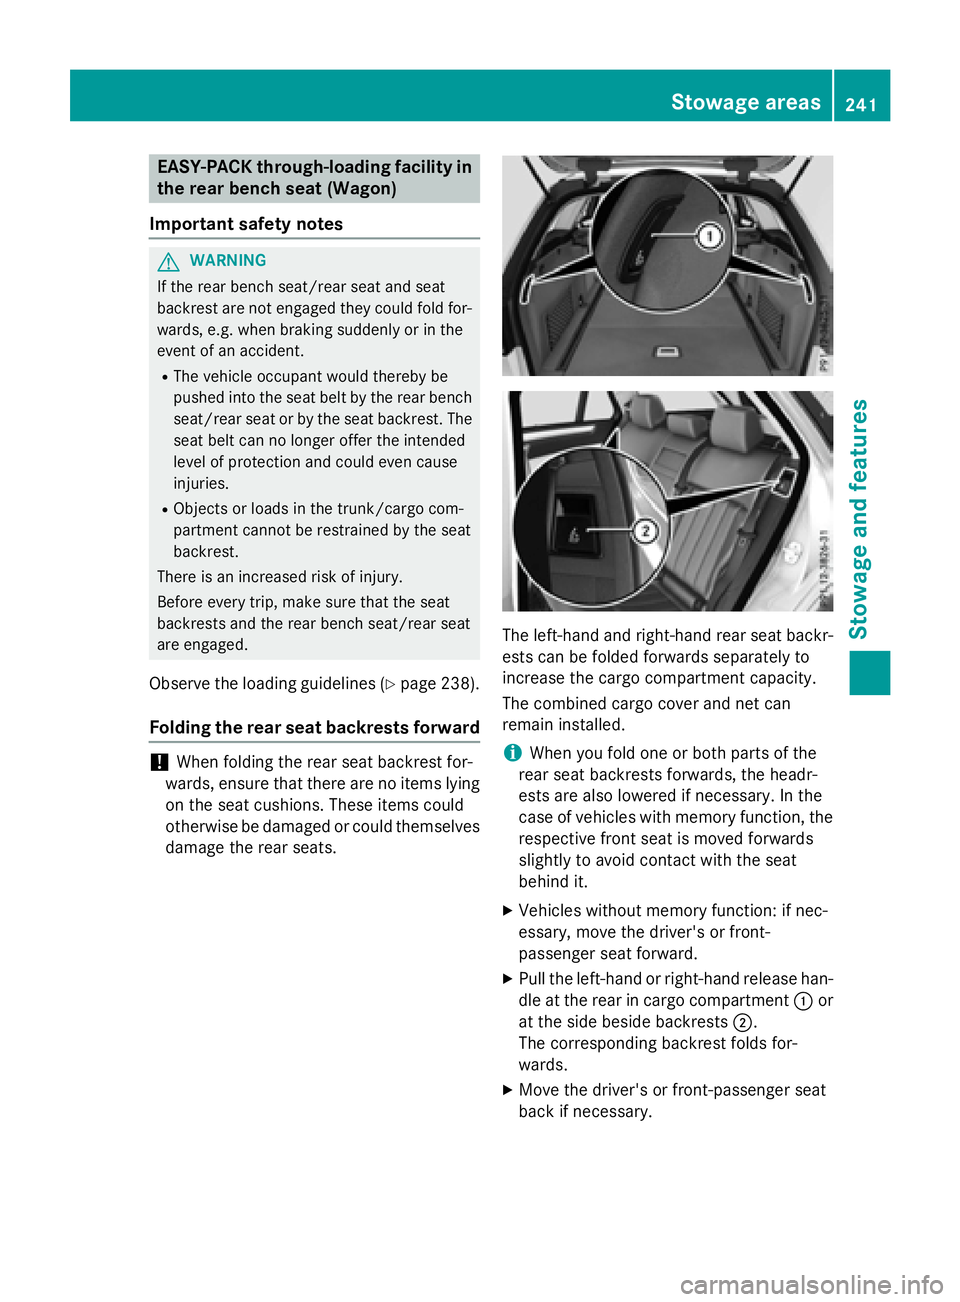
The left-hand and right-hand rear seat backr-
ests can be folded forwards separately to
increase the cargo compartment capacity.
The combined cargo cover and net can
remain installed.
iWhen you fold one or both parts of the
rear seat backrests forwards, the headr-
ests are also lowered if necessary. In the
case of vehicles with memory function, the
respective front seat is moved forwards
slightly to avoid contact with the seat
behind it.
XVehicles without memory function: if nec-
essary, move the driver's or front-
passenger seat forward.
XPull the left-hand or right-hand release han-
dle at the rear in cargo compartment :or
at the side beside backrests ;.
The corresponding backrest folds for-
wards.
XMove the driver's or front-passenger seat
back if necessary.
Stowage areas241
Stowage and features
Z