2016 MERCEDES-BENZ E-CLASS SALOON seats
[x] Cancel search: seatsPage 5 of 557

At
agl ance .................................................... 6
Cockpit ........................................................... 6
Wa rning and indicator lamps ........................ 10
Overhead contro l panel ................................ 14
Door control panel and seat adjustment ....... 16
Emergencies and breakdowns ...................... 18Digital Owner's Manual
.............................20
Calling up the Digital Owner's Manual ..........20 Genera
l notes............................................. 21
Pr otection of the environment ......................21
Ta ke -ba ckof end-of-life vehicles ...................21
Mercedes-Benz GenuineParts ....................... 22
Owner's Manual ...........................................23
Operating saf ety .......................................... .23
Declaration of Conformity ............................. 24
Diagno stics connection ................................ 26
Qualified specialist workshop ....................... 26
Ve hicle registration ....................................... 27
Cor rect use of theve hicle ............................. 27
Implied warranty .......................................... .27
QR code forre scue card ...............................27
Ve hicle data storage .....................................27 Copyright ...................................................... 28 Occupant saf
ety......................................... 30
Re stra int sy stem ...........................................30
Seat belts ..................................................... 32
Airbags ......................................................... 37
PRE-SAFE ®
sy stem ....................................... 44
Children in theve hicle ..................................45
Pe ts in theve hicle ........................................63 Opening and closing
.................................. 64
Ke y .............................................................. .64
Doo rs............................................................ 68
Boot .............................................................. 73
Ro ller sunblinds ............................................ 78
Side windo ws............................................... 79
Sliding sunroof ............................................. 83
Anti-theft pr otection .....................................87 Seats and
stowing ..................................... 90
Cor rect driver's seat position ....................... 90
Seats ............................................................ 91
St eering wheel ............................................ 101Using
the memory function ........................ 104
St ow age areas ............................................ 105
Cup holders ................................................ .115
Ashtr ayand cigar ette lighter ...................... .117
Soc kets ....................................................... 11 8
Wi reless charging of the mobile phone
and connection with theex terior aerial ...... 12 0
Fitting/removing floor mats ....................... 12 2 Light and sight
......................................... 12 3
Exterior lighting .......................................... 12 3
Interior lighting ........................................... 13 0
Changing bulbs (on lyforve hicles with
halogen headlamp s) .................................... 131
Wi ndsc reen wipers and windscreen
wa sher sy stem ............................................ 13 4
Mir rors ........................................................ 137
Operating the sun visors ............................. 13 9
Infrared reflective windscreen .................... 14 0 Climate control
......................................... 141
Overview of climate contro l systems ........... 141
Operating the climate control sy stem ......... 14 2 2
Contents
Page 20 of 557

1
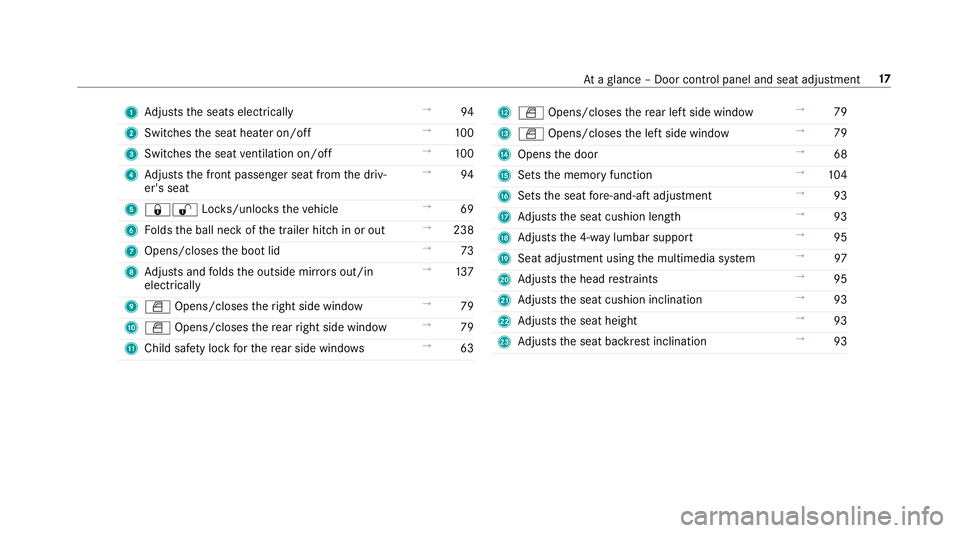
Adjusts the seats electrically →
94
2 Switches the seat heater on/off →
100
3 Switches the seat ventilation on/o ff →
100
4 Adjusts the front passenger seat from the driv‐
er's seat →
94
5 &% Locks/unloc kstheve hicle →
69
6 Folds the ball neck of the trailer hitch in or out →
238
7 Opens/closes the boot lid →
73
8 Adjusts and folds the outside mir rors out/in
electrically →
137
9 W Opens/closes theright side window →
79
A W Opens/closes there ar right side window →
79
B Child saf ety lock forth ere ar side wind ows →
63 C
W Opens/closes there ar left side wind ow→
79
D W Opens/closes the left side window →
79
E Opens the door →
68
F Sets the memory function →
104
G Sets the seat fore -and-aft adjustment →
93
H Adjusts the seat cushion length →
93
I Adjusts the 4-w aylumbar support →
95
J Seat adjustment using the multimedia sy stem →
97
K Adjusts the head restra ints →
95
L Adjusts the seat cushion inclination →
93
M Adjusts the seat height →
93
N Adjusts the seat backrest inclination →
93 At
aglance – Door control panel and seat adjustment 17
Page 25 of 557

Mercedes-Benz GenuineParts
+ ENVIRONMENTAL
NOTEEnvironmental
dama gecaused bythe non-use of recon‐
ditioned components. Daimler
AGoffers recycled reconditioned
components and pa rts with the same quality
as new parts. The same entitlement from the
implied warranty is valid as for new parts. #
Use recycled reconditioned compo‐
nents and pa rts from Daimler AG.*
NO
TEImpairment of the operating ef fi‐
ciency of there stra int sy stems from
ins talling accessories or from repairs or
we lding Airbags and seat belt
tensioners, as well as
control units and sensors forth ere stra int
sy stems, may be ins talled in thefo llowing
areas of your vehicle:
R Doors
R Door pillars R
Door sills
R Seats
R Cockpit
R Instrument clus ter
R Centre console #
Do not ins tall accessories such as audio
sy stems in these areas. #
Do not car ryout repairs or welding. #
Have accesso ries retrofitted at a quali‐
fi ed specialist workshop. Yo
u could jeopardise the operating saf ety of your
ve hicle if you use parts, tyres and wheels as well
as accessories releva nt tosaf ety which ha venot
been appr ovedby Mercedes-Benz. This could
lead tomalfunctions in saf ety-re leva nt sy stems,
e.g. the brake sy stem. Only use Mercedes-Benz
GenuineParts or parts of equal qualit y.Only use
tyres, wheels and accessory parts that ha ve
been specifically appr ovedfo ryo ur vehicle
model.
Mercedes-Benz testsge nuine pa rts and con ver‐
sion parts and accessory parts that ha vebeen specifically appr
ovedfo ryo ur vehicle model for
th eir reliability, saf ety and suitabilit y.Despite
ongoing ma rket resear ch, Mercedes-Benz is
unable toassess other parts. Mercedes-Benz
th erefore accepts no responsibility forth e use of
such parts in Mercedes-Benz vehicles, even if
th ey have been of ficially appr oved or independ‐
ently appr oved byate sting centre.
Cer tain parts are only of ficially appr ovedfor
ins tallation or modification if they comply wi th
legal requirements. All Mercedes-Benz Genuine‐
Pa rts meet the appr oval requ irements. The use
of non-appr oved parts may in validate theve hi‐
cle's general operating pe rmit.
This is the case in thefo llowing situations:
R Ach ange of theve hicle type from that for
which theve hicle's general operating pe rmit
wa s granted.
R Ifot her road users could be endangered.
R Ifth eex haust gas or noise le vels are
adversely af fected.
Alw ays specify theve hicle identification number
(VIN) (→ page 423) when ordering Mercedes-
Benz GenuineParts. 22
General no tes
Page 42 of 557

Re
duced airbag pr otection &
WARNING Risk of inju ryfrom modi fica‐
tions tothe airbag co ver
If yo u modify an airbag co ver or af fix objects
su ch assticke rs to it,the airbag can no lon‐
ge r function cor rectl y. #
Never modify an airbag co ver and do
not af fix objects toit. The ins
tallation location of an airbag is identified
by the AIRB AGsymbol (→ page37). &
WARNING Risk of inju ryor death due to
th e use of unsuitable seat co vers
Uns uitable seat co vers can obstruct or pre‐
ve nt the deployment of the airbags integra‐
te d into the seats.
Consequentl y,the airbags cann otprotect
ve hicle occupants as they are designed to
do. In addition, the operation of the auto‐
matic front passenger airbag shutoff could
be restricted. #
You should on lyuse seat co vers that
ha ve been appr oved forth e cor respond‐
ing seats byMercedes-Benz. &
WARNING Risk of inju rydue tomalfunc‐
tions of the sensors in the door panelling
Sensors tocontrol the airbags are located in
th e doors. Modifications or worknot per‐
fo rm ed cor rectly tothe doors or door panel‐
ling, as well as damaged doors, can lead to
th e function of the sensors being impaired.
The airbags might therefore not function
proper lyany more.
Consequent ly,th e airbags cann otprotect
ve hicle occupants as they are designed to
do. #
Never modify the doors or parts of the
doors. #
Alw ays ha vewo rkon the doors or door
panelling car ried out at a qualified spe‐
cialist workshop. &
WARNING Risk of inju rydue todeplo yed
airbag
A deplo yed airbag no longer of fers any pro‐
te ction and cannot pr ovide the intended pro‐
te ctive function in theeve nt of an accident. #
Have theve hicle towe dto aqu alified
specialist workshop in order tohave the
deplo yed airbag replaced. Ha
ve deplo yed airbags replaced immediately. St
atus of the front passenger airbags Po
ints toremember when the front
passen ger seat is occupied
The au tomatic front passenger airbag shutoff is
able todetect whe ther the front passenger seat
is occupied bya person or a child restra int sys‐
te m. The front passenger airbag is enabled or
disabled accordingly.
When ins talling a child restra int sy stem on the
front passenger sea t:
R Ensu rethat thech ild restra int sy stem is posi‐
tioned cor rectly (→ page 52). Occupant saf
ety39
Page 52 of 557

tions and
the instructions for cor rect use of the
ch ild restra int sy stem.
Before every trip, make sure that the ISOFIX
ch ild restra int sy stem or the i-Size child restra int
sy stem is engaged cor rectly in bo thISOFIX or
i‑Size mounting brac kets. 1
ISOFIX mounting brac kets
2 i-Size mounting brac kets *
NO
TEDama getothe seat belt forthe
centre seat When
fitting a child restra int sy stem, the seat
belt forth e cent reseat could be damaged. #
Make sure that the seat belt is not trap‐
ped. #
Remo veeach co verfo r ISOFIX mounting
brac kets 1 or i‑Size mounting brac kets 2. #
Attach the ISOFIX child restra int sy stem to
bo th ISOFIX mounting brac kets 1 or i‑Size
mounting brac kets 2.
or #
Attach the i‑Size child restra int sy stem to
bo th i‑Size mounting brac kets 2. #
Afterre moving thech ild seat, replace each
co verfo r ISOFIX mounting brac kets 1 or
i‑Size mounting brac kets 2. Secu
ring TopTe ther &
WARNING Risk of inju ryifth e seat
backrests of there ar seats are not
loc ked af terfitting TopTe ther belts
If th ere ar seat backrests are not loc ked, they
could fold forw ards in theeve nt of an acci‐
dent, heavy braking or sudden changes of
direction.
As a result, child restra int sy stems cann ot
per form their intended pr otective function.
Re ar seat backrests that are not loc ked can
also cause additional injuries, e.g. in the
ev ent of an accident. This poses an
increased risk of injury or even fata l injur y. #
Alw ays lock rear seat backrests af ter
fi tting TopTe ther belts. #
Obser vethe lock verification indicator. If
th e seat backrest is not engaged and loc ked,
th is will be shown in the multifunction display in
th e instrument clus ter.
The risk of injury can be reduced byTopTe ther
as TopTe ther pr ovides an additional connection Occupant saf
ety49
Page 53 of 557

between
thech ild restra int sy stem secured with
ISOFIX and theve hicle.
The child restra int sy stem must be equipped
with a TopTe ther belt. #
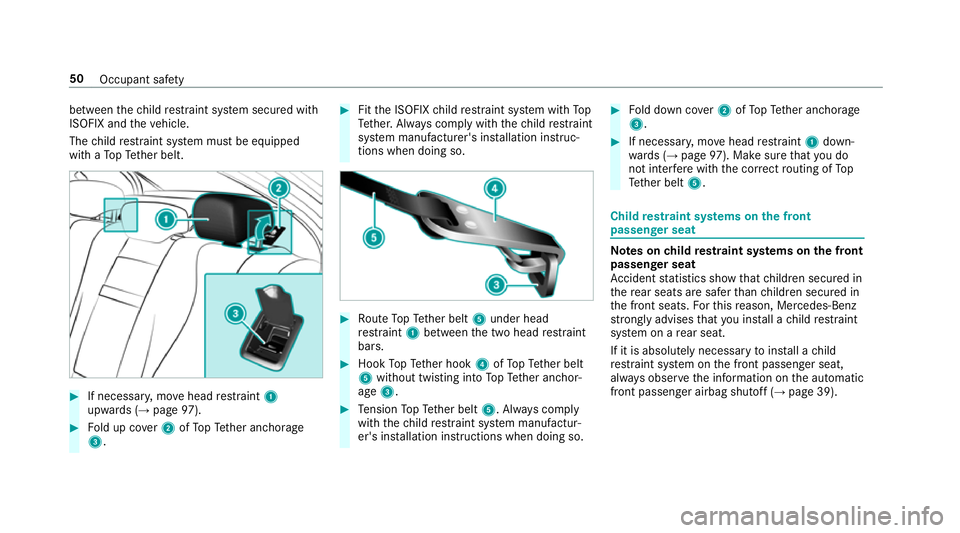
If necessar y,mo vehead restra int 1
upwards (→ page97). #
Fold up co ver2 ofTopTe ther anchorage
3. #
Fitthe ISOFIX child restra int sy stem with To p
Te ther. Alw ays comply with thech ild restra int
sy stem manufacturer's ins tallation instruc‐
tions when doing so. #
Route TopTe ther belt 5under head
re stra int 1 between the two head restra int
bars. #
Hook TopTe ther hook 4ofTopTe ther belt
5 without twisting into TopTe ther anchor‐
age 3. #
Tension TopTe ther belt 5. Alw ays comply
with thech ild restra int sy stem manufactur‐
er's ins tallation instructions when doing so. #
Fold down co ver2 ofTopTe ther anchorage
3. #
If necessar y,mo vehead restra int 1 down‐
wa rds (→ page 97). Make sure that you do
not inter fere with the cor rect routing of To p
Te ther belt 5. Child
restra int sy stems on the front
passenger seat Note
s onchild restra int sy stems on the front
passenger seat
Ac cident statistics show that children secured in
th ere ar seats are safer than children secured in
th e front seats. Forth is reason, Mercedes-Benz
stro ngly advises that you ins tall a child restra int
sy stem on a rear seat.
If it is absolutely necessary toins tall a child
re stra int sy stem on the front passenger seat,
alw ays obser vethe information on the automatic
front passenger airbag shutoff (→ page 39).50
Occupant saf ety
Page 55 of 557

The
following no tes must be obser ved:
R Onforw ard-facing and rear wa rd-facing child
re stra int sy stems on the front passenger seat
(→ page 52).
R On attaching suitable child restra int sy stems
(→ page 52).
Fo rw ard-facing and rear wa rd-facing child
re stra int sy stems on the front passenger
seat
When using a rear wa rd-facing child restra int sys‐
te m on the front passenger seat, the front
passenger airbag must alw ays be disabled. This
is only the case if thePA SSENGER AIR BAG OFF
indicator lamp is lit continuously (→ page41).
When using a child restra int sy stem on the front
passenger seat, it is essential toobser vethefo l‐
lowing:
R Movethe front passenger seat as far back as
possible.
R Set the seat backrest toan almost vertical
position.
R Retract the seat cushion length as far as pos‐
sible. R
The entire base of thech ild restra int sy stem
must alw aysre st on the sitting sur face of the
front passenger seat.
R The backrest of thefo rw ard-facing child
re stra int sy stem must, as far as possible, be
re sting on the seat backrest of the front
passenger seat. The child restra int sy stem
must not touch thero of or be put under
st ra in by the head restra ints.
R If necessar y,adjust the angle of the seat
backrest and the head restra int position
according ly.
R Movethe seat cushion inclination tothe
highest, most vertical position.
R Alw ays make sure that the shoulder belt
st ra p is cor rectly routed from the seat belt
outlet of theve hicle tothe shoulder belt
guide on thech ild restra int sy stem. The
shoulder belt stra p must be routed forw ards
and down wards from the seat belt outlet.
R If necessar y,adjust the seat belt outlet and
th e front passenger seat accordingly.
R Never place objects, e.g. a cushion, under or
behind thech ild restra int sy stem. Alw
ays comply with the manufacturer's ins talla‐
tion and operating instructions forth ech ild
re stra int sy stem used, and the no tes on fitting
suitable child restra int sy stems (→ page 52). Suitability of
the seats forch ild restra int sys‐
te ms Note
s on attaching suitable child restra int
sy stems
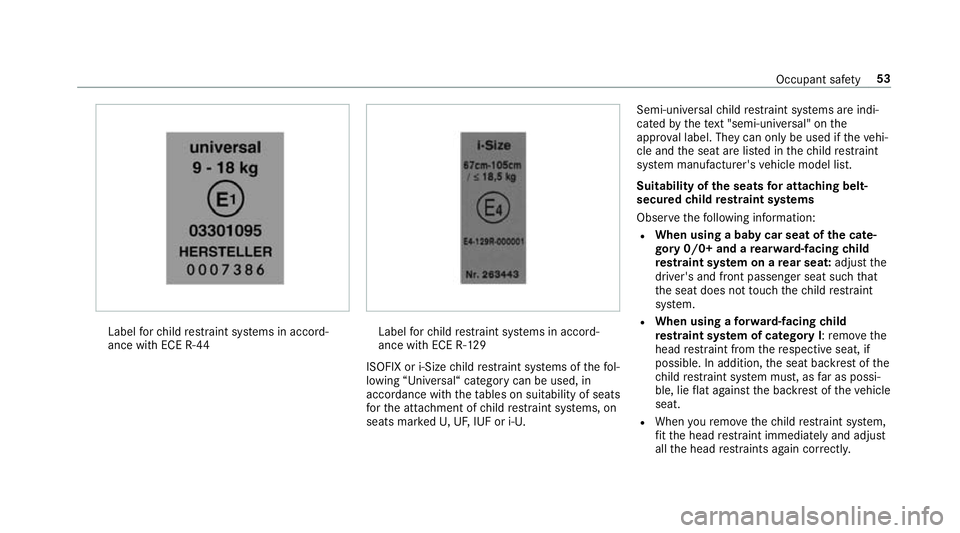
On lych ild restra int sy stems with thefo llowing
ECE standards are permit tedfo r use in theve hi‐
cle:
R ECE R44
R ECE-R129 (i-Size child restra int sy stems)
Examples of appr oval labels on child restra int
sy stems: 52
Occupant saf ety
Page 56 of 557

Label
forch ild restra int sy stems in accord‐
ance with ECE R-44 Label
forch ild restra int sy stems in accord‐
ance with ECE R-12 9
ISOFIX or i-Size child restra int sy stems of thefo l‐
lowing “Universal“ category can be used, in
accordance with theta bles on suitability of seats
fo rth e atta chment of child restra int sy stems, on
seats mar kedU, UF, IUF or i-U. Semi-universal
child restra int sy stems are indi‐
cated bythete xt "semi-uni versal" on the
appr oval label. They can on ly beused if theve hi‐
cle and the seat are lis ted in thech ild restra int
sy stem manufacturer's vehicle model list.
Suitability of the seats for attaching belt-
secu redch ild restra int sy stems
Obser vethefo llowing information:
R When using a baby car seat of the cate‐
gory 0/0+ and a rear wa rd-facing child
re stra int sy stem on a rear seat: adjustthe
driver's and front passenger seat such that
th e seat does not touch thech ild restra int
sy stem.
R When using a forw ard-facing child
re stra int sy stem of category I: remo vethe
head restra int from there spective seat, if
possible. In addition, the seat backrest of the
ch ild restra int sy stem must, as far as possi‐
ble, lie flat against the backrest of theve hicle
seat.
R When youre mo vethech ild restra int sy stem,
fi t th e head restra int immediately and adjust
all the head restra ints again cor rectl y. Occupant saf
ety53