2016 MERCEDES-BENZ E-CLASS ESTATE oil change
[x] Cancel search: oil changePage 375 of 565
ASS
YST PLUS se rvice inter val display Fu
nction of the ASS YST PLUS se rvice inter val
displ ay The ASS
YST PLUS service inter val display in the
instrument display pr ovides information on the
re maining time or dis tance be fore the next
service due date.
Yo u can hide this service message using the
back button on the left-hand side of thesteering
wheel.
Yo u can obtain fur ther information concerning
th e servicing of your vehicle from a qualified
specialist workshop, e.g. a Mercedes-Benz
Service Centre. Displaying
the service due da teOn-board computer:
, Service .
ASSYST PLUS
The next service due date is displa yed. #
Toexitth e displa y:press the back button
on the left-hand side of thesteering wheel. Make sure
toobser vethefo llowing fur ther rela‐
te d subjec t:
R Operating the on-board computer
(→ page 256). Car
rying out service workatregular inter‐
va ls *
NO
TEPremature wearthro ugh failure to
obser veservice due dates Service
workwhich is not car ried out at the
ri ght time or incomple tely can lead to
inc reased wear and damage totheve hicle. #
Alw ays obser vethe prescribed service
inter vals. #
Alw ays ha vethe prescribed service
wo rkcar ried out at a qualified specialist
wo rkshop. Special service
requ irements The prescribed service inter
val is based on nor‐
mal operation of theve hicle. Service workwill need
tobe per form ed more of ten if theve hicle
is operated under arduous conditions or
increased loads, forex ample:
R regular city driving with frequent intermedi‐
ate stops.
R ifth eve hicle is primarily used totrave l short
dis tances.
R for frequent operation in mountainous terrain
or on poor road sur faces.
R ifth e engine is of ten le ftidling for long peri‐
ods.
R in particula rly dusty conditions and/or if air-
re circulation mode is frequently used.
In these or similar operating conditions, ha ve,for
ex ample, the interior air filter, engine air filter,
engine oil and oil filter changed more frequent ly.
The tyres must be checked more frequently if
th eve hicle is operated under increased loads.
Fu rther information can be obtained at a quali‐
fi ed specialist workshop. 372
Maintenance and care
Page 380 of 565
R
The bonnet was pr eviously opened.
The engine must be restar ted and the engine oil
le ve l will be de term ined again during driving.
On-board computer: , Service .
Engine oil level:
Yo u will see one of thefo llowing display
messa ges in the multifunction displa y:#
Engine oil level Measuring now: measu re‐
ment of the oil le vel is not yet possible.
Re peat there qu est af ter a maximum of 30
minutes' driving. #
Engine oil level OK andthe bar display for
indicating the oil le vel in the multifunction
display is green and is between "min" and
"max": the oil le vel is cor rect. #
Engine oil level Add 1.0 l andthe bar display
fo r indicating the oil le vel in the multifunction
display is orange and is below "min": top up
with 1 l of engine oil. #
Reduce engine oil level andthe bar display
fo r indicating the oil le vel in the multifunction
display is orange and is abo ve"max": drain off
theexc ess engine oil. Consult a qualified
specialist workshop. #
For engine oil level turn on ignition: switch on
th e ignition tocheck the engine oil le vel. #
Engine oil level System inoperative : sensor
fa ulty or not connected. Consult a qualified
specialist workshop. #
Engine oil level System currently unavail. :
close the engine bonn et.
To pping up engine oil &
WARNING Danger of bu rns from hot
component parts in the engine compart‐
ment
Cer tain component parts in the engine com‐
partment may be very hot, e.g. the engine,
th era diator and parts of theex haust sy stem. #
Let the engine cool down and only
to uch the component parts described
below: &
WARNING Risk offire and injury from
engine oil
If engine oil comes into con tact wi thhot
component parts in the engine compart‐
ment, it may ignite. #
Make sure that no engine oil is spilled
next tothefiller opening. #
Allow the engine tocool off and thor‐
oughly clean the engine oil from compo‐
nent parts before starting theve hicle. *
NO
TEEngine dama gecaused byan
incor rect oil filter, incor rect oil or addi‐
tives #
Do not use engine oils or oil filters
which do not cor respond tothe specifi‐
cations explicitly prescribed forthe
service inter vals. #
Do not alter the engine oil or oil filter in
order toachie velonger change inter vals
th an presc ribed. #
Do not use additives. Maintenance and care
377
Page 424 of 565
may se
verely impair the driving characteris‐
tics.
The disk brakes or wheel suspension compo‐
nents may also be damaged. #
Rotate front and rear wheels on lyifthe
wheels and tyres are of the same
dimensions. Inter
changing the front and rear wheels if the
wheels or tyres ha vediffere nt dimensions can
re nder thege neral operating pe rmit in valid.
The wear pat tern s on the front and rear wheels
dif fer:
R Front wheels wear more on the shoulder of
th e tyre
R Rear wheels wear more in the cent reofthe
tyre
On vehicles with the same front and rear wheel
size, you can inter change the wheels every
5000 to10000 km, depending on thewe ar.
Ensure the direction of rotation is maintained for
th e wheels. It is imperative
toobser vethe instructions and
saf ety no tes on "Wheel change" when doing so. Note
s onstoring wheels R
Afterre moving wheels, store them in a cool,
dry and preferably dark place.
R Protect the tyres from conta ct withoil,
grease or fuel. Overview of
the ty re-change tool kit Apart from some countr
y-specific variants, vehi‐
cles are not equipped with a tyre-change tool kit.
Fo r more information on which tyre-changing
to ols are requ ired and appr ovedfo r per form ing a
tyre change on your vehicle, consult a qualified
specialist workshop.
Necessary tyre-changing tools may include, for
ex ample:
R jack
R chock
R wheel spanner
R centri ng pin %
The jack weighs appr oximately 3.4 kg.
The maximum load capacity of the jack can
be found on thest icke r af fixe dto the jac k.
The jack is maintenance-free. If there is a
malfunction, please conta ct aqualified spe‐
cialist workshop.
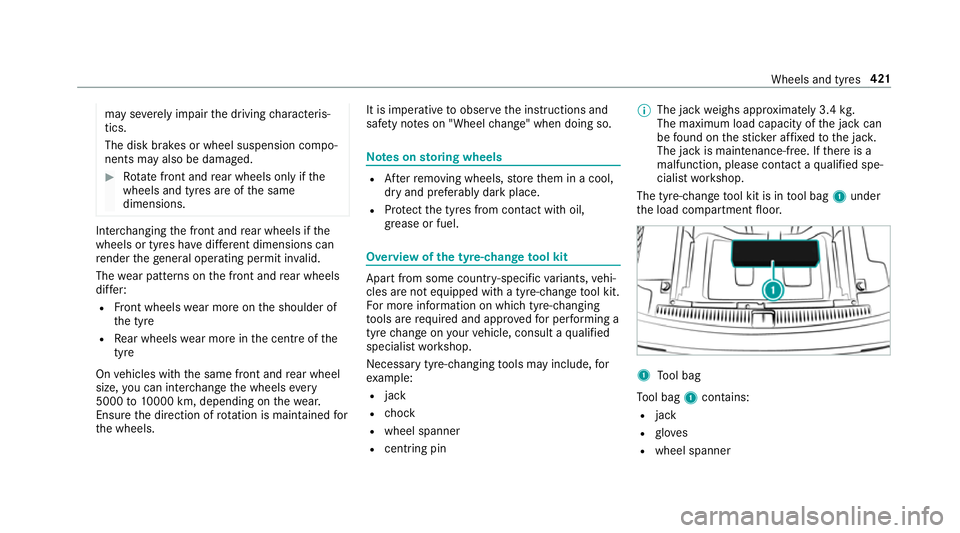
The tyre-change tool kit is in tool bag 1under
th e load compartment floor. 1
Tool bag
To ol bag 1contains:
R jack
R glov es
R wheel spanner Wheels and tyres
421
Page 429 of 565
&
WARNING Risk of accident from losing a
wheel
Oiled, greased or damaged wheel bolt/wheel
nut thre ads or wheel hub/wheel mounting
bolt thre ads can cause the wheel bolts/
wheel nuts tocome loose.
As a result, you could lose a wheel while driv‐
ing. #
Never oil or grease theth re ads. #
Intheeve nt of damage totheth re ads,
con tact a qualified specialist workshop
immediatel y. #
Have the damaged wheel bolts or dam‐
aged hub thre ads replaced. #
Do not continue driving. #
Obser vethe information on thech oice of
tyres (→ page417).
Fo r tyres with a specified direction of rotation,
an ar rowonthe side wall of the tyre indicates
th e cor rect di rection of rotation. Obse rvethe
direction of rotation when fitting. #
Slide the wheel tobe mounted onto the cen‐
tring pin and push it on. &
WARNING Risk of inju ryfrom tightening
wheel bolts andnuts
If yo u tighten the wheel bolts or wheel nuts
when theve hicle is raised, the jack could tip. #
Only tighten wheel bolts or wheel nuts
when theve hicle is on the ground. #
For saf etyre asons, Mercedes-Benz recom‐
mends that you on lyuse wheel bolts which
ha ve been appr oved for Mercedes-Benz vehi‐
cles, as well as forth e wheel in question. #
Tighten the wheel bolts until they are finger-
tight. #
Unscr ew the cent ring pin. #
Tighten the last wheel bolt until it is finger-
tight. #
Lowe rth eve hicle(→ page 426). Lo
weri ngtheve hicle af ter a wheel change Re
quirements:
R The new wheel has been fitted (→ page 425). #
Place thera tchet ring spanner onto the he xa‐
gon nut of the jack so that the letters "AB"
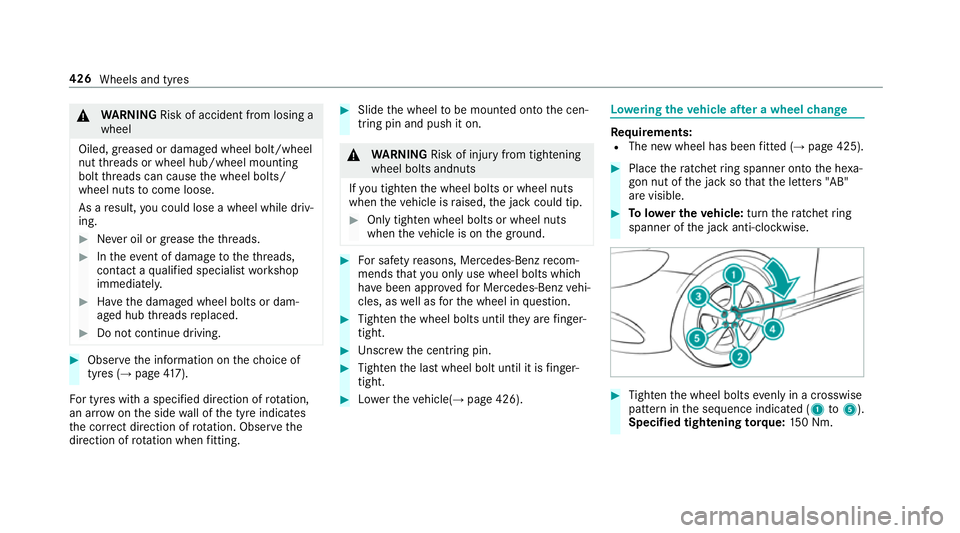
are visible. #
Tolowe r the vehicle: turnthera tchet ring
spanner of the jack anti-clockwise. #
Tighten the wheel bolts evenly in a crosswise
pattern in the sequence indicated (1 to5 ).
Specified tightening torq ue: 150 Nm. 426
Wheels and tyres
Page 441 of 565
*
NO
TEDama geand malfunctions due to
impurities in AdBlue ® Impu
rities in AdBlue ®
lead to:
R Increased emissions values
R Damage tothe catalytic con verter
R Engine damage
R BlueTEC exhaust gas af tertre atment mal‐
functions #
Avoid impurities in AdBlue ®
. +
ENVI
RONMENTAL NOTEContamination
caused byAdBlue ® Ad
Blue ®
re sidues cr ystallise af ter a period of
time, and contamina tethe sur faces wi th
which they come into contact. #
Surfaces that ha vecome into contact
wi th Ad Blue®
while refilling must be
immediately rinsed wi thwa ter,or
Ad Blue ®
must be remo ved with a damp
clo thand cold water. If
Ad Blue ®
has al ready cr ystallised, clean it
with a spon geand cold water. When
you open theAd Blue ®
tank, small
amounts of ammonia vapour may escape. Do
not inhale any ammonia vapours that may be
re leased. Only fill th eAd Blue ®
tank in well-venti‐
lated areas.
Ad Blue ®
filling capacity
To tal capacity of AdBlue ®
tank Mode
lT otal capacity
All models 23.5 l Engine oil
Note
s on engine oil
Obser vethe no tes on operating fluids
(→ page 433). *
NO
TEEngine dama gecaused byan
incor rect oil filter, incor rect oil or addi‐
tives #
Do not use engine oils or oil filters
which do not cor respond tothe specifi‐
cations explicitly prescribed forthe
service inter vals. #
Do not alter the engine oil or oil filter in
order toachie velonger change inter vals
th an presc ribed. #
Do not use additives. #
Have the engine oil rene we d at regular
inter vals. 438
Tech nical da ta
Page 442 of 565
Mercedes-Benz
recommends that you ha vethe
oil change car ried out at a qualified specialist
wo rkshop.
Only Mercedes-Benz appr oved engine oils may
be used in Mercedes-Benz engines.
Fu rther information on engine oils and oil filters:
R Inthe Mercedes-Benz Specifications for
operating fluids at http://be vo.mercedes-
benz.co m (by en tering the designation)
R Ataqu alified specialist workshop
Pet rol engines: For cer tain countries, dif fere nt
engine oils can be used in conjunction wi th
re duced maintenance inter vals. For more infor‐
mation, please contact a qualified specialist
wo rkshop.
Quality and filling capacity of engine oil
MB- Freigabe or MB -Appr oval Pe
trol engine sM B-Freigabe or MB-
Appr oval
All models 229.5, 229.6 MB-F
reigabe or MB-Appr oval Diesel engine
sMB-Freigabe or MB-
Appr oval
E 350 d2 28.51,229.3 1,
229.5 1,229.52
All other models 228.51 , 229.31,
229.5 1,229.52,
229.71 If
th e engine oils lis ted in theta ble are not avail‐
able, you may add a maximum of 1.0 lof thefo l‐
lowing engine oils once only:
R Petrol engines: MB-Freigabe or MB-Appr oval
229.3 or ACEA A3/B3
R Diesel engines: MB-Freigabe or MB-
Appr oval 229.3, 229.5 or ACEA C3
The following values referto an oil change,
including the oil filter: Re
placement amount Mode
lR eplacement
amount
E 200
E 250 7.
0 l
E 200 4MATIC
E 400 4MATIC 6.5 l
E 350 d9 .0 l
All other models 6.3 l Note
s on brake fluid Obser
vethe no tes on operating fluids
(→ page 433). &
WARNING Risk of an accident due to
va pour poc kets form ing in the brake sys‐
tem
The brake fluid cons tantly absorbs moi sture
from the air. This lo wersthe boiling point of Te
ch nical da ta439
Page 443 of 565
th
e brake fluid. If the boiling point is too lo w,
va pour poc kets may form inthe brake sys‐
te m when the brakes are applied hard.
This impairs the braking ef fect. #
Have the brake fluid rene we d at the
specified inter vals. Ha
ve the brake fluid regularly changed at a quali‐
fi ed specialist workshop.
Only use brake fluid appr ovedby Mercedes-Benz
according toMB-F reigabe or MB-Appr oval 33 1.0.
Fu rther information on brake fluid:
R Inthe Mercedes-Benz Specifications for
Operating Fluids at http://be vo.mercedes-
benz.com
R Ataqu alified specialist workshop Coolant
Note
s on coolant
Obser vethe no tes on operating fluids
(→ page 433). &
WARNING Risk offire ‑ and inju ryfrom
antifreeze
If antifreeze comes into contact with hot
component parts in the engine compart‐
ment, it may ignite. #
Allow the engine tocool down before
yo uto p up the antif reeze. #
Make sure that no antifreeze spills out
next tothefiller opening. #
Thoroughly clean the antif reeze from
component parts before starting the
ve hicle. *
NO
TEDama gecaused byincor rect cool‐
ant #
Only add coolant that has been pre‐
mixed with therequ ired antifreeze pro‐
te ction. Fu
rther information on coolant:
R Inthe Mercedes-Benz Specifications for
Operating Fluids 310.1, e.g. online at
http://be vo.mercedes-benz.com.
R Ataqu alified specialist workshop. *
NO
TEOverheating at high outside tem‐
peratures If an inapp
ropriate coolant is used, the
engine cooling sy stem is not suf ficiently pro‐
te cted against overheating and cor rosion at
high outside temp eratures. #
Alw ays use an appropriate coolant. Ha
ve the coolant regularly changed at a qualified
specialist workshop.
The proportion of cor rosion inhibitor/ antifreeze
concentrate in the engine cooling sy stem should
be:
R A minimum of 50% (antifreeze pr otection
down toappr oximately -37 °C). 440
Tech nical da ta
Page 521 of 565
1,
2, 3 ...
12 V so cket
see Soc ket (12 V)
230 V so cket ............................................ 127
360° Camera .......................................... .224
Assigning as a favo urite ...................... .227
Care .................................................... 383
Fu nction .............................................. 224
Selecting a view .................................. 226 A
A/C function Activating/deactivating (control
panel) ................................................... 151
Ac tivating/deactivating (multimedia
sy stem) ................................................ 151
ABS (Anti-lock Braking Sy stem) ............ .189
Ac celeration
see Kickdown
Ac cess data
Editing ................................................ .342
Setting ................................................. 340 Ac
oustic locking verification signal
Swit ching on/off .................................. .65
Ac tive Blind Spot Assi st.......................... 24 2
Ac tivating/deactivating ...................... .244
Brake application ................................. 24 2
Fu nction/no tes ................................... 24 2
Sy stem limits ....................................... 24 2
Tr ailer operation .................................. 24 2
Ac tive bonn et(pedestrian pr otection) ..373
Operation ............................................ 373
Re setting ............................................. 373
Ac tive Brake Assi st................................. 194
Fu nction/no tes .................................... 194
Setting ................................................. 19 8
Ac tive Eme rgency Stop Assist ................ 210
Ac tive Lane Change Assi st..................... 210
Ac tive Lane Keeping Assist .................... 24 4
Ac tivating/deactivating ...................... .246
Fu nction .............................................. 24 4
Sensitivity (function/no tes) ................. 247
Setting the sensitivity .......................... 247
Sy stem limits ....................................... 24 4
Tr ailer operation .................................. 24 4Ac
tive light function ................................ 13 4
Ad aptive brake lights ..............................19 9
Ad aptive cruise control
see Dis tance Pilot DISTRONIC
Ad aptive functions, MULTIBEAM LED
see Intelligent Light Sy stem
Ad aptive Highbeam Assist Plus
Ac tivating/deactivating ...................... .137
Fu nction .............................................. 13 6
Ad Blue ®
.................................................... 437
Ad ditives .............................................4 37
Filling capacity .................................... 438
Low outside temp eratures ...................4 37
No tes ................................................... 178
Purity ................................................... 437
Ad ditional door lo ck.................................. 68
Ad diti ves.................................................. 438
Ad Blue ®
............................................... 437
Engine oil ............................................ 438
Fu el ..................................................... 435
Ad diti ves (engine oil)
see Additives 518
Index