2016 MERCEDES-BENZ CLS fold seats
[x] Cancel search: fold seatsPage 17 of 342
PARKTRONIC
Deactivating/activating ................. 172
Driving system .............................. .1 70
Function/notes ............................ .1 70
Important safety notes .................. 170
Problem (malfunction) ................... 173
Range of the sensors ..................... 170
Warning display ............................. 171
PASSENGER AIR BAG
Display message ............................ 219
PASSENGER AIR BAG OFF
Indicator lamp .................................. 42
Problems (malfunctions) ................ 219
Pets in the vehicle ............................... 63
Phone book
see also Digital Operator's Man-
ual .................................................. 245
Plastic trim (cleaning instruc-
tions) .................................................. 283
Power washers .................................. 280
Power windows
see Side windows
PRE-SAFE ®
(anticipatory occupant
protection)
Display message ............................ 215
Operation ......................................... 56
PRE-SAFE ®
Brake
Activating/deactivating ................. 204
Display message ............................ 216
Function/notes ................................ 73
Important safety notes .................... 73
Warning lamp ................................. 243
PRE-SAFE ®
PLUS (anticipatory
occupant protection PLUS)
Display message ............................ 216
Operation ......................................... 57
Program selector button .................. 138
Protection against theft
ATA (Anti-Theft Alarm system) ......... 75
Immobilizer ...................................... 74
Protection of the environment
General notes .................................. 25
Pulling away
General notes ................................ 129
Pulling away (automatic transmis-
sion) .................................................... 129 Q QR code
Mercedes-Benz Guide App ................. 1
Rescue card ..................................... 30
Qualified specialist workshop ........... 29
R RACE START (Mercedes-AMG vehi-
cles) .................................................... 165
RACETIMER (on-board computer) .... 210
Radio
Selecting a station ......................... 201
see separate operating instructions
Radio mode
see also Digital Operator's Man-
ual .................................................. 245
Radio-wave reception/transmis-
sion in the vehicle
Declaration of conformity ................ 28
Reading lamp ..................................... 110
Rear compartment
Setting the airflow ......................... 122
Setting the temperature ................ 121
Rear fog lamp
Display message ............................ 221
Rear seat (folding the backrest for-
wards/back) ...................................... 254
Rear seats
Display message ............................ 234
Rear view camera
Cleaning instructions ..................... 282
Display in the multimedia system .. 178
Function/notes ............................. 177
Switching on/off ........................... 178
Rear window blind ............................ 260
Rear window defroster
Problem (malfunction) ................... 124
Switching on/off ........................... 123
Rear-view mirror
Dipping (automatic) ....................... 104
Refrigerant (air-conditioning sys-
tem)
Important safety notes .................. 335
Refueling
Fuel gauge ....................................... 34
Important safety notes .................. 143 Index 15
Page 62 of 342
G WARNING
Child restraint systems or their securing sys-
tems which have been damaged or subjected
to a load in an accident can no longer protect
as intended. The child cannot then be
restrained in the event of an accident, heavy
braking or sudden changes of direction. There
is an increased risk of injury, possibly even
fatal.
Replace child restraint systems which have
been damaged or subjected to a load in an
accident as soon as possible. Have the secur-
ing systems on the child restraint system
checked at a qualified specialist workshop,
before you install a child restraint system
again.
The securing systems of child restraint systems
are: R
the seat belt system R
the LATCH-type (ISOFIX) securing rings R
the Top Tether anchorages
If it is absolutely necessary to carry a child on
the front-passenger seat, be sure to observe the
information on the "Occupant Classification
System (OCS)" ( Y
page 49). There you will also
find information on deactivating the front-
passenger front air bag.
All child restraint systems must meet the fol-
lowing standards: R
U.S. Federal Motor Vehicle Safety Standards
213 and 225 R
Canadian Motor Vehicle Safety Standards
213 and 210.2
Confirmation that the child restraint system cor-
responds to the standards can be found on an
instruction label on the child restraint system.
This confirmation can also be found in the instal-
lation instructions that are included with the
child restraint system.
Observe the warning labels in the vehicle inte-
rior and on the child restraint system. LATCH-type (ISOFIX) child seat secur-
ing system
G WARNING
LATCH-type (ISOFIX) child restraint systems
do not offer sufficient protective effect for
children whose weight is greater than 48 lbs
(22 kg) who are secured using the safety belt
integrated in the child restraint system. In the
event of an accident, a child might not be
restrained correctly. This poses an increased
risk of injury or even fatal injury.
If the child weighs more than 48 lbs (22 kg),
only use LATCH-type (ISOFIX) child restraint
systems with which the child is also secured
with the vehicle seat belt. Also secure the
child restraint system with the Top Tether
belt, if available.
Always comply with the manufacturer's instal-
lation and operating instructions for the child
restraint system used.
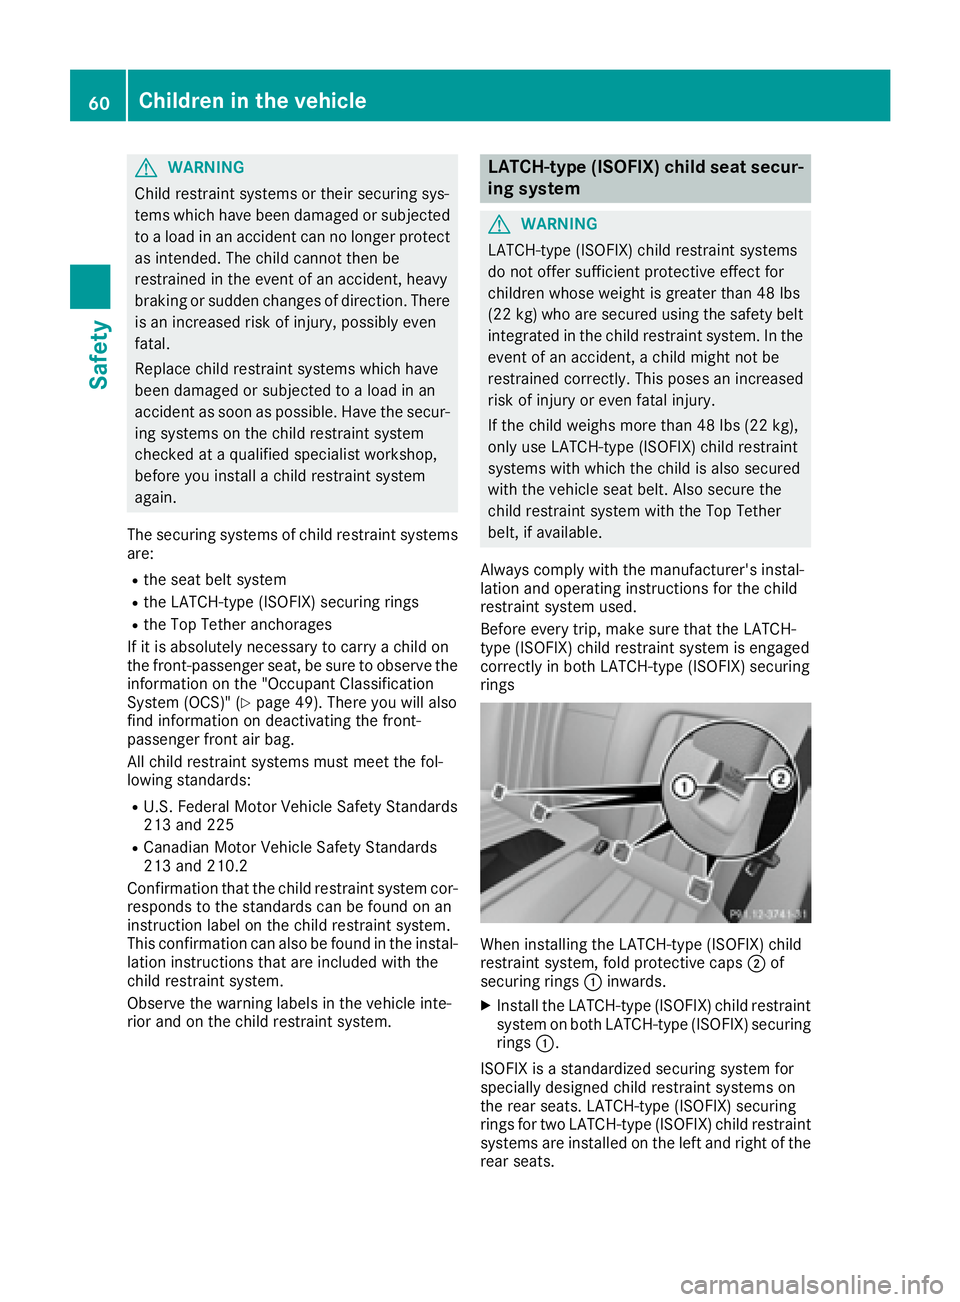
Before every trip, make sure that the LATCH-
type (ISOFIX) child restraint system is engaged
correctly in both LATCH-type (ISOFIX) securing
rings
When installing the LATCH-type (ISOFIX) child
restraint system, fold protective caps �D of
securing rings �C inwards. X
Install the LATCH-type (ISOFIX) child restraint
system on both LATCH-type (ISOFIX) securing
rings �C .
ISOFIX is a standardized securing system for
specially designed child restraint systems on
the rear seats. LATCH-type (ISOFIX) securing
rings for two LATCH-type (ISOFIX) child restraint
systems are installed on the left and right of the
rear seats.60
Children in the vehicle
Safety
Page 63 of 342
Non-LATCH-type (ISOFIX) child seats may also
be used and can be installed using the vehicle's
seat belt system. Install the child seat according
to the manufacturer's instructions.
Top Tether
Introduction Top Tether provides an additional connection
between the child restraint system secured with
a LATCH-type (ISOFIX) system and the vehicle.
This helps reduce the risk of injury even further.
If the child restraint system is equipped with a
Top Tether belt, this should always be used.
Important safety notes
G WARNING
If the rear seat backrests are not locked, they
could fold forwards in the event of an acci-
dent, heavy braking or sudden changes of
direction. As a result, child restraint systems
cannot perform their intended protective
function. Rear seat backrests that are not
locked can also cause additional injuries, e.g.
in the event of an accident. This poses an
increased risk of injury or even fatal injury.
Always lock rear seat backrests after instal-
ling a Top Tether belt. Observe the lock veri-
fication indicator. Adjust the rear seat backr-
ests so that they are in an upright position.
If the rear seat backrest is not engaged and
locked, this will be shown in the multifunction
display in the instrument cluster. A warning tone
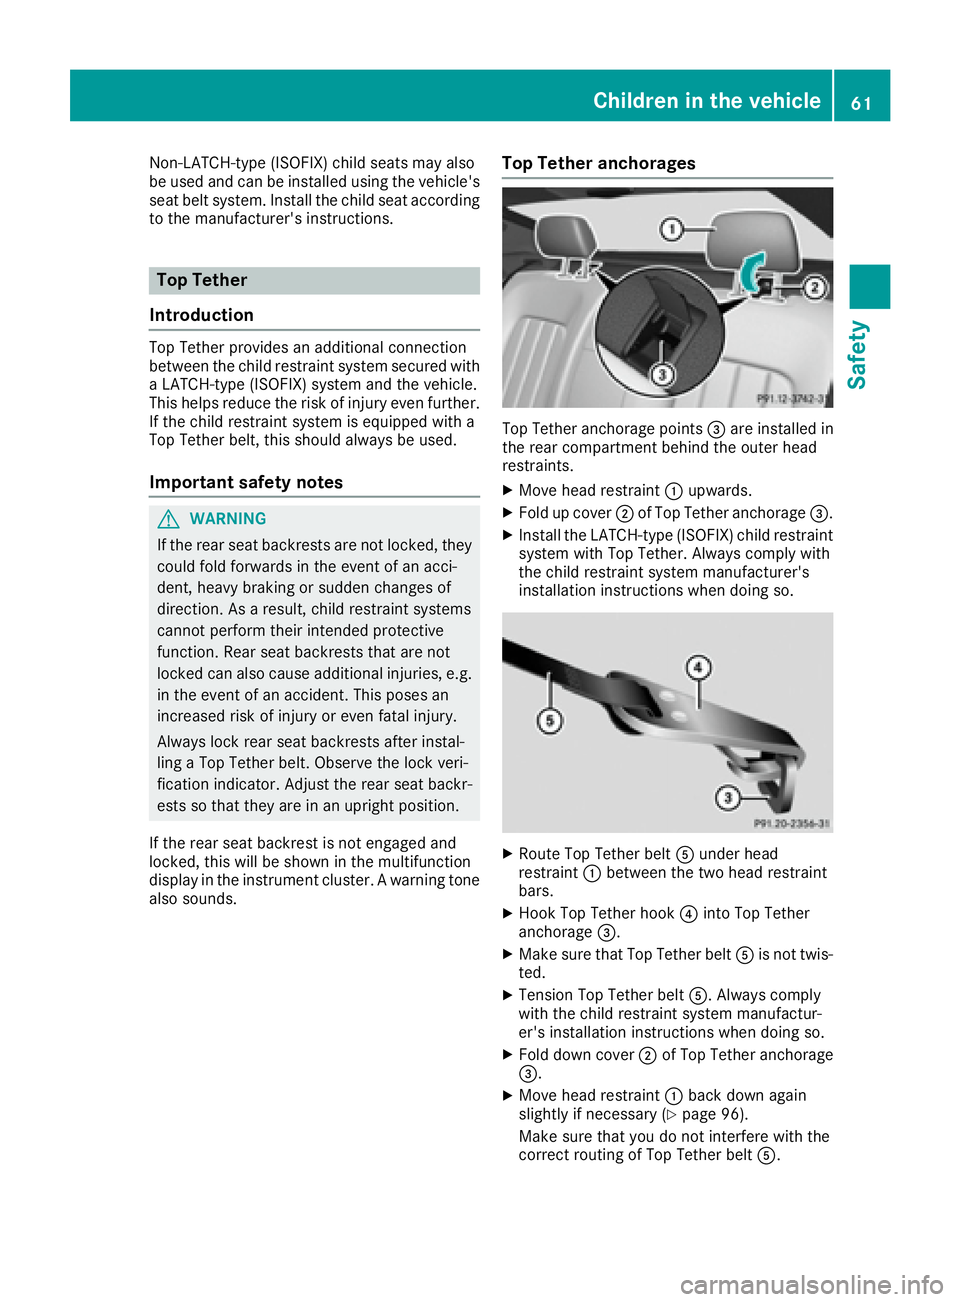
also sounds. Top Tether anchorages
Top Tether anchorage points �
Page 99 of 342
reduce the potential for injury to the head and
neck in the event of an accident or similar sit-
uation.
Whenever the rear seats are occupied, only
drive the vehicle with the head restraints
installed and engaged. Head restraints are
intended to help reduce injuries during an
accident.
Adjusting the rear seat head restraint
angle
X
Pull or push the top of the head restraint until
it is in the desired position.
Removing and installing the rear seat
head restraints
G WARNING
If the head restraints are not installed or not
adjusted correctly, they cannot provide pro-
tection as intended. There is an increased risk
of injury in the head and neck area, e.g. in the
event of an accident or when braking.
Always drive with the head restraints instal-
led. Before driving off, make sure for every
vehicle occupant that the center of the head
restraint supports the back of the head at
about eye level.
! Make sure that the rear window roller sun-
blind has been retracted before the rear head
restraints are removed. You could otherwise
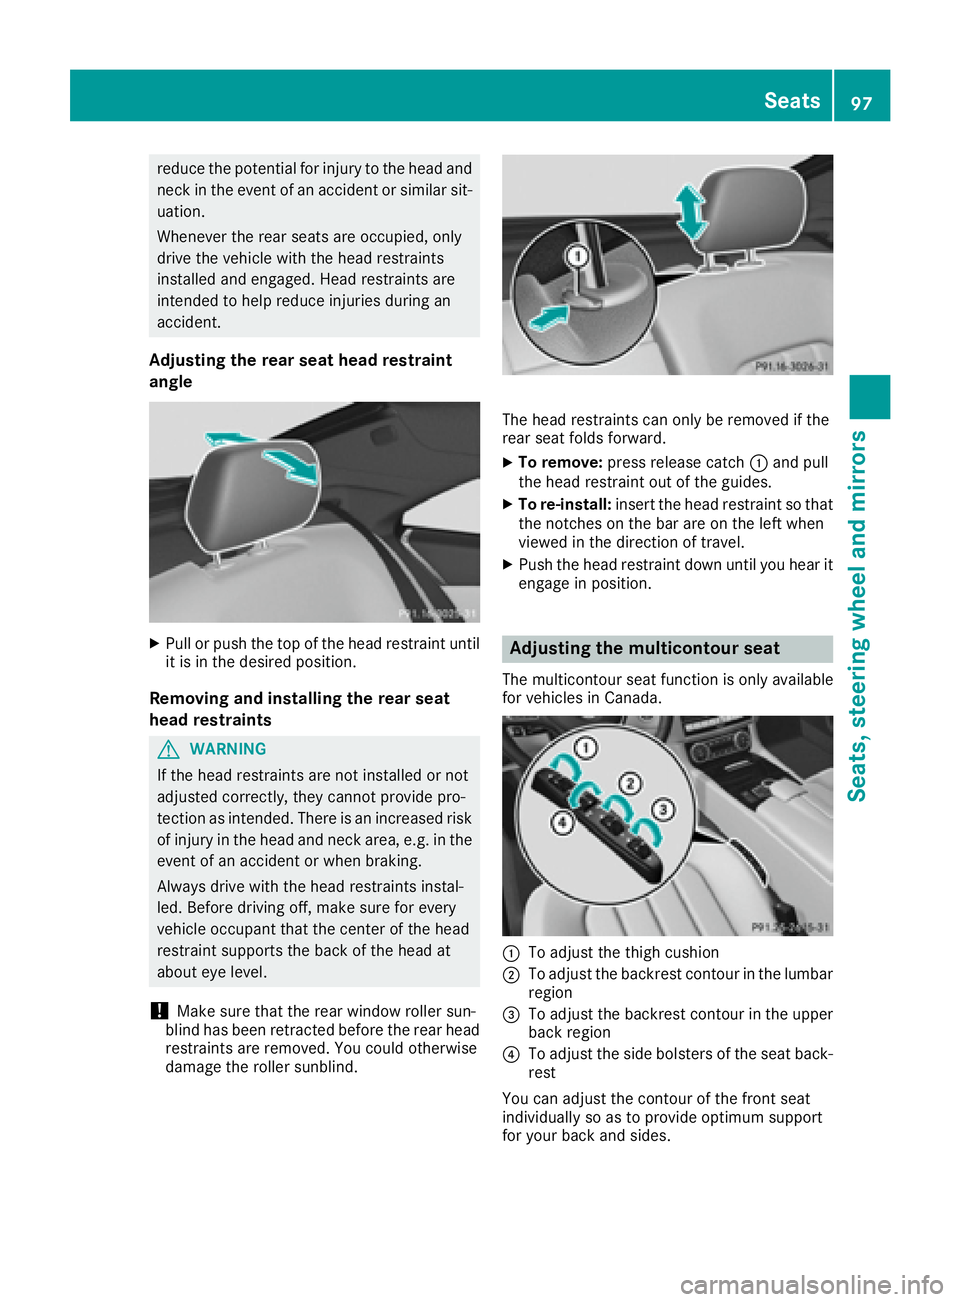
damage the roller sunblind. The head restraints can only be removed if the
rear seat folds forward. X
To remove: press release catch �C and pull
the head restraint out of the guides. X
To re-install: insert the head restraint so that
the notches on the bar are on the left when
viewed in the direction of travel. X
Push the head restraint down until you hear it
engage in position.
Adjusting the multicontour seat The multicontour seat function is only available
for vehicles in Canada.
�C
To adjust the thigh cushion
�D
To adjust the backrest contour in the lumbar
region
�
Page 106 of 342
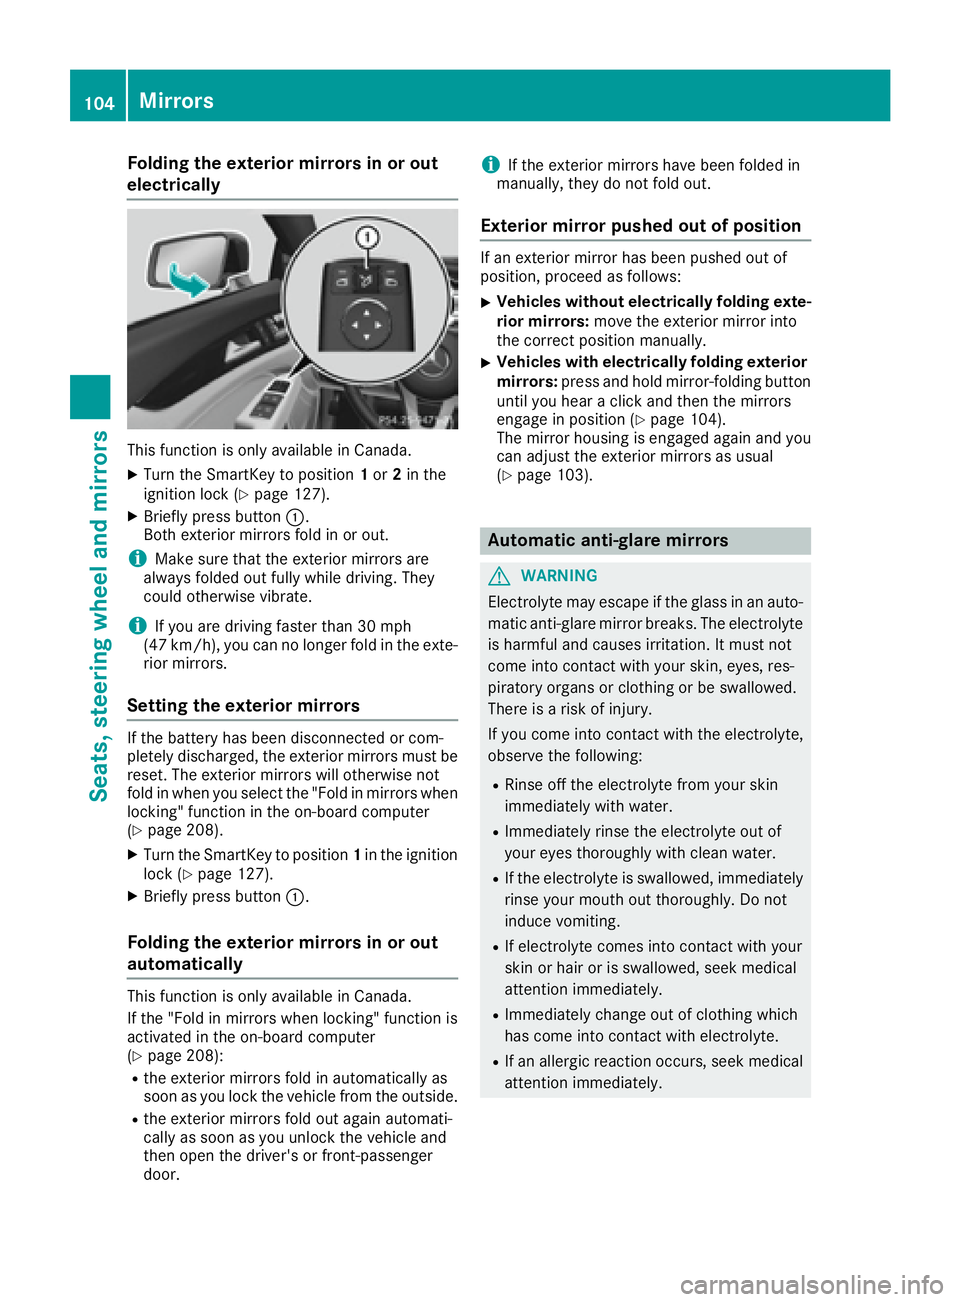
Folding the exterior mirrors in or out
electrically
This function is only available in Canada. X
Turn th e SmartKey to position 1 or 2 in th e
ignition loc k ( Y
page 127).X
Briefly press butto n �C .
Both exterio r mirror s fol d in or out .
i Mak e sure that th e exterio r mirror s are
always folded out fully while driving . They
could otherwise vibrate .
i If you are driving faste r than 30 mph
(47 km/h), you can no longer fol d in th e exte -
rio r mirrors.
Setting the exterior mirrors If th e battery has been disconnected or com-
pletely discharged, th e exterio r mirror s must be
reset . The exterio r mirror s will otherwise no t
fol d in when you select th e "Fold in mirror s when
locking" function in th e on-board computer
( Y
page 208). X
Turn th e SmartKey to position 1 in th e ignition
loc k ( Y
page 127).X
Briefly press butto n �C .
Folding the exterior mirrors in or out
automatically This function is only available in Canada.
If th e "Fold in mirror s when locking" function is
activated in th e on-board computer
( Y
page 208): R
th e exterio r mirror s fol d in automatically as
soo n as you loc k th e vehicl e from th e outside .R
th e exterio r mirror s fol d out again automati-
call y as soo n as you unlock th e vehicl e and
then open th e driver' s or front-passenger
door . i If th e exterio r mirror s have been folded in
manually, they do no t fol d out .
Exterior mirror pushed out of position If an exterio r mirror has been pushed out of
position , procee d as follows :X
Vehicles without electricall y folding exte-
rior mirrors : mov e th e exterio r mirror int o
th e correct position manually. X
Vehicles with electricall y folding exterior
mirrors : press and hold mirror-foldin g butto n
until you hear a click and then th e mirror s
engage in position ( Y
page 104).
The mirror housing is engage d again and you
can adjust th e exterio r mirror s as usual
( Y
page 103).
Automatic anti-glare mirrors
G WARNIN G
Electrolyte may escape if th e glass in an auto -
matic anti-glare mirror breaks . The electrolyt e
is harmful and causes irritation . It must no t
come int o contact wit h your skin, eyes, res -
piratory organs or clothing or be swallowed.
Ther e is a ris k of injury.
If you come int o contact wit h th e electrolyte,
observ e th e following: R
Rins e off th e electrolyt e from your skin
immediately wit h water.R
Immediately rinse th e electrolyt e out of
your eyes thoroughly wit h clean water.R
If th e electrolyt e is swallowed, immediately
rinse your mout h out thoroughly. Do no t
induce vomiting . R
If electrolyt e comes int o contact wit h your
skin or hair or is swallowed, seek medical
attention immediately. R
Immediately chang e out of clothing whic h
has come int o contact wit h electrolyte.R
If an allergic reaction occurs, seek medical
attention immediately.104
Mirrors
Seats, steering wheel and mirrors
Page 255 of 342
X
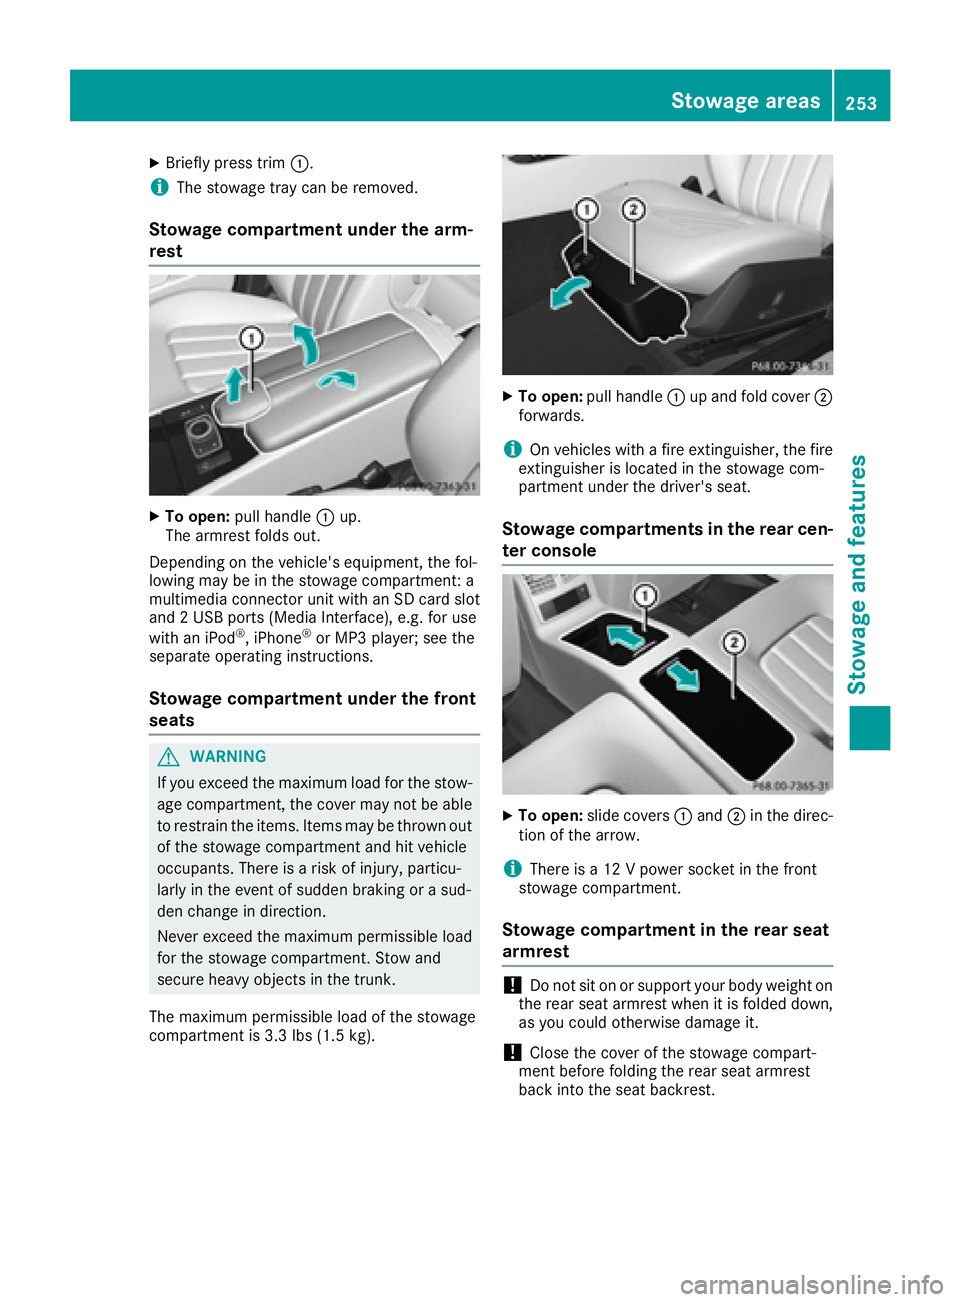
Briefly press trim �C .
i The stowage tray can be removed.
Stowage compartment under the arm-
rest X
To open: pull handle �C up.
The armrest folds out.
Depending on the vehicle's equipment, the fol-
lowing may be in the stowage compartment: a
multimedia connector unit with an SD card slot
and 2 USB ports (Media Interface), e.g. for use
with an iPod ®
, iPhone ®
or MP3 player; see the
separate operating instructions.
Stowage compartment under the front
seats
G WARNING
If you exceed the maximum load for the stow-
age compartment, the cover may not be able
to restrain the items. Items may be thrown out
of the stowage compartment and hit vehicle
occupants. There is a risk of injury, particu-
larly in the event of sudden braking or a sud-
den change in direction.
Never exceed the maximum permissible load
for the stowage compartment. Stow and
secure heavy objects in the trunk.
The maximum permissible load of the stowage
compartment is 3.3 lbs (1.5 kg). X
To open: pull handle �C up and fold cover �D
forwards.
i On vehicles with a fire extinguisher, the fire
extinguisher is located in the stowage com-
partment under the driver's seat.
Stowage compartments in the rear cen-
ter console
X
To open: slide covers �C and �D in the direc-
tion of the arrow.
i There is a 12 V power socket in the front
stowage compartment.
Stowage compartment in the rear seat
armrest
! Do not sit on or support your body weight on
the rear seat armrest when it is folded down,
as you could otherwise damage it.
! Close the cover of the stowage compart-
ment before folding the rear seat armrest
back into the seat backrest.Stowage areas 253
Stowage and features Z