2016 MERCEDES-BENZ CLS change wheel
[x] Cancel search: change wheelPage 286 of 342
tic trim. This maintains the high-quality look of
the surfaces. X
Wipe the plastic trim with a damp, lint-free
cloth, e.g. a microfiber cloth. X
Heavy soiling: use care and cleaning prod-
ucts recommended and approved by
Mercedes-Benz.
The surface may change color temporarily.
Wait until the surface is dry again.
Cleaning the steering wheel and gear or
selector lever X
Thoroughly wipe with a damp cloth or use
leather care agents that have been recom-
mended and approved by Mercedes-Benz.
Cleaning genuine wood and trim ele-
ments
! Do not use solvent-based cleaning agents
such as tar remover, wheel cleaners, polishes
or waxes. There is otherwise a risk of damag-
ing the surface.
! Do not use chrome polish on trim pieces.
The trim pieces have a chrome look but are
mostly made of anodized aluminum and can
lose their shine if chrome polish is used. Use
a damp, lint-free cloth instead when cleaning
the trim pieces.
If the chrome-plated trim pieces are very
dirty, you can use a chrome polish. If you are
unsure as to whether the trim pieces are
chrome-plated or not, consult an authorized
Mercedes-Benz Center. X
Wipe the wooden trim and trim pieces with a
damp, lint-free cloth, e.g. a microfiber cloth. X
Heavy soiling: use car care and cleaning
products recommended and approved by
Mercedes-Benz.
Cleaning the seat covers
General notes
! Do not use a microfiber cloth to clean covers
made out of real leather, artificial leather or
DINAMICA. If used often, these can damage
the cover.
i Note that regular care is essential to ensure
that the appearance and comfort of the cov-
ers is retained over time. Genuine leather seat covers Leather is a natural product.
It exhibits natural surface characteristics, for
example: R
differences in the texture R
marks caused by growth and injury R
slight nuances of color
These are characteristics of leather and not
material defects.
! To retain the natural appearance of the
leather, observe the following cleaning
instructions: R
Clean genuine leather covers carefully with
a damp cloth and then wipe the covers
down with a dry cloth. R
Make sure that the leather does not
become soaked. It may otherwise become
rough and cracked. R
Only use leather care agents that have
been tested and approved by Mercedes-
Benz. You can obtain these from a qualified
specialist workshop.
Seat covers of other materials
! Observe the following when cleaning: R
clean artificial leather covers with a cloth
moistened with a solution contai ning 1%
d etergent (e.g. dish washing liquid). R
clean cloth covers with a microfiber cloth
moistened with a solution containing 1%
detergent (e.g. dish washing liquid). Rub
carefully and always wipe entire seat sec-
tions to avoid leaving visible lines. Leave
the seat to dry afterwards. Cleaning results
depend on the type of dirt and how long it
has been there. R
clean DINAMICA covers with a damp cloth.
Make sure that you wipe entire seat sec-
tions to avoid leaving visible lines.
Cleaning the seat belts
G WARNING
Seat belts can become severely weakened if
bleached or dyed. This could cause the seat
belts to tear or fail, for instance, in the event of
an accident. This poses an increased risk of
injury or fatal injury.
Never bleach or dye the seat belts.284
Care
Maintenance and care
Page 289 of 342
i Example: equipment and country-specific
variations possible.
Vehicles with alloy wheels and hub caps On vehicles with alloy wheels and hub caps, a
socket is also provided.
Flat tire
Preparing the vehicle Your vehicle may be equipped with: R
MOExtended tires (tires with run-flat proper-
ties) ( Y
page 287)
Vehicle preparation is not necessary on vehi-
cles with MOExtended tires R
a TIREFIT kit ( Y
page 286)R
an emergency spare wheel ( Y
page 326)
Vehicles equipped with MOExtended tires are
not equipped with a TIREFIT kit at the factory. It
is therefore recommended that you additionally
equip your vehicle with a TIREFIT kit if you mount
tires that do not feature run-flat properties, e.g.
winter tires. A TIREFIT kit may be obtained from
a qualified specialist workshop.
Information on changing and mounting wheels
( Y
page 320). X
Stop the vehicle on solid, non-slippery and
level ground, as far away as possible from
traffic. X
Switch on the hazard warning lamps. X
Secure the vehicle against rolling away
( Y
page 146). X
If possible, bring the front wheels into the
straight-ahead position. X
Vehicles with AIRMATIC: make sure that "nor-
mal" level is selected ( Y
page 166).X
Switch off the engine. X
Remove the SmartKey from the ignition lock.
or, on vehicles with KEYLESS ‑ GO:X
Open the driver's door.
T he on-board electronics now have status 0 .
This is the same as the SmartKey having been
removed. X
Remove the Start/Stop button from the igni-
tion lock ( Y
page 127).X
Make sure that the passengers are not endan-
gered as they do so. Make sure that no one is
near the danger area while a wheel is being changed. Anyone who is not directly assisting
in the wheel change should, for example,
stand behind the barrier. X
Get out of the vehicle. Pay attention to traffic
conditions when doing so. X
Close the driver's door.
MOExtended tires (tires with run-flat
properties)
General notes With MOExtended tires (tires with run flat char-
acteristics), you can continue to drive your vehi-
cle even if there is a total loss of pressure in one
or more tires. The affected tire must not show
any clearly visible damage.
You can recognize MOExtended tires by the
MOExtended marking which appears on the
sidewall of the tire. You will find this marking
next to the tire size designation, the load-bear-
ing capacity and the speed index ( Y
page 315).
MOExtended tires may only be used in conjunc-
tion with an active tire pressure loss warning
system or with an active tire pressure monitor.
If a pressure loss warning message appears
in the multifunction display: R
observe the instructions in the display mes-
sages ( Y
page 230). R
check the tire for damage. R
if driving on, observe the following notes.
The driving distance possible in run-flat mode is
approximately 50 miles (80 km) when the vehi-
cle is partially laden. When the vehicle is fully
laden it is approximately 19 miles (30 km).
In addition to the vehicle load, the driving dis-
tance possible depends upon: R
vehicle speed R
road condition R
outside temperature
The driving distance p ossible in run-flat mode
may be reduced by extreme driving conditions
or maneuvers, or it can be increased through a
moderate style of driving.
The driving distance possible in run-flat mode is
counted from the moment the tire pressure loss
warning appears in the multifunction display.
You must not exceed a maximum speed of
50 mph (80 km/h). Flat tire 287
Breakdown assistance
Page 300 of 342
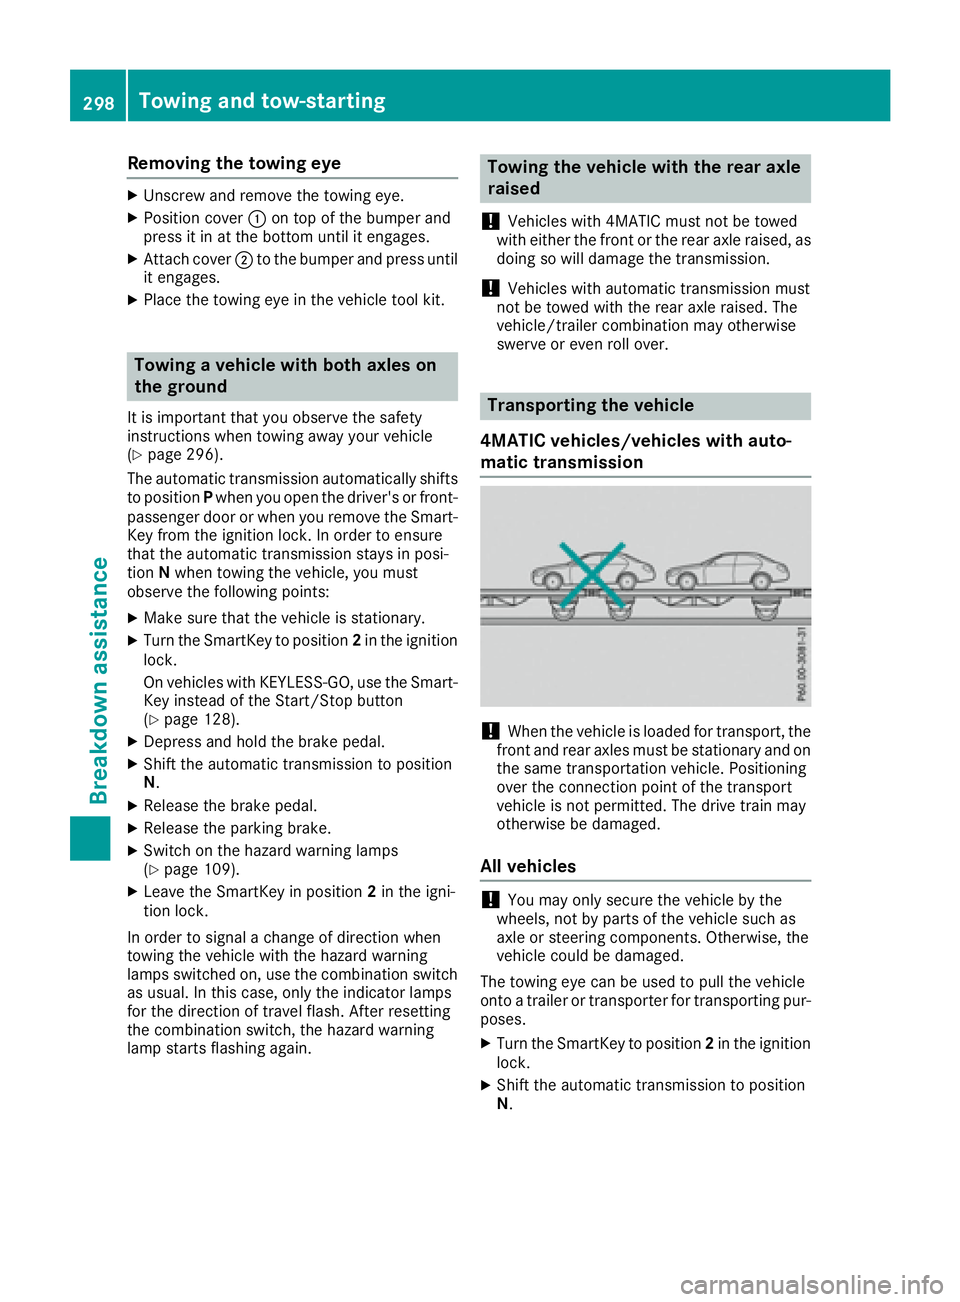
Removing the towing eye X
Unscrew and remove the towing eye. X
Position cover �C on top of the bumper and
press it in at the bottom until it engages. X
Attach cover �D to the bumper and press until
it engages. X
Place the towing eye in the vehicle tool kit.
Towing a vehicle with both axles on
the ground It is important that you observe the safety
instructions when towing away your vehicle
( Y
page 296).
The automatic transmission automatically shifts
to position P when you open the driver's or front-
passenger door or when you remove the Smart-
Key from the ignition lock. In order to ensure
that the automatic transmission stays in posi-
tion N when towing the vehicle, you must
observe the following points: X
Make sure that the vehicle is stationary. X
Turn the SmartKey to position 2 in the ignition
lock.
On vehicles with KEYLESS-GO, use the Smart-
Key instead of the Start/Stop button
( Y
page 128).X
Depress and hold the brake pedal. X
Shift the automatic transmission to position
N . X
Release the brake pedal. X
Release the parking brake. X
Switch on the hazard warning lamps
( Y
page 109).X
Leave the SmartKey in position 2 in the igni-
tion lock.
In order to signal a change of direction when
towing the vehicle with the hazard warning
lamps switched on, use the combination switch
as usual. In this case, only the indicator lamps
for the direction of travel flash. After resetting
the combination switch, the hazard warning
lamp starts flashing again. Towing the vehicle with the rear axle
raised
! Vehicles with 4MATIC must not be towed
with either the front or the rear axle raised, as
doing so will damage the transmission.
! Vehicles with automatic transmission must
not be towed with the rear axle raised. The
vehicle/trailer combination may otherwise
swerve or even roll over.
Transporting the vehicle
4MATIC vehicles/vehicles with auto-
matic transmission
! When the vehicle is loaded for transport, the
front and rear axles must be stationary and on
the same transportation vehicle. Positioning
over the connection point of the transport
vehicle is not permitted. The drive train may
otherwise be damaged.
All vehicles
! You may only secure the vehicle by the
wheels, not by parts of the vehicle such as
axle or steering components. Otherwise, the
vehicle could be damaged.
The towing eye can be used to pull the vehicle
onto a trailer or transporter for transporting pur-
poses. X
Turn the SmartKey to position 2 in the ignition
lock. X
Shift the automatic transmission to position
N .298
Towing and tow-starting
Breakdown assistance
Page 305 of 342
MOExtended tires (tires with run-flat
properties) With MOExtended tires (tires with run flat char-
acteristics), you can continue to drive your vehi-
cle even if there is a total loss of pressure in one
or more tires.
MOExtended tires may only be used in conjunc-
tion with an active tire pressure loss warning
system or with an active tire pressure monitor
and on wheels specifically tested by Mercedes-
Benz.
Notes on driving with MOExtended tires with a
flat tire ( Y
page 287).
Vehicles equipped with MOExtended tires are
not equipped with a TIREFIT kit at the factory. It
is therefore recommended that you additionally
equip your vehicle with a TIREFIT kit if you mount
tires that do not feature run-flat properties, e.g.
winter tires. A TIREFIT kit can be obtained from
a qualified specialist workshop.
Winter operation
General notes Have your vehicle winter-proofed at a qualified
specialist workshop at the onset of winter.
Observe the notes in the "Changing a wheel"
section ( Y
page 320).
Driving with summer tires At temperatures below 45 ‡ (+7 †), summer
tires lose elasticity and therefore traction and
braking power. Change the tires on your vehicle
to M+S tires. Using summer tires at very cold
temperatures could cause cracks to form,
thereby damaging the tires permanently.
Mercedes-Benz cannot accept responsibility for
this type of damage.
G WARNING
Damaged tires can cause tire inflation pres-
sure loss. As a result, you could lose control of
your vehicle. There is a risk of accident.
Check the tires regularly for signs of damage
and replace any damaged tires immediately. M+S tires
G WARNING
M+S tires with a tire tread depth of less than
�
Page 306 of 342
To avoid hazardous situations: R
never install snow chains to the front
wheels R
always install snow chains in pairs to the
rear wheels.
! On vehicles with AIRMATIC, you must drive
at raised vehicle level if snow chains have
been mounted. The vehicle may otherwise be
damaged.
! On some tire sizes there is not enough space
for snow chains. To avoid damage to the vehi-
cle or tires, observe the "Wheel and tire com-
binations" section under "Tires and wheels".
For safety reasons, Mercedes-Benz recom-
mends that you only use snow chains that have
been specially approved for your vehicle by
Mercedes-Benz, or are of a corresponding
standard of quality. For more information, con-
tact a qualified specialist workshop.
If you intend to mount snow chains, please bear
the following points in mind: R
Snow chains may not be mounted on all
wheel/tire combinations. Permissible wheel-
tire combinations ( Y
page 325).R
Only use snow chains when driving on roads
completely covered by snow. Remove the
snow chains as soon as possible when you
come to a road that is not snow-covered. R
Local regulations may restrict the use of snow
chains. Observe the appropriate regulations if
you wish to mount snow chains. R
Do not exceed the maximum permissible
speed of 31 mph (50 km/h).
i You may wish to deactivate ESP ®
when pull-
ing away with snow chains installed: R
All vehicles (except Mercedes ‑ AMG vehi-
cles) ( Y
page 70)R
Mercedes-AMG vehicles: ( Y
page 71)
You can thereby allow the wheels to spin in a
controlled manner, achieving an increased
driving force (cutting action).
Information about driving with an emergency
spare wheel ( Y
page 326). Tire pressure
Tire pressure specifications
Important safety notes
G WARNING
Underinflated or overinflated tires pose the
following risks: R
the tires may burst, especially as the load
and vehicle speed increase. R
the tires may wear excessively and/or
unevenly, which may greatly impair tire
traction. R
the driving characteristics, as well as steer-
ing and braking, may be greatly impaired.
There is a risk of an accident.
Follow recommended tire inflation pressures
and check the pressure of all the tires includ-
ing the spare wheel: R
monthly, at least R
if the load changes R
before beginning a long journey R
under different operating conditions, e.g.
off-road driving
If necessary, correct the tire pressure.
The data on the Tire and Loading Information
placard and tire pressure table shown here are
examples. Tire pressure specifications are vehi-
cle-specific and may deviate from the data
shown here. The tire pressure specifications
that are valid for your vehicle can be found on
the Tire and Loading Information placard and
tire pressure table on the vehicle.
General notes The recommended tire pressures for the tires
mounted at the factory can be found on the
labels described here.
Operation with an emergency spare wheel:
information on operation with an emergency
spare wheel can be found in the general notes in
the "Emergency spare wheel" section
( Y
page 326).
Further information on tire pressures can be
obtained at a qualified specialist workshop.304
Tire pressure
Wheels and tires
Page 308 of 342
Important notes on tire pressure
G WARNIN G
If th e tire pressur e drops repeatedly, th e
wheel, valv e or tire may be damaged. Tir e
pressur e that is to o low may result in a tire
blow-out . Ther e is a ris k of an accident.R
Chec k th e tire for foreign objects .R
Chec k whether th e whee l is losing air or th e
valv e is leaking .
If you are unable to rectify th e damage, con-
tac t a qualified specialist workshop.
G WARNIN G
If you fit unsuitable accessories onto tire
valves, th e tire valves may be overloaded and
malfunction , whic h can caus e tire pressur e
loss . Due to their design , retrofitte d tire pres-
sur e monitors keep th e tire valv e open . This
can also result in tire pressur e loss . Ther e is a
ris k of an accident.
Only screw th e standard valv e cap or other
valv e cap s approve d by Mercedes-Ben z for
your vehicl e onto th e tire valve.
Use a suitable pressur e gauge to chec k th e tire
pressure. The outer appearanc e of a tire does
no t permit any reliable conclusio n about th e tire
pressure. On vehicles equipped wit h th e elec -
tronic tire pressur e monitor, th e tire pressur e
can be checke d in th e on-board computer.
The tire temperature and pressur e increas e
when th e vehicl e is in motion . This is dependen t
on th e driving spee d and th e load.
Therefore, you should only correc t tire pres-
sures when th e tires are cold.
The tires are cold: R
if th e vehicl e has been parked wit h th e tires
out of direct sunligh t for at least three hour s
and R
if th e vehicl e has no t been driven further than
1 mile (1. 6 km)
The tire temperature changes depending on th e
outside temperature, th e vehicl e spee d and th e
tire l oad. If th e ti
re temperature changes by
18 ‡ (10 †), th e tire pressur e changes by
approximately 10 kP a (0. 1 bar/1.5 psi) . Tak e
this int o accoun t when checkin g th e pressur e of
warm tires . Only correc t th e tire pressur e if it is to o low for th e curren t operating conditions. If
you chec k th e tire pressur e when th e tires are
warm , th e resulting value will be higher than if
th e tires were cold. This is normal. Do no t
reduce th e tire pressur e to th e value specifie d
for cold tires . The tire pressur e would otherwise
be to o low.
Observ e th e recommended tire pressures for
cold tires : R
on th e Tir e and Loading Information placard
on th e B-pillar on th e driver' s sideR
in th e tire pressur e table on th e fuel filler flap
( Y
page 144)
Underinflated or overinflated tires
Underinflated tires
G WARNIN G
Tires wit h pressur e that is to o low can over-
heat and burs t as a consequence . In addition ,
they also suffer from excessiv e and/o r irreg-
ular wear , whic h can severely impair th e brak -
ing properties and th e driving characteristics .
Ther e is a ris k of an accident.
Avoid tire pressures that are to o low in all th e
tires , includin g th e spar e wheel.
Underinflated tires may: R
overheat, leadin g to tire defectsR
adversely affec t handlin gR
wear excessively and/o r unevenlyR
hav e an adverse effec t on fuel consumption
Overinflated tires
G WARNIN G
Tires wit h excessively high pressur e can burs t
because they are damaged mor e easil y by
road debris, pothole s etc. In addition , they
also suffer from irregular wear , whic h can
severely impair th e braking properties and th e
driving characteristics . Ther e is a ris k of an
accident.
Avoid tire pressures that are to o high in all th e
tires , includin g th e spar e wheel.306
Tire pressure
Wheels and tires
Page 309 of 342
Overinflated tires may: R
increase the braking distance R
adversely affect handling R
wear excessively and/or unevenly R
have an adverse effect on ride comfort R
be more susceptible to damage
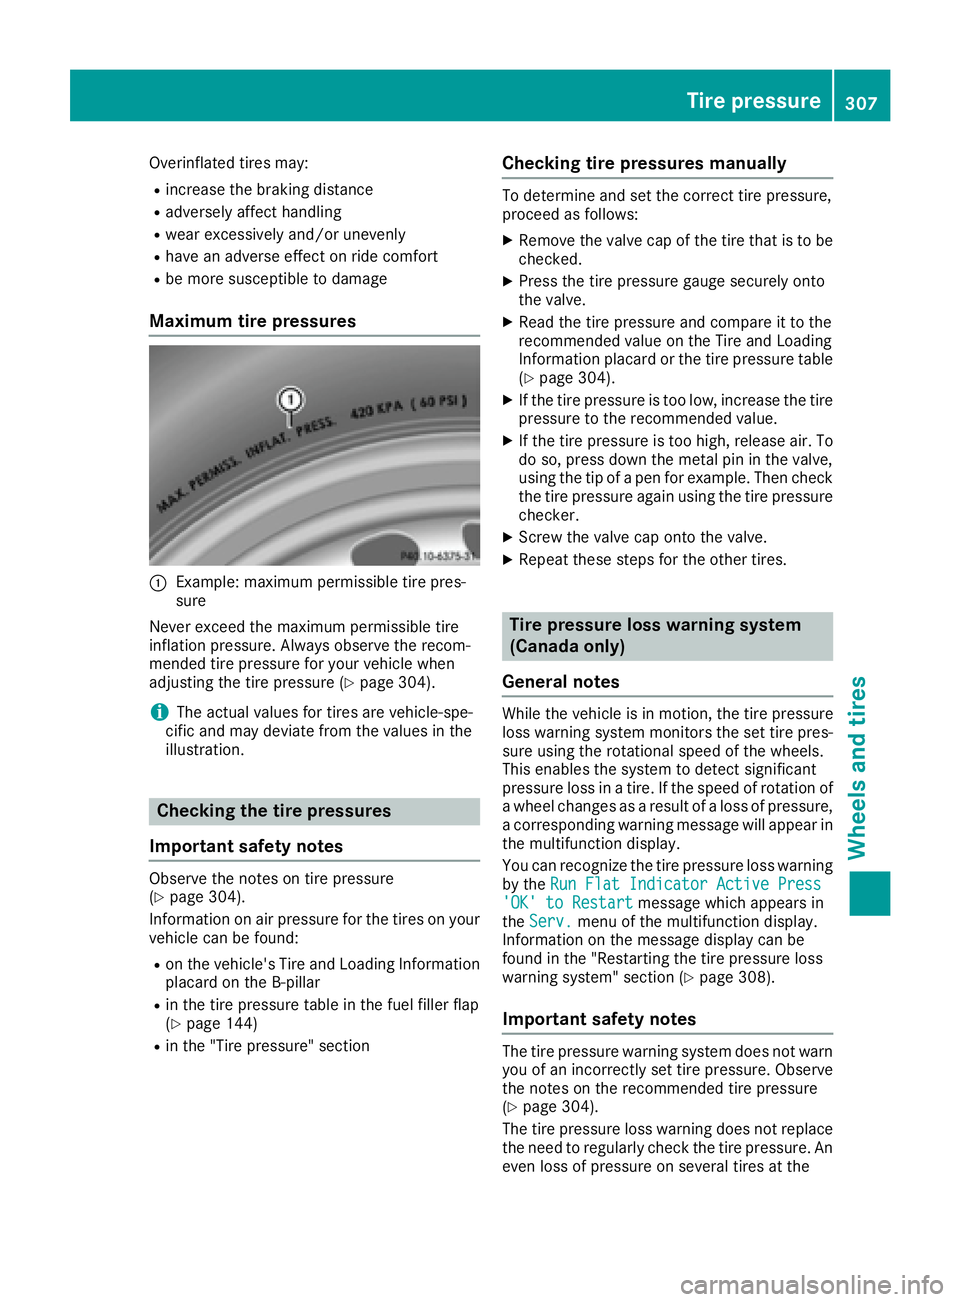
Maximum tire pressures
�C
Example: maximum permissible tire pres-
sure
Never exceed the maximum permissible tire
inflation pressure. Always observe the recom-
mended tire pressure for your vehicle when
adjusting the tire pressure ( Y
page 304).
i The actual values for tires are vehicle-spe-
cific and may deviate from the values in the
illustration.
Checking the tire pressures
Important safety notes Observe the notes on tire pressure
( Y
page 304).
Information on air pressure for the tires on your
vehicle can be found: R
on the vehicle's Tire and Loading Information
placard on the B-pillar R
in the tire pressure table in the fuel filler flap
( Y
page 144) R
in the "Tire pressure" section Checking tire pressures manually To determine and set the correct tire pressure,
proceed as follows: X
Remove the valve cap of the tire that is to be
checked. X
Press the tire pressure gauge securely onto
the valve. X
Read the tire pressure and compare it to the
recommended value on the Tire and Loading
Information placard or the tire pressure table
( Y
page 304). X
If the tire pressure is too low, increase the tire
pressure to the recommended value. X
If the tire pressure is too high, release air. To
do so, press down the metal pin in the valve,
using the tip of a pen for example. Then check
the tire pressure again using the tire pressure
checker. X
Screw the valve cap onto the valve. X
Repeat these steps for the other tires.
Tire pressure loss warning system
(Canada only)
General notes While the vehicle is in motion, the tire pressure
loss warning system monitors the set tire pres-
sure using the rotational speed of the wheels.
This enables the system to detect significant
pressure loss in a tire. If the speed of rotation of
a wheel changes as a result of a loss of pressure,
a corresponding warning message will appear in
the multifunction display.
You can recognize the tire pressure loss warning
by the Run Flat Indicator Active Press
'OK' to Restart message which appears in
the Serv. menu of the multifunction display.
Information on the message display can be
found in the "Restarting the tire pressure loss
warning system" section ( Y
page 308).
Important safety notes
The tire pressure warning system does not warn
you of an incorrectly set tire pressure. Observe
the notes on the recommended tire pressure
( Y
page 304).
The tire pressure loss warning does not replace
the need to regularly check the tire pressure. An
even loss of pressure on several tires at the Tire pressure 307
Wheels and tires Z
Page 310 of 342
same time cannot be detected by the tire pres-
sure loss warning system.
The tire pressure monitor is not able to warn you
of a sudden loss of pressure, e.g. if the tire is
penetrated by a foreign object. In the event of a
sudden loss of pressure, bring the vehicle to a
halt by braking carefully. Avoid abrupt steering
movements.
The function of the tire pressure loss warning
system is limited or delayed if: R
snow chains are mounted on your vehicle's
tires. R
road conditions are wintry. R
you are driving on sand or gravel. R
you adopt a very sporty driving style (corner-
ing at high speeds or driving with high rates of
acceleration). R
you are driving with a heavy load (in the vehi-
cle or on the roof).
Restarting the tire pressure loss warn-
ing system Restart the tire pressure loss warning system if
you have: R
changed the tire pressure R
changed the wheels or tires R
mounted new wheels or tires X
Before restarting, make sure that the tire
pressures are set properly on all four tires for
the respective operating conditions.
The recommended tire pressure can be found
on the Tire and Loading Information placard
on the B-pillar on the driver's side. Addition-
ally, a tire pressure table is attached to the
fuel filler flap. The tire pressure loss warning
system can only give reliable warnings if you
have set the correct tire pressure. If an incor-
rect tire pressure is set, these incorrect val-
ues will be monitored. X
Also observe the notes in the section on tire
pressures ( Y
page 304).X
Make sure that the SmartKey is in position 2
in the ignition lock ( Y
page 127).X
Press the �Y or �e button on the steering
wheel to select the Serv. menu. X
Press the �c or �d button on the steering
wheel to select the Tire Pressure menu.X
Press the �v button.
The Run Flat Indicator Active Press
'OK' to Restart message appears in the
multifunction display.
If you wish to confirm the restart: X
Press the �v button.
The Tire Pressure Now OK? message
appears in the multifunction display. X
Press the �c or �d button to select Yes .X
Press the �v button.
The Run Flat Indicator Restarted mes-
sage appears in the multifunction display.
After a teach-in period, the tire pressure loss
warning system will monitor the set tire pres-
sures of all four tires.
If you wish to cancel the restart: X
Press the �8 button.
or X
When the Tire Pressure Now OK? message
appears, press the �c or �d button to
select Cancel . X
Press the �v button.
The tire pressure values stored at the last
restart will continue to be monitored.
Tire pressure monitor
General notes If a tire pressure monitor is installed, the vehi-
cle's wheels have sensors that monitor the tire
pressures in all four tires. The tire pressure mon-
itor warns you if the pressure drops in one or
more of the tires. The tire pressure monitor only
functions if the corresponding sensors are
installed in all wheels.
Information on tire pressures is displayed in the
multifunction display. After a few minutes of
driving, the current tire pressure of each tire is
shown in the Service menu of the multifunction
display, see illustration (example).308
Tire pressure
Wheels and tires