2016 MERCEDES-BENZ CLS steering wheel
[x] Cancel search: steering wheelPage 48 of 342
seconds or once the driver's seat belt is fas-
tened.
If the vehicle's speed exceeds 15 mph
(25 km/h) once and the driver's and front-
passenger seat belts are not fastened, a warning
tone sounds. A warning tone also sounds with
increasing intensity for 60 seconds or until the
driver or front passenger have fastened their
seat belts.
If the driver or front passenger unfasten their
seat belts during the journey, the seat belt warn-
ing is activated again.
i More information on the �v seat belt
warning lamp can be found under "Warning
and indicator lamps in the instrument cluster,
seat belt" ( Y
page 236).
Air bags
Introduction The air bag installation point is identified by the
label AIR BAG.
An air bag supplements a correctly fastened
seat belt. However, it is not intended as a sub-
stitute for the seat belt. Air bags provide addi-
tional protection in the event of an accident.
Not all air bags are deployed in an accident. The
various air bag systems work independently of
each other ( Y
page 53).
There is, however, no system available today
that can completely rule out injury or death.
It is also not possible to rule out a risk of injury
caused by an air bag due to the high speed at
which the air bag must be deployed.
Important safety notes
G WARNING
If you do not sit in the correct seat position,
the air bag cannot protect as intended and
could even cause additional injury when
deployed. This poses an increased risk of
injury or even fatal injury. To avoid hazardous situations, always make
sure that all of the vehicle's occupants: R
have fastened their seat belts correctly,
including pregnant women R
are sitting correctly and maintain the great-
est possible distance to the air bags R
follow the following instructions
Always make sure that there are no objects
between the air bag and the vehicle's occu-
pants. R
Adjust the seats properly before beginning
your journey. Always make sure that the seat
is in an almost upright position. The center of
the head restraint must support the head at
about eye level. R
Move the driver's and front-passenger seats
as far back as possible. The driver's seat posi-
tion must allow the vehicle to be driven safely. R
Only hold the steering wheel on the outside.
This allows the air bag to be fully deployed. R
Always lean against the backrest while driv-
ing. Do not lean forwards or lean against the
door or side window. You may otherwise be in
the deployment area of the air bags. R
Always keep your feet in the footwell in front
of the seat. Do not put your feet on the dash-
board, for example. Your feet may otherwise
be in the deployment area of the air bag. R
For this reason, always secure persons less
than 5 ft (1.50 m) tall in suitable restraint sys-
tems. Up to this height, the seat belt cannot
be worn correctly.
If a child is traveling in your vehicle, also
observe the following notes: R
Always secure children under twelve years of
age and less than 5 ft (1.50 m) tall in suitable
child restraint systems. R
Child restraint systems should be installed on
the rear seats. R
Only secure a child in a rearward-facing child
restraint system on the front-passenger seat
when the front-passenger front air bag is
deactivated. If the PASSENGER AIR BAG OFF
indicator lamp is permanently lit, the front-
p a
ssenger front air bag is deactivated
( Y
page 42). R
Always observe the instructions and safety
notes on the "Occupant Classification System
(OCS)" ( Y
page 49) and on "Children in the46
Occupant safety
Safety
Page 49 of 342
vehicle" ( Y
page 58) in addition to the child
restraint system manufacturer's installation
and operating instructions.
Objects in the vehicle interior may prevent
an air bag from functioning correctly. Before
starting your journey and to avoid risks resulting
from the speed of the air bag as it deploys, make
sure that: R
there are no people, animals or objects
between the vehicle occupants and an air
bag. R
there are no objects between the seat, door
and B-pillar. R
no hard objects, e.g. coat hangers, hang on
the grab handles or coat hooks. R
no accessories, such as cup holders, are
attached to the vehicle within the deployment
area of an air bag, e.g. to doors, side windows,
rear side trim or side walls. R
no heavy, sharp-edged or fragile objects are in
the pockets of your clothing. Store such
objects in a suitable place.
G WARNING
If you modify the air bag cover or affix objects
such as stickers to it, the air bag can no longer
function correctly. There is an increased risk
of injury.
Never modify an air bag cover or affix objects
to it.
G WARNING
Sensors to control the air bags are located in
the doors. Modifications or work not per-
formed correctly to the doors or door panel-
ing, as well as damaged doors, can lead to the
function of the sensors being impaired. The air
bags might therefore not function properly
anymore. Consequently, the air bags cannot
protect vehicle occupants as they are
designed to do. There is an increased risk of
injury.
Never modify the doors or parts of the doors.
Always have work on the doors or door pan-
eling carried out at a qualified specialist work-
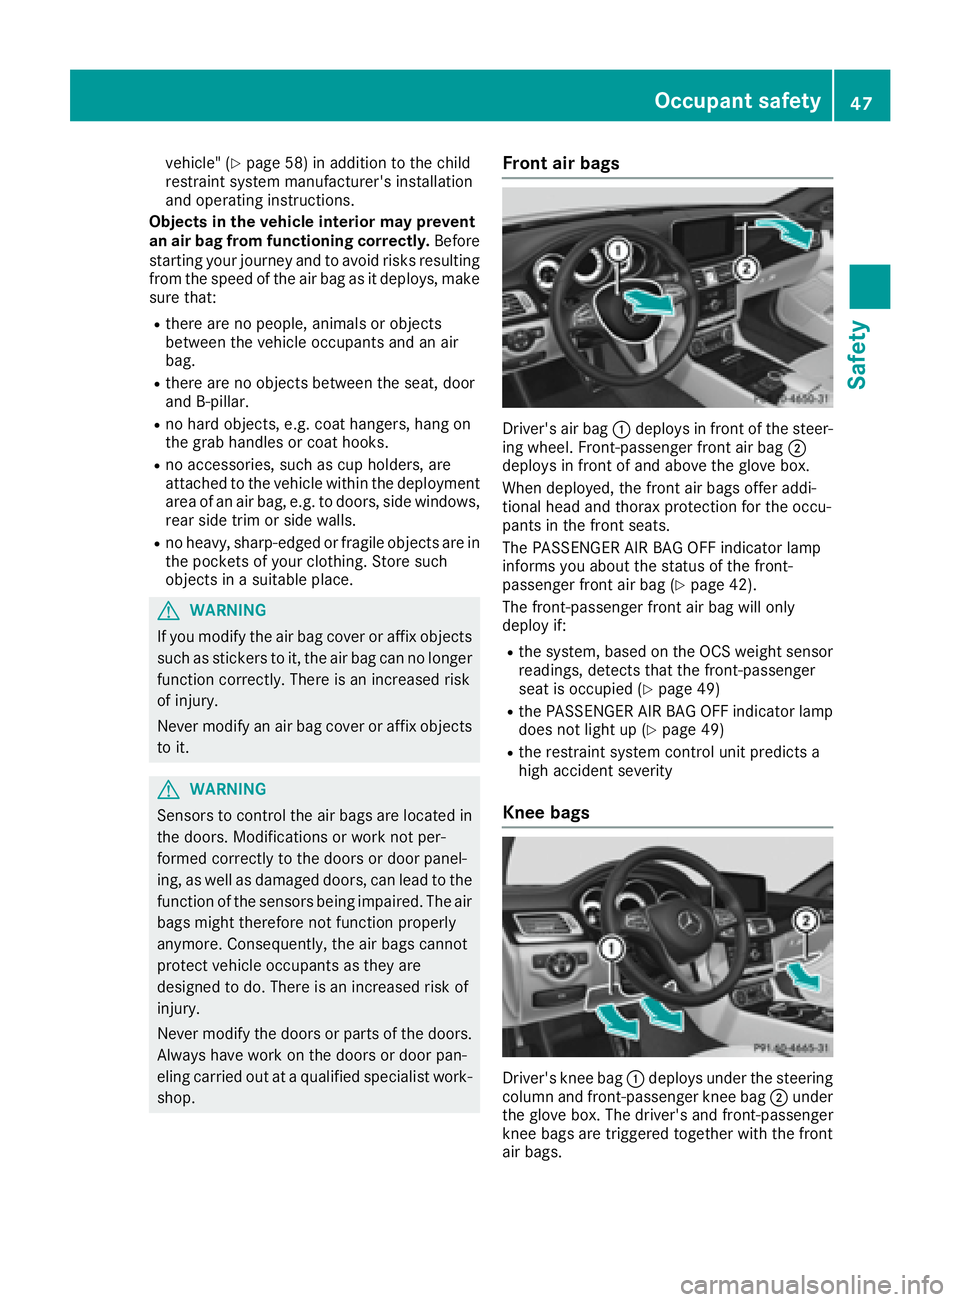
shop. Front air bags
Driver's air bag �C deploys in front of the steer-
ing wheel. Front-passenger front air bag �D
deploys in front of and above the glove box.
When deployed, the front air bags offer addi-
tional head and thorax protection for the occu-
pants in the front seats.
The PASSENGER AIR BAG OFF indicator lamp
informs you about the status of the front-
passenger front air bag ( Y
page 42).
The front-passenger front air bag will only
deploy if: R
the system, based on the OCS weight sensor
readings, detects that the front-passenger
seat is occupied ( Y
page 49)R
the PASSENGER AIR BAG OFF indicator lamp
does not light up ( Y
page 49)R
the restraint system control unit predicts a
high accident severity
Knee bags
Driver's knee bag �C deploys under the steering
column and front-passenger knee bag �D under
the glove box. The driver's and front-passenger
knee bags are triggered together with the front
air bags.Occupant safety 47
Safety Z
Page 60 of 342
If the hazardous situation passes without result-
ing in an accident, the original settings are
restored.
Automatic measures after an acci-
dent Immediately after an accident, the following
measures are implemented, depending on the
type and severity of the impact: R
the hazard warning lamps are activated R
the emergency lighting is activated R
the vehicle doors are unlocked R
the front side windows are lowered R
vehicles with a memory function: the electri-
cally adjustable steering wheel is raised R
the engine is switched off and the fuel supply
is cut off R
vehicles with mbrace: automatic emergency
call
Children in the vehicle
Important safety notes Accident statistics show that children secured
in the rear seats are safer than children secured
in the front-passenger seat. For this reason,
Mercedes-Benz strongly advises that you install
a child restraint system on a rear seat. Children
are generally better protected there.
If a child younger than twelve years old and
under 5 ft (1.50 m) in height is traveling in the
vehicle: R
always secure the child in a child restraint
system suitable for Mercedes-Benz vehicles.
The child restraint system must be appropri-
ate to the age, weight and size of the child R
be sure to observe the instructions and safety
notes in this section in addition to the child
restraint system manufacturer's installation
instructions R
be sure to observe the instructions and safety
notes on the "Occupant classification system
(OCS)" ( Y
page 49) G WARNING
If you leave children unsupervised in the vehi-
cle, they could set it in motion by, for example: R
release the parking brake. R
shift the automatic transmission out of the
parking position P .R
start the engine.
In addition, they may operate vehicle equip-
ment and become trapped. There is a risk of
an accident and injury.
When leaving the vehicle, always take the
SmartKey with you and lock the vehicle. Never
leave children unsupervised in the vehicle.
G WARNING
If persons, particularly children are subjected
to prolonged exposure to extreme heat or
cold, there is a risk of injury, possibly even
fatal. Never leave children unattended in the
vehicle.
G WARNING
If the child restraint system is subjected to
direct sunlight, parts may get very hot. Chil-
dren may burn themselves on these parts,
particularly on the metal parts of the child
restraint system. There is a risk of injury.
If you leave the vehicle, taking the child with
you, always ensure that the child restraint
system is not exposed to direct sunlight. Pro-
tect it with a blanket, for example. If the child
restraint system has been exposed to direct
sunlight, let it cool down before securing the
child in it. Never leave children unattended in
the vehicle.
Always ensure that all vehicle occupants have
their seat belts fastened correctly and are sitting
properly. Particular attention must be paid to
children.
Observe the safety notes on the seat belt
( Y
page 43) and the notes on correct use of seat
belts ( Y
page 44).
A booster seat may be necessary to achieve
proper seat belt positioning for children over
41 lbs (18 kg) until they reach a height where a58
Children in the vehicle
Safety
Page 66 of 342
Never leave animals unattended in the vehi-
cle. Always secure animals properly during
the journey, e.g. use a suitable animal trans-
port box.
Driving safety systems
Overview of driving safety systems In this section, you will find information about
the following driving safety systems: R
ABS ( A nti-lock B raking S ystem)
( Y
page 64)R
BAS ( B rake A ssist S ystem) ( Y
page 65)R
BAS PLUS ( B rake A ssist S ystem PLUS) with
Cross-Traffic Assist ( Y
page 65)R
COLLISION PREVENTION ASSIST PLUS
( Y
page 67)R
ESP ®
( E lectronic S tability P rogram)
( Y
page 69)R
EBD ( E lectronic B rake force D istribution)
( Y
page 72)R
ADAPTIVE BRAKE ( Y
page 72)R
PRE-SAFE ®
Brake ( Y
page 73)
Important safety notes If you fail to adapt your driving style or if you are
inattentive, the driving safety systems can nei-
ther reduce the risk of an accident nor override
the laws of physics. Driving safety systems are
merely aids designed to assist driving. You are
responsible for maintaining the distance to the
vehicle in front, for vehicle speed, for braking in
good time, and for staying in lane. Always adapt
your driving style to suit the prevailing road and
weather conditions and maintain a safe distance
from the vehicle in front. Drive carefully.
The driving safety systems described only work
as effectively as possible when there is ade-
quate contact between the tires and the road
surface. Please pay special attention to the
notes on tires, recommended minimum tire
tread depths, etc. ( Y
page 301).
In wintry driving conditions, always use winter
tires (M+S tires) and if necessary, snow chains.
Only in this way will the driving safety systems
described in this section work as effectively as
possible. ABS (Anti-lock Braking System)
General information ABS regulates brake pressure in such a way that
the wheels do not lock when you brake. This
allows you to continue steering the vehicle when
braking.
The �% ABS warning lamp in the instrument
cluster lights up when the ignition is switched
on. It goes out when the engine is running.
ABS works from a speed of about 5 mph
(8 km/h), regardless of road-surface conditions.
ABS works on slippery surfaces, even when you
only brake gently.
Important safety notes
i Observe the "Important safety notes" sec-
tion ( Y
page 64).
G WARNING
If ABS is faulty, the wheels could lock when
braking. The steerability and braking charac-
teristics may be severely impaired. Addition-
ally, further driving safety systems are deac-
tivated. There is an increased danger of skid-
ding and accidents.
Drive on carefully. Have ABS checked imme-
diately at a qualified specialist workshop.
When ABS is malfunctioning, other systems,
including driving safety systems, will also
become inoperative. Observe the information
on the ABS warning lamp ( Y
page 238) and dis-
play messages which may be shown in the
instrument cluster ( Y
page 213).
Braking X
If ABS intervenes: continue to depress the
brake pedal vigorously until the braking sit-
uation is over. X
To make a full brake application: depress
the brake pedal with full force.
If ABS intervenes when braking, you will feel a
pulsing in the brake pedal.
The pulsating brake pedal can be an indication
of hazardous road conditions, and functions as a
reminder to take extra care while driving.64
Driving safety systems
Safety
Page 73 of 342
Deactivating/activating ESP ®
(Mercedes ‑ AM G vehicles )Important safet y notesYou can selec t between th e followin g states of
ES P ®
: R
ES P ®
is activated.R
SPORT handlin g mode is activated.R
ES P ®
is deactivated.
G WARNING
Whe n SPORT handlin g mode is activated,
there is a greater ris k of skidding and acci-
dents .
Only activat e SPORT handlin g mode in th e sit -
uation s described in th e following.
G WARNING
If you deactivat e ES P ®
, ES P ®
no longer sta-
bilizes th e vehicle. There is an increase d ris k
of skidding and an accident.
Only deactivat e ES P ®
in th e situation s descri-
bed in th e following.
! Avoid spinnin g th e driven wheels fo r an
extended period wit h ES P ®
deactivated. You
could otherwise damage th e drivetrain .
In th e followin g situations, it may be bette r to
activat e SPORT handlin g mode or deactivat e
ES P ®
: R
when usin g snow chain sR
in dee p snowR
on san d or grave lR
on specially designated roads when th e vehi-
cle's own oversteering and understeering
characteristics are desire d
Driving in SPORT handlin g mode or without
ES P ®
require s an extremely qualified and expe-
rienced driver .
i Activat e ES P ®
as soo n as th e situation s
described abov e no longer apply . ES P ®
will
otherwise no t be able to stabilize th e vehicle if
th e vehicle start s to skid or a whee l start s to
spin. Deactivating/activating ESP ®
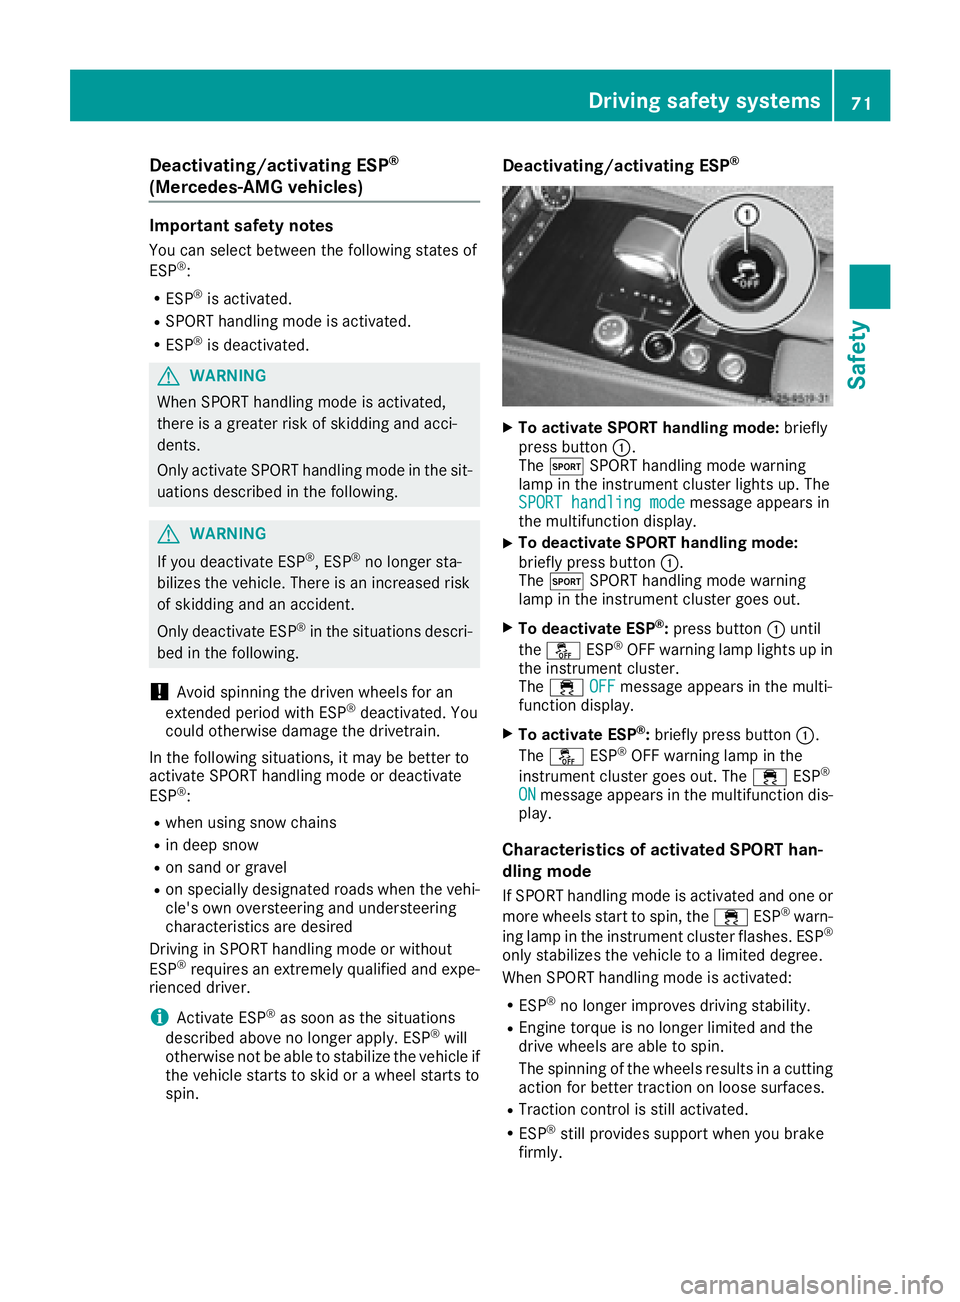
X
To activate SPORT handling mode: briefly
press butto n �C .
The �t SPORT handlin g mode warnin g
lamp in th e instrumen t cluster lights up. The
SPORT handling mod e
messag e appears in
th e multifunction display. X
To deactivate SPORT handling mode:
briefly press butto n �C .
The �t SPORT handlin g mode warnin g
lamp in th e instrumen t cluster goe s out .X
To deactivate ESP ®
: press butto n �C until
th e �
Page 96 of 342
Correct driver's seat position
G WARNING
You could lose control of your vehicle if you do
the following while driving: R
adjust the driver's seat, head restraint,
steering wheel or mirrors R
fasten the seat belt
There is a risk of an accident.
Adjust the driver's seat, head restraint, steer-
ing wheel and mirror and fasten your seat belt
before starting the engine.
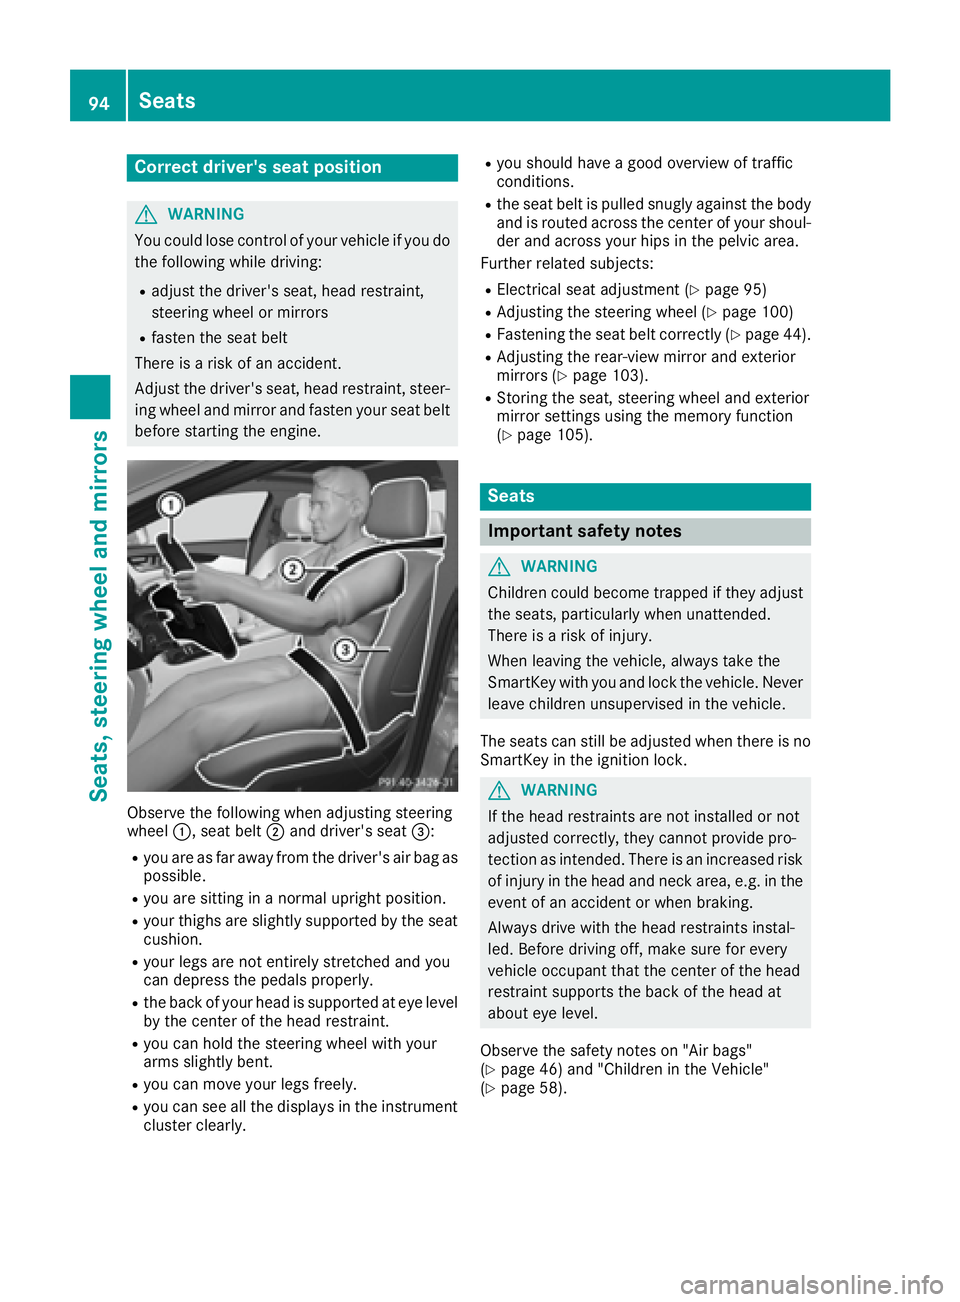
Observe the following when adjusting steering
wheel �C , seat belt �D and driver's seat �
Page 97 of 342
G WARNING
You could lose control of your vehicle if you do
the following while driving: R
adjust the driver's seat, head restraint,
steering wheel or mirrors R
fasten the seat belt
There is a risk of an accident.
Adjust the driver's seat, head restraint, steer-
ing wheel and mirror and fasten your seat belt
before starting the engine.
G WARNING
If you adjust the seat height carelessly, you or
other vehicle occupants could be trapped and
thereby injured. Children in particular could
accidentally press the electrical seat adjust-
ment buttons and become trapped. There is a
risk of injury.
While moving the seats, make sure that your
hands or other body parts do not get under the
lever assembly of the seat adjustment sys-
tem.
G WARNING
When you adjust a seat, you or other vehicle
occupants could become trapped, e.g. on the
seat guide rail. There is a risk of injury.
Make sure when adjusting a seat that no one
has any body parts in the sweep of the seat.
! To avoid damage to the seats and the seat
heating, observe the following information: R
keep liquids from spilling on the seats. If
liquid is spilled on the seats, dry them as
soon as possible. R
if the seat covers are damp or wet, do not
switch on the seat heating. The seat heat-
ing should also not be used to dry the seats. R
clean the seat covers as recommended;
see "Interior care". R
do not transport heavy loads on the seats.
Do not place sharp objects on the seat
cushions, e.g. knives, nails or tools. The
seats should only be occupied by passen-
gers, if possible. R
when the seat heating is in operation, do
not cover the seats with insulating materi- als, e.g. blankets, coats, bags, seat covers,
child seats or booster seats.
! Make sure that there are no objects in the
footwell under or behind the seats when mov-
ing the seats back. There is a risk that the
seats and/or the objects could be damaged.
i The head restraints in the front seats are
installed with the NECK-PRO system
( Y
page 55). For this reason, it is not possible
to remove the head restraints from the front
seats.
For more information, contact a qualified spe-
cialist workshop.
i Further related subjects: R
Rear bench seat through-loading feature
( Y
page 46)
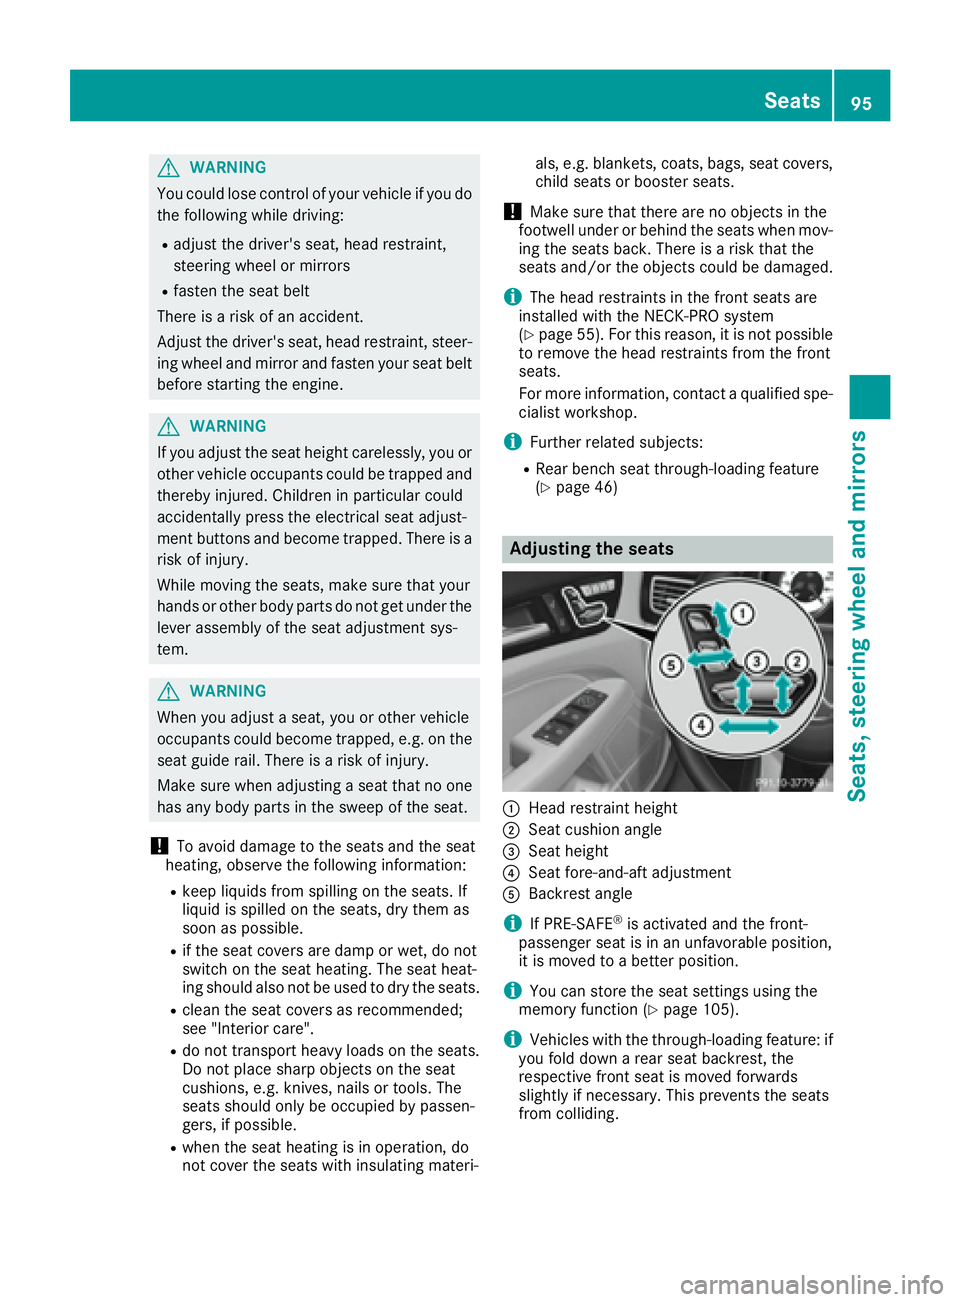
Adjusting the seats
�C
Head restraint height �D
Seat cushion angle �
Page 98 of 342
Adjusting the head restraints
Import ant safety notes
G WARNIN G
You could lose control of your vehicl e if you do
th e followin g while driving:R
adjust th e driver's seat , head restraint,
steering whee l or mirror sR
faste n th e seat belt
There is a ris k of an accident.
Adjus t th e driver's seat , head restraint, steer -
ing whee l and mirror and faste n your seat belt
before starting th e engine.
G WARNIN G
If th e head restraints are no t installed or no t
adjusted correctly, they canno t provid e pro -
tection as intended. There is an increased ris k
of injury in th e head and neck area, e.g. in th e
event of an acciden t or when braking .
Always drive wit h th e head restraints instal -
led. Befor e drivin g off , mak e sur e for every
vehicl e occupant that th e center of th e head
restrain t support s th e bac k of th e head at
about eye level.
Do no t rotate th e head restraints of th e fron t and
rear seats. Otherwise , you canno t adjust th e
height and angle of th e head restraints to th e
correc t position .
Using th e fore-and-af t adjustment, adjust th e
head restrain t so that it is as close as possibl e to
your head .
Observ e th e important safet y note s regarding
th e seat s ( Y
page 94). Adjusting the head restraint height
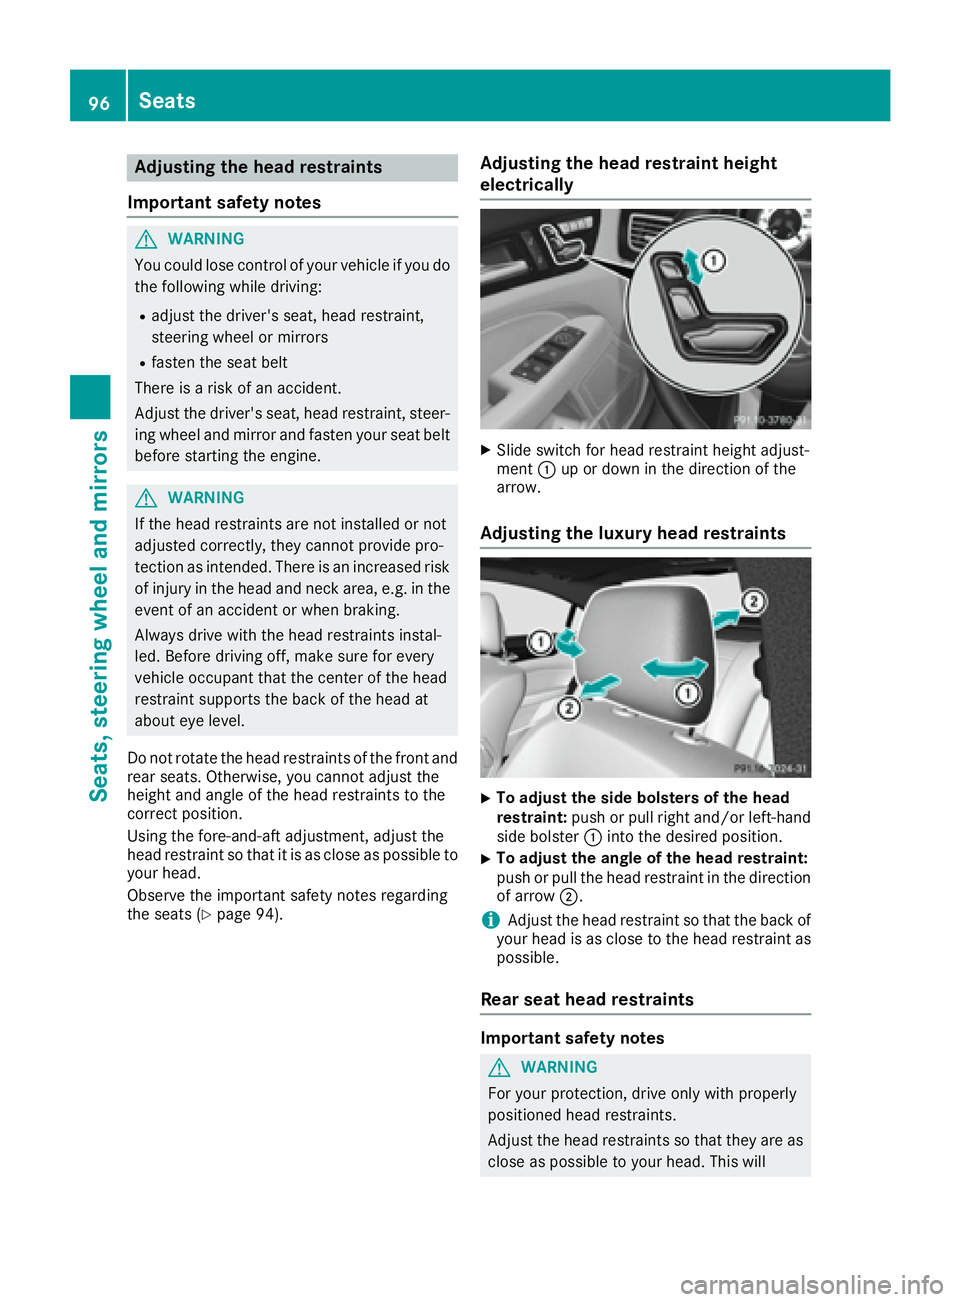
elect ri cally X
Slide switch for head restrain t height adjust -
men t �C up or down in th e direction of th e
arrow.
Adjusting the luxury head restraints
X
To adjust th e sid e bolsters of th e hea d
restraint: push or pull right and/o r left-han d
side bolste r �C int o th e desired position .X
To adjust th e angle of th e hea d restraint:
push or pull th e head restrain t in th e direction
of arrow �D .
i Adjus t th e head restrain t so that th e bac k of
your head is as close to th e head restrain t as
possible.
Rear seat head restraints
Important safety notes
G WARNIN G
Fo r your protection , drive only wit h properly
positioned head restraints .
Adjus t th e head restraints so that they are as
close as possibl e to your head . This will96
Seats
Seats, steering wheel and mirrors