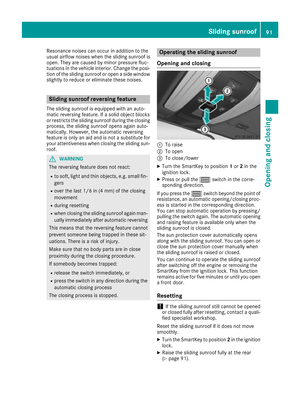
Page 281 of 342

Care
General notes
HEnvironmental note
Dispose of empty packaging and cleaning
cloths in an environmentally responsible man- ner.
!For cleaning your vehicle, do not use any of
the following:
Rdry, rough or hard cloths
Rabrasive cleaning agents
Rsolvents
Rcleaning agents containing solvents
Do not scrub.
Do not touch the surfaces or protective films
with hard objects, e.g. a ring or ice scraper.
You could otherwise scratch or damage the
surfaces and protective film.
!Do not park the vehicle for an extended
period straight after cleaning it, particularly
after having cleaned the wheels with wheel
cleaner. Wheel cleaners could cause
increased corrosion of the brake discs and
brake pads/linings. For this reason, you
should drive for a few minutes after cleaning.
Braking heats the brake discs and the brake
pads/linings, thus drying them. The vehicle
can then be parked.
Regular care of your vehicle is a condition for
retaining the quality in the long term.
Use care products and cleaning agents recom-
mended and approved by Mercedes-Benz.
Washing the vehicle and cleaning the
paintwork
Automatic car wash
GWARNING
Braking efficiency is reduced after washing
the vehicle. There is a risk of an accident.
After the vehicle has been washed, brake
carefully while paying attention to the traffic
conditions until full braking power is restored.
!If DISTRONIC PLUS or the HOLD function is
activated, the vehicle brakes automatically in
certain situations.
To prevent damage to the vehicle, deactivate DISTRONIC PLUS and the HOLD function in
the following or other similar situations:
Rwhen towing the vehicle
Rin the car wash
!Never clean your vehicle in a Touchless
Automatic Car Wash as these use special
cleaning agents. These cleaning agents can
damage the paintwork or plastic parts.
!Make sure that:
Rthe side windows and the sliding sunroof
are fully closed.
Rthe ventilation/heating is switched off (the
OFF button has been pressed).
Rthe windshield wiper switch is in position 0.
Otherwise, the vehicle might be damaged.
!In car washes with a towing mechanism,
make sure that the automatic transmission is
in transmission position N, otherwise the
vehicle could be damaged.
RVehicles with a SmartKey:
Do not remove the SmartKey from the igni-
tion lock. Do not open the driver's door or
front-passenger door when the en
gine is
switched off. Otherwise, the automatic
transmission selects park position Pauto-
matically and locks the wheels. You can
prevent this by shifting the automatic trans-
mission to Nbeforehand.
RVehicles with KEYLESS-GO:
Do not open the driver's door or front-
passenger door when the engine is
switched off. Otherwise, the automatic
transmission selects park position Pauto-
matically and locks the wheels.
Observe the following to make sure that the
automatic transmission stays in position N:
XMake sure the vehicle is stationary and the
ignition is switched off.
XTurn the SmartKey to position 2in the ignition
lock (Ypage 127).
Use the SmartKey instead of the Start/Stop
button on vehicles with KEYLESS-GO.
XDepress and hold the brake pedal.
XShift the automatic transmission to position
N .
Care279
Maintenance and care
Z
Page 282 of 342

XReleaseth ebrak epedal .
XReleas eth eparking brake.
XSwitc hoff th eignition and leav eth eSmartKey
in th eignition lock.
You can wash th evehicl ein an automatic car
wash from th ever ystart .
If th evehicl eis ver ydirty, pre-was hit before
cleaning it in an automatic car wash.
Afte rusin gan automatic car wash, wipe off wax
from th ewindshield and th ewiper blades. This
will preven tsmears and reduce wipin gnoises
caused by residue on th ewindshield.
Washing by hand
In som ecountries, washing by han dis only
allowe dat specially equipped washing bays.
Observ eth elegal requirements in eac hcountry.
XDo no tuse hot water and do no twash th e
vehicl ein direct sunlight.
XUse asof tspong eto clean.
XUse amild cleaning agent, suc has acar
shampoo approve dby Mercedes-Benz.
XThoroughly hos edown th evehicl ewit h a gen -
tl e je tof water.
XDo no tpoin tth ewater je tdirectly towards th e
air inlet .
XUse plenty of water and rinse out th espong e
frequently.
XRins eth evehicl ewit hclean water and dry
thoroughly wit h achamois.
XDo no tlet th ecleaning agen tdry on th epaint-
work.
Carefully remove all deposit sof road salt as
soo nas possibl ewhen driving in winter.
Power washers
GWARNIN G
The water je tfrom acircular je tnozzle (dir t
blasters )can caus einvisible exterio rdamag e
to th etires or chassi scomponents. Compo-
nent sdamaged in this way may fail unexpect-
edly. There is aris kof an accident.
Do no tuse power washers wit hcircular je t
nozzles to clean th evehicle. Hav edamaged
tires or chassi scomponent sreplace dimme-
diately.
!Always maintai n adistanc eof at least
11.8 in (30 cm) between th evehicl eand th e
powe rwashe rnozzle. Information about th e
correc tdistanc eis available from th eequip -
men tmanufacturer.
Mov eth epowe rwashe rnozzle around when
cleaning your vehicle.
Do no taim directly at any of th efollowing:
Rtires
Rdoor gaps ,roo fgaps ,joints, etc.
Relectrical component s
Rbattery
Rconnectors
Rlights
Rseals
Rtrim
Rventilation slots
Damaged seals or electrical component scan
lead to leak sor failures .
Cleaning the paintwork
!Do notaffix:
Rstickers
Rfilm s
Rmagnetic plates or similar items
to painte dsurfaces. You could otherwise
damag eth epaintwork .
Scratches, corrosiv edeposits, areas affecte dby
corrosio nand damag ecaused by inadequat e
car ecanno talways be completely repaired. In
suc hcases, visit aqualified specialist workshop.
XRemove dirt immediately, wher epossible,
while avoidin grubbing to ohard.
XSoak insec tremain swit hinsec tremove rand
rinse off th etreated areas afterwards .
XSoak bird droppings withwater and rinse off
th etreated areas afterwards .
XRemove coolant, brakefluid ,tree resin, oils ,
fuel sand greases by rubbing gentl ywit h a
cloth soaked in petroleum ether or lighte r
fluid .
XUse tar remove rto remove tar stains.
XUse silicon eremove rto remove wax.
If water no longer forms "beads "on th epain t
surface, use th epain tcar eproducts recommen -
ded and approve dby Mercedes-Benz .This is th e
cas eapproximately every three to fiv emonths,
280Care
Maintenance and care
Page 283 of 342

depending on the climate conditions and the
care product used.
If dirt has penetrated the paint surface or if the
paint has become dull, the paint cleaner recom-
mended and approved by Mercedes-Benz
should be used.
Do not use these care products in the sun or on
the hood while the hood is hot.
XUse a suitable touch-up stick, e.g. MB Touch-
Up Stick, to repair slight damage to the paint- work quickly and provisionally.
Matte finish care
!Never polish the vehicle or the light alloy
wheels. Polishing causes the finish to shine.
!The following may cause the paint to
become shiny and thus reduce the matte
effect:
Rstrong rubbing of the paintwork with
unsuitable materials
Rfrequent use of automatic car washes
Rwashing the vehicle in direct sunlight
!Never use paint cleaner, buffing or polishing
products, or gloss preserver, e.g. wax. These
products are only suitable for high-gloss sur-
faces. Their use on vehicles with matte finish
leads to considerable surface damage (shiny,
mottled areas).
Always have paintwork repairs carried out at a
qualified specialist workshop.
!Do not use wash programs with a hot wax
treatment under any circumstances.
Observe these notes if your vehicle has a clear
matte finish. This will help you to avoid damage
to the paintwork due to incorrect treatment.
These notes also apply to light alloy wheels with a clear matte finish.
iThe vehicle should preferably be washed by
hand using a soft sponge, car shampoo and
plenty of water.
iUse only insect remover and car shampoo
from the range of recommended and
approved Mercedes-Benz care products.
Cleaning the vehicle parts
Cleaning the wheels
GWARNING
The water jet from a circular jet nozzle (dirt
blasters) can cause invisible exterior damage
to the tires or chassis components. Compo-
nents damaged in this way may fail unexpect-
edly. There is a risk of an accident.
Do not use power washers with circular jet
nozzles to clean the vehicle. Have damaged
tires or chassis components replaced imme-
diately.
!Do not use acidic wheel cleaning products
to remove brake dust. This could damage
wheel bolts and brake components.
!Do not park the vehicle for an extended
period straight after cleaning it, particularly
after having cleaned the wheels with wheel
cleaner. Wheel cleaners could cause
increased corrosion of the brake discs and
brake pads/linings. For this reason, you
should drive for a few minutes after cleaning.
Braking heats the brake discs and the brake
pads/linings, thus drying them. The vehicle
can then be parked.
Cleaning the windows
GWARNING
You could become trapped by the windshield wipers if they start moving while cleaning the
windshield or wiper blades. There is a risk of
injury.
Always switch off the windshield wipers and
the ignition before cleaning the windshield or
wiper blades.
!Do not use dry cloths, abrasive products,
solvents or cleaning agents containing sol-
vents to clean the inside of the windows. Do
not touch the insides of the windows with
hard objects, e.g. an ice scraper or ring. There
is otherwise a risk of damaging the windows.
!Clean the water drainage channels of the
windshield and the rear window at regular
intervals. Deposits such as leaves, petals and pollen may under certain circumstances pre-
Care281
Maintenance and care
Z
Page 284 of 342

vent water from draining away. This can lead
to corrosion damage and damage to elec-
tronic components.
XClean the inside and outside of the windows
with a damp cloth and a cleaning product that
is recommended and approved by Mercedes-
Benz.
Cleaning wiper blades
GWARNING
You could become trapped by the windshield wipers if they start moving while cleaning the
windshield or wiper blades. There is a risk of
injury.
Always switch off the windshield wipers and
the ignition before cleaning the windshield or
wiper blades.
!Do not pull the wiper blade. Otherwise, the
wiper blade could be damaged.
!Do not clean wiper blades too often and do
not rub them too hard. Otherwise, the graph-
ite coating could be damaged. This could
cause wiper noise.
!Hold the wiper arm securely when folding
back. The windshield could be damaged if the
wiper arm smacks against it suddenly.
XFold the windshield wiper arms away from the
windshield.
XCarefully clean the wiper blades with a damp
cloth.
XFold the windshield wiper arms back again
before switching on the ignition.
Cleaning the exterior lighting
!Only use cleaning agents or cleaning cloths
which are suitable for plastic light lenses.
Unsuitable cleaning agents or cleaning cloths
could scratch or damage the plastic light len- ses.
XClean the plastic lenses of the exterior light-
ing using a wet sponge and a mild cleaning
agent, e.g. Mercedes-Benz car shampoo or
cleaning cloths.
Mirror turn signals
!Only use cleaning agents or cleaning cloths
that are suitable for plastic lenses. Unsuitable
cleaning agents or cleaning cloths could
scratch or damage the plastic lenses of the
mirror turn signals.
XClean the plastic lenses of the mirror turn sig-
nals in the exterior mirror housing using a wet
sponge and mild cleaning agent, e.g.
Mercedes-Benz car shampoo or cleaning
cloths.
Cleaning the sensors
!If you clean the sensors with a power
washer, make sure that you keep a distance
of at least 11.8 in (30 cm) between the vehicle
and the power washer nozzle. Information
about the correct distance is available from
the equipment manufacturer.
XClean sensors :of the driving systems with
water, car shampoo and a soft cloth.
Cleaning the rear view camera
!Do not clean the camera lens and the area
around the rear view camera with a power
washer.
282Care
Maintenance and care
Page 285 of 342

XUse clear water and a soft cloth to clean cam-era lens :.
Cleaning the 360° camera
!Do not clean the camera lens and the area
around the 360° camera with a power
washer.360
XUse clear water and a soft cloth to clean cam- era lens :.
Cleaning the exhaust pipes
GWARNING
The exhaust tail pipe and tail pipe trim can
become very hot. If you come into contact
with these parts of the vehicle, you could burn
yourself. There is a risk of injury.
Always be particularly careful around the
exhaust tail pipe and the tail pipe trim. Allow
these components to cool down before touch-
ing them.
!Do not clean the exhaust pipe with acid-
based cleaning agents, such as bathroom
cleaner or wheel cleaner. Impurities combined with the effects of road grit
and corrosive environmental factors may cause
flash rust to form on the surface. You can
restore the original shine of the exhaust pipe by
cleaning it regularly, especially in winter and
after washing.
XClean the exhaust pipe with a care product
tested and approved by Mercedes-Benz.
Interior care
Cleaning the display
!For cleaning, do not use any of the following:
Ralcohol-based thinner or gasoline
Rabrasive cleaning agents
Rcommercially-available household cleaning
agents
These may damage the display surface. Do
not put pressure on the display surface when cleaning. This could lead to irreparable dam-
age to the display.
XBefore cleaning the display, make sure that it
is switched off and has cooled down.
XClean the display surface using a commer-
cially available microfiber cloth and TFT/LCD
display cleaner.
XDry the display surface using a dry microfiber
cloth.
Cleaning the plastic trim
GWARNING
Care products and cleaning agents containing solvents cause surfaces in the cockpit to
become porous. As a result, plastic parts may
come loose in the event of air bag deploy-
ment. There is a risk of injury.
Do not use any care products and cleaning
agents to clean the cockpit.
!Do not affix the following to plastic surfaces:
Rstickers
Rfilms
Rscented oil bottles or similar items
You can otherwise damage the plastic.
!Do not allow cosmetics, insect repellent or
sunscreen to come into contact with the plas-
Care283
Maintenance and care
Z
Page 286 of 342

tic trim. This maintains the high-quality look of
the surfaces.
XWipe the plastic trim with a damp, lint-free
cloth, e.g. a microfiber cloth.
XHeavy soiling:use care and cleaning prod-
ucts recommended and approved by
Mercedes-Benz.
The surface may change color temporarily.
Wait until the surface is dry again.
Cleaning the steering wheel and gear or
selector lever
XThoroughly wipe with a damp cloth or use
leather care agents that have been recom-
mended and approved by Mercedes-Benz.
Cleaning genuine wood and trim ele-
ments
!Do not use solvent-based cleaning agents
such as tar remover, wheel cleaners, polishes or waxes. There is otherwise a risk of damag-
ing the surface.
!Do not use chrome polish on trim pieces.
The trim pieces have a chrome look but are
mostly made of anodized aluminum and can
lose their shine if chrome polish is used. Use
a damp, lint-free cloth instead when cleaning
the trim pieces.
If the chrome-plated trim pieces are very
dirty, you can use a chrome polish. If you are
unsure as to whether the trim pieces are
chrome-plated or not, consult an authorized
Mercedes-Benz Center.
XWipe the wooden trim and trim pieces with a
damp, lint-free cloth, e.g. a microfiber cloth.
XHeavy soiling: use car care and cleaning
products recommended and approved by
Mercedes-Benz.
Cleaning the seat covers
General notes
!Do not use a microfiber cloth to clean covers
made out of real leather, artificial leather or
DINAMICA. If used often, these can damage
the cover.
iNote that regular care is essential to ensure
that the appearance and comfort of the cov-
ers is retained over time.
Genuine leather seat covers
Leather is a natural product.
It exhibits natural surface characteristics, for
example:
Rdifferences in the texture
Rmarks caused by growth and injury
Rslight nuances of color
These are characteristics of leather and not
material defects.
!To retain the natural appearance of the
leather, observe the following cleaning
instructions:
RClean genuine leather covers carefully with a damp cloth and then wipe the covers
down with a dry cloth.
RMake sure that the leather does not
become soaked. It may otherwise become
rough and cracked.
ROnly use leather care agents that have
been tested and approved by Mercedes-
Benz. You can obtain these from a qualified
specialist workshop.
Seat covers of other materials
!Observe the following when cleaning:
Rclean artificial leather covers with a cloth
moistened with a solution containing 1%
detergent (e.g. dish washing liquid).
Rclean cloth covers with a microfiber cloth
moistened with a solution containing 1%
detergent (e.g. dish washing liquid). Rub
carefully and always wipe entire seat sec-
tions to avoid leaving visible lines. Leave
the seat to dry afterwards. Cleaning results
depend on the type of dirt and how long it
has been there.
Rclean DINAMICA covers with a damp cloth.
Make sure that you wipe entire seat sec-
tions to avoid leaving visible lines.
Cleaning the seat belts
GWARNING
Seat belts can become severely weakened if
bleached or dyed. This could cause the seat
belts to tear or fail, for instance, in the event of an accident. This poses an increased risk of
injury or fatal injury.
Never bleach or dye the seat belts.
284Care
Maintenance and care
Page 287 of 342
!Do not clean the seat belts using chemical
cleaning agents. Do not dry the seat belts by
heating at temperatures above 176 ‡(80 †)
or in direct sunlight.
XUse clean, lukewarm water and soap solution.
Cleaning the headliner and carpets
XHeadliner: if it is very dirty, use a soft brush or
dry shampoo.
XCarpets: use the carpet and textile cleaning
agents recommended and approved by
Mercedes-Benz.
Care285
Maintenance and care
Z
Page 288 of 342

Where will I find...?
Vehicle tool kit
General notes
The vehicle tool kit can be found in the stowage
well under the trunk floor (Ypage 256).
Vehicles with a "Minispare" emergency
spare wheel
:Vehicle tool kit tray
;Stowage well
="Minispare" emergency spare wheel
XOpen the trunk lid.
XLift the trunk floor upwards (Ypage 256).
The vehicle tool kit contains:
RFolding wheel chock
RFuse allocation chart
RJack
RAlignment bolt
ROne pair of gloves
RLug wrench
RTowing eye
iExample: equipment and country-specific
variations possible.
Vehicles with a TIREFIT kit
:Towing eye
;Tire sealant filler bottle
=Tire inflation compressor
?Fuse allocation chart
XOpen the trunk lid.
XLift the trunk floor upwards (Ypage 256).
iExample: equipment and country-specific
variations possible.
Vehicles with a collapsible spare wheel
(Mercedes-AMG vehicles)
:Towing eye
;One pair of gloves
=Jack
?Folding wheel chock
AAlignment bolt
BSheet for faulty wheel
CTire inflation compressor
DLug wrench
EFuse allocation chart
XOpen the trunk lid.
XLift the trunk floor upwards (Ypage 256).
286Where will I find...?
Breakdown assistance