2016 MERCEDES-BENZ CLS-Class window
[x] Cancel search: windowPage 59 of 342

Important safety notes
!Makesur ethat there are no objects in th e
footwell or behind th eseats. Ther eis adanger
that th eseat sand/o robjects could be dam-
aged when PRE-SAF E
®is activated.
Althoug hyour vehicl eis equipped wit hPRE -
SAFE
®, th epossibilit yof injury in th eevent of an
acciden tcanno tbe rule dout .Always adapt your
driving style to suit th eprevailing road and
weather condition sand maintai n asafedistanc e
from th evehicl ein front. Drive carefully.
Function
PRE-SAF E®intervenes:
Rin emergenc ybraking situations, e.g. when
BA Sis activated
Rin critical driving situations, e.g. when physi-
cal limits are exceeded and th evehicl eunder-
steer sor oversteer sseverely
Ron vehicles wit hth eDrivin gAssistanc epack-
age: if BA SPLU Sintervenes powerfully or th e
radar sensor system detects an imminent
danger of collision in certain situation s
PRE-SAF E
®takes thefollowin gmeasures
depending on th ehazardous situation detected:
Rth efron tseat belt sare pre-tensioned.
Rth efront-passenger seat is adjusted if it is in
an unfavorable position .
Rif thevehicl eskids, th eside windows and th e
sliding sunroo fare closed.
Rvehicles wit h amulticontour seat or active
multicontour seat :th eair pressur ein th eside
bolsters of th ebackrest is increased.
If th ehazardous situation passes without result -
ing in an accident, PRE-SAF E
®slackens thebelt
pre-tensioning .On vehicles wit hmulticontour
seat sor active multicontour seats, th eair pres-
sur ein th eside bolsters is reduce dagain .All
setting smade by PRE-SAF E
®can then be
reversed.
If th eseat belt pre-tensioning is no treduced:
XMov eth eseat backrest or seat bac kslightly
when th evehicl eis stationary.
The seat belt pre-tensioning is reduce dand
th elockin gmechanism is released.
The seat-belt adjustmen tis an integral part of
th ePRE-SAF E
®convenience function .Informa-
tion about th econvenience function can be
foun dunder "Belt adjustment" (
Ypage 45).
PRE-SAFE®PLUS (anticipatory occu-
pant protection system PLUS)
Introduction
PRE-SAF E®PLUSis only available in vehicles
wit hth eDrivin gAssistanc epackage.
Using th eradar sensor system, PRE-SAF E
®
PLUSis able to detec tthat ahead-on or rear-end
collision is imminent .In certain hazardous sit -
uations, PRE-SAF E
®PLUStakes pre-emptive
measures to protect th evehicl eoccupants.
Important safety notes
The intervention of PRE-SAF E®PLUScanno t
preven tan imminent collision .
The driver is no twarned about th eintervention
of PRE-SAF E
®PLUS.
PRE-SAF E®PLUSdoes no tinterven eif th evehi-
cle is backin gup.
When driving ,or when parking or exiting apark -
ing spac ewit hassistanc efrom Active Parking
Assist ,PRE-SAF E
®PLUSwill no tapply th e
brakes.
Function
PRE-SAF E®PLUSintervenes in certain situa-
tion sif th eradar sensor system detects an
imminent head-on or rear-end collision .
PRE-SAF E
®PLUStakes th efollowin gmeasures
depending on th ehazardous situation detected:
Rif th eradar sensor system detects that a
head-on collision is imminent ,th eseat belt s
are pre-tensioned.
Rif th eradar sensor system detects that arear -
en dcollision is imminent :
-thebrak epressur eis increased if th edriver
applie sth ebrakes when th evehicl eis sta-
tionary.
-th eseat belt sare pre-tensioned.
The PRE-SAF E®PLUSbraking application is can -
celed:
Rif th eaccelerato rpedal is depressed when a
gear is engage d
Rif theris kof acollision passes or is no longer
detecte d
Rif DISTRONI CPLU Sindicates an intention to
pull away
Occupant safety57
Safety
Z
Page 60 of 342

If the hazardous situation passes without result-
ing in an accident, the original settings are
restored.
Automatic measures after an acci-
dent
Immediately after an accident, the following
measures are implemented, depending on the
type and severity of the impact:
Rthe hazard warning lamps are activated
Rthe emergency lighting is activated
Rthe vehicle doors are unlocked
Rthe front side windows are lowered
Rvehicles with a memory function: the electri-
cally adjustable steering wheel is raised
Rthe engine is switched off and the fuel supply
is cut off
Rvehicles with mbrace: automatic emergency
call
Children in the vehicle
Important safety notes
Accident statistics show that children secured
in the rear seats are safer than children secured
in the front-passenger seat. For this reason,
Mercedes-Benz strongly advises that you install
a child restraint system on a rear seat. Children
are generally better protected there.
If a child younger than twelve years old and
under 5 ft (1.50 m)in height is traveling in the
vehicle:
Ralways secure the child in a child restraint
system suitable for Mercedes-Benz vehicles.
The child restraint system must be appropri-
ate to the age, weight and size of the child
Rbe sure to observe the instructions and safety
notes in this section in addition to the child
restraint system manufacturer's installation
instructions
Rbe sure to observe the instructions and safety
notes on the "Occupant classification system
(OCS)" (
Ypage 49)
GWARNING
If you leave children unsupervised in the vehi-
cle, they could set it in motion by, for example:
Rrelease the parking brake.
Rshift the automatic transmission out of the
parking position P.
Rstart the engine.
In addition, they may operate vehicle equip-
ment and become trapped. There is a risk of
an accident and injury.
When leaving the vehicle, always take the
SmartKey with you and lock the vehicle. Never
leave children unsupervised in the vehicle.
GWARNING
If persons, particularly children are subjected to prolonged exposure to extreme heat or
cold, there is a risk of injury, possibly even
fatal. Never leave children unattended in the
vehicle.
GWARNING
If the child restraint system is subjected to
direct sunlight, parts may get very hot. Chil-
dren may burn themselves on these parts,
particularly on the metal parts of the child
restraint system. There is a risk of injury.
If you leave the vehicle, taking the child with
you, always ensure that the child restraint
system is not exposed to direct sunlight. Pro- tect it with a blanket, for example. If the child
restraint system has been exposed to direct
sunlight, let it cool down before securing the
child in it. Never leave children unattended in
the vehicle.
Always ensure that all vehicle occupants have
their seat belts fastened correctly and are sitting
properly. Particular attention must be paid to
children.
Observe the safety notes on the seat belt
(
Ypage 43) and the notes on correct use of seat
belts (Ypage 44).
A booster seat may be necessary to achieve
proper seat belt positioning for children over
41 lbs (18 kg) until they reach a height where a
58Children in the vehicle
Safety
Page 64 of 342
Child restraint system on the front-
passenger seat
General notes
Accident statistics show that children secured
in the rear seats are safer than children secured
in the front-passenger seat. For this reason,
Mercedes-Benz strongly advises that you install
the child restraint system on a rear seat.
If it is absolutely necessary to install a child
restraint system on the front-passenger seat,
always observe the instructions and safety
notes on the "Occupant Classification System
(OCS)" (
Ypage 49).
You can thus avoid the risks that could arise as a result of:
Ran incorrectly categorized person in the front-
passenger seat
Rthe unintentional deactivation of the front-
passenger front air bag
Rthe unsuitable positioning of the child
restraint system, e.g. too close to the dash-
board
Rearward-facing child restraint system
If it is absolutely necessary to install a rearward-
facing child restraint system on the front-
passenger seat, always make sure that the
front-passenger front air bag is deactivated.
Only if the PASSENGER AIR BAG OFF indicator
lamp is permanently lit (
Ypage 42) is the front-
passenger front air bag deactivated.
Always observe the child restraint system man-
ufacturer's installation and operating instruc-
tions.
Forward-facing child restraint system
If it is absolutely necessary to install a forward-
facing child restraint system on the front-
passenger seat, always move the front-
passenger seat as far back as possible. The
entire base of the child restraint system must
always rest on the seat cushion of the front-
passenger seat. The backrest of the child
restraint system must lie as flat as possible
against the backrest of the front-passenger
seat. The child restraint system must not touch
the roof or be subjected to a load by the head
restraint. Adjust the angle of the seat backrest
and the head restraint position accordingly.
Always make sure that the shoulder belt strap is correctly routed from the vehicle belt outlet to
the shoulder belt guide on the child restraint
system. The shoulder belt strap must be routed
forwards and downwards from the vehicle belt
outlet. If necessary, adjust the vehicle belt out-
let and the front-passenger seat accordingly.
Always observe the child restraint system man-
ufacturer's installation and operating instruc-
tions.
Child-proof locks
Important safety notes
GWARNING
If children are traveling in the vehicle, they
could:
Ropen doors, thus endangering other people
or road users
Rexit the vehicle and be caught by oncoming
traffic
Roperate vehicle equipment and become
trapped
There is a risk of an accident and injury.
Always activate the child-proof locks and
override feature if children are traveling in the vehicle. When leaving the vehicle, always take
the key with you and lock the vehicle. Never
leave children unattended in the vehicle.
Override feature for:
Rthe rear doors (Ypage 63)
Rthe rear side windows (Ypage 63)
GWARNING
If you leave children unsupervised in the vehi-
cle, they could set it in motion by, for example:
Rrelease the parking brake.
Rshift the automatic transmission out of the
parking position P.
Rstart the engine.
In addition, they may operate vehicle equip-
ment and become trapped. There is a risk of
an accident and injury.
62Children in the vehicle
Safety
Page 65 of 342

When leaving the vehicle, always take the
SmartKey with you and lock the vehicle. Never
leave children unsupervised in the vehicle.
GWARNING
If persons, particularly children are subjected to prolonged exposure to extreme heat or
cold, there is a risk of injury, possibly even
fatal. Never leave children unattended in the
vehicle.
GWARNING
If the child restraint system is subjected to
direct sunlight, parts may get very hot. Chil-
dren may burn themselves on these parts,
particularly on the metal parts of the child
restraint system. There is a risk of injury.
If you leave the vehicle, taking the child with
you, always ensure that the child restraint
system is not exposed to direct sunlight. Pro- tect it with a blanket, for example. If the child
restraint system has been exposed to direct
sunlight, let it cool down before securing the
child in it. Never leave children unattended in
the vehicle.
Child-proof locks for the rear doors
You secure each door individually with the child-
proof locks on the rear doors. A door secured
with a child-proof lock cannot be opened from
inside the vehicle. When the vehicle is unlocked,the door can be opened from the outside.
XTo activate: press the child-proof lock lever
up in the direction of arrow :.
XMake sure that the child-proof locks are work-
ing properly.
XTo deactivate: press the child-proof lock
lever down in the direction of arrow ;.
Override feature for the rear side win-
dows
XTo activate/deactivate:press button;.
If indicator lamp :is lit, operation of the rear
side windows is disabled. Operation is only
possible using the switches in the driver's
door. If indicator lamp :is off, operation is
possible using the switches in the rear com-
partment.
Pets in the vehicle
GWARNING
If you leave animals unattended or unsecured
in the vehicle, they could press buttons or
switches, for example.
As a result, they could:
Ractivate vehicle equipment and become
trapped, for example
Ractivate or deactivate systems, thereby
endangering other road users
Unsecured animals could also be flung around
the vehicle in the event of an accident or sud-
den steering or braking, thereby injuring vehi-
cle occupants. There is a risk of an accident
and injury.
Pets in the vehicle63
Safety
Z
Page 88 of 342
Opening and closing
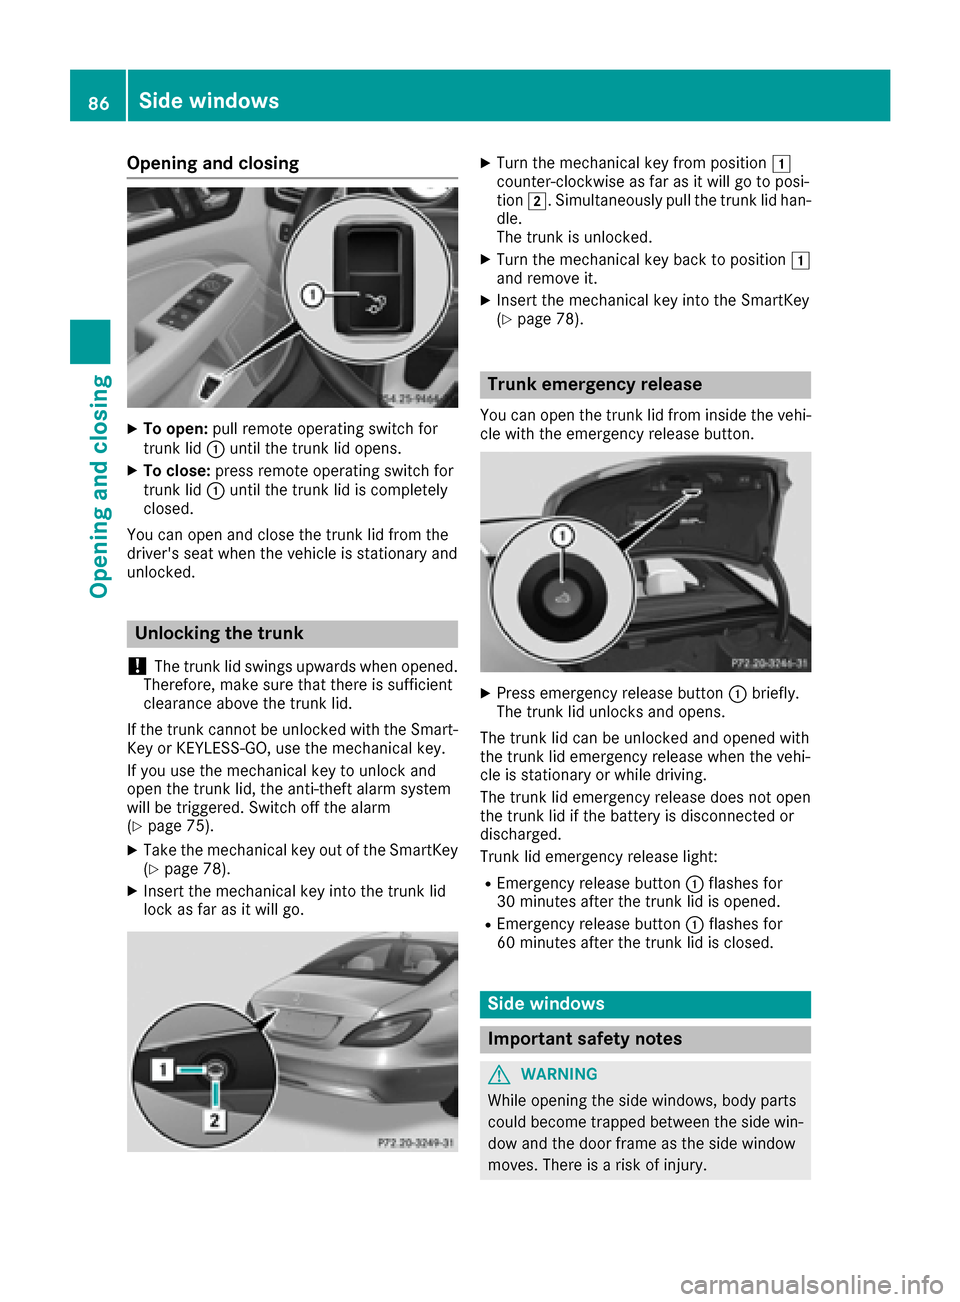
XTo open:pull remote operating switch for
trunk lid :until the trunk lid opens.
XTo close: press remote operating switch for
trunk lid :until the trunk lid is completely
closed.
You can open and close the trunk lid from the
driver's seat when the vehicle is stationary and
unlocked.
Unlocking the trunk
!
The trunk lid swings upwards when opened.
Therefore, make sure that there is sufficient
clearance above the trunk lid.
If the trunk cannot be unlocked with the Smart-
Key or KEYLESS-GO, use the mechanical key.
If you use the mechanical key to unlock and
open the trunk lid, the anti-theft alarm system
will be triggered. Switch off the alarm
(
Ypage 75).
XTake the mechanical key out of the SmartKey
(Ypage 78).
XInsert the mechanical key into the trunk lid
lock as far as it will go.
XTurn the mechanical key from position 1
counter-clockwise as far as it will go to posi-
tion 2. Simultaneously pull the trunk lid han-
dle.
The trunk is unlocked.
XTurn the mechanical key back to position 1
and remove it.
XInsert the mechanical key into the SmartKey
(Ypage 78).
Trunk emergency release
You can open the trunk lid from inside the vehi-
cle with the emergency release button.
XPress emergency release button :briefly.
The trunk lid unlocks and opens.
The trunk lid can be unlocked and opened with
the trunk lid emergency release when the vehi-
cle is stationary or while driving.
The trunk lid emergency release does not open
the trunk lid if the battery is disconnected or
discharged.
Trunk lid emergency release light:
REmergency release button :flashes for
30 minutes after the trunk lid is opened.
REmergency release button :flashes for
60 minutes after the trunk lid is closed.
Side windows
Important safety notes
GWARNING
While opening the side windows, body parts
could become trapped between the side win-
dow and the door frame as the side window
moves. There is a risk of injury.
86Side windows
Opening and closing
Page 89 of 342

Make sure that nobody touches the side win-dow during the opening procedure. If some-
body becomes trapped, release the switch or
pull the switch to close the side window again.
GWARNING
While closing the side windows, body parts in
the closing area could become trapped. There is a risk of injury.
When closing make sure that no parts of the
body are in the closing area. If somebody
becomes trapped, release the switch or press
the switch to open the side window again.
GWARNING
If children operate the side windows they
could become trapped, particularly if they are left unsupervised. There is a risk of injury.
Activate the override feature for the rear side
windows. When leaving the vehicle, always
take the SmartKey with you and lock the vehi-
cle. Never leave children unsupervised in the
vehicle.
Side window reversing feature
The side windows are equipped with an auto-
matic reversing feature. If a solid object blocks
or restricts a side window during the closing
process, the side window opens again automat-
ically. However, the automatic reversing feature
is only an aid and is not a substitute for your
attentiveness when closing a side window.
GWARNING
The reversing feature does not react:
Rto soft, light and thin objects, e.g. small fin-
gers
Rover the last 1/6 in(4 mm) of the closing
movement
Rduring resetting
Rwhen closing the side window again man-
ually immediately after automatic reversing
This means that the reversing feature cannot
prevent someone being trapped in these sit-
uations. There is a risk of injury.
Make sure that no body parts are in close
proximity during the closing procedure. If
someone becomes trapped, press the switch
to open the side window again.
Opening and closing the side win-
dows
The switches for all side windows are located on the driver's door. There is also a switch on each
door for the corresponding side window.
The switches on the driver's door take prece-
dence.
:Front left
;Front right
=Rear right
?Rear left
XTurn the SmartKey to position 1or 2in the
ignition lock.
XTo open manually: press and hold the cor-
responding switch.
XTo open fully: press the switch beyond the
point of resistance and release it.
Automatic operation is started.
XTo close manually: pull and hold the corre-
sponding switch.
XTo close fully: pull the corresponding switch
beyond the pressure point.
Automatic operation is started.
XTo interrupt automatic operation: press/
pull the corresponding switch again.
If you press/pull the switch beyond the point of
resistance, automatic operation is started in the
corresponding direction. You can stop auto-
matic operation by pressing/pulling the switch
again.
Side windows87
Opening and closing
Z
Page 90 of 342

You can continue to operate the side windows
after you switch off the engine or remove the
SmartKey. This function is available for up to five
minutes or until the driver's or front-passenger
door is opened.
When the override feature for the side windows
is activated, the side windows cannot be oper-
ated from the rear (
Ypage 63).
Convenience opening
General notes
You can ventilate the vehicle before you start
driving. To do this, the SmartKey is used to carry
out the following functions simultaneously:
Runlock the vehicle
Ropen the side windows
Ropen the sliding sunroof
Rswitch on the seat ventilation for the driver's
seat
The convenience opening feature can only be
operated using the SmartKey. The SmartKey
must be in close proximity to the vehicle.
The "convenience opening" feature is also avail-
able when the vehicle is unlocked.
Convenience opening
XPress and hold the %button until the side
windows and the sliding sunroof are in the
desired position.
XTo interrupt convenience opening: release
the % button.
Convenience closing feature
Important safety notes
Information on the side window reversing fea-
ture (Ypage 87).
GWARNING
When the convenience closing feature is oper- ating, parts of the body could become trapped
in the closing area of the side window and the
sliding sunroof. There is a risk of injury.
Observe the complete closing procedure
when the convenience closing feature is oper-
ating. Make sure that no body parts are in
close proximity during the closing procedure.
Proceed as follows if someone is trapped:
With the SmartKey:
XRelease the &button.
XPress and hold the %button until the side
windows and the sliding sunroof or the pano-
rama roof with power tilt/sliding panel open
again.
With KEYLESS-GO:
XRelease the sensor surface on the door han-
dle.
XPull the door handle immediately and hold it.
The side windows and the sliding sunroof or
the panorama roof with power tilt/sliding
panel open.
General notes
When you lock the vehicle, you can simultane-
ously:
Rclose the side windows
Rclose the sliding sunroof
Using the SmartKey
XVehicles without KEYLESS-GO: point the tip
of the SmartKey at the door handle on the
driver's door.
XVehicles with KEYLESS-GO: the SmartKey
must be in close proximity to the vehicle.
XPress and hold the &button until the side
windows and the sliding sunroof are fully
closed.
XPress and hold the &button until the side
windows are fully closed.
XMake sure that all the side windows and the
sliding sunroof are closed.
XMake sure that all the side windows are
closed.
XTo interrupt convenience closing: release
the & button.
Using KEYLESS-GO
The driver's door and the door at which the han-
dle is used, must both be closed. The SmartKey
must be outside the vehicle. The gap between
88Side windows
Opening and closing
Page 91 of 342

the SmartKey and the corresponding door han-
dle should not be greater than 3 ft (1 m).
XTouch recessed sensor surface:on the
door handle until the side windows and the
sliding sunroof are fully closed.
XTouch recessed sensor surface :on the
door handle until the side windows are fully
closed.
iMake sure you only touch recessed sensor
surface :.
XMake sure that all the side windows and the
sliding sunroof are closed.
XMake sure that all the side windows are
closed.
XTo interrupt convenience closing: release
recessed sensor surface :on the door han-
dle.
Resetting the side windows
If a side window can no longer be closed fully,
you must reset it.
XClose all the doors.
XTurn the SmartKey to position 1or 2in the
ignition lock.
XPull the corresponding switch on the door
control panel until the side window is com-
pletely closed (
Ypage 87).
XHold the switch for an additional second.
If the side window opens again slightly:
XImmediately pull the corresponding switch on
the door control panel until the side window is
completely closed (
Ypage 87).
XHold the switch for an additional second.
XIf the respective side window remains closed
after the button is released, then it has been set correctly. If this is not the case, repeat the
steps above again.
Side
windows89
Openin gan d closing
Z