2016 MERCEDES-BENZ CLA tow
[x] Cancel search: towPage 291 of 374
Information on the data stored in the vehicle
( Y
page 27).
Information on Roadside Assistance
( Y
page 23).
Downloading routes Downloading routes allows you to transfer
and save predefined routes in the navigation
system.
A route can be prepared and sent by either a
customer service representative or under
"Owners Online" at http://www.mbusa.com.
Each route can include up to four way points.
Once a route has been received by the navi-
gation system, you will see the External
route ICON_POI_Category Name_1 has
been saved to "Previous destina‐
tions". Would you like to start nav‐
igation? message on the Audio 20 display.
The route is saved. X
To start route guidance: select Yes .
An overview of the route is shown in the
display.
If you select No , the saved route can be
called up later in the navigation menu. X
Select Start .
Starting route guidance.
Downloaded and saved routes can be called
up again.
You can find further information in the sepa-
rate COMAND/Audio 20 operating instruc-
tions.
Speed alert
You can define the upper speed limit, which
must not be exceeded by the vehicle.
If this selected speed is exceeded by the vehi-
cle, a message will be sent to the Customer
Assistance Center. The Customer Assistance
Center then forwards this information to you.
You can select the way in which you receive
this information beforehand. Possible options
include text message, e-mail or an automated
call. The data you receive contains the following
information: R
the location where the speed limit was
exceeded R
the time at which the speed limit was
exceeded R
the selected speed limit which was excee-
ded
Geo fencing Geo fencing allows you to select areas which
the vehicle should not enter or leave. You will
be informed if the vehicle crosses the boun-
daries of the selected areas. You can select
the way in which you receive this information
beforehand. Possible options include text
message, e-mail or an automated call.
The area can be determined as either a circle
or a polygon with a maximum of ten corners.
You can specify up to ten areas simultane-
ously. Different settings are possible for each
area.
These settings can be called up under "Own-
ers Online" at http://www.mbusa.com.
Alternatively, you can trigger an MB Info call
and inform the customer service representa-
tive that you wish to activate geo fencing.
Currently inactive areas can be activated by
text message.
Triggering the vehicle alarm
With this function, you can trigger the vehi-
cle's panic alarm via text message. An alarm
sounds and the exterior lighting flashes.
Depending on the setting, the panic alarm
lasts five or ten seconds. Afterwards, the
alarm switches off.
Garage door opener
General notes
The HomeLink ®
garage door opener integra-
ted in the rear-view mirror allows you to oper- Features 289
Stowage and features Z
Page 296 of 374
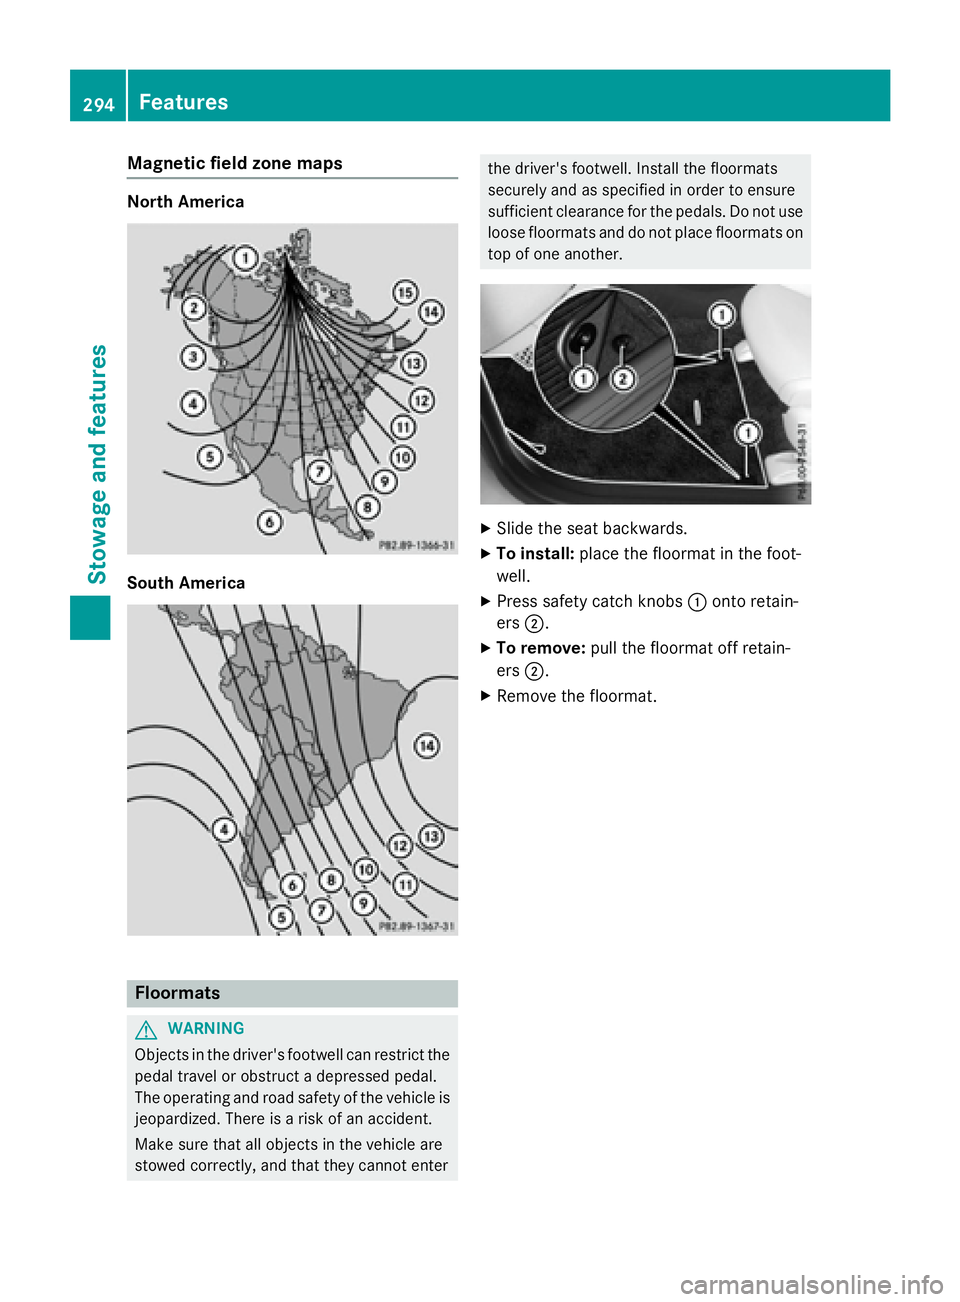
Magnetic field zone maps North America
South America
Floormats
G WARNING
Objects in the driver's footwell can restrict the
pedal travel or obstruct a depressed pedal.
The operating and road safety of the vehicle is
jeopardized. There is a risk of an accident.
Make sure that all objects in the vehicle are
stowed correctly, and that they cannot enter the driver's footwell. Install the floormats
securely and as specified in order to ensure
sufficient clearance for the pedals. Do not use
loose floormats and do not place floormats on
top of one another.
X
Slide the seat backwards. X
To install: place the floormat in the foot-
well. X
Press safety catch knobs �C onto retain-
ers �D . X
To remove: pull the floormat off retain-
ers �D . X
Remove the floormat.294
Features
Stowage and features
Page 304 of 374
should drive for a few minutes after clean-
ing. Braking heats the brake discs and the
brake pads/linings, thus drying them. The
vehicle can then be parked.
Regular care of your vehicle is a condition for
retaining the quality in the long term.
Use care products and cleaning agents rec-
ommended and approved by Mercedes-Benz.
Washing the vehicle and cleaning the
paintwork
Automatic car wash
G WARNING
Braking efficiency is reduced after washing
the vehicle. There is a risk of an accident.
After the vehicle has been washed, brake
carefully while paying attention to the traffic
conditions until full braking power is restored.
! If DISTRONIC PLUS or the HOLD function
is activated, the vehicle brakes automati-
cally in certain situations.
To prevent damage to the vehicle, deacti-
vate DISTRONIC PLUS and the HOLD func-
tion in the following or other similar situa-
tions: R
when towing the vehicle R
in the car wash
! Never clean your vehicle in a Touchless
Automatic Car Wash as these use special
cleaning agents. These cleaning agents can
damage the paintwork or plastic parts.
! Make sure that the automatic transmis-
sion is in position N when washing your
vehicle in a tow-through car wash. The vehi-
cle could be damaged if the transmission is
in another position.
! Make sure that: R
the side windows and the sliding sunroof
are fully closed. R
the ventilation/heating is switched off
(the OFF button has been pressed/the
airflow control is set to position 0 ).R
the windshield wiper switch is in position
0 .
Otherwise, the vehicle might be damaged.
You can wash the vehicle in an automatic car
wash from the very start.
If the vehicle is very dirty, pre-wash it before
cleaning it in an automatic car wash.
After using an automatic car wash, wipe off
wax from the windshield and the wiper
blades. This will prevent smears and reduce
wiping noises caused by residue on the wind-
shield.
Washing by hand In some countries, washing by hand is only
allowed at specially equipped washing bays.
Observe the legal requirements in each coun-
try. X
Do not use hot water and do not wash the
vehicle in direct sunlight. X
Use a soft sponge to clean. X
Use a mild cleaning agent, such as a car
shampoo approved by Mercedes-Benz. X
Thoroughly hose down the vehicle with a
gentle jet of water. X
Do not point the water jet directly towards
the air inlet. X
Use plenty of water and rinse out the
sponge frequently. X
Rinse the vehicle with clean water and dry
thoroughly with a chamois. X
Do not let the cleaning agent dry on the
paintwork.
Carefully remove all deposits of road salt as
soon as possible when driving in winter.302
Care
Maintenance and care
Page 311 of 374
Useful information ............................ 310
Where will I find...? ........................... 310
Flat tire .............................................. 310
Battery (vehicle) ................................ 315
Jump-starting .................................... 319
Towing and tow-starting .................. 321
Fuses .................................................. 325 309
Breakdown assistance
Page 312 of 374
Useful information
i This Operator's Manual describes all
models and all standard and optional equip-
ment of your vehicle available at the time of
publication of the Operator's Manual.
Country-specific differences are possible.
Please note that your vehicle may not be
equipped with all features described. This
also applies to safety-related systems and
functions.
i Read the information on qualified special-
ist workshops ( Y
page 25).
Where will I find...?
Vehicle tool kit
General notes Vehicles with a TIREFIT kit: the TIREFIT kit is
located in the stowage well under the trunk
floor.
Vehicles with a tire-change tool kit: the tire-
change tool kit is in the stowage well under
the trunk floor.
i Apart from certain country-specific varia-
tions, the vehicles are not equipped with a
tire-change tool kit. Some tools for chang-
ing a wheel are specific to the vehicle. For
more information on which tire changing
tools are required and approved to perform
a wheel change on your vehicle, consult a
qualified specialist workshop.
Tools required for changing a wheel may
include, for example: R
Jack R
Wheel chock R
Lug wrench R
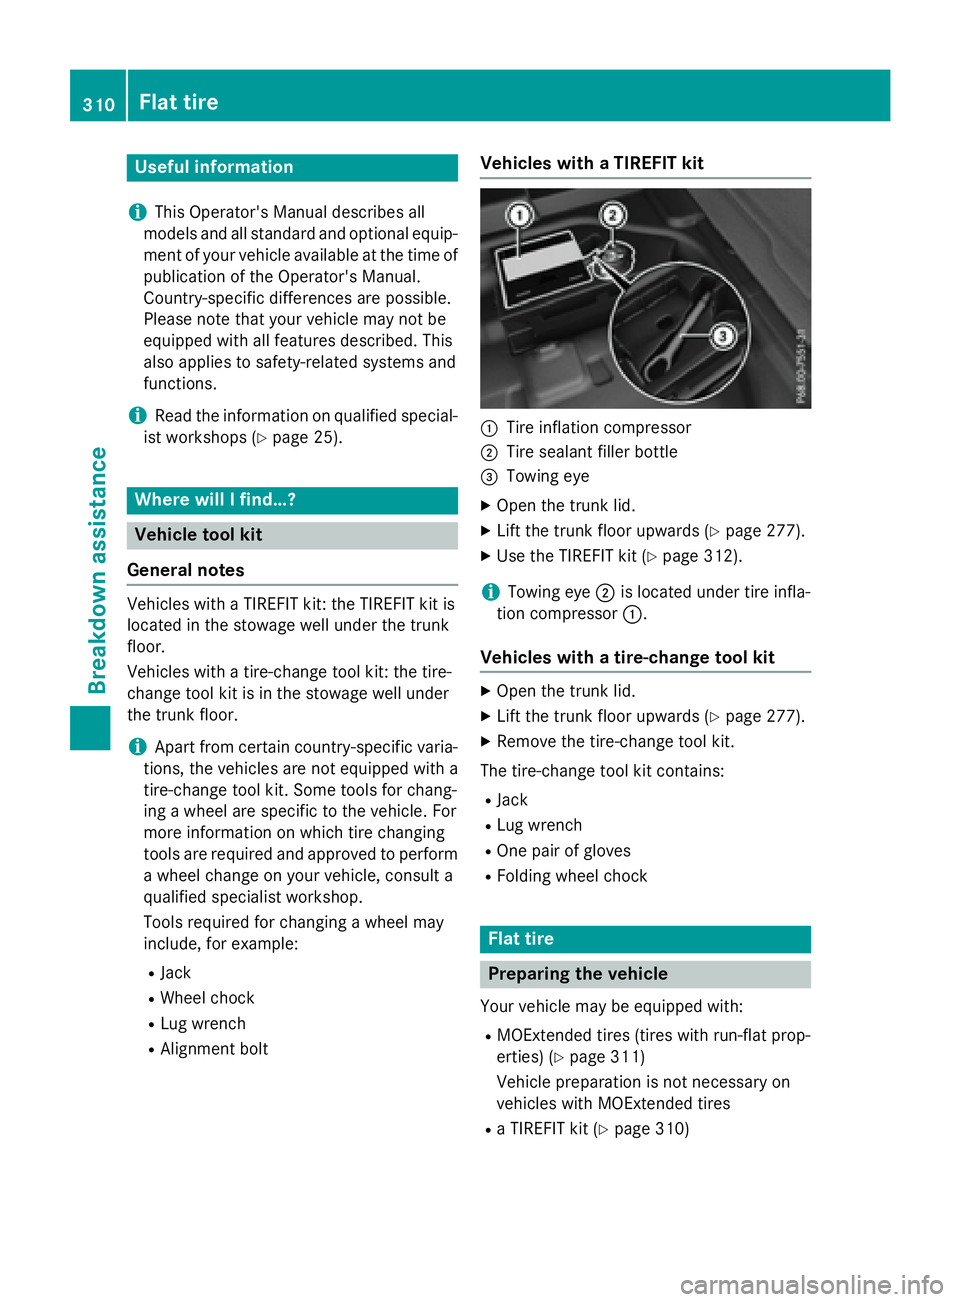
Alignment bolt Vehicles with a TIREFIT kit
�C
Tire inflation compressor �D
Tire sealant filler bottle �
Page 315 of 374
! Do not operate the tire inflation compres-
sor for longer than ten minutes at a time
without a break. It may otherwise overheat.
The tire inflation compressor can be oper-
ated again once it has cooled down.
Comply with the manufacturer’s safety
instructions on the sticker on the tire inflation
compressor.
Using the TIREFIT kit X
Do not remove any foreign objects which
have penetrated the tire, e.g. screws or
nails. X
Remove the tire sealant bottle, the accom-
panying TIREFIT sticker and the tire infla-
tion compressor from the stowage well
underneath the trunk floor ( Y
page 310).X
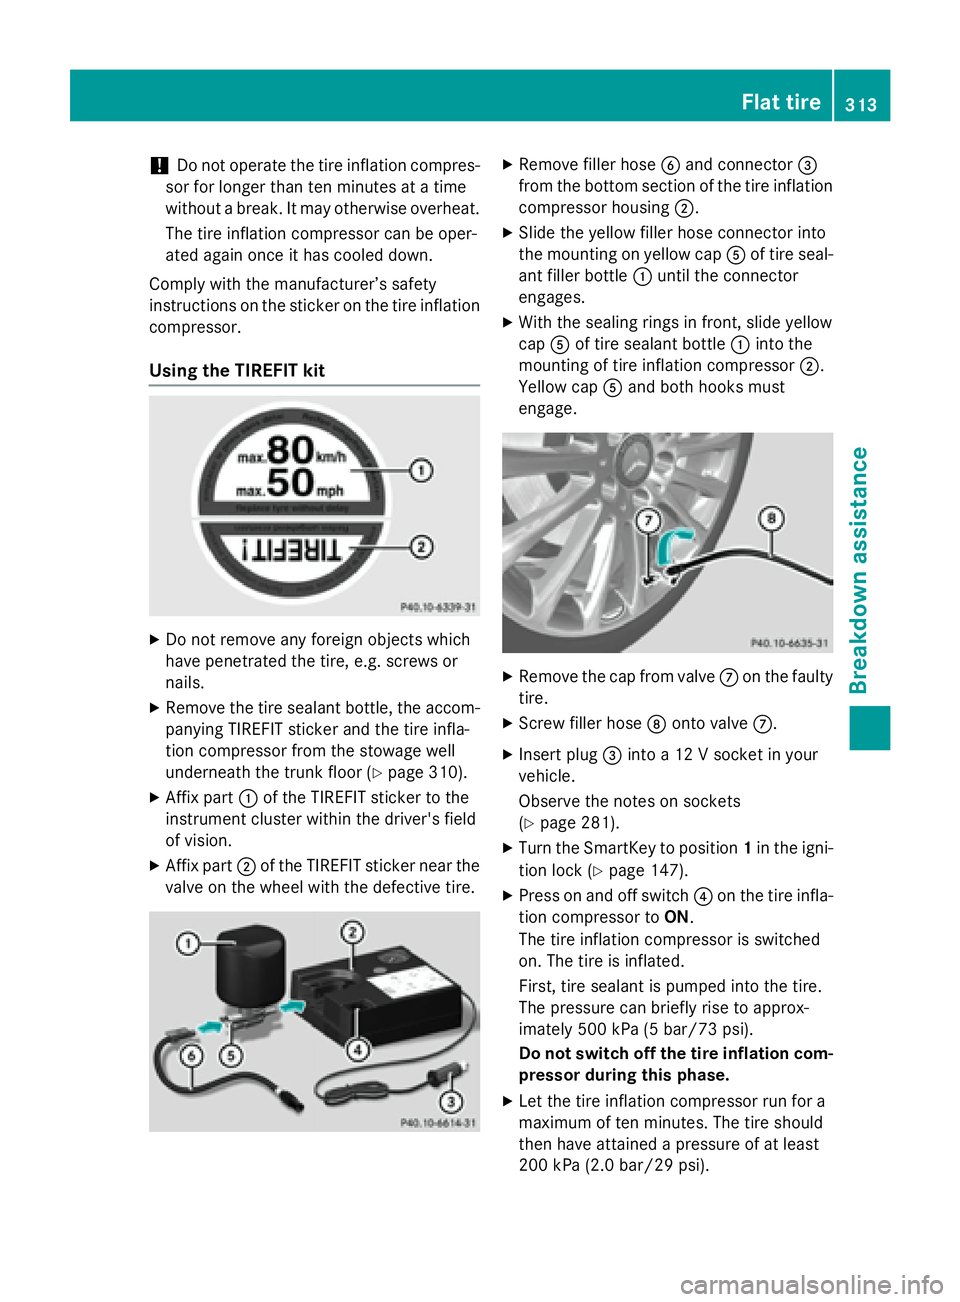
Affix part �C of the TIREFIT sticker to the
instrument cluster within the driver's field
of vision. X
Affix part �D of the TIREFIT sticker near the
valve on the wheel with the defective tire. X
Remove filler hose �
Page 316 of 374
If a pressure of 200 kPa (2.0 bar/29 psi) has
been attained after five minutes, see "Tire
pressure reached" ( Y
page 314).
If a tire pressure of 200 kPa (2.0 bar/29 psi)
has not been attained after five minutes, see
"Tire pressure not reached" ( Y
page 314).
If tire sealant has escaped, clean it off affec-
ted areas as quickly as possible. Use plain
water if possible.
If your clothes are soiled with tire sealant,
have them cleaned with perchloroethylene at
a dry cleaner as soon as possible.
Tire pressure not reached If a tire pressure of 200 kPa (2.0 bar/29 psi)
has not been attained after ten minutes: X
Switch off the tire inflation compressor. X
Unscrew the filler hose from the valve of
the faulty tire.
Note that tire sealant may escape when you
unscrew the filler hose. X
Very slowly drive forwards or reverse
approximately 30 ft (10 m). X
Pump up the tire again.
After a maximum of ten minutes, the tire
pressure must be at least 200 kPa (2.0 bar/
29 psi).
G WARNING
If the required tire pressure is not reached
after the specified time, the tire is too badly
damaged. The tire sealant cannot repair the
tire in this instance. Damaged tires and a tire
pressure that is too low can significantly
impair the vehicle's braking and driving char-
acteristics. There is a risk of accident.
Do not continue driving. Contact a qualified
specialist workshop.
Tire pressure reached
G WARNING
A tire temporarily sealed with tire sealant
impairs the driving characteristics and is not suitable for higher speeds. There is a risk of
accident.
You should therefore adapt your driving style
accordingly and drive carefully. Do not exceed
the specified maximum speed with a tire that
has been repaired using tire sealant.
The maximum permissible speed for a tire
sealed with tire sealant is 50 mph (80 km/h).
The upper part of the TIREFIT sticker must be
affixed to the instrument cluster in the driv-
er's field of vision.
! Residue from the tire sealant may come
out of the filler hose after use. This could
cause stains.
Therefore, place the filler hose in the plastic
bag which contained the TIREFIT kit.
H Environmental note
Have the used tire sealant bottle disposed of
professionally, e.g. at a qualified specialist
workshop.
If a tire pressure of 200 kPa (2.0 bar/29 psi)
has been attained after ten minutes: X
Switch off the tire inflation compressor. X
Unscrew the filler hose from the valve of
the faulty tire. X
Stow the tire sealant bottle and the tire
inflation compressor. X
Pull away immediately .X
Stop after driving for approximately ten
minutes and check the tire pressure with
the tire inflation compressor.
The tire pressure must now be at least
130 kPa (1.3 bar/19 psi).
G WARNING
If the required tire pressure is not reached
after driving for a short period, the tire is too
badly damaged. The tire sealant cannot repair
the tire in this instance. Damaged tires and a
tire pressure that is too low can significantly
impair the vehicle's braking and driving char-
acteristics. There is a risk of accident.314
Flat tire
Breakdown assistance
Page 324 of 374
! Make sure that the electric parking brake
is released. If the electric parking brake is
faulty, visit a qualified specialist workshop.
! Only secure the tow rope or tow bar at the
towing eyes. Otherwise, the vehicle could
be damaged.
! Do not use the towing eyes for recovery
purposes as this could damage the vehicle.
If in doubt, recover the vehicle with a crane.
! When towing, pull away slowly and
smoothly. If the tractive power is too high,
the vehicles could be damaged.
! The vehicle can be towed a maximum of
30 miles (50km). The towing speed of
30 mph (50km/h) must not be exceeded.
If the vehicle has to be towed more than
30 miles (50km), the front axle must be
raised or the entire vehicle raised and
transported.
! Do not tow with sling-type equipment.
This could damage the vehicle.
! When towing vehicles with KEYLESS-GO,
use the key instead of the Start/Stop but-
ton. Otherwise, the automatic transmission
may shift to position P when the driver's or
front-passenger door are opened, which
could lead to damage to the transmission.
! Vehicles with automatic transmission
must not be started by tow-starting. This
could otherwise damage the transmission.
It is better to have the vehicle transported
than to have it towed away.
If the vehicle can no longer be driven because
of an accident or breakdown, you have the
following options: R
Transporting the vehicle
As a rule, you should have the vehicle trans-
ported. R
Towing the vehicle with a tow rope or tow
bar
Only tow the vehicle in exceptional cases. The battery must be connected and charged.
Otherwise, you: R
cannot turn the SmartKey to position 2 in
the ignition lock R
cannot release the electric parking brake R
cannot shift the transmission to position N
The function of the electric parking brake and
the parking lock is dependent on the on-board
voltage.
If the on-board voltage is low or there is a
system malfunction, it is possible that: R
the electric parking brake may not be
applied in certain circumstances, or R
the transmission may not be shifted to P
Switch off non-essential consumers, e.g. the
radio.
Disarm the automatic locking feature before
the vehicle is towed ( Y
page 222). You could
otherwise be locked out when pushing or
towing the vehicle.
Installing/removing the towing eye
Installing the towing eye
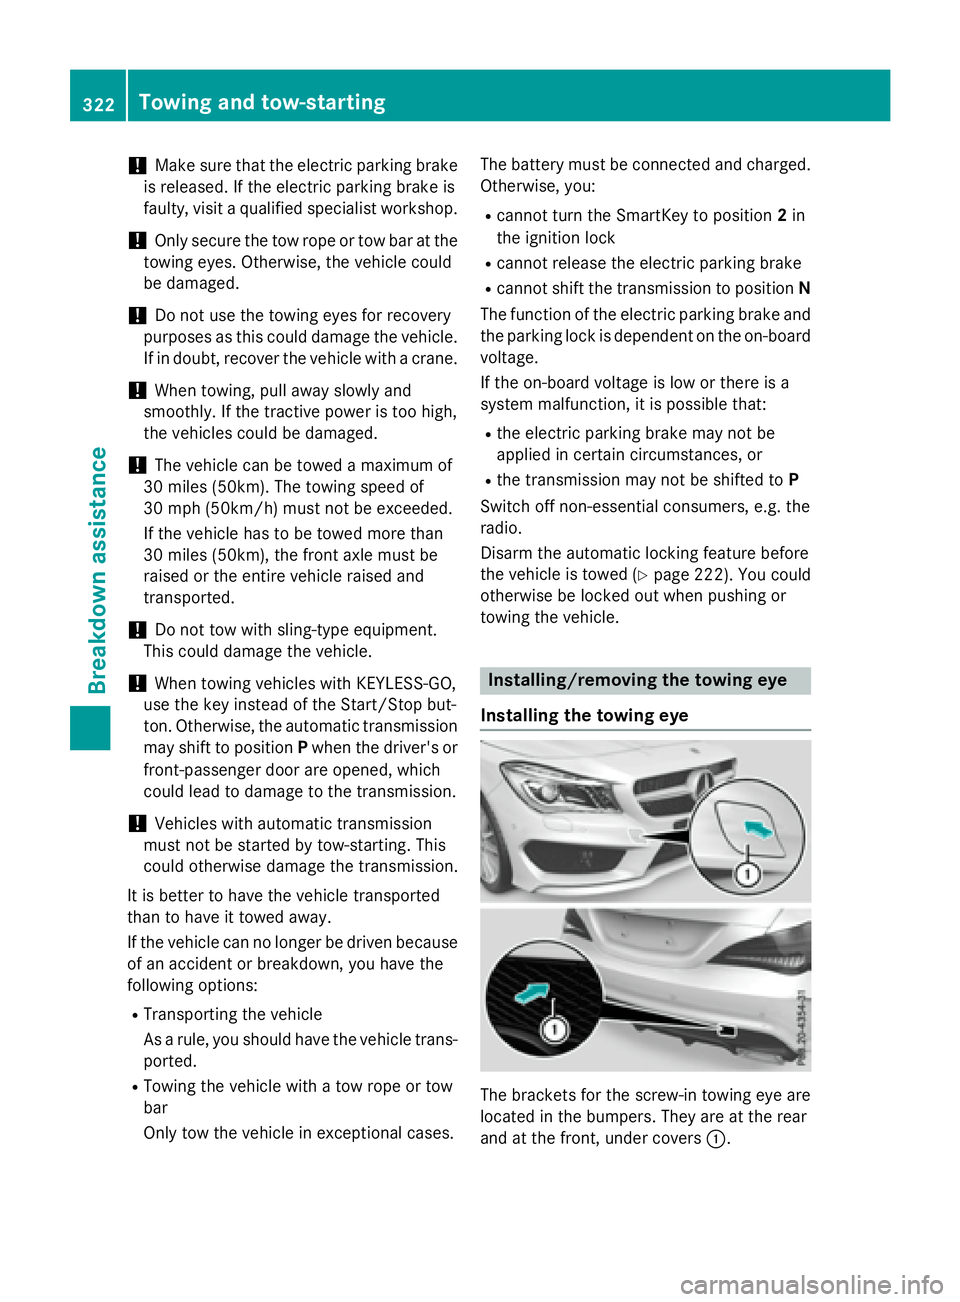
The brackets for the screw-in towing eye are
located in the bumpers. They are at the rear
and at the front, under covers �C .322
Towing and tow-starting
Breakdown assistance