2016 MERCEDES-BENZ CLA fuel cap
[x] Cancel search: fuel capPage 11 of 374

Driving tips
Automati c transmissio n ................ .1 61
Brakes .......................................... .1 75
Break-in period .............................. 146
Checking brake lining thickness .... 176
DISTRONIC PLUS ........................... 186
Downhill gradient ........................... 175
Drinking and driving ....................... 173
Driving in winter ............................ .1 77
Driving on flooded roads ................ 177
Driving on wet roads ..................... .1 77
Exhaust check ............................... 173
Fuel ................................................ 173
General .......................................... 172
Hydroplaning ................................. 177
Icy road surfaces ........................... 177
Limited braking efficiency on sal-
ted roads ....................................... 175
Snow chains .................................. 331
The first 1000 miles (1500 km) ..... 146
Wet road surface ........................... 175
DVD video
Operating (on-board computer) ..... 217
DYNAMIC SELECT button
Climate control (3-zone automatic
climate control) ............................ .1 35
Climate control (air-conditioning
system) .......................................... 132
DYNAMIC SELECT button (all vehi-
cles except Mercedes-AMG vehi-
cles) .................................................... 155
DYNAMIC SELECT controller
(Mercedes-AMG vehicles) ................. 156
E
EBD (electronic brake force distri-
bution)
Display message ............................ 230
Function/notes ................................ 72
ECO display
Function/notes ............................ .1 74
On-board computer ....................... 214
ECO start/stop function
Automatic engine start .................. 152
Automatic engine switch-off .......... 152
Deactivating/activating ................. 153
General information ....................... 152 Important safety notes .................. 151
Introduction ................................... 151
Electronic Stability Program
see ESP ®
(Electronic Stability Program)
Emergency
Automatic measures after an acci-
dent ................................................. 58
Emergency release
Driver's door ................................... .8 5
Trunk ............................................... 87
Vehicle ............................................. 85
Emergency Tensioning Devices
Activation ......................................... 56
Emissions control
Service and warranty information ... .2 2
Engine
Check Engine warning lamp .......... .2 67
Display message ............................ 243
ECO start/stop function ................ 151
Engine number ............................... 365
Irregular running ............................ 154
Jump-starting ................................. 319
Starting (important safety notes) ... 149
Starting problems .......................... 154
Starting the engine with the
SmartKey ....................................... 149
Starting with the Start/Stop but-
ton ................................................. 150
Switching off .................................. 170
Tow-starting (vehicle) ..................... 325
Engine electronics
Problem (malfunction) ................... 154
Engine jump starting
see Jump starting (engine)
Engine oil
Adding ........................................... 298
Additives ........................................ 369
Checking the oil level ..................... 297
Checking the oil level using the
dipstick .......................................... 298
Display message ............................ 245
Filli ng capacity ............................... 368
No tes about oil grades ................... 368
Notes on oil level/consumption .... 297
Temperature (on-board computer,
Mercedes-AMG vehicles) ............... 223
Viscosity ........................................ 369 Index 9
Page 12 of 374

ESP ®
(Electronic Stability Pro-
gram)
AMG menu (on-board computer) .. .2 24
Characteristics ................................. 69
Deactivating/activating (button
in Mercedes-AMG vehicles) ............. 70
Deactivating/activating (except
Mercedes ‑ AMG vehicles) ................. 70
Deactivating/activating (on-
board computer, except
Mercedes-AMG vehicles) .............. .2 19
Display message ............................ 228
Function/notes ................................ 69
General notes .................................. 69
Important safety information ........... 69
Trailer stabilization ........................... 72
Warning lamp ................................. 263
ETS/4ETS (Electronic Traction Sys-
tem) ...................................................... 69
Exhaust
see Exhaust pipe
Exhaust check ................................... 173
Exhaust pipe
Cleaning ......................................... 306
Exterior lighting
Cleaning ......................................... 305
see Lights
Exterior mirrors
Adjusting ....................................... 107
Dipping (automatic) ....................... 108
Folding in when locking (on-board
computer) ...................................... 223
Folding in/out (automatically) ....... 108
Folding in/out (electrically) ........... 107
Out of position (troubleshooting) ... 108
Setting ........................................... 108
Storing settings (memory func-
tion) ............................................... 110
Storing the parking position .......... 109
Eyeglasses compartment ................. 273
F
Filler cap
see Refueling
Flat tire
MOExtended tires .......................... 311
Preparing the vehicle ..................... 310 TIREFIT kit ...................................... 312
Floormats ........................................... 294
Fog lamps
Switching on/off ........................... 115
Frequencies
Mobile phone ................................. 362
Two-way radio ................................ 362
Front fog lamps
Display message ............................ 241
Switching on/off ........................... 115
Fuel
Additives ........................................ 367
Consumption information .............. 367
Consumption statistics .................. 214
Displaying the current consump-
tion ................................................ 214
Displaying the range ...................... 214
Driving tips .................................... 173
E10 ................................................ 366
Flexible fuel vehicles ...................... 367
Fuel gauge ....................................... 31
Grade (gasoline) ............................ 366
Important safety notes .................. 365
Problem (malfunction) ................... 169
Refueling ........................................ 167
Tank content/reserve fuel ............. 366
Fuel filler flap
Opening ......................................... 168
Fuel level
Calling up the range (on-board
computer) ...................................... 214
Fuel tank
Capacity ........................................ 366
Problem (malfunction) ................... 169
Fuses
Allocation chart ............................. 326
Before changing ............................. 325
Fuse box in the engine compart-
ment .............................................. 325
Fuse box in the front-passenger
footwell .......................................... 326
Important safety notes .................. 325
G
Garage door opener
Clearing the memory ..................... 292
General notes ................................ 28910
Index
Page 19 of 374

Steering assistant STEER CON-
TROL
see STEER CONTROL
Steering wheel
Adjusting (manually) ..................... .1 06
Button overview ............................... 33
Buttons (on-board computer) ......... 211
Cleaning ......................................... 307
Important safety notes .................. 106
Paddle shifters ............................... 164
Steering wheel paddle shifters ....... .1 64
Stopwatch (RACETIMER) ................... 224
Stowage compartments
Armrest (front) ............................... 274
Armrest (under) ............................ .2 74
Center console .............................. 273
Center console (rear) ..................... 274
Cup holders ................................... 278
Eyeglasses compartment .............. .2 73
Glove box ....................................... 273
Important safety information ......... 273
Map pockets .................................. 275
Stowage net ................................... 275
Under driver's seat/front-
passenger seat .............................. 274
Stowage net ....................................... 275
Stowage well beneath the trunk
floor .................................................... 277
Summer tires ..................................... 330
Sun visor ............................................ 279
Suspension
Adaptive Damping System ............. 191
Suspension setting
AMG adaptive sport suspension
system ........................................... 190
Switching air-recirculation mode
on/off ................................................. 141
T
Tachometer ........................................ 211
Tail lamps
Display message ............................ 241
see Lights
Tank
see Fuel tank
Tank content
Fuel gauge ....................................... 31 Technical data
Capacities ...................................... 365
Information .................................... 362
Tires/wheels ................................. 355
Vehicle data ................................... 371
Telephone
Accepting a call (multifunction
steering wheel) .............................. 218
Display message ............................ 256
Introduction ................................... 218
Menu (on-board computer) ............ 218
Number from the phone book ........ 218
Redialing ........................................ 219
Rejecting/ending a call ................. 218
Temperature
Coolant .......................................... 211
Coolant (on-board computer,
Mercedes-AMG vehicles) ............... 223
Engine oil (on-board computer,
Mercedes-AMG vehicles) ............... 223
Outside temperature ...................... 211
Setting (climate control) ................ 137
Transmission oil (on-board com-
puter, Mercedes-AMG vehicles) ..... 223
Through-loading feature ................... 275
Timing (RACETIMER) ......................... 224
Tire pressure
Calling up (on-board computer) ..... 336
Checking manually ........................ 335
Display message ............................ 250
Maximum ....................................... 334
Not reached (TIREFIT) .................... 314
Notes ............................................. 333
Reached (TIREFIT) .......................... 314
Recommended ............................... 332
Tire pressure loss warning system
General notes ................................ 335
Important safety notes .................. 335
Restarting ...................................... 336
Tire pressure monitor
Checking the tire pressure elec-
tronically ........................................ 338
Function/notes ............................. 336
General notes ................................ 336
Important safety notes .................. 336
Radio type approval for the tire
pressure monitor ........................... 339
Restarting ...................................... 338 Index 17
Page 29 of 374
QR codes for the rescue card The QR codes are secured in the fuel filler flap
and on the opposite side on the B-pillar. In the
event of an accident, rescue services can use
the QR code to quickly find the appropriate
rescue card for your vehicle. The current res-
cue card contains the most important infor-
mation about your vehicle in a compact form,
e.g. the routing of the electric cables.
You can find more information under http://
portal.aftersales.i.daimler.com/public/
content/asportal/en/communication/
informationen_fuer/QRCode.html.
Data stored in the vehicle
Data recording This vehicle is capable of recording diagnostic
information relating to vehicle operation, mal-
functions, and user settings. This may include
information about the performance or status
of various systems, including but not limited
to, engine, throttle, steering or brake sys-
tems, that is stored and can be read out with
suitable devices, particularly when the vehi-
cle is serviced. The data obtained is used to
properly diagnose and service your vehicle or
to further optimize and develop vehicle func-
tions.
COMAND/mbrace
If the vehicle is equipped with COMAND or
mbrace, additional data about the vehicle’s
operation, the use of the vehicle in certain
situations, and the location of the vehicle may
be compiled through COMAND or the mbrace
system.
For additional information please refer to the
COMAND User Manual and/or the mbrace
Terms and Conditions. Event data recorders This vehicle is equipped with an event data
recorder (EDR). The main purpose of an EDR
is to record data that will assist in under-
standing how a vehicle’s systems performed
in certain crash or near crash-like situations,
such as during air bag deployment or when
hitting a road obstacle. The EDR is designed
to record data related to vehicle dynamics
and safety systems for a short period of time,
typically 30 seconds or less.
The EDR in this vehicle is designed to record
such data as: R
how various systems in your vehicle are
operating R
whether or not the driver and passenger
seat belts are fastened R
how far (if at all) the driver is depressing the
accelerator and/or brake pedal and R
how fast the vehicle is traveling
This data can help provide a better under-
standing of the circumstances in which
crashes and injuries occur. NOTE: EDR data is
recorded by your vehicle only if a non-trivial
crash situation occurs; no data is recorded by
the EDR under normal driving conditions and
no personal data (e.g., name, gender, age,
and crash location) are recorded. However,
other parties, such as law enforcement, can
combine the EDR data with the type of per-
sonal identification data routinely acquired
during a crash investigation.
To read data recorded by an EDR, special
equipment is required, and access to the vehi-
cle or the EDR is needed. In addition to the
vehicle manufacturer, other parties that have
the special equipment, such as law enforce-
ment, can read the information by accessing
the vehicle or the EDR.
EDR data may be used in civil and criminal
matters as a tool in accident reconstruction,
accident claims, and vehicle safety. Since the
Crash Data Retrieval CDR tool that is used to
extract data from the EDR is commercially
available, Mercedes-Benz USA, LLC Introduction 27
Z
Page 170 of 374
! Overfilling the fuel tank could damage the
fuel system.
! Take care not to spill any fuel on painted
surfaces. You could otherwise damage the
paintwork.
! Use a filter when refueling from a fuel can.
Otherwise, the fuel lines and/or injection
system could be blocked by particles from
the fuel can.
Do not get into the vehicle again during the
refueling process. Otherwise, electrostatic
charge could build up again.
If you overfill the fuel tank, fuel could spray
out when the fuel pump nozzle is removed.
For further information on fuel and fuel quality
( Y
page 365).
Refueling
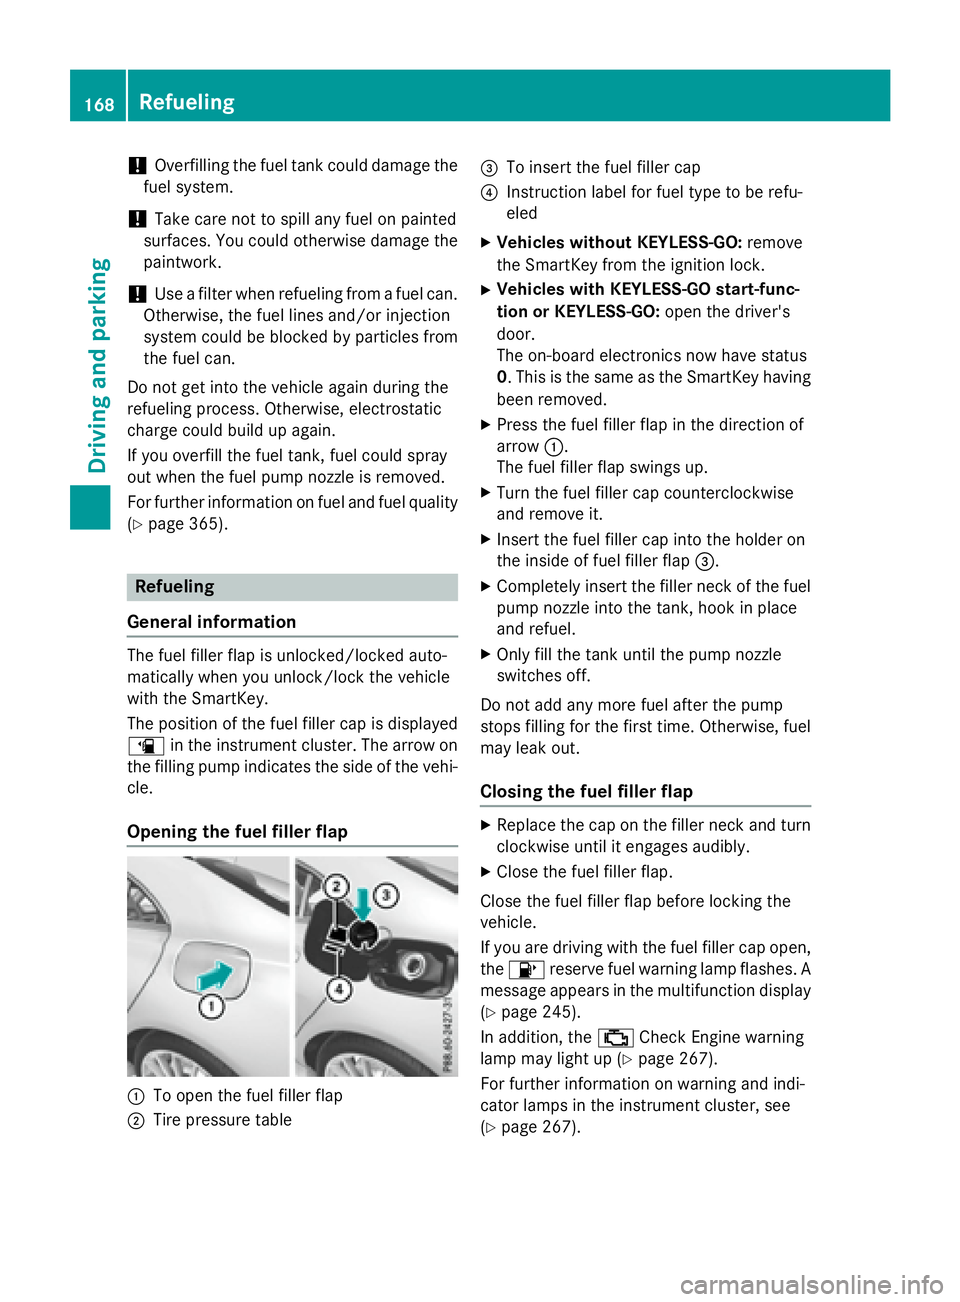
General information The fuel filler flap is unlocked/locked auto-
matically when you unlock/lock the vehicle
with the SmartKey.
The position of the fuel filler cap is displayed
�
Page 317 of 374
Do not continue driving. Contact a qualified
specialist workshop.
i In cases such as the one mentioned
above, contact an authorized Mercedes-
Benz Center. Or call 1-800-FOR-MERCedes
(in the USA) or 1-800-387-0100 (in Can-
ada). X
Correct the tire pressure if it is still at least
130 kPa (1.3 bar/19 psi). See the Tire and
Loading Information placard on the driver's
side B-pillar or the tire pressure table in the
fuel filler flap for values. X
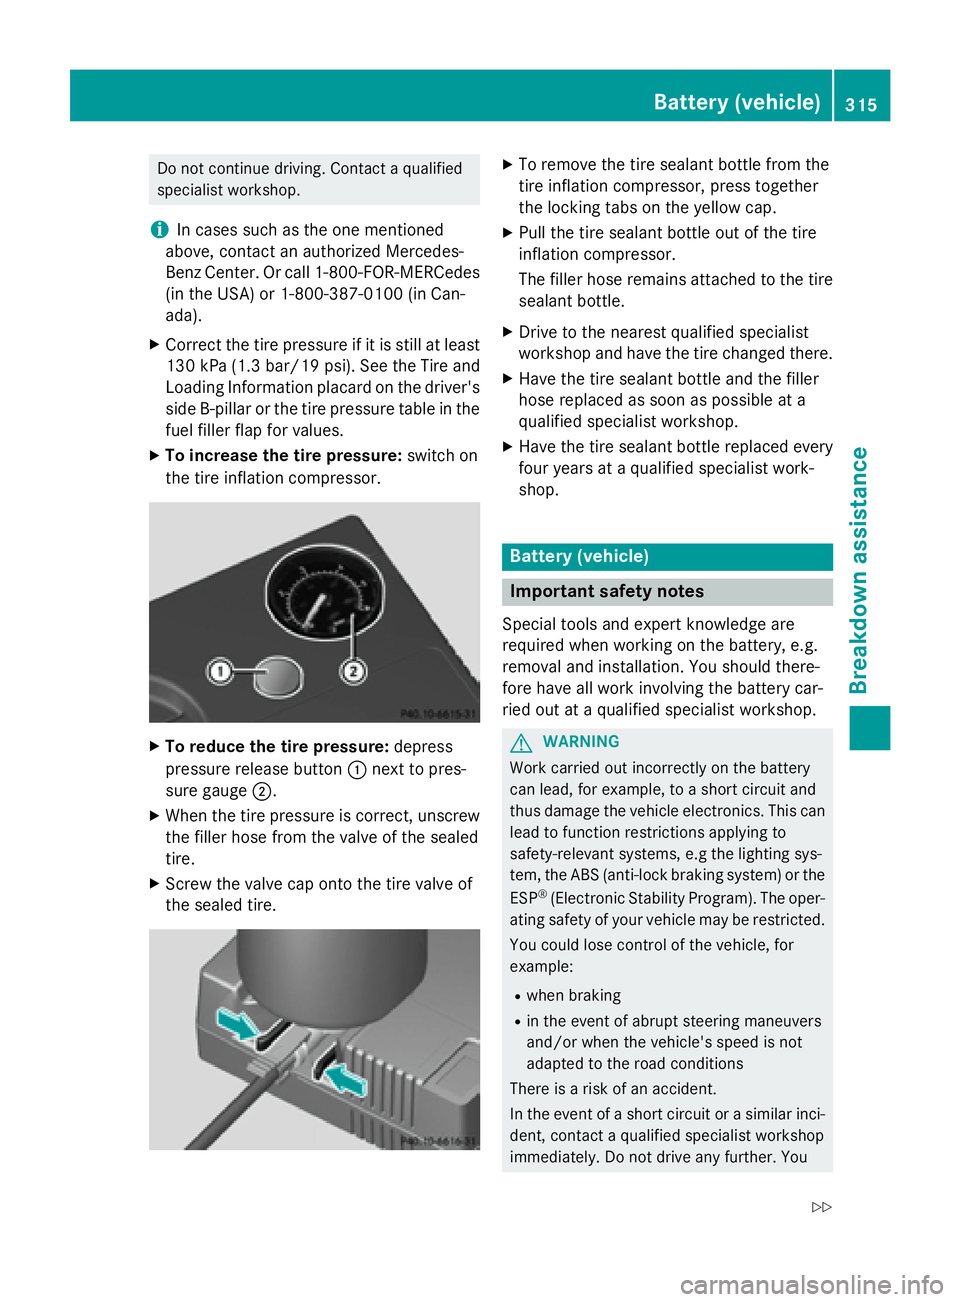
To increase the tire pressure: switch on
the tire inflation compressor.
X
To reduce the tire pressure: depress
pressure release button �C next to pres-
sure gauge �D .X
When the tire pressure is correct, unscrew
the filler hose from the valve of the sealed
tire. X
Screw the valve cap onto the tire valve of
the sealed tire. X
To remove the tire sealant bottle from the
tire inflation compressor, press together
the locking tabs on the yellow cap. X
Pull the tire sealant bottle out of the tire
inflation compressor.
The filler hose remains attached to the tire
sealant bottle. X
Drive to the nearest qualified specialist
workshop and have the tire changed there. X
Have the tire sealant bottle and the filler
hose replaced as soon as possible at a
qualified specialist workshop. X
Have the tire sealant bottle replaced every
four years at a qualified specialist work-
shop.
Battery (vehicle)
Important safety notes Special tools and expert knowledge are
required when working on the battery, e.g.
removal and installation. You should there-
fore have all work involving the battery car-
ried out at a qualified specialist workshop.
G WARNING
Work carried out incorrectly on the battery
can lead, for example, to a short circuit and
thus damage the vehicle electronics. This can
lead to function restrictions applying to
safety-relevant systems, e.g the lighting sys-
tem, the ABS (anti-lock braking system) or the
ESP ®
(Electronic Stability Program). The oper-
ating safety of your vehicle may be restricted.
You could lose control of the vehicle, for
example: R
when braking R
in the event of abrupt steering maneuvers
and/or when the vehicle's speed is not
adapted to the road conditions
There is a risk of an accident.
In the event of a short circuit or a similar inci-
dent, contact a qualified specialist workshop
immediately. Do not drive any further. YouBattery (vehicle) 315
Breakdown assistance Z
Page 321 of 374
Jump-starting For the jump-starting procedure, use only the jump-starting connection point, consisting of a
positive terminal and a ground point, in the engine compartment.
G WARNING
Battery acid is caustic. There is a risk of injury.
Avoid contact with skin, eyes or clothing. Do not inhale any battery gases. Do not lean over the
battery. Keep children away from batteries. Wash away battery acid immediately with plenty of
clean water and seek medical attention.
G WARNING
During charging and jump-starting, explosive gases can escape from the battery. There is a risk
of an explosion.
Particularly avoid fire, open flames, creating sparks and smoking. Ensure there is sufficient ven-
tilation while charging and jump-starting. Do not lean over a battery.
G WARNING
During the charging process, a battery produces hydrogen gas. If a short circuit occurs or sparks
are created, the hydrogen gas can ignite. There is a risk of an explosion. R
Make sure that the positive terminal of a connected battery does not come into contact with
vehicle parts. R
Never place metal objects or tools on a battery. R
It is important that you observe the described order of the battery terminals when connecting
and disconnecting a battery. R
When jump-starting, make sure that the battery poles with identical polarity are connected. R
It is particularly important to observe the described order when connecting and disconnecting
the jumper cables. R
Never connect or disconnect the battery terminals while the engine is running.
G WARNING
A discharged battery can freeze at temperatures below freezing point. When jump-starting the
vehicle or charging the battery, gases can escape from the battery. There is a risk of an explosion.
Allow the frozen battery to thaw out before charging it or jump-starting.
! Avoid repeated and lengthy starting attempts. Otherwise, the catalytic converter could be
damaged by the non-combusted fuel.
If the indicator/warning lamps do not light up at low temperatures, it is very likely that the
discharged battery has frozen. In this case you may neither jump-start the vehicle nor charge
the battery. Let the battery thaw first. The service life of a thawed-out battery may be shorter.
The starting characteristics can be impaired, particularly at low temperatures. Have the
thawed-out battery checked at a qualified specialist workshop. Jump-starting 319
Breakdown assistance Z
Page 337 of 374
Checking the tire pressures
Important safety notes Observe the notes on tire pressure
( Y
page 332).
Information on air pressure for the tires on
your vehicle can be found: R
on the vehicle's Tire and Loading Informa-
tion placard on the B-pillar R
in the tire pressure table in the fuel filler flap
( Y
page 168) R
in the "Tire pressure" section
Checking tire pressures manually To determine and set the correct tire pres-
sure, proceed as follows: X
Remove the valve cap of the tire that is to
be checked. X
Press the tire pressure gauge securely onto
the valve. X
Read the tire pressure and compare it to
the recommended value on the Tire and
Loading Information placard or the tire
pressure table ( Y
page 332).X
If the tire pressure is too low, increase the
tire pressure to the recommended value. X
If the tire pressure is too high, release air.
To do so, press down the metal pin in the
valve, using the tip of a pen for example.
Then check the tire pressure again using
the tire pressure checker. X
Screw the valve cap onto the valve. X
Repeat these steps for the other tires.
Tire pressure loss warning system
General notes
While the vehicle is in motion, the tire pres-
sure loss warning system monitors the set
tire pressure using the rotational speed of the
wheels. This enables the system to detect
significant pressure loss in a tire. If the speed
of rotation of a wheel changes as a result of a loss of pressure, a corresponding warning
message will appear in the multifunction dis-
play.
You can recognize the tire pressure loss warn-
ing by the Run Flat Indicator Active
Press 'OK' to Restart message in the
multifunction display in the Serv.
menu.
Information on the message display can be
found in the "Restarting the tire pressure loss
warning system" section ( Y
page 336).
Important safety notes The tire pressure warning system does not
warn you of an incorrectly set tire pressure.
Observe the notes on the recommended tire
pressure ( Y
page 332).
The tire pressure loss warning does not
replace the need to regularly check the tire
pressure. An even loss of pressure on several
tires at the same time cannot be detected by
the tire pressure loss warning system.
The tire pressure monitor is not able to warn
you of a sudden loss of pressure, e.g. if the
tire is penetrated by a foreign object. In the
event of a sudden loss of pressure, bring the
vehicle to a halt by braking carefully. Avoid
abrupt steering movements.
The function of the tire pressure loss warning
system is limited or delayed if: R
snow chains are mounted on your vehicle's
tires. R
road conditions are wintry. R
you are driving on sand or gravel. R
you adopt a very sporty driving style (cor-
nering at high speeds or driving with high
rates of acceleration). R
you are driving with a heavy load (in the
vehicle or on the roof). Tire pressure 335
Wheels and tires Z