2016 MERCEDES-BENZ CLA COUPE ESP
[x] Cancel search: ESPPage 111 of 345
(side lamps) and
L(dipped-beam head-
lamps) in the instrument cluster light up.
Dipped-beam headlamps When the ignition is switched on and the light
switch is in the Lposition, the side lamps
and dipped-beam headlamps are switched on
even if the light sensor does not sense dark
ambient light conditions. This is advantageous
when there is fog or rain.
X To switch on the dipped-beam headlamps:
turn the key in the ignition lock to position 2
or start the engine.
X Turn the light switch to L.
The green Lindicator lamp on the instru-
ment cluster lights up.
Rear foglamp The rear foglamp improves the visibility of your
vehicle in heavy fog for the following traffic.
Please observe the country-specific laws on the
use of rear foglamps.
X To switch on the rear foglamp: turn the key
in the ignition lock to position 2or start the
engine.
X Turn the light switch to LorÃ.
X Press the Rbutton.
The yellow Rindicator lamp in the instru-
ment cluster lights up.
X To switch off the rear foglamp:press the
R button.
The yellow Rindicator lamp in the instru-
ment cluster goes out.
i When the rear foglamp is switched on, the
centre brake lamp in the tail lamp switches off
due to a legal requirement.
Side lamps ! When the battery is discharged heavily, the
side lamps or parking lamps are automatically
switched off to facilitate an engine start.
Always park your vehicle safely and in a well lit area, in accordance with the relevant legal
stipulations. Avoid using the Tside lamps
for periods lasting several hours. Where pos-
sible, switch on the right Xor left W
parking lamp.
X To switch on: turn the light switch to T.
The green Tindicator lamp in the instru-
ment cluster lights up. Parking lamps
Switching on the parking lamps ensures that the
corresponding side of the vehicle is illuminated.
X To switch on the parking lamps: the key
should not be in the ignition lock or it should
be in position 0.
X Turn the light switch to W(left-hand side of
the vehicle) or X(right-hand side of the
vehicle).
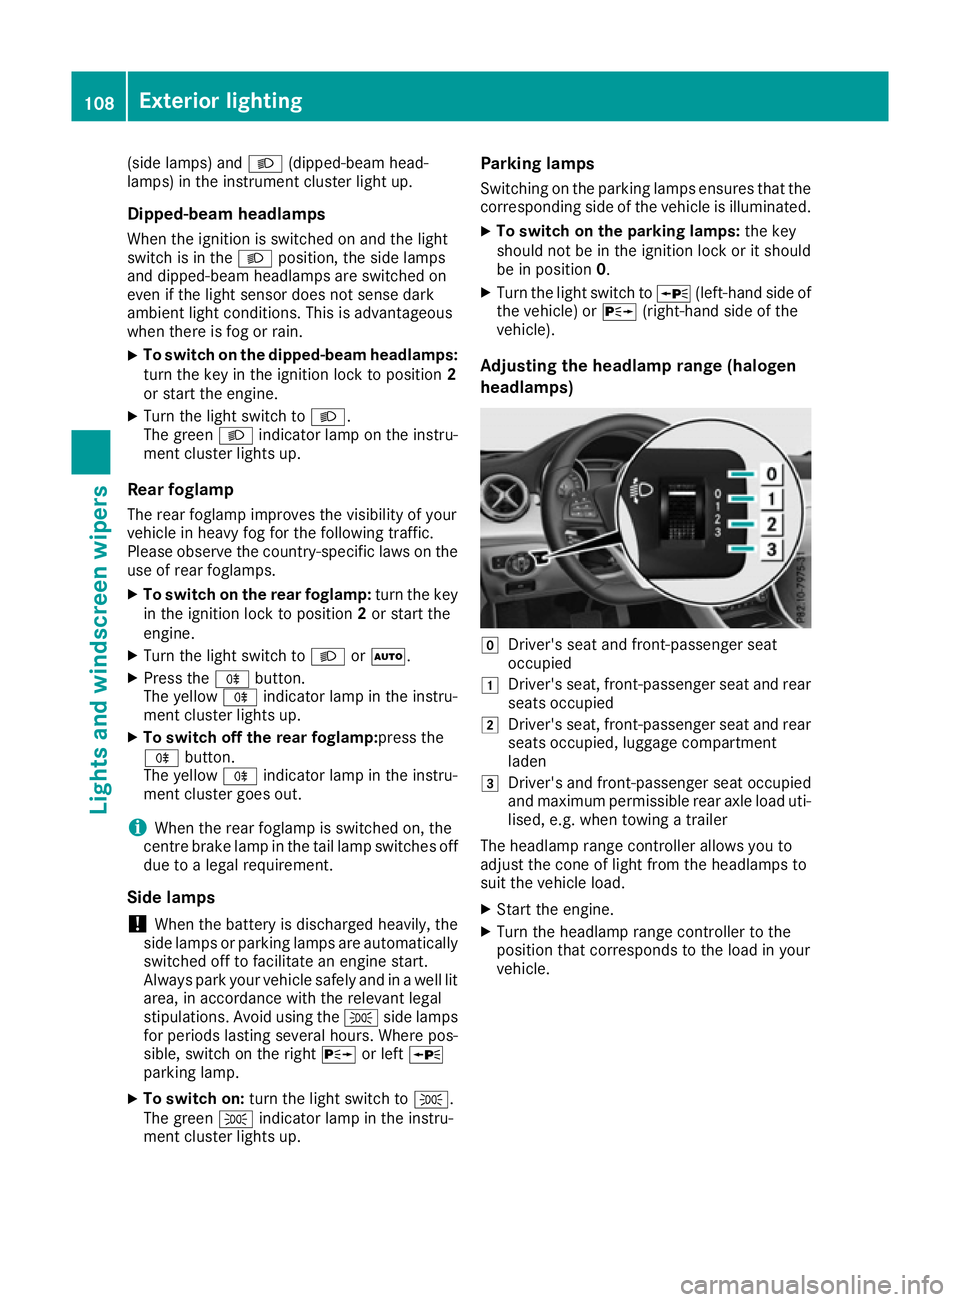
Adjusting the headlamp range (halogen
headlamps) g
Driver's seat and front-passenger seat
occupied
1 Driver's seat, front-passenger seat and rear
seats occupied
2 Driver's seat, front-passenger seat and rear
seats occupied, luggage compartment
laden
3 Driver's and front-passenger seat occupied
and maximum permissible rear axle load uti-
lised, e.g. when towing a trailer
The headlamp range controller allows you to
adjust the cone of light from the headlamps to
suit the vehicle load.
X Start the engine.
X Turn the headlamp range controller to the
position that corresponds to the load in your
vehicle. 108
Exterior lightingLights and windscreen wipers
Page 112 of 345
Combination switch
X
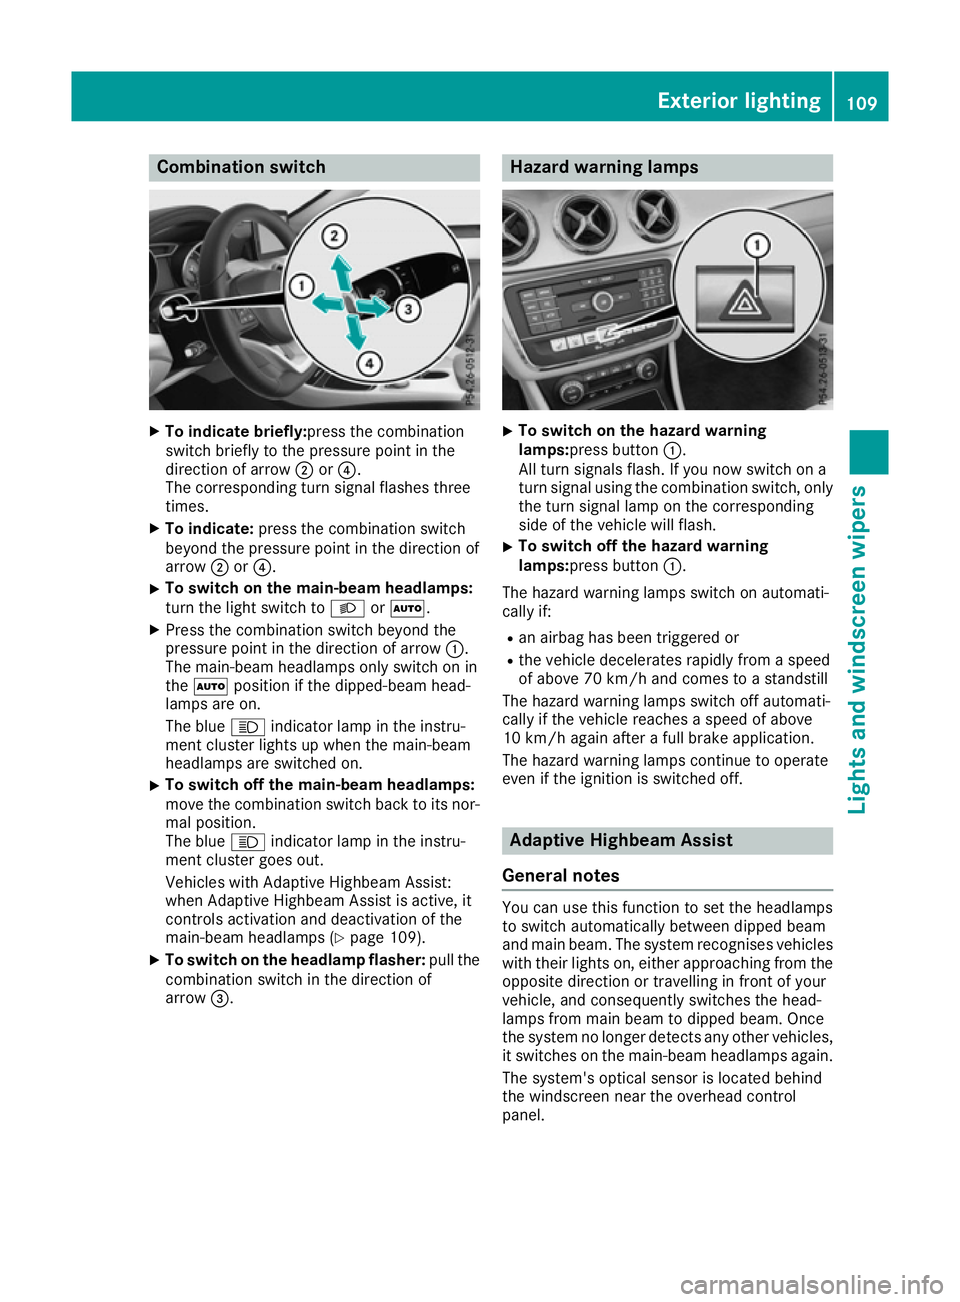
To indicate briefly:press the combination
switch briefly to the pressure point in the
direction of arrow ;or?.
The corresponding turn signal flashes three
times.
X To indicate: press the combination switch
beyond the pressure point in the direction of
arrow ;or?.
X To switch on the main-beam headlamps:
turn the light switch to LorÃ.
X Press the combination switch beyond the
pressure point in the direction of arrow :.
The main-beam headlamps only switch on in
the à position if the dipped-beam head-
lamps are on.
The blue Kindicator lamp in the instru-
ment cluster lights up when the main-beam
headlamps are switched on.
X To switch off the main-beam headlamps:
move the combination switch back to its nor-
mal position.
The blue Kindicator lamp in the instru-
ment cluster goes out.
Vehicles with Adaptive Highbeam Assist:
when Adaptive Highbeam Assist is active, it
controls activation and deactivation of the
main-beam headlamps (Y page 109).
X To switch on the headlamp flasher: pull the
combination switch in the direction of
arrow =. Hazard warning lamps
X
To switch on the hazard warning
lamps:press button
:.
All turn signals flash. If you now switch on a
turn signal using the combination switch, only the turn signal lamp on the corresponding
side of the vehicle will flash.
X To switch off the hazard warning
lamps:press button
:.
The hazard warning lamps switch on automati-
cally if:
R an airbag has been triggered or
R the vehicle decelerates rapidly from a speed
of above 70 km/h and comes to a standstill
The hazard warning lamps switch off automati-
cally if the vehicle reaches a speed of above
10 km/h again after a full brake application.
The hazard warning lamps continue to operate
even if the ignition is switched off. Adaptive Highbeam Assist
General notes You can use this function to set the headlamps
to switch automatically between dipped beam
and main beam. The system recognises vehicles
with their lights on, either approaching from the opposite direction or travelling in front of your
vehicle, and consequently switches the head-
lamps from main beam to dipped beam. Once
the system no longer detects any other vehicles, it switches on the main-beam headlamps again.
The system's optical sensor is located behind
the windscreen near the overhead control
panel. Exterior lighting
109Lights and windscreen wipers Z
Page 113 of 345
Important safety notes
G
WARNING
Adaptive Highbeam Assist does not recognise road users:
R who have no lights, e.g. pedestrians
R who have poor lighting, e.g. cyclists
R whose lighting is blocked, e.g. by a barrier
On very rare occasions, Adaptive Highbeam
Assist may fail to recognise other road users
that have lights, or may recognise them too
late. In this, or in similar situations, the auto-
matic main-beam headlamps will not be deac-
tivated or will be activated despite the pres-
ence of other road users. There is a risk of an accident.
Always carefully observe the traffic conditionsand switch off the main-beam headlamps in
good time.
Adaptive Highbeam Assist cannot take into
account road, weather or traffic conditions.
Adaptive Highbeam Assist is only an aid. You are
responsible for adjusting the vehicle's lighting
to the prevailing light, visibility and traffic con-
ditions.
In particular, the detection of obstacles can be
restricted if there is:
R poor visibility, e.g. due to fog, heavy rain or
snow
R dirt on the sensors or if the sensors are
obscured
Switching Adaptive Highbeam Assist
on/off X
To switch on: turn the light switch to Ã.
X Press the combination switch beyond the
pressure point in the direction of arrow :.
The _ indicator lamp in the multifunction
display lights up when it is dark and the light
sensor switches on the dipped-beam head-
lamps.
If you are driving at speeds above approx-
imately 30 km/h and no other road users are recognised:
The main-beam headlamps are switched on
automatically. The Kindicator lamp in the
instrument cluster also lights up. If you are driving at speeds below 25 km/h or
other road users are recognised or the roads
are adequately lit:
the main-beam headlamps are switched off
automatically The Kindicator lamp in the
instrument cluster goes out. The _indi-
cator lamp in the multifunction display
remains lit.
X To deactivate:move the combination switch
back to its normal position.
The _ indicator lamp in the multifunction
display goes out. Headlamps misted up on the inside
Certain climatic and physical conditions may
cause moisture to form in the headlamp. This
moisture does not affect the functionality of the headlamp. Interior lighting
Overview of interior lighting
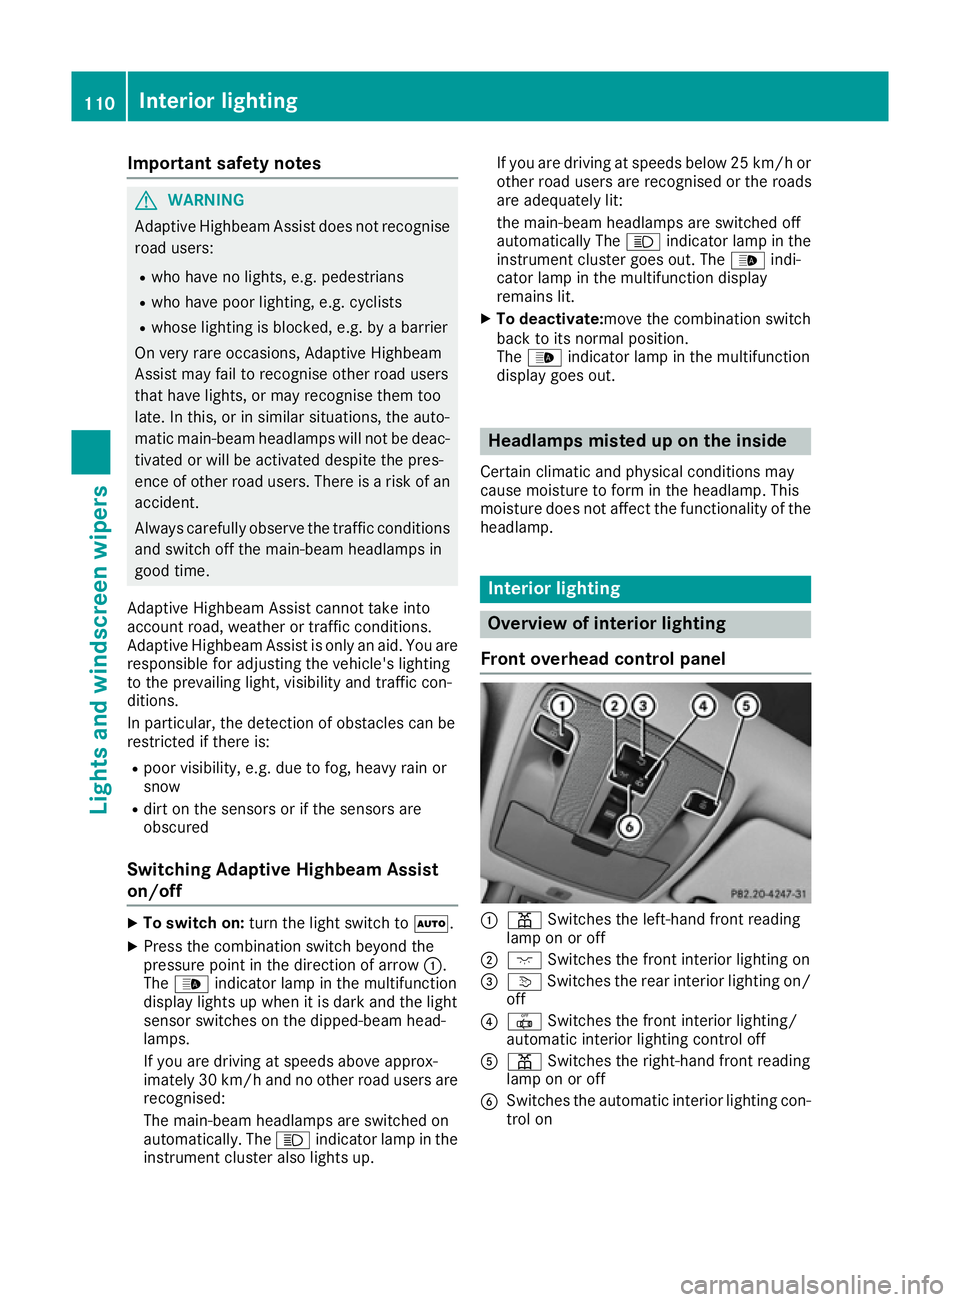
Front overhead control panel :
p Switches the left-hand front reading
lamp on or off
; c Switches the front interior lighting on
= v Switches the rear interior lighting on/
off
? | Switches the front interior lighting/
automatic interior lighting control off
A p Switches the right-hand front reading
lamp on or off
B Switches the automatic interior lighting con-
trol on 110
Interior lightingLights and windscreen wipers
Page 117 of 345
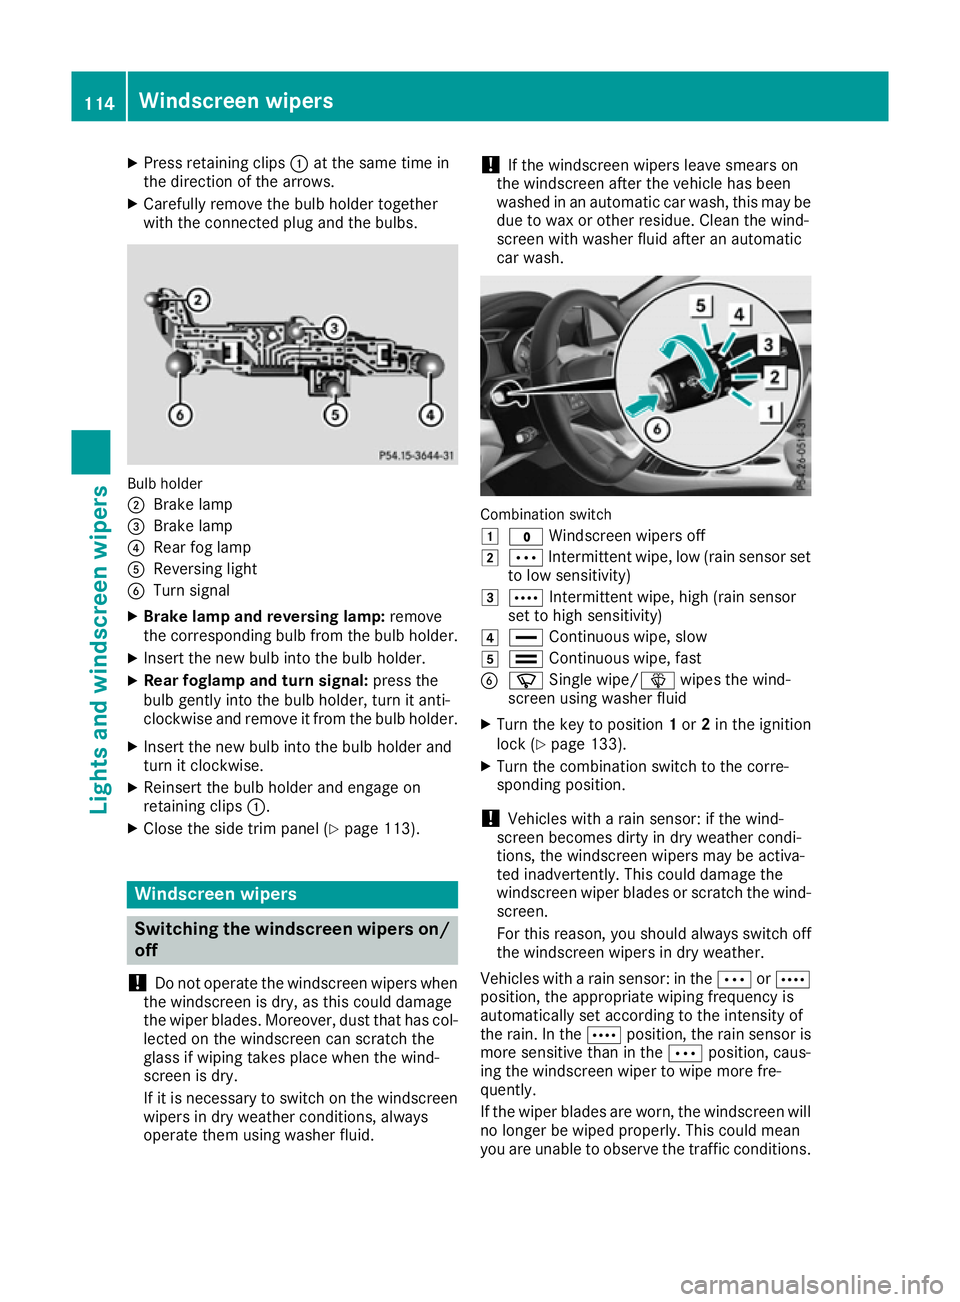
X
Press retaining clips :at the same time in
the direction of the arrows.
X Carefully remove the bulb holder together
with the connected plug and the bulbs. Bulb holder
;
Brake lamp
= Brake lamp
? Rear fog lamp
A Reversing light
B Turn signal
X Brake lamp and reversing lamp: remove
the corresponding bulb from the bulb holder.
X Insert the new bulb into the bulb holder.
X Rear foglamp and turn signal: press the
bulb gently into the bulb holder, turn it anti-
clockwise and remove it from the bulb holder.
X Insert the new bulb into the bulb holder and
turn it clockwise.
X Reinsert the bulb holder and engage on
retaining clips :.
X Close the side trim panel (Y page 113).Windscreen wipers
Switching the windscreen wipers on/
off
! Do not operate the windscreen wipers when
the windscreen is dry, as this could damage
the wiper blades. Moreover, dust that has col-
lected on the windscreen can scratch the
glass if wiping takes place when the wind-
screen is dry.
If it is necessary to switch on the windscreen wipers in dry weather conditions, always
operate them using washer fluid. !
If the windscreen wipers leave smears on
the windscreen after the vehicle has been
washed in an automatic car wash, this may be
due to wax or other residue. Clean the wind-
screen with washer fluid after an automatic
car wash. Combination switch
1
$ Windscreen wipers off
2 Ä Intermittent wipe, low (rain sensor set
to low sensitivity)
3 Å Intermittent wipe, high (rain sensor
set to high sensitivity)
4 ° Continuous wipe, slow
5 ¯ Continuous wipe, fast
B í Single wipe/î wipes the wind-
screen using washer fluid
X Turn the key to position 1or 2in the ignition
lock (Y page 133).
X Turn the combination switch to the corre-
sponding position.
! Vehicles with a rain sensor: if the wind-
screen becomes dirty in dry weather condi-
tions, the windscreen wipers may be activa-
ted inadvertently. This could damage the
windscreen wiper blades or scratch the wind- screen.
For this reason, you should always switch off
the windscreen wipers in dry weather.
Vehicles with a rain sensor: in the ÄorÅ
position, the appropriate wiping frequency is
automatically set according to the intensity of
the rain. In the Åposition, the rain sensor is
more sensitive than in the Äposition, caus-
ing the windscreen wiper to wipe more fre-
quently.
If the wiper blades are worn, the windscreen will
no longer be wiped properly. This could mean
you are unable to observe the traffic conditions. 114
Windscreen wipersLights and windscreen wipers
Page 124 of 345
THERMOTRONIC automatic climate
control X
Turn the key to position 2in the ignition lock
(Y page 133).
X To activate: press theÃbutton.
The indicator lamp in the Ãbutton lights
up. Airflow and air distribution are set to auto-
matic mode.
or X Press the ^button.
The indicator lamp in the ^button goes
out. The previous settings are reactivated.
X To deactivate: press the^button.
The indicator lamp in the ^button lights
up.
i THERMOTRONIC automatic climate control:
switch on climate control primarily using the
à button. Activating/deactivating cooling with
dehumidification
General notes If you deactivate the "Cooling with air dehumid-
ification" function, the air inside the vehicle will not be cooled during warm weather. The air
inside the vehicle will also not be dehumidified.
The windows can mist up more quickly. There-
fore, only deactivate the "Cooling with air dehu- midification" function briefly.
The "Cooling with air dehumidification" function
is available only when the engine is running. The air inside the vehicle is cooled and dehumidified
according to the temperature selected.
Condensation may drip from the underside of
the vehicle when cooling mode is active. This is
normal and not a sign that there is a malfunc-
tion.
Activating/deactivating X
Press the ¿button.
The indicator lamp in the ¿button lights
up or goes out.
The indicator lamp in the button indicates that the respective function is activated. The cool- ing with air dehumidification function has a
delayed switch-off feature.
Problems with the "Cooling with air dehumidification" function Problem
Possible causes/consequences and
M MSolutions The indicator lamp in the
¿ button flashes
three times or remains
off. The cooling with air
dehumidification func-
tion cannot be activated. The cooling with air dehumidification function has been deactivated
due to a malfunction.
X Consult a qualified specialist workshop. Setting climate control to automatic
mode
General notes Only THERMOTRONIC automatic climate con-
trol features the "Control climate control auto-
matically" function.
In automatic mode, the set temperature is main-
tained automatically at a constant level. The
system automatically regulates the temperature of the dispensed air, the airflow and the air dis-
tribution.
The "Cooling with air dehumidification" function
is activated automatically in automatic mode. Operating the climate control system
121Climate control
Page 125 of 345
Setting climate control to automatic
mode X
Turn the key to position 2in the ignition lock
(Y page 133).
X Set the desired temperature.
X To activate: press theÃbutton.
The indicator lamp in the Ãbutton lights
up. Automatic air distribution and airflow are
activated.
X To switch to manual mode: press theÉ
or Ë button.
or
X Press the KorI button.
The indicator lamp in the Ãbutton goes
out. Automatic air distribution and airflow are deactivated. Setting the temperature
Air-conditioning system You can set the temperature for the entire vehi-
cle. The set temperature is automatically main-
tained at a constant level.
X Turn the key to position 2in the ignition lock
(Y page 133).
X To increase or reduce: turn control:anti-
clockwise or clockwise (Y page 118). Change
the temperature setting only in small incre-
ments. Start at 22 †.
THERMOTRONIC automatic climate
control Different temperatures can be set for the driv-
er's and front-passenger sides. The set temper- ature is automatically maintained at a constant
level.
X Turn the key to position 2in the ignition lock
(Y page 133).
X To increase or decrease: turn control:or
E anti-clockwise or clockwise (Y page 119).
Change the temperature setting only in small
increments. Start at 22 †. Setting the air distribution
Air-conditioning system Air distribution settings
¯ Directs the airflow through the demister
vents
P Directs the airflow through the centre
and side air vents
O Directs the airflow through the footwell
air vents
i You can also activate several of the air dis-
tribution settings simultaneously. In order to
do this, press several of the air distribution
buttons. The air is then routed through differ-
ent air vents.
i Regardless of the air distribution setting,
airflow is always directed through the side air vents. The side air vents can only be closed if
the adjusters are turned clockwise until they
engage.
Setting the air distribution X Turn the key to position 2in the ignition lock
(Y page 133).
X Press one or more of the P,O,¯
buttons.
The corresponding indicator lamp comes on.
THERMOTRONIC automatic climate
control Air distribution settings
¯ Directs the airflow through the demister
vents
P Directs the airflow through the centre
and side air vents
O Directs the airflow through the footwell
air vents
S Directs the airflow through the centre
and side air vents as well as the footwell
air vents
b Directs the airflow through the centre
and side air vents as well as the demister
vents
a Directs the airflow through the footwell
and demister vents
_ Directs the airflow through the demister
vents, the centre and side air vents as
well as the footwell air vents 122
Operating the climate control systemClimate control
Page 129 of 345
with the convenience closing feature, they
will remain in this position when opened using
the convenience opening feature. Switching the residual heat on/off
General notes The residual heat function is only available with
THERMOTRONIC automatic climate control.
It is possible to make use of the residual heat of the engine to continue heating the vehicle for
approximately 30 minutes after the engine has
been switched off. The heating time depends on
the set interior temperature.
i The blower will run at a low speed regardless
of the airflow setting.
i If you switch on the residual heat function at
high temperatures, only the ventilation will be
activated. The blower runs at medium speed.
i You cannot use the ventilation to cool the
vehicle interior to a temperature lower than
the outside temperature.
Activating/deactivating X
Turn the key to position 0in the ignition lock
or remove it (Y page 133).
X Press the Ìbutton.
The indicator lamp in the Ìbutton lights
up or goes out.
The indicator lamp in the button indicates that the respective function is activated.
i Residual heat is switched off automatically:
R after approximately 30 minutes
R when the ignition is switched on
R if the battery voltage drops
R when the auxiliary heating is switched on Auxiliary heating
Important safety notes G
DANGER
If the exhaust pipe is blocked or sufficient
ventilation is not possible, toxic exhaust
fumes can enter the vehicle, especially car- bon monoxide. This is the case, e.g. in
enclosed spaces, or if the vehicle is stuck in
snow. There is a risk of fatal injuries.
You should switch off the auxiliary heating in
enclosed spaces which do not have an extrac- tion system, e.g. a garage. If the vehicle is
stuck in snow and you must leave the auxiliary
heating running, keep the exhaust pipe and
the area around the vehicle clear of snow. To guarantee a sufficient supply of fresh air, open
a window on the side of the vehicle away from the wind. G
WARNING
When the auxiliary heating is switched on,
parts of the vehicle can become very hot.
Flammable materials such as leaves, grass or twigs may ignite if they come into contact
with:
R hot parts of the exhaust system
R the exhaust gas itself
There is a risk of fire.
When the auxiliary heating is switched on,
make sure that:
R no flammable materials come into contact
with hot vehicle components
R the exhaust gas can escape from the
exhaust pipe unhindered
R the exhaust gas does not come into contact
with flammable materials.
The auxiliary heating and the exhaust gas outlet are situated in front of the right-hand front
wheel.
! Operating the auxiliary heating/ventilation
draws on the vehicle battery. After you have
heated or ventilated the vehicle a maximum of two times, drive for a longer distance.
Switch the auxiliary heating on regularly once a
month for about ten minutes.
The auxiliary heating timer function calculates
the switch-on time according to the outside
temperature so that the vehicle is preheated by the departure time. When the departure time isreached, the auxiliary heating continues to heat
for a further five minutes and then switches off. 126
Operating the climate control systemClimate control
Page 132 of 345
time and at an unsuitable location. When setting
the departure time, observe the important
safety notes (Y page 126).
X Briefly press the ubutton.
X Press the ,or. button repeatedly
until the time to be changed appears in the
display.
X Press the uand^ buttons at the same
time.
The Îsymbol in the remote control display
flashes.
X Press the ,or. button to set the
desired departure time.
i The longer you press the
,or. but-
ton, the faster the time changes.
X Press the uand^ buttons at the same
time.
The new departure time is stored.
Activating the set departure time X Briefly press the ubutton.
X Press the ,or. button repeatedly
until the desired departure time appears in
the display.
X Press the ubutton.
The Ísymbol, the departure time and,
depending on the selected departure time,
the letter A, BorCappear in the display.
Deactivating the set departure time
X Briefly press the ubutton.
The status of the auxiliary heating is shown on
the display.
X Press the .button.
The first departure time stored appears on the
display.
X Press the ^button.
OFF is shown in the remote control display.
Replacing the remote control battery Important safety notes
G
WARNING
Batteries contain toxic and corrosive substan- ces. If batteries are swallowed, it can result in
severe health problems. There is a risk of fatal injury. Keep batteries out of the reach of children. If
a battery is swallowed, seek medical attention
immediately. H
Environmental note Batteries contain pollutants.
It is illegal to dispose of them
with the household rubbish.
They must be collected sep-
arately and disposed of in anenvironmentally responsible
recycling system. Dispose of batteries in an
environmentally responsible
manner. Take discharged
batteries to a qualified spe-
cialist workshop or to a col-
lection point for used batter-
ies.
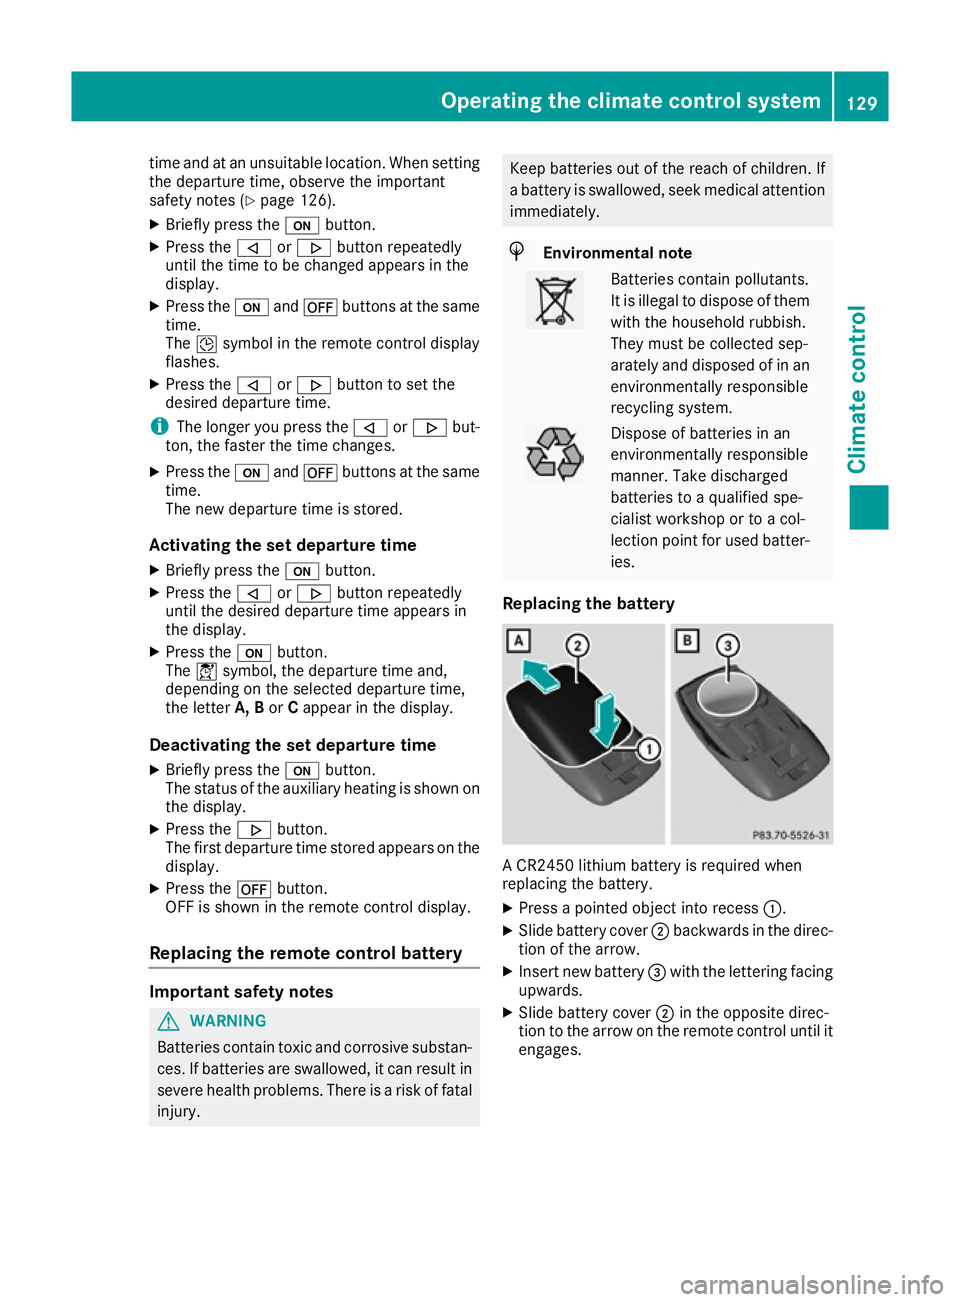
Replacing the battery A CR2450 lithium battery is required when
replacing the battery.
X Press a pointed object into recess :.
X Slide battery cover ;backwards in the direc-
tion of the arrow.
X Insert new battery =with the lettering facing
upwards.
X Slide battery cover ;in the opposite direc-
tion to the arrow on the remote control until it engages. Operating the climate control system
129Climate control Z