2016 MERCEDES-BENZ CLA COUPE roof
[x] Cancel search: roofPage 165 of 345
For this reason, drive in the following manner in
the event of heavy rain or in conditions in which aquaplaning can occur:
R lower your speed
R avoid tyre ruts
R avoid sudden steering movements
R brake carefully
Driving on flooded roads !
Bear in mind that vehicles travelling in front
or in the opposite direction create waves. This may cause the maximum permissible water
depth to be exceeded.
These notes must be observed under all cir-
cumstances. You could otherwise damage
the engine, the electronics or the transmis-
sion.
If you must drive on stretches of road on which
water has collected, please bear in mind that:
R in the case of standing water, the water level
must be no higher than the lower edge of the
vehicle body
R you should drive no faster than walking pace Winter driving
G
WARNING
If you shift down on a slippery road surface in an attempt to increase the engine's braking
effect, the drive wheels could lose their grip.
This increases the risk of skidding and having
an accident.
Do not shift down for additional engine brak-
ing on a slippery road surface. G
DANGER
If the exhaust pipe is blocked or adequate
ventilation is not possible, poisonous gases
such as carbon monoxide (CO) may enter the vehicle. This is the case, e.g. if the vehicle
becomes trapped in snow. There is a risk of
fatal injury.
If you leave the engine or the auxiliary heating
running, make sure the exhaust pipe and area
around the vehicle are clear of snow. To
ensure an adequate supply of fresh air, open a window on the side of the vehicle that is not
facing into the wind.
Have your vehicle winterproofed at a qualified
specialist workshop at the onset of winter.
You should drive particularly carefully on slip-
pery road surfaces. Avoid sudden acceleration,
steering and braking manoeuvres. Do not use
cruise control or Distance Pilot DISTRONIC.
If the vehicle threatens to skid or cannot be
stopped when moving at low speed:
X Vehicles with manual transmission: shift
to neutral.
X Vehicles with automatic transmission:
shift the transmission to position
N.
X Try to bring the vehicle under control by using
corrective steering.
The outside temperature indicator is not
designed to serve as an ice-warning device and
is therefore unsuitable for that purpose.
Changes in the outside temperature are dis-
played after a short delay.
Indicated temperatures just above freezing
point do not guarantee that the road surface is
free of ice. The road may still be icy, especially in wooded areas or on bridges.
You should pay special attention to road condi-
tions when temperatures are around freezing
point.
Further information on driving with snow chains
(Y page 313).
Further information on driving with summer
tyres (Y page 312).
Observe the notes in the "Winter operation" sec-
tion (Y page 312). Driving systems
Cruise control
General notes Cruise control maintains a constant road speed
for you. It brakes automatically in order to avoid
exceeding the set speed. You must select a
lower gear in good time on long and steep down-
hill gradients, especially if the vehicle is laden or towing a trailer. On vehicles with automatic
transmission, you need to have selected the
manual drive program M(Y page 150). By doing
so, you will make use of the braking effect of the 162
Driving systemsDriving and parking
Page 181 of 345
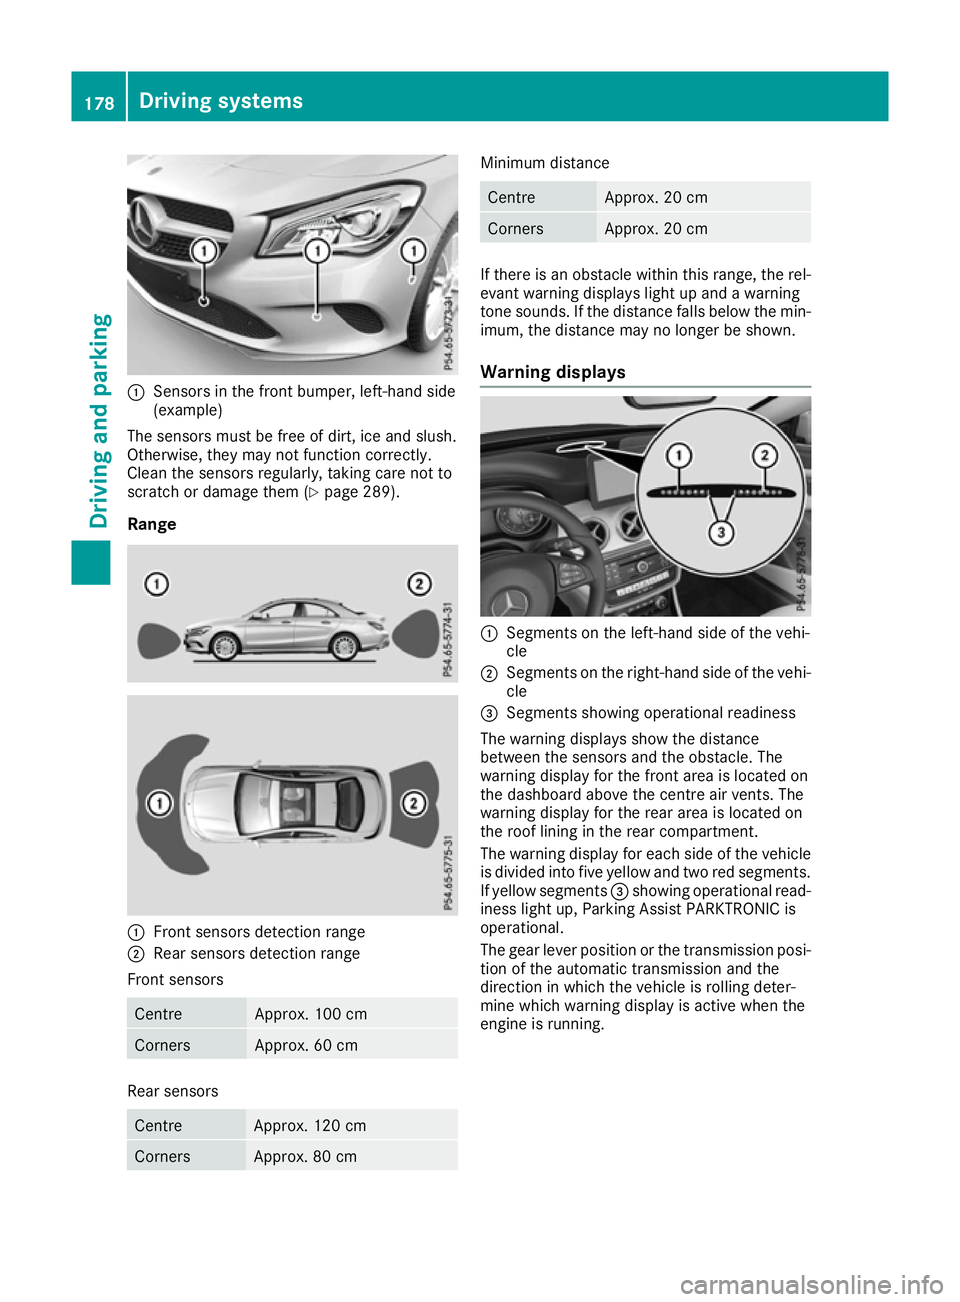
:
Sensors in the front bumper, left-hand side
(example)
The sensors must be free of dirt, ice and slush.
Otherwise, they may not function correctly.
Clean the sensors regularly, taking care not to
scratch or damage them (Y page 289).
Range :
Front sensors detection range
; Rear sensors detection range
Front sensors Centre Approx. 100 cm
Corners Approx. 60 cm
Rear sensors
Centre Approx. 120 cm
Corners Approx. 80 cm Minimum distance
Centre Approx. 20 cm
Corners Approx. 20 cm
If there is an obstacle within this range, the rel-
evant warning displays light up and a warning
tone sounds. If the distance falls below the min- imum, the distance may no longer be shown.
Warning displays :
Segments on the left-hand side of the vehi-
cle
; Segments on the right-hand side of the vehi-
cle
= Segments showing operational readiness
The warning displays show the distance
between the sensors and the obstacle. The
warning display for the front area is located on
the dashboard above the centre air vents. The
warning display for the rear area is located on
the roof lining in the rear compartment.
The warning display for each side of the vehicle
is divided into five yellow and two red segments. If yellow segments =showing operational read-
iness light up, Parking Assist PARKTRONIC is
operational.
The gear lever position or the transmission posi-
tion of the automatic transmission and the
direction in which the vehicle is rolling deter-
mine which warning display is active when the
engine is running. 178
Driving systemsDriving and parking
Page 276 of 345

To enlarge the boot you can remove the boot
floor.
X To remove: lift the boot floor almost to rain
trough ;and pull it out. X
To insert: place the boot floor at the bottom
in the centre.
X Hold sides of boot floor =and press in the
direction of the arrow until it engages in
hooks ?. Roof carrier
Important safety notes G
WARNING
When a load is transported on the roof, the
vehicle's centre of gravity rises and the han-
dling changes. If you exceed the maximum
roof load, the handling as well as steering and braking characteristics are severely affected.
There is a risk of an accident.
Always observe the maximum roof load and
adapt your driving style.
! Mercedes-Benz recommends that you only
use roof carriers that have been tested and
approved for Mercedes-Benz vehicles. This
helps to prevent damage to the vehicle.
Position the load on the roof carrier in such a way that the vehicle will not sustain damage
even when it is in motion.
Depending on the vehicle equipment, ensure
that when the roof carrier is fitted you can:
R open the panorama sliding sunroof fully
R open the boot lid fully You will find information on the maximum roof
load in the "Technical Data" section
(Y page 333).
An incorrectly secured roof carrier or roof load
may become detached from the vehicle. You
must therefore ensure that you observe the roof
carrier manufacturer's installation instructions.
Attaching the roof carrier X
Open and fold the covers :upwards care-
fully in the direction of the arrow.
X Only secure the roof carrier to the anchorage
points under covers :.
X Observe the manufacturer's installation
instructions. Features
Cup holders
Important safety notes G
WARNING
The cup holder cannot secure a drinks con-
tainer in place during a journey. If you use a
cup holder during a journey, the drinks con-
tainer could be flung around and liquid could
be spilt. Vehicle occupants could come into
contact with the liquid and, in particular, be
scalded by hot liquid. You could be distracted
from the traffic situation and lose control of
the vehicle. There is a risk of an accident and
injury.
Only use the cup holder when the vehicle is
stationary. Only place containers of a suitable Features
273Stowing and features
Z
Page 289 of 345
Care
General notes
H
Environmental note
Dispose of empty packaging and cleaning
cloths in an environmentally responsible man- ner.
! For cleaning your vehicle, do not use any of
the following:
R dry, rough or hard cloths
R abrasive cleaning agents
R solvents
R cleaning agents containing solvents
Do not scrub.
Do not touch the surfaces or protective films
with hard objects, e.g. a ring or ice scraper.
You could otherwise scratch or damage the
surfaces and protective film.
! Do not park up your vehicle for a long period
of time immediately after cleaning, particu-
larly after cleaning the wheel rim with wheel
cleaner. Wheel cleaner may lead to increased corrosion of the brake discs and pads. You
should therefore drive for a few minutes after
cleaning. By heating up the brakes, the brake
discs and pads dry. The vehicle can then be
parked up for a long period of time.
Regular care of your vehicle is a condition for
retaining quality in the long term.
Use care products and cleaning agents recom-
mended and approved by Mercedes-Benz. Washing the vehicle and cleaning the
paintwork
Automatic car wash G
WARNING
Braking efficiency is reduced after the vehicle has been washed. There is a risk of an acci-
dent.
After washing the vehicle, brake carefully
while paying attention to the traffic conditions in order to restore full braking efficiency. !
When Distance Pilot DISTRONIC or the
HOLD function is activated, the vehicle
brakes automatically in certain situations.
To avoid damage to the vehicle, deactivate
Distance Pilot DISTRONIC and the HOLD
function in the following or similar situations:
R when towing away
R in a car wash
! Make sure that the automatic transmission
is in position Nwhen washing your vehicle in
a tow-through car wash. The vehicle could be
damaged if the transmission is in another
position.
! Make sure that:
R the side windows and sliding sunroof are
closed completely.
R the blower for the ventilation/heating is
switched off (OFF button is depressed/
airflow control is turned to position 0).
R the windscreen wiper switch is at position
0 .
The vehicle could otherwise be damaged.
You can wash the vehicle in an automatic car
wash from the very start.
If the vehicle is very dirty, wash off excess dirt
before cleaning the vehicle in an automatic car
wash.
After using an automatic car wash, wipe off the
wax from the windscreen and the windscreen
wiper blades. This will prevent smears and
reduce wiping noises caused by residue on the
windscreen.
Washing by hand In some countries, washing by hand is only
allowed at specially equipped washing bays.
Observe the legal requirements for each indi-
vidual country.
X Do not use hot water and do not wash the
vehicle in direct sunlight.
X Use a soft sponge to clean.
X Use a mild cleaning agent, such as a car
shampoo approved by Mercedes-Benz.
X Thoroughly hose down the vehicle with a gen-
tle jet of water.
X Do not point the water jet directly towards the
air inlet.
X Use plenty of water and rinse out the sponge
frequently. 286
CareMaintenance and care
Page 290 of 345
X
Rinse the vehicle with clean water and dry
thoroughly with a chamois.
X Do not let the cleaning agent dry on the paint-
work.
When using the vehicle in winter, remove all
traces of road salt deposits carefully and as
soon as possible.
High-pressure cleaning equipment G
WARNING
The water jet of circular-jet nozzles (dirt grind- ers) can cause damage not visible from the
outside to tyres or chassis components. Com-
ponents damaged in this way can unexpect-
edly fail. There is a risk of an accident.
Do not use high-pressure cleaners with circu-
lar-jet nozzles to clean the vehicle. Have dam- aged tyres or chassis components replaced
immediately.
! Always maintain a distance of at least 30 cm
between the vehicle and the high-pressure
cleaner nozzle. Information about the correct
distance is available from the equipment
manufacturer.
Move the high-pressure cleaner nozzle
around when cleaning your vehicle.
Do not aim directly at any of the following:
R tyres
R door gaps, roof gaps, joints etc.
R electrical components
R battery
R plug connectors
R lamps
R seals
R trim elements
R ventilation slots
Damage to seals or electrical components
can lead to leaks or failures.
! Vehicles with decorative film: parts of your
vehicle are covered with a decorative film.
Maintain a distance of at least 70 cm between
the parts of the vehicle covered with the film
and the nozzle of the high pressure cleaner.
Information about the correct distance is
available from the equipment manufacturer.
Move the high-pressure cleaner nozzle
around whilst cleaning. Cleaning the paintwork !
Do not affix:
R stickers
R films
R magnetic plates or similar items
to painted surfaces. You could otherwise
damage the paintwork.
Scratches, corrosive deposits, areas affected by
corrosion and damage caused by inadequate
care cannot always be completely repaired. In
such cases, visit a qualified specialist workshop.
X Remove impurities immediately, where pos-
sible, whilst avoiding rubbing too hard.
X Soak insect remains with insect remover and
rinse off the treated areas afterwards.
X Soak bird droppings with water and rinse off
the treated areas afterwards.
X Remove coolant, brake fluid, tree resins, oils,
fuels and greases by rubbing gently with a
cloth soaked in petroleum ether or lighter
fluid.
X Use tar remover to remove tar stains.
X Use silicone remover to remove wax.
Care and treatment of matt paintwork !
Never polish the vehicle or the light alloy
wheels. Polishing makes the paintwork shiny.
! The following may cause the paint to
become shiny and thus reduce the matt
effect:
R vigorous rubbing with unsuitable materials
R frequent use of car washes
R washing the vehicle in direct sunlight
! Never use paint cleaner, buffing or polishing
products, or gloss preserver, e.g. wax, for the purpose of paintwork care. These products
are only suitable for high-gloss surfaces. Their
use on vehicles with matt paintwork leads to
considerable surface damage or, more spe-
cifically, to shiny, spotted areas.
Always have paintwork repairs carried out at a
qualified specialist workshop.
! Do not use wash programs with a hot wax
treatment under any circumstances.
Observe these notes if your vehicle has a clear
matt finish. This will help you to avoid damage to the paintwork due to incorrect treatment. Care
287Maintenance and care Z
Page 295 of 345
accident. There is an increased risk of injury,
possibly even fatal.
Never bleach or colour seat belts.
! Do not clean the seat belts using chemical
cleaning agents. Do not dry the seat belts at
temperatures above 80 † or in direct sun-
light.
X Use clean, lukewarm water and soap solution.
Cleaning the roof lining and carpets X
Roof lining: if it is very dirty, use a soft brush
or dry shampoo.
X Carpets: use the carpet and textile cleaning
agents recommended and approved by
Mercedes-Benz. 292
CareMaintenance and care
Page 315 of 345
R
Do not drive with tyres that have too little
tread depth. This significantly reduces trac-
tion on wet roads (aquaplaning).
R Replace the tyres after six years at the latest,
regardless of wear.
Observe the notes on the emergency spare
wheel (Y page 323). MOExtended tyres (tyres with run-flat
characteristics)
With MOExtended tyres (tyres with run-flat char- acteristics), you can continue to drive your vehi-
cle even if there is a total loss of pressure in one or more tyres.
MOExtended tyres may be used only in conjunc-tion with an activated tyre pressure loss warning
system or with an activated tyre pressure mon-
itor and only on wheels specifically tested by
Mercedes-Benz.
Notes on driving with MOExtended tyres with a
flat tyre (Y page 295).
Vehicles with MOExtended tyres are not equip-
ped with a TIREFIT kit at the factory. It is there-
fore recommended that you additionally equip
your vehicle with a TIREFIT kit if you fit tyres that
do not feature run-flat characteristics, e.g. win-
ter tyres. A TIREFIT kit can be obtained from a
qualified specialist workshop. Winter operation
General notes
Have your vehicle winterproofed at a qualified
specialist workshop at the onset of winter.
Observe the notes in the "Changing a wheel"
section (Y page 318). Driving with summer tyres
At temperatures below +7 †, summer tyres lose
elasticity and therefore traction and braking
power. Change the tyres on your vehicle to
M+S tyres. Using summer tyres at very cold
temperatures could cause tears to form,
thereby damaging the tyres permanently.
Mercedes-Benz cannot accept responsibility for
this type of damage. G
WARNING
Damaged tyres can cause tyre inflation pres-
sure loss. As a result, you could lose control of your vehicle. There is a risk of accident.
Check the tyres regularly for signs of damageand replace any damaged tyres immediately. M+S tyres
G
WARNING
M+S tyres with a tyre tread depth of less than 4 mm are not suitable for use in winter as they
do not provide sufficient traction. There is a
risk of accident.
M+S tyres with a tread depth of less than
4 mm must be replaced.
At temperatures below +7 †, use winter tyres or all-season tyres. Both types of tyre are identified
by the M+S marking.
Only winter tyres bearing the isnowflake
symbol in addition to the M+S marking provide
the best possible grip in wintry road conditions. Only these tyres will allow driving safety sys-
tems such as ABS and ESP ®
to function opti-
mally in winter. These tyres have been devel-
oped specifically for driving in snow.
Use M+S tyres of the same make and tread on all
wheels to maintain safe handling characteris-
tics.
Always observe the maximum permissible
speed specified for the M+S tyres you have fit-
ted.
If you fit M+S tyres that have a lower maximum
permissible speed than that of the vehicle, affix
an appropriate warning label in the driver's field
of vision. This can be obtained at a qualified
specialist workshop.
Under these circumstances, you should also
restrict the maximum design speed of the vehi- cle using the permanent limiter to the maximumpermissible speed for the M+S tyres
(Y page 166). 312
Winter operationWheels and tyres
Page 318 of 345
You can recognise the tyre pressure loss warn-
ing by the Run Flat Indicator active
Run Flat Indicator active
Restart with OK
Restart with OK message which appears in
the multifunction display in the Serv.
Serv.menu.
Information on the message display can be
found in the "Restarting the tyre pressure loss
warning system" section (Y page 315).
Important safety notes The tyre pressure warning system does not warn
you of an incorrectly set tyre pressure. Observe the notes on the recommended tyre pressure
(Y page 313).
The tyre pressure loss warning system does not
replace the need to regularly check the tyre
pressure. An even loss of pressure on several
tyres at the same time cannot be detected by
the tyre pressure loss warning system.
The tyre pressure loss warning system is not
able to warn you of a sudden loss of air, e.g. if the
tyre is penetrated by a foreign object. In the
event of a sudden loss of air, bring the vehicle to a halt by braking carefully. Avoid abrupt steering
manoeuvres.
The function of the tyre pressure loss warning
system is limited or delayed if:
R snow chains are fitted on your vehicle
R road conditions are wintry
R you are driving on a loose surface (e.g. sand or
gravel)
R you adopt a very sporty driving style (corner-
ing at high speeds or driving with high rates of acceleration)
R you are towing a very heavy or large trailer
R you are driving with a heavy load (in the vehi-
cle or on the roof)
Restarting the tyre pressure loss warn-
ing system Restart the tyre pressure loss warning system if
you have:
R changed the tyre pressure
R changed the wheels or tyres
R fitted new wheels or tyres
X Before restarting, make sure that the tyre
pressures are set properly on all four tyres for
the respective operating conditions. The rec-
ommended tyre pressures can be found in the
tyre pressure table on the fuel filler flap. The tyre pressure loss warning system can
only give reliable warnings if you have set the correct tyre pressure. If an incorrect tyre
pressure is set, this incorrect value will be
monitored.
X Observe the notes in the section on tyre pres-
sures (Y page 313).
X Make sure that the key is in position 2in the
ignition lock (Y page 133).
X Press =or; on the steering wheel to
select the Serv.
Serv.menu.
X Press the 9or: button to select
Tyre pressure Tyre pressure .
X Press the abutton.
The Run Flat Indicator active
Run Flat Indicator active
Restart with OK
Restart with OK message appears in the
multifunction display.
If you wish to confirm the restart:
X Press the abutton.
The Tyre
Tyre press.
press. now
nowOK?
OK?message appears
in the multifunction display.
X Press the 9or: button to select Yes
Yes.
X Press the abutton.
The Run Flat Indicator restarted
Run Flat Indicator restarted mes-
sage appears in the multifunction display.
After a teach-in period, the tyre pressure loss warning system will monitor the set tyre pres-
sures of all four tyres.
If you wish to cancel the restart: X Press the %button.
or X If the Tyre press. now OK? Tyre press. now OK? message
appears, press the 9or: button to
select Cancel
Cancel.
X Press the abutton.
The tyre pressure values stored at the last
restart will continue to be monitored. Tyre pressure monitor
General notes If a tyre pressure monitor system is fitted, the
vehicle's wheels have sensors fitted that moni-
tor the tyre pressures in all four tyres. The tyre
pressure monitor warns you if the pressure
drops in one or more of the tyres. The tyre pres- sure monitor functions only if the corresponding
sensors are fitted to all wheels. Tyre pressure
315Wheels and tyres Z