2016 MERCEDES-BENZ CLA COUPE engine
[x] Cancel search: enginePage 89 of 345
X
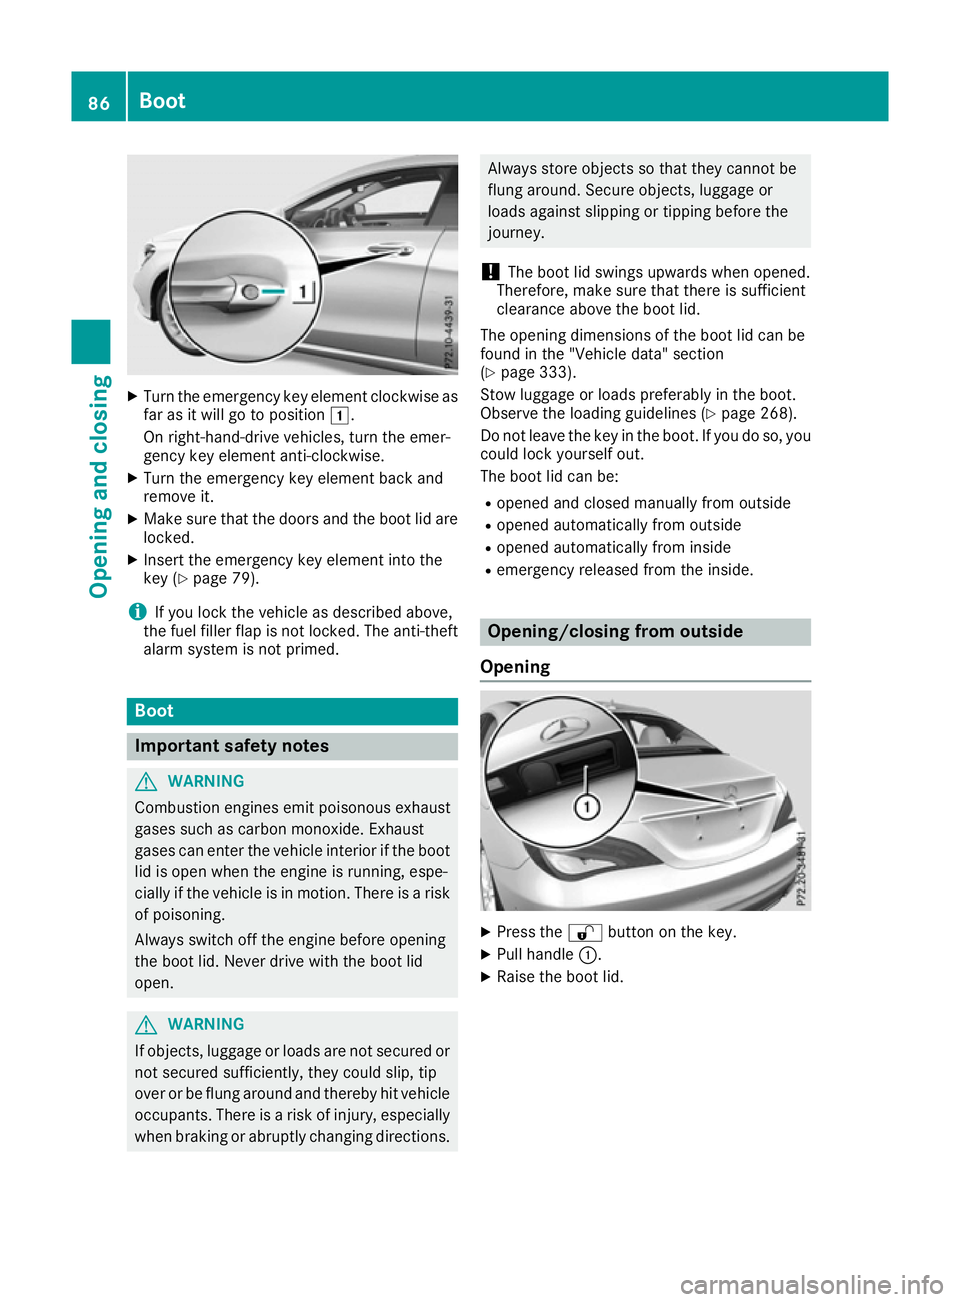
Turn the emergency key element clockwise as
far as it will go to position 1.
On right-hand-drive vehicles, turn the emer-
gency key element anti-clockwise.
X Turn the emergency key element back and
remove it.
X Make sure that the doors and the boot lid are
locked.
X Insert the emergency key element into the
key (Y page 79).
i If you lock the vehicle as described above,
the fuel filler flap is not locked. The anti-theft
alarm system is not primed. Boot
Important safety notes
G
WARNING
Combustion engines emit poisonous exhaust
gases such as carbon monoxide. Exhaust
gases can enter the vehicle interior if the boot
lid is open when the engine is running, espe-
cially if the vehicle is in motion. There is a risk of poisoning.
Always switch off the engine before opening
the boot lid. Never drive with the boot lid
open. G
WARNING
If objects, luggage or loads are not secured or not secured sufficiently, they could slip, tip
over or be flung around and thereby hit vehicle
occupants. There is a risk of injury, especially when braking or abruptly changing directions. Always store objects so that they cannot be
flung around. Secure objects, luggage or
loads against slipping or tipping before the
journey.
! The boot lid swings upwards when opened.
Therefore, make sure that there is sufficient
clearance above the boot lid.
The opening dimensions of the boot lid can be
found in the "Vehicle data" section
(Y page 333).
Stow luggage or loads preferably in the boot.
Observe the loading guidelines (Y page 268).
Do not leave the key in the boot. If you do so, you
could lock yourself out.
The boot lid can be:
R opened and closed manually from outside
R opened automatically from outside
R opened automatically from inside
R emergency released from the inside. Opening/closing from outside
Opening X
Press the %button on the key.
X Pull handle :.
X Raise the boot lid. 86
BootOpening and closing
Page 91 of 345
R
HANDS-FREE ACCESS does not function dur-
ing engine start.
R Dirt caused by road salt around sensors :
may restrict functionality.
Using HANDS-FREE ACCESS with a pros-
thetic leg may restrict functionality.
R If a KEYLESS-GO key is in the KEYLESS-GO
detection range to the rear of the vehicle,
HANDS-FREE ACCESS could be triggered.
The boot lid could thus be opened uninten-
tionally, for example, when you:
- fold the ball coupling in or out
- couple or uncouple a trailer
- fit or remove a rear-mounted bicycle rack
- load/unload bicycles on/from a rear-
mounted bicycle rack
- set down or lift up an object behind the
vehicle
- polish the rear of the vehicle
Do not carry the KEYLESS-GO key with you in
such situations. This will prevent the uninten- tional opening of the boot lid.
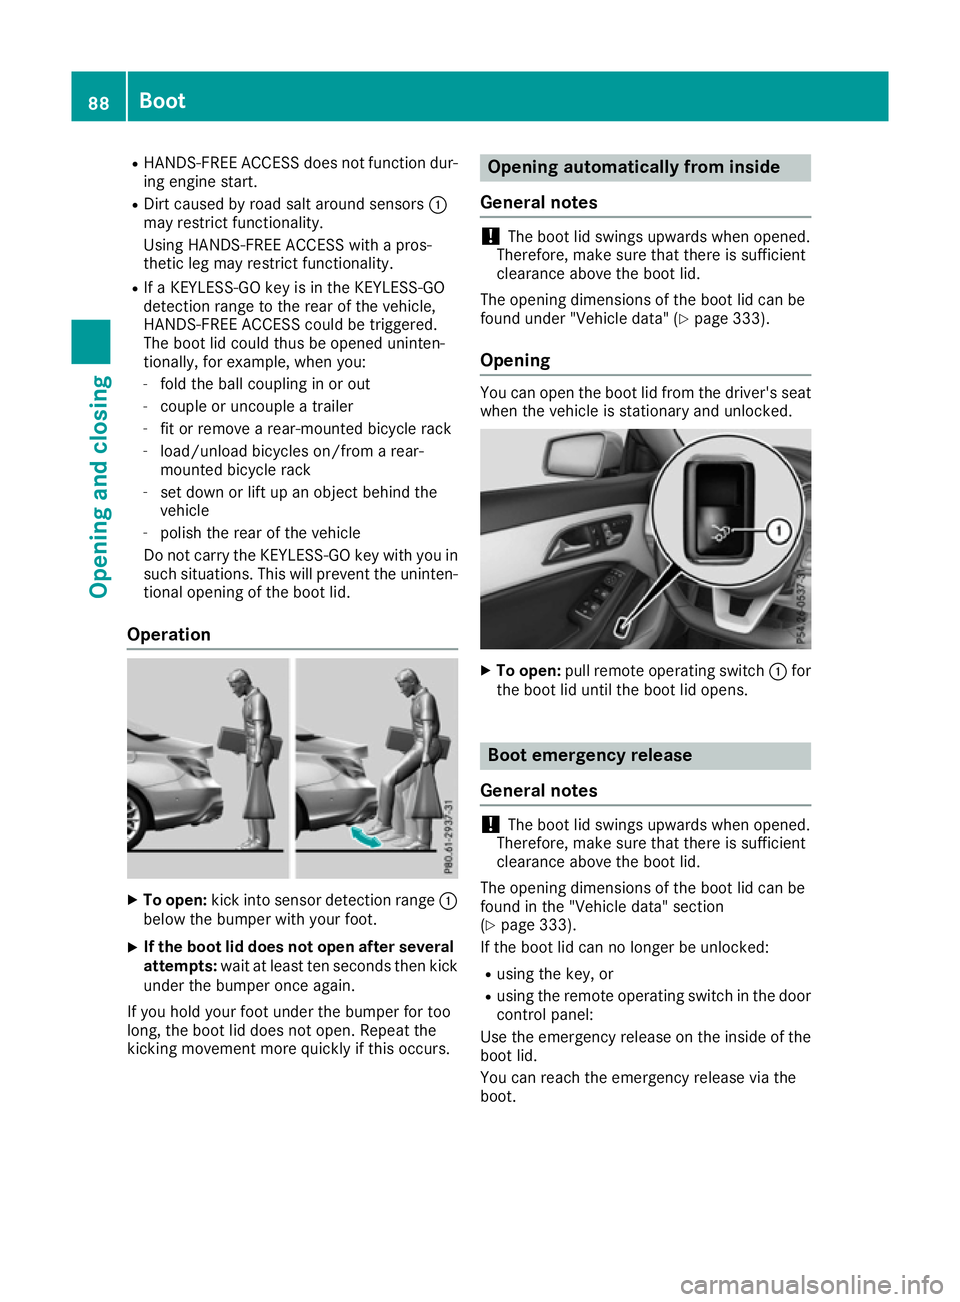
Operation X
To open: kick into sensor detection range :
below the bumper with your foot.
X If the boot lid does not open after several
attempts: wait at least ten seconds then kick
under the bumper once again.
If you hold your foot under the bumper for too
long, the boot lid does not open. Repeat the
kicking movement more quickly if this occurs. Opening automatically from inside
General notes !
The boot lid swings upwards when opened.
Therefore, make sure that there is sufficient
clearance above the boot lid.
The opening dimensions of the boot lid can be
found under "Vehicle data" (Y page 333).
Opening You can open the boot lid from the driver's seat
when the vehicle is stationary and unlocked. X
To open: pull remote operating switch :for
the boot lid until the boot lid opens. Boot emergency release
General notes !
The boot lid swings upwards when opened.
Therefore, make sure that there is sufficient
clearance above the boot lid.
The opening dimensions of the boot lid can be
found in the "Vehicle data" section
(Y page 333).
If the boot lid can no longer be unlocked:
R using the key, or
R using the remote operating switch in the door
control panel:
Use the emergency release on the inside of the boot lid.
You can reach the emergency release via the
boot. 88
BootOpening and closing
Page 93 of 345
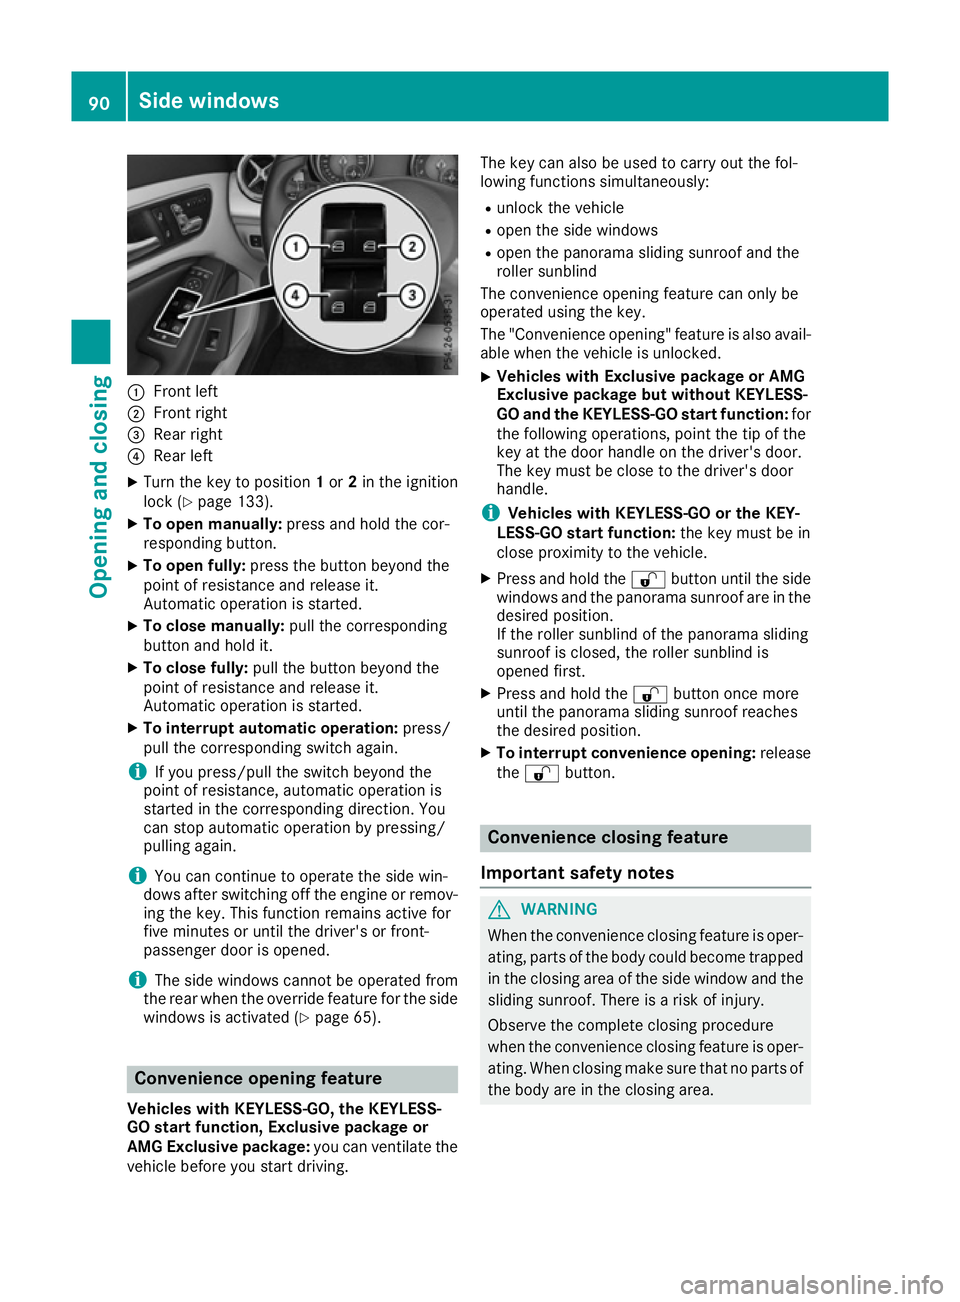
:
Front left
; Front right
= Rear right
? Rear left
X Turn the key to position 1or 2in the ignition
lock (Y page 133).
X To open manually: press and hold the cor-
responding button.
X To open fully: press the button beyond the
point of resistance and release it.
Automatic operation is started.
X To close manually: pull the corresponding
button and hold it.
X To close fully: pull the button beyond the
point of resistance and release it.
Automatic operation is started.
X To interrupt automatic operation: press/
pull the corresponding switch again.
i If you press/pull the switch beyond the
point of resistance, automatic operation is
started in the corresponding direction. You
can stop automatic operation by pressing/
pulling again.
i You can continue to operate the side win-
dows after switching off the engine or remov-
ing the key. This function remains active for
five minutes or until the driver's or front-
passenger door is opened.
i The side windows cannot be operated from
the rear when the override feature for the side windows is activated (Y page 65).Convenience opening feature
Vehicles with KEYLESS-GO, the KEYLESS-
GO start function, Exclusive package or
AMG Exclusive package: you can ventilate the
vehicle before you start driving. The key can also be used to carry out the fol-
lowing functions simultaneously:
R
unlock the vehicle
R open the side windows
R open the panorama sliding sunroof and the
roller sunblind
The convenience opening feature can only be
operated using the key.
The "Convenience opening" feature is also avail-
able when the vehicle is unlocked.
X Vehicles with Exclusive package or AMG
Exclusive package but without KEYLESS-
GO and the KEYLESS-GO start function: for
the following operations, point the tip of the
key at the door handle on the driver's door.
The key must be close to the driver's door
handle.
i Vehicles with KEYLESS-GO or the KEY-
LESS-GO start function: the key must be in
close proximity to the vehicle.
X Press and hold the %button until the side
windows and the panorama sunroof are in the
desired position.
If the roller sunblind of the panorama sliding
sunroof is closed, the roller sunblind is
opened first.
X Press and hold the %button once more
until the panorama sliding sunroof reaches
the desired position.
X To interrupt convenience opening: release
the % button. Convenience closing feature
Important safety notes G
WARNING
When the convenience closing feature is oper- ating, parts of the body could become trapped
in the closing area of the side window and the
sliding sunroof. There is a risk of injury.
Observe the complete closing procedure
when the convenience closing feature is oper-
ating. When closing make sure that no parts of the body are in the closing area. 90
Side windowsOpening and closing
Page 97 of 345
At low speeds it raises again automatically.
You can also temporarily deactivate automatic
lowering. To do so, press the 3switch. The
sliding sunroof raises again automatically.
You can continue to operate the sliding sunroof
after switching off the engine or removing the
key. This function remains active for five
minutes or until you open a front door.
The sliding sunroof cannot be opened if a roof
carrier is fitted. In order to allow ventilation of
the vehicle interior, you can raise the sliding
sunroof.
If contact is made with a roof carrier approved
by Mercedes-Benz, the sliding sunroof lowers
slightly but remains raised at the rear.
Rain-closing feature when the engine is
switched off The rain-closing feature is only available for vehi-
cles with a rain sensor.
When the key is in position 0in the ignition lock
or is removed, the panorama sliding sunroof
closes automatically:
R if it starts to rain
R at extreme outside temperatures
R after six hours
R if there is a malfunction in the power supply
The panorama sliding sunroof remains raised at
the rear in order to allow ventilation of the vehi-
cle interior.
If the panorama sliding sunroof is obstructed
when being closed by the rain-closing feature, it opens again slightly. The rain-closing feature is
then deactivated.
The panorama sliding sunroof does not close if:
R it is raised at the rear.
R it is blocked.
R no rain is falling on the area of the windscreen
being monitored by the rain sensor. If, for
example, the vehicle is under a bridge or in a
carport, the field of the sensor may be cov-
ered.
Rain-closing feature when driving The raised panorama sliding sunroof automati-
cally lowers when driving if it starts to rain. The
sliding sunroof is lowered depending on:
R the road speed and
R the intensity of the rain You can manually cancel the automatic closing
procedure. Press or pull the
3switch in any
direction.
To raise the panorama sliding sunroof again,
press the 3button in direction :. The rain-
closing feature remains activated. Operating the roller sunblind for the
panorama sliding sunroof
Important safety notes G
WARNING
Parts of the body could become trapped
between the roller sunblind and frame or slid- ing sunroof during automatic opening or clos-
ing. There is a risk of injury.
When opening or closing, make sure that no
body parts are in the sweep of the roller sun- blind.
If someone is trapped:
R release the switch immediately or
R press the switch in any direction during the
automatic opening/closing process
The opening/closing process is stopped.
The roller sunblind shields the vehicle interior
from sunlight. The roller sunblind can only be
opened and closed when the panorama sliding
sunroof is closed.
Roller sunblind reversing feature The roller sunblind is equipped with an auto-
matic reversing feature. If an object blocks or
restricts the roller sunblind during the closing
process, the roller sunblind opens again auto-
matically. The automatic reversing feature is,
however, only an aid and is no substitute for your
attention when closing the roller sunblind. G
WARNING
The reversing feature does not react:
R to soft, light and thin objects, e.g. small fin-
gers
R when closing the roller sunblind again man-
ually immediately after automatic reversing 94
Panorama sliding sunroofOpening and closing
Page 100 of 345

Correct driver's seat position
G
WARNING
You could lose control of the vehicle while
driving if you:
R adjust the driver's seat, steering wheel or
mirrors
R fasten the seat belt
There is a risk of an accident.
Adjust the driver's seat, head restraint, steer-
ing wheel and mirrors and fasten your seat
belt before starting the engine. Observe the following when adjusting steering
wheel
:, seat belt ;and driver's seat =:
R you are as far away from the driver's airbag as
possible
R you are sitting in an upright position
R your thighs are slightly supported by the seat
cushion
R your legs are not entirely stretched and you
can depress the pedals properly
R the back of your head is supported at eye level
by the centre of the head restraint
R you can hold the steering wheel with your
arms slightly bent
R you can move your legs freely
R you can see all the displays in the instrument
cluster clearly R
you have a good overview of traffic conditions
R the seat belt is pulled snugly against the body
and must be routed across the centre of your
shoulder and across your hips in the pelvic
area
Further related subjects:
R Adjusting the seats manually (Y page 98)
R Adjusting the seats electrically
(Y page 99)
R Adjusting the steering wheel manually
(Y page 102)
R Fastening the seat belt correctly
(Y page 43)
R Adjusting the rear-view mirror and exterior
mirrors (Y page 103)
R Vehicles with a memory function: save the
seat, steering wheel and exterior mirror set-
tings using the memory function
(Y page 106) Seats
Important safety notes
G
WARNING
If children adjust the seats, they could
become trapped, especially if they are unat-
tended. There is a risk of injury.
When leaving the vehicle, always take the key with you and lock the vehicle. Never leave
children unattended in the vehicle.
The seats can still be adjusted when there is no
key in the ignition lock. G
WARNING
When adjusting a seat, you or another vehicle occupant could become trapped by the guiderail of the seat, for instance. There is a risk of
injury.
Make sure that no one has any part of their
body within the sweep of the seat when
adjusting it.
Observe the safety notes on "Airbags"
(Y page 44) and "Children in the Vehicle"
(Y page 54). Seats
97Seats, steering wheel and mirrors Z
Page 101 of 345
G
WARNING
If the driver's seat is not correctly engaged, it could unexpectedly move while driving. This
could cause you to lose control of the vehicle. There is a risk of an accident.
Always ensure that the driver's seat is
engaged before starting the vehicle. G
WARNING
You could lose control of the vehicle while
driving if you:
R adjust the driver's seat, steering wheel or
mirrors
R fasten the seat belt
There is a risk of an accident.
Adjust the driver's seat, head restraint, steer-
ing wheel and mirrors and fasten your seat
belt before starting the engine. G
WARNING
If you adjust the seat height carelessly, you or other vehicle occupants could be trapped andthereby injured. Children in particular could
accidentally press the electrical seat adjust-
ment buttons and become trapped. There is a
risk of injury.
While moving the seats, make sure that your
hands or other body parts do not get under the
lever assembly of the seat adjustment sys-
tem.
! To avoid damage to the seats and the seat
heating, observe the following information:
R do not spill any liquids on the seats. If liquid
is spilled on the seats, dry them as soon aspossible.
R if the seat covers are damp or wet, do not
switch on the seat heating. The seat heat-
ing should also not be used to dry the seats.
R clean the seat covers as recommended;
see the "Interior care" section.
R do not transport heavy loads on the seats.
Do not place sharp objects on the seat
cushions, e.g. knives, nails or tools. The seats should only be occupied by passen-
gers, if possible.
R when the seat heating is in operation, do
not cover the seats with insulating materi-
als, e.g. blankets, coats, bags, seat covers,
child seats or booster seats.
! Make sure that there are no objects in the
footwell under or behind the seats when mov-
ing the seats back. There is a risk that the
seats and/or the objects could be damaged.
i Further related subjects:
R Luggage compartment enlargement (fold-
ing down the rear seats) (Y page 271) Adjusting the seats manually
Vehicles without the seating comfort
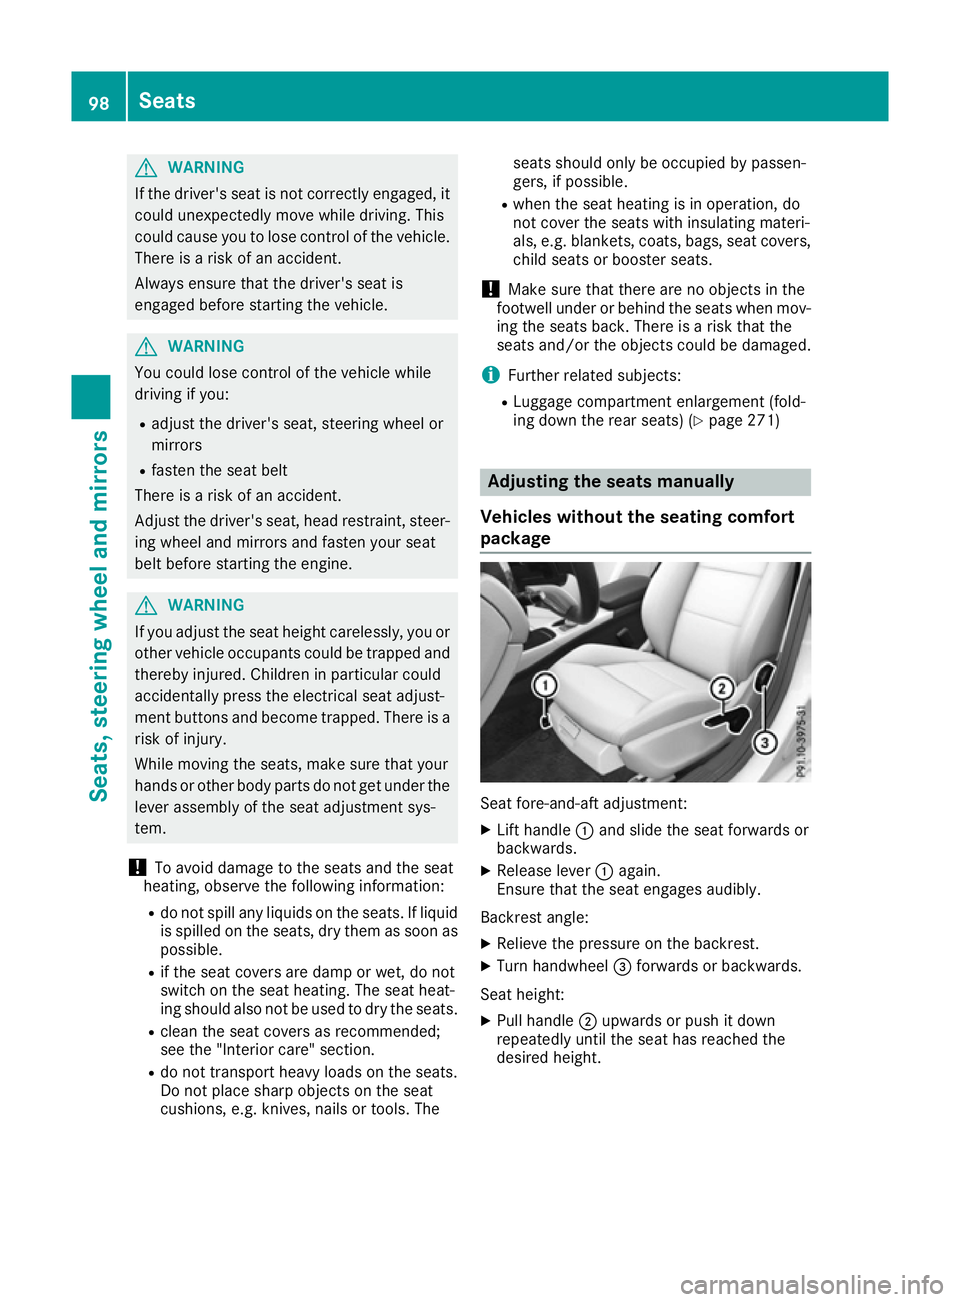
package Seat fore-and-aft adjustment:
X
Lift handle :and slide the seat forwards or
backwards.
X Release lever :again.
Ensure that the seat engages audibly.
Backrest angle:
X Relieve the pressure on the backrest.
X Turn handwheel =forwards or backwards.
Seat height: X Pull handle ;upwards or push it down
repeatedly until the seat has reached the
desired height. 98
SeatsSeats, steering wheel and mirrors
Page 102 of 345
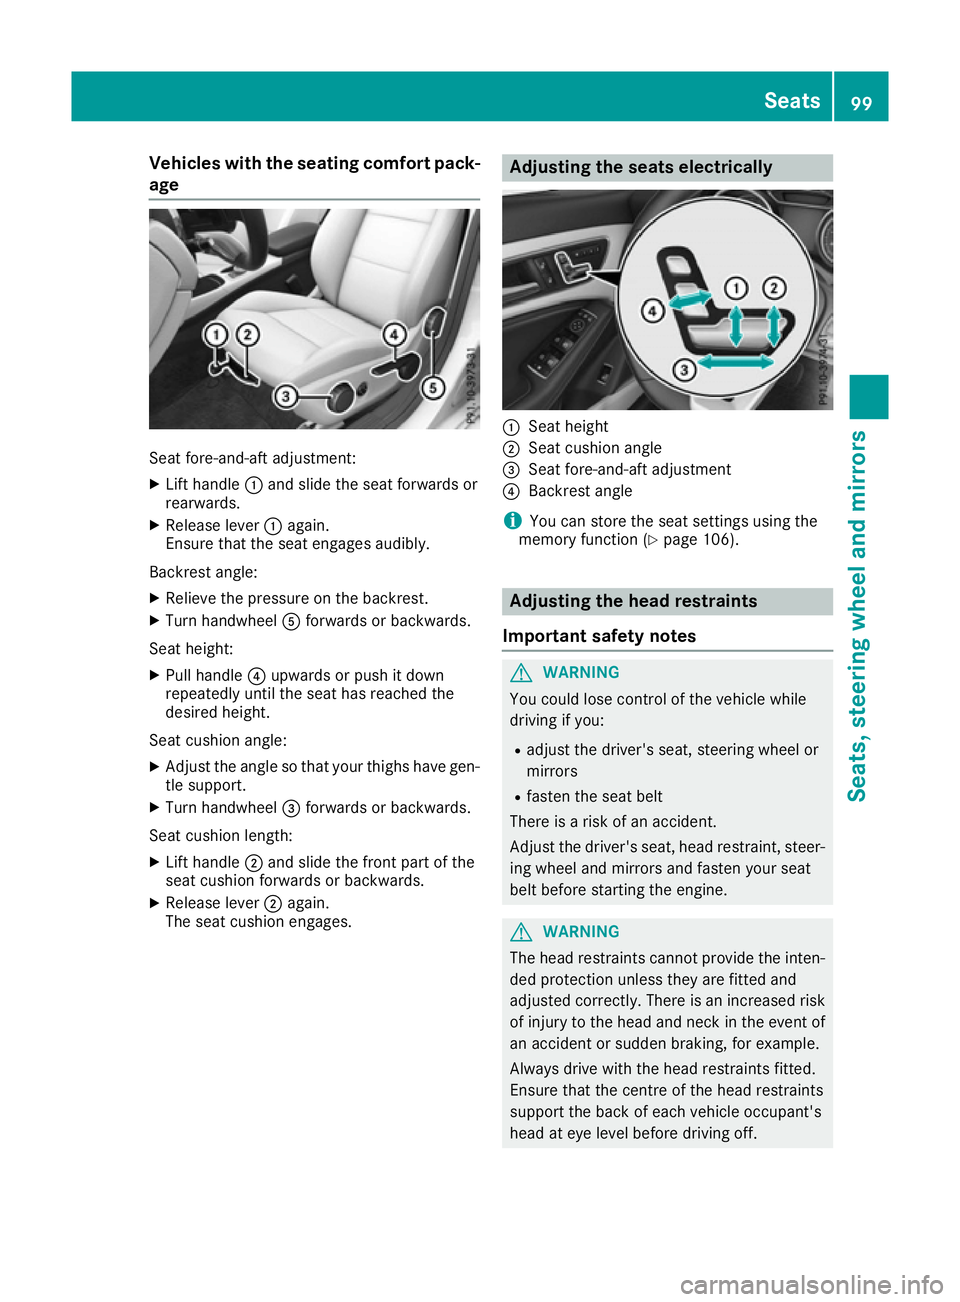
Vehicles with the seating comfort pack-
age Seat fore-and-aft adjustment:
X Lift handle :and slide the seat forwards or
rearwards.
X Release lever :again.
Ensure that the seat engages audibly.
Backrest angle:
X Relieve the pressure on the backrest.
X Turn handwheel Aforwards or backwards.
Seat height: X Pull handle ?upwards or push it down
repeatedly until the seat has reached the
desired height.
Seat cushion angle:
X Adjust the angle so that your thighs have gen-
tle support.
X Turn handwheel =forwards or backwards.
Seat cushion length: X Lift handle ;and slide the front part of the
seat cushion forwards or backwards.
X Release lever ;again.
The seat cushion engages. Adjusting the seats electrically
:
Seat height
; Seat cushion angle
= Seat fore-and-aft adjustment
? Backrest angle
i You can store the seat settings using the
memory function (Y page 106). Adjusting the head restraints
Important safety notes G
WARNING
You could lose control of the vehicle while
driving if you:
R adjust the driver's seat, steering wheel or
mirrors
R fasten the seat belt
There is a risk of an accident.
Adjust the driver's seat, head restraint, steer-
ing wheel and mirrors and fasten your seat
belt before starting the engine. G
WARNING
The head restraints cannot provide the inten-
ded protection unless they are fitted and
adjusted correctly. There is an increased risk of injury to the head and neck in the event of
an accident or sudden braking, for example.
Always drive with the head restraints fitted.
Ensure that the centre of the head restraints
support the back of each vehicle occupant's
head at eye level before driving off. Seats
99Seats, steering wheel and mirrors Z
Page 105 of 345
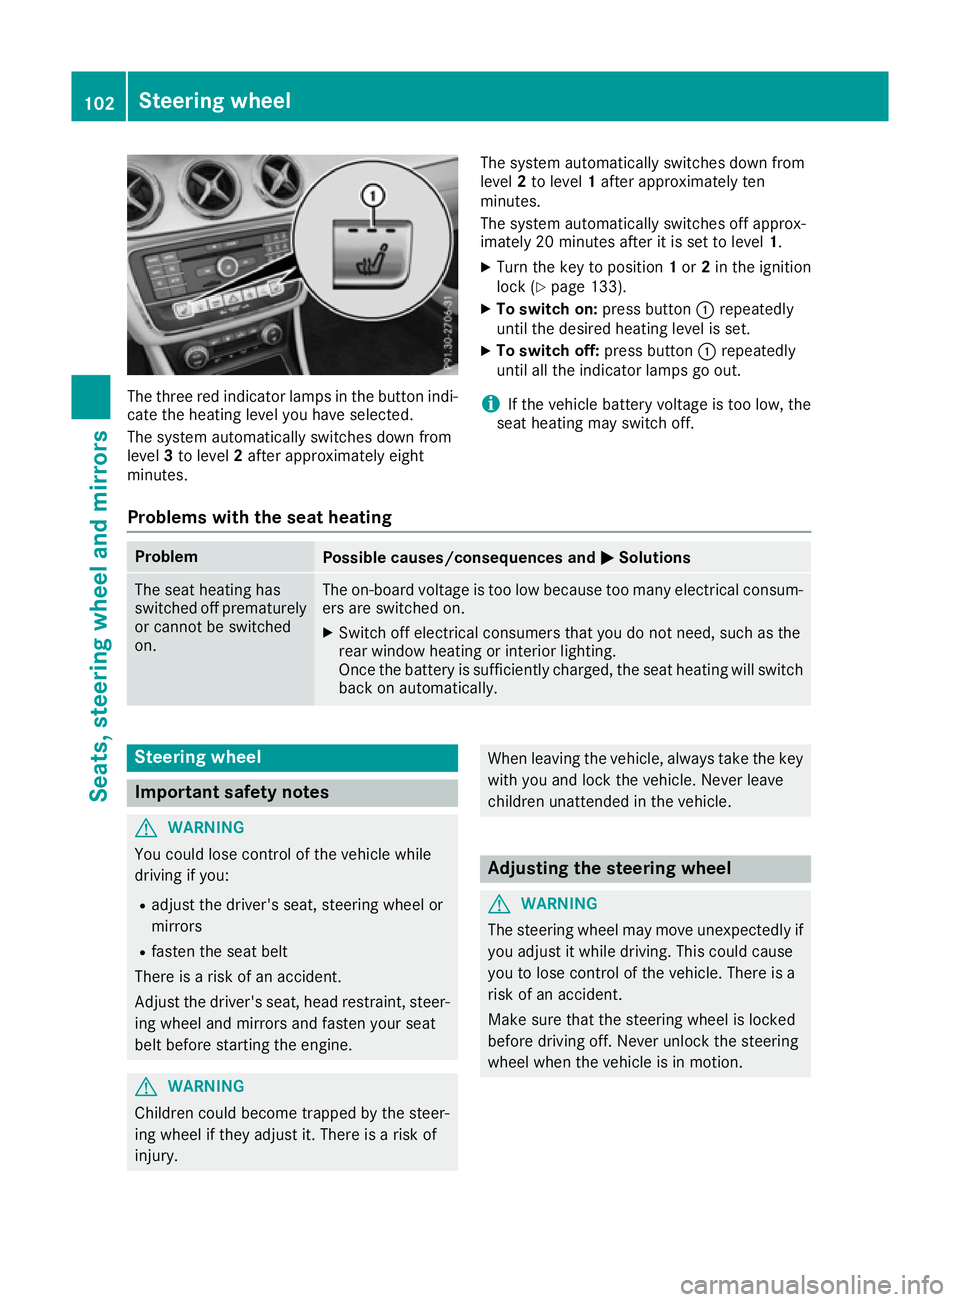
The three red indicator lamps in the button indi-
cate the heating level you have selected.
The system automatically switches down from
level 3to level 2after approximately eight
minutes. The system automatically switches down from
level 2to level 1after approximately ten
minutes.
The system automatically switches off approx-
imately 20 minutes after it is set to level 1.
X Turn the key to position 1or 2in the ignition
lock (Y page 133).
X To switch on: press button:repeatedly
until the desired heating level is set.
X To switch off: press button:repeatedly
until all the indicator lamps go out.
i If the vehicle battery voltage is too low, the
seat heating may switch off.
Problems with the seat heating Problem
Possible causes/consequences and
M MSolutions The seat heating has
switched off prematurely
or cannot be switched
on. The on-board voltage is too low because too many electrical consum-
ers are switched on.
X Switch off electrical consumers that you do not need, such as the
rear window heating or interior lighting.
Once the battery is sufficiently charged, the seat heating will switch
back on automatically. Steering wheel
Important safety notes
G
WARNING
You could lose control of the vehicle while
driving if you:
R adjust the driver's seat, steering wheel or
mirrors
R fasten the seat belt
There is a risk of an accident.
Adjust the driver's seat, head restraint, steer-
ing wheel and mirrors and fasten your seat
belt before starting the engine. G
WARNING
Children could become trapped by the steer-
ing wheel if they adjust it. There is a risk of
injury. When leaving the vehicle, always take the key
with you and lock the vehicle. Never leave
children unattended in the vehicle. Adjusting the steering wheel
G
WARNING
The steering wheel may move unexpectedly if you adjust it while driving. This could cause
you to lose control of the vehicle. There is a
risk of an accident.
Make sure that the steering wheel is locked
before driving off. Never unlock the steering
wheel when the vehicle is in motion. 102
Steering wheelSeats, steering wheel and mirrors