2016 MERCEDES-BENZ CLA COUPE keyless
[x] Cancel search: keylessPage 118 of 345
Replacing the wiper blades
Important safety notes G
WARNING
If the windscreen wipers begin to move while
you are changing the wiper blades, you can be trapped by the wiper arm. There is a risk of
injury.
Always switch off the windscreen wipers and
ignition before changing the wiper blades.
! To avoid damaging the windscreen wiper
blades, make sure that you touch only the
wiper arm of the windscreen wiper.
! Never open the bonnet if a windscreen
wiper arm has been folded away from the
windscreen.
Never fold a windscreen wiper arm without a
wiper blade back onto the windscreen.
Hold the windscreen wiper arm firmly when
you change the wiper blade. If you release the
windscreen wiper arm without a wiper blade
and it falls onto the windscreen, the wind-
screen may be damaged by the force of the
impact.
Mercedes-Benz recommends that you have
the wiper blades changed at a qualified spe-
cialist workshop.
Replacing the windscreen wiper blades Removing the wiper blades
X Vehicles without KEYLESS-GO or KEY-
LESS-GO start function:
remove the key
from the ignition lock.
X Vehicles with KEYLESS-GO or KEYLESS-
GO start function:
switch off the engine.
X Fold the wiper arm away from the windscreen. X
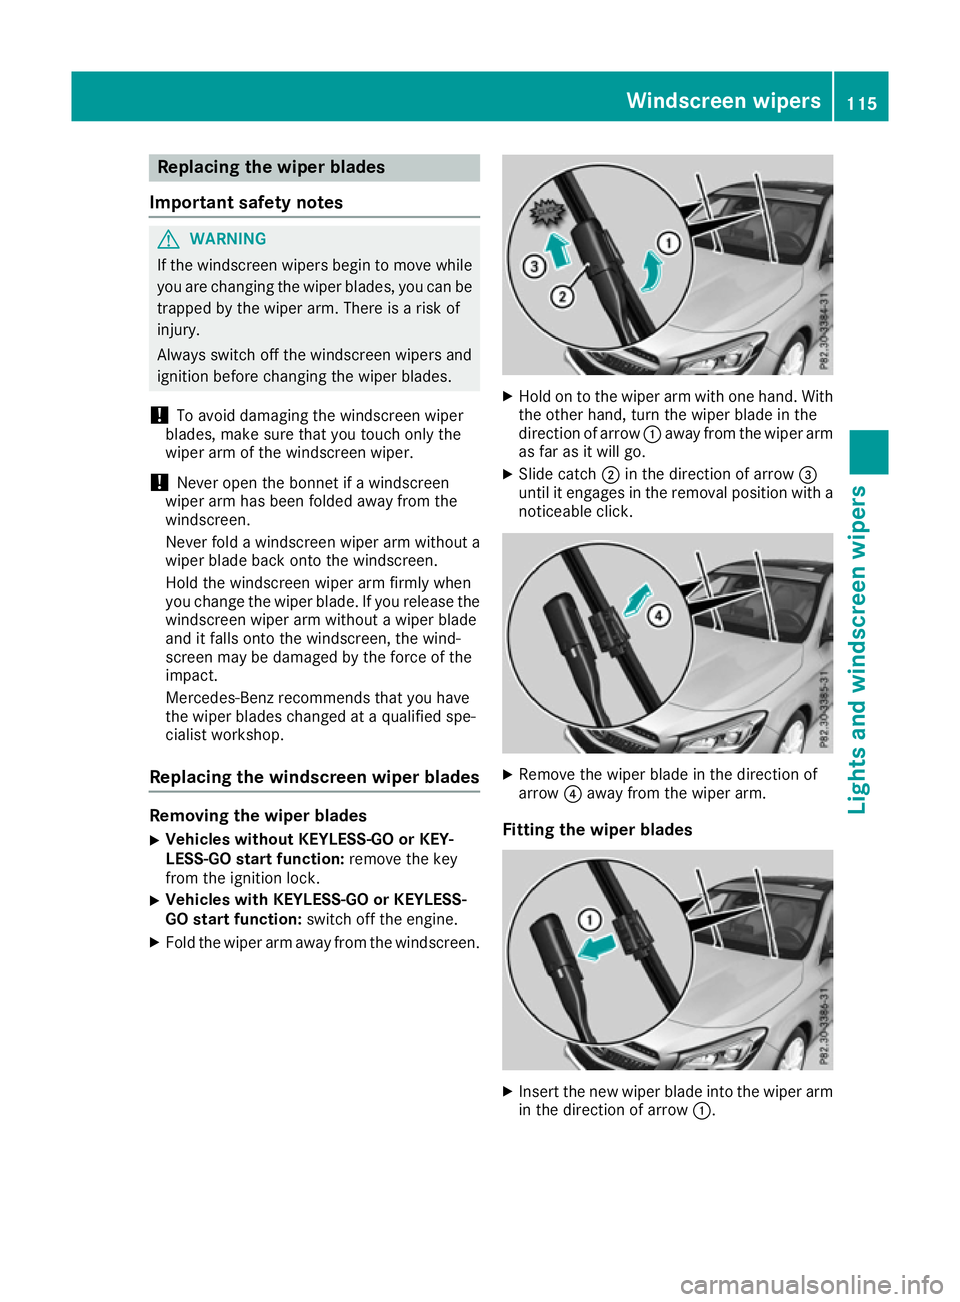
Hold on to the wiper arm with one hand. With
the other hand, turn the wiper blade in the
direction of arrow :away from the wiper arm
as far as it will go.
X Slide catch ;in the direction of arrow =
until it engages in the removal position with a noticeable click. X
Remove the wiper blade in the direction of
arrow ?away from the wiper arm.
Fitting the wiper blades X
Insert the new wiper blade into the wiper arm
in the direction of arrow :. Windscreen wipers
115Lights and windscreen wipers Z
Page 136 of 345
!
Do not warm up the engine when the vehicle
is stationary. Drive off immediately. Avoid
high engine speeds and driving at full throttle
until the engine has reached its operating
temperature.
Only shift the automatic transmission to the
desired drive position when the vehicle is sta- tionary.
Where possible, avoid spinning the drive
wheels when pulling away on slippery roads.
You could otherwise damage the drive train.
! Mercedes-AMG vehicles:
avoid full-load
operation and engine speeds greater than
5000 rpm when the engine is cold. This will
help to protect the engine and maintain
smooth engine operation. Key positions
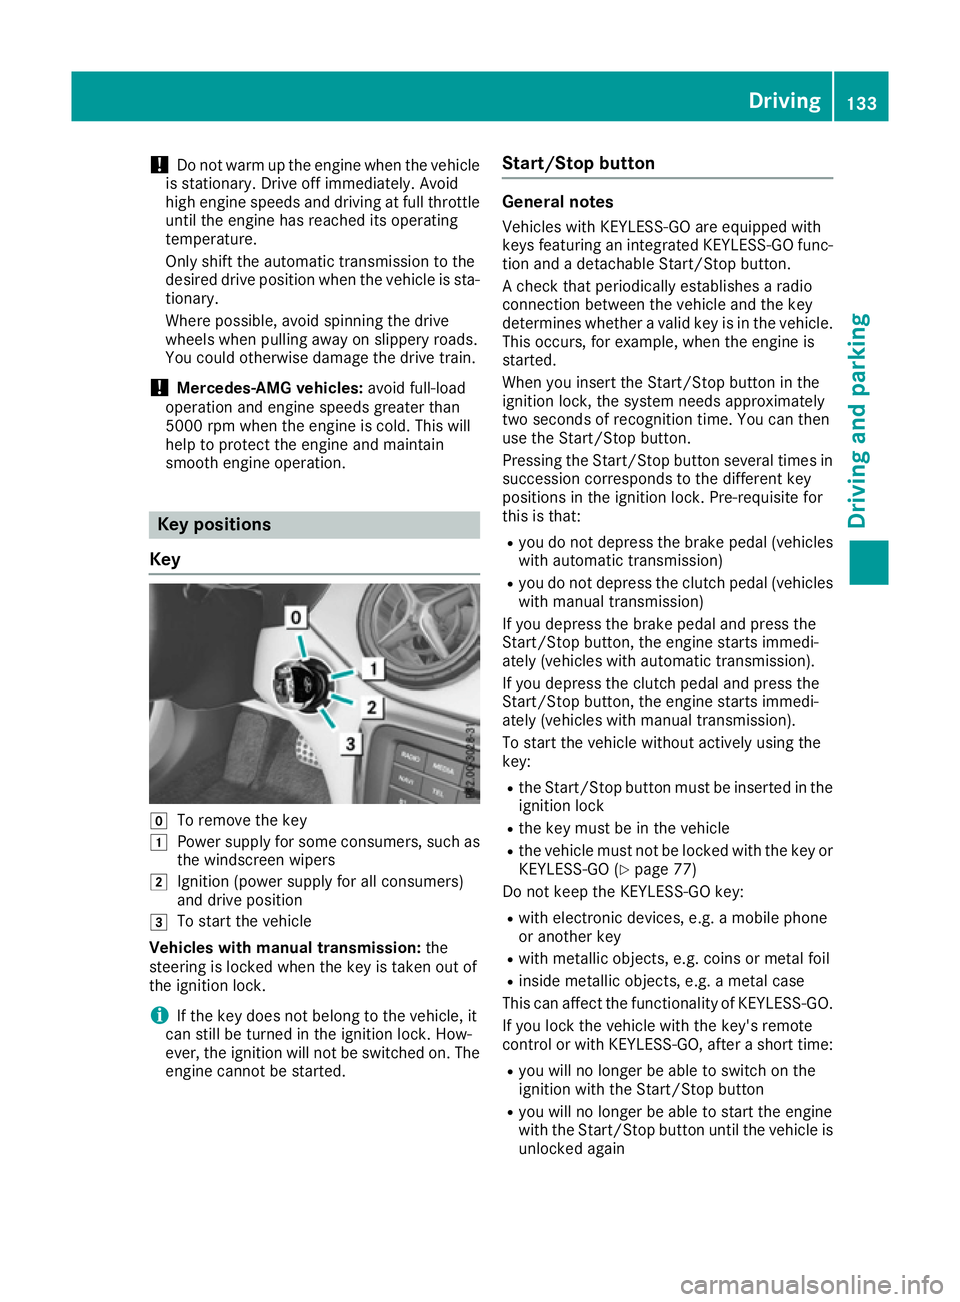
Key g
To remove the key
1 Power supply for some consumers, such as
the windscreen wipers
2 Ignition (power supply for all consumers)
and drive position
3 To start the vehicle
Vehicles with manual transmission: the
steering is locked when the key is taken out of
the ignition lock.
i If the key does not belong to the vehicle, it
can still be turned in the ignition lock. How-
ever, the ignition will not be switched on. The engine cannot be started. Start/Stop button General notes
Vehicles with KEYLESS-GO are equipped with
keys featuring an integrated KEYLESS-GO func- tion and a detachable Start/Stop button.
A check that periodically establishes a radio
connection between the vehicle and the key
determines whether a valid key is in the vehicle.This occurs, for example, when the engine is
started.
When you insert the Start/Stop button in the
ignition lock, the system needs approximately
two seconds of recognition time. You can then
use the Start/Stop button.
Pressing the Start/Stop button several times in
succession corresponds to the different key
positions in the ignition lock. Pre-requisite for
this is that:
R you do not depress the brake pedal (vehicles
with automatic transmission)
R you do not depress the clutch pedal (vehicles
with manual transmission)
If you depress the brake pedal and press the
Start/Stop button, the engine starts immedi-
ately (vehicles with automatic transmission).
If you depress the clutch pedal and press the
Start/Stop button, the engine starts immedi-
ately (vehicles with manual transmission).
To start the vehicle without actively using the
key:
R the Start/Stop button must be inserted in the
ignition lock
R the key must be in the vehicle
R the vehicle must not be locked with the key or
KEYLESS-GO (Y page 77)
Do not keep the KEYLESS-GO key:
R with electronic devices, e.g. a mobile phone
or another key
R with metallic objects, e.g. coins or metal foil
R inside metallic objects, e.g. a metal case
This can affect the functionality of KEYLESS-GO.
If you lock the vehicle with the key's remote
control or with KEYLESS-GO, after a short time:
R you will no longer be able to switch on the
ignition with the Start/Stop button
R you will no longer be able to start the engine
with the Start/Stop button until the vehicle is
unlocked again Driving
133Driving and parking Z
Page 157 of 345
Opening the fuel filler flap
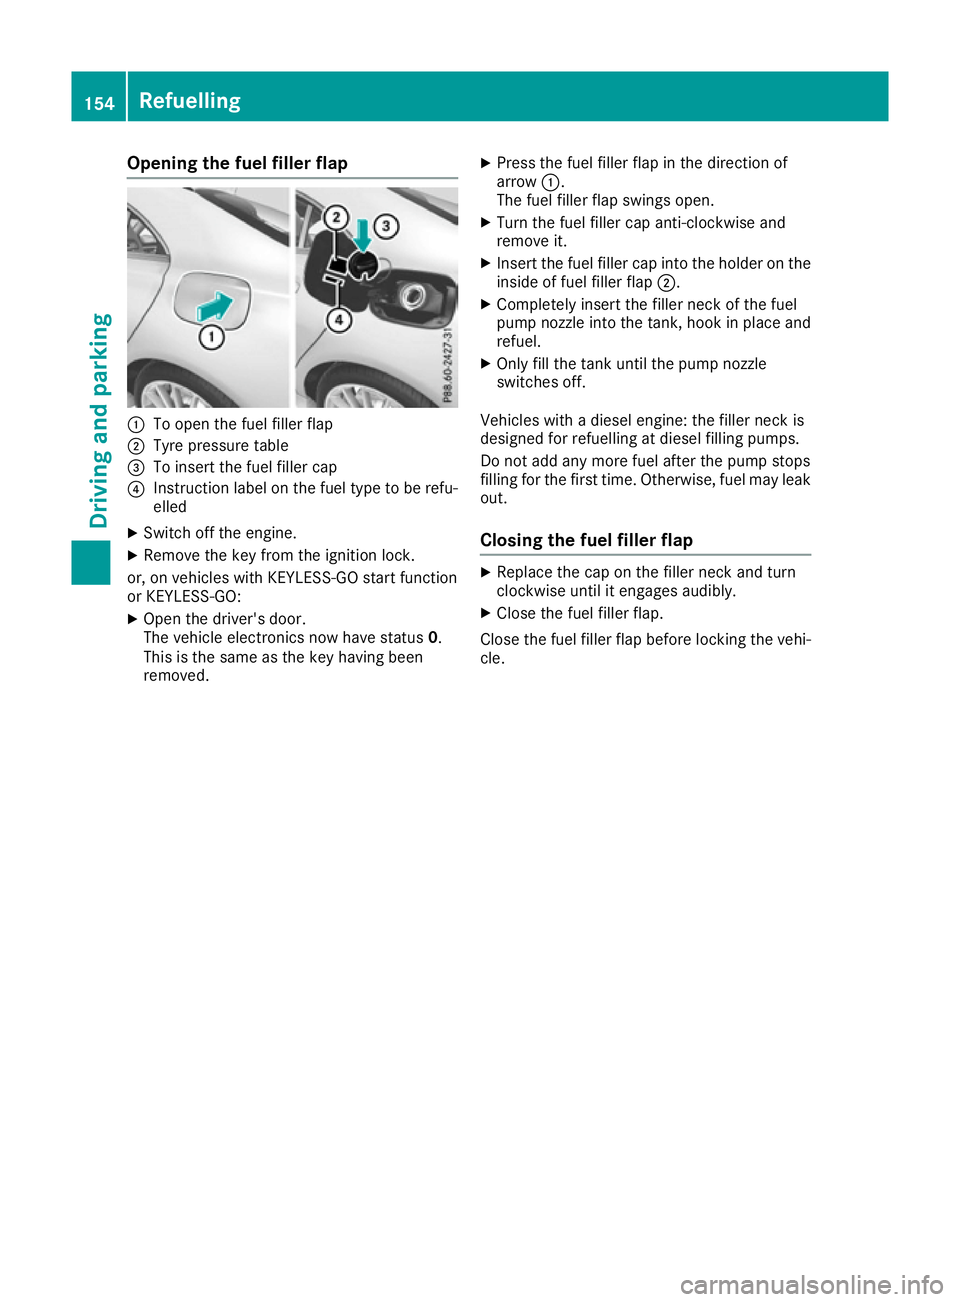
:
To open the fuel filler flap
; Tyre pressure table
= To insert the fuel filler cap
? Instruction label on the fuel type to be refu-
elled
X Switch off the engine.
X Remove the key from the ignition lock.
or, on vehicles with KEYLESS-GO start function
or KEYLESS‑GO: X Open the driver's door.
The vehicle electronics now have status 0.
This is the same as the key having been
removed. X
Press the fuel filler flap in the direction of
arrow :.
The fuel filler flap swings open.
X Turn the fuel filler cap anti-clockwise and
remove it.
X Insert the fuel filler cap into the holder on the
inside of fuel filler flap ;.
X Completely insert the filler neck of the fuel
pump nozzle into the tank, hook in place and refuel.
X Only fill the tank until the pump nozzle
switches off.
Vehicles with a diesel engine: the filler neck is
designed for refuelling at diesel filling pumps.
Do not add any more fuel after the pump stops
filling for the first time. Otherwise, fuel may leak out.
Closing the fuel filler flap X
Replace the cap on the filler neck and turn
clockwise until it engages audibly.
X Close the fuel filler flap.
Close the fuel filler flap before locking the vehi-
cle. 154
RefuellingDriving and parking
Page 158 of 345
Problems with the fuel and fuel tank
Problem
Possible causes/consequences and
M
MSolutions Fuel is leaking from the
vehicle. The fuel line or the fuel tank is faulty.
G WARNING
There is a risk of fire or explosion. X Apply the electric parking brake.
X Switch off the engine.
X Remove the key from the ignition lock.
or, on vehicles with KEYLESS-GO start function or KEYLESS ‑GO:
X Open the driver's door.
The vehicle electronics now have status 0. This is the same as the
key having been removed.
X Do not restart the engine under any circumstances.
X Consult a qualified specialist workshop. The engine does not
start. The fuel tank of a vehicle with a diesel engine has been run completely
dry.
X Refuel the vehicle with at least 5 litres of diesel.
X Turn the ignition on for approximately ten seconds (Y page 133).
X Start the engine continuously for a maximum of ten seconds until it
runs smoothly.
If the engine does not start: X Turn the ignition on again for a maximum of ten seconds
(Y page 133).
X Start the engine again continuously for a maximum of ten seconds
until it runs smoothly.
If the engine does not start after three attempts:
X Consult a qualified specialist workshop. The fuel filler flap cannot
be opened. The fuel filler flap is not unlocked.
X Unlock the vehicle (Y page 76). The key battery is weak or discharged.
X Unlock the vehicle using the emergency key element (Y page 78).The fuel filler flap is unlocked, but the opening mechanism is jammed.
X Consult a qualified specialist workshop. Parking
Important safety notes
G
WARNING
Flammable material such as leaves, grass or
twigs may ignite if they come into contact with hot parts of the exhaust system or exhaust
gas flow. There is a risk of fire.
Park the vehicle so that no flammable mate-
rial can come into contact with hot vehicle
components. In particular, do not park on dry
grassland or harvested grain fields. Parking
155Driving and parking Z
Page 222 of 345
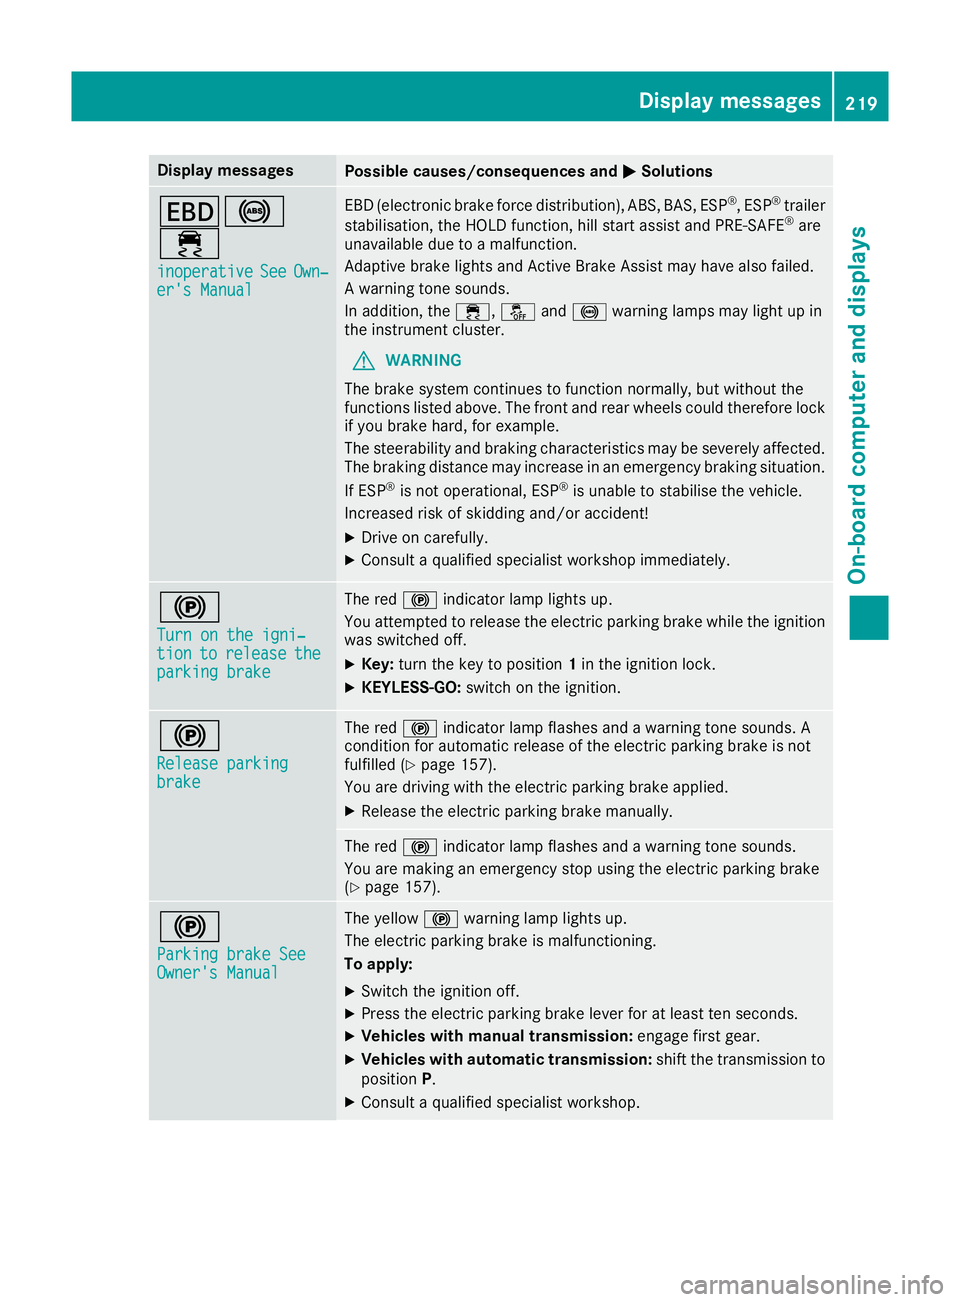
Display messages
Possible causes/consequences and
M
MSolutions T!
÷
inoperative inoperative See
SeeOwn‐
Own‐
er's Manual
er's Manual EBD (electronic brake force distribution), ABS, BAS, ESP
®
, ESP ®
trailer
stabilisation, the HOLD function, hill start assist and PRE-SAFE ®
are
unavailable due to a malfunction.
Adaptive brake lights and Active Brake Assist may have also failed.
A warning tone sounds.
In addition, the ÷,åand! warning lamps may light up in
the instrument cluster.
G WARNING
The brake system continues to function normally, but without the
functions listed above. The front and rear wheels could therefore lock
if you brake hard, for example.
The steerability and braking characteristics may be severely affected. The braking distance may increase in an emergency braking situation.
If ESP ®
is not operational, ESP ®
is unable to stabilise the vehicle.
Increased risk of skidding and/or accident!
X Drive on carefully.
X Consult a qualified specialist workshop immediately. !
Turn on the igni‐ Turn on the igni‐
tion tion
to
torelease
release the
the
parking brake
parking brake The red
!indicator lamp lights up.
You attempted to release the electric parking brake while the ignition
was switched off.
X Key: turn the key to position 1in the ignition lock.
X KEYLESS-GO: switch on the ignition. !
Release parking Release parking
brake brake The red
!indicator lamp flashes and a warning tone sounds. A
condition for automatic release of the electric parking brake is not
fulfilled (Y page 157).
You are driving with the electric parking brake applied.
X Release the electric parking brake manually. The red
!indicator lamp flashes and a warning tone sounds.
You are making an emergency stop using the electric parking brake
(Y page 157). !
Parking brake See Parking brake See
Owner's Manual Owner's Manual The yellow
!warning lamp lights up.
The electric parking brake is malfunctioning.
To apply:
X Switch the ignition off.
X Press the electric parking brake lever for at least ten seconds.
X Vehicles with manual transmission: engage first gear.
X Vehicles with automatic transmission: shift the transmission to
position P.
X Consult a qualified specialist workshop. Display
messages
219On-board computer and displays Z
Page 298 of 345
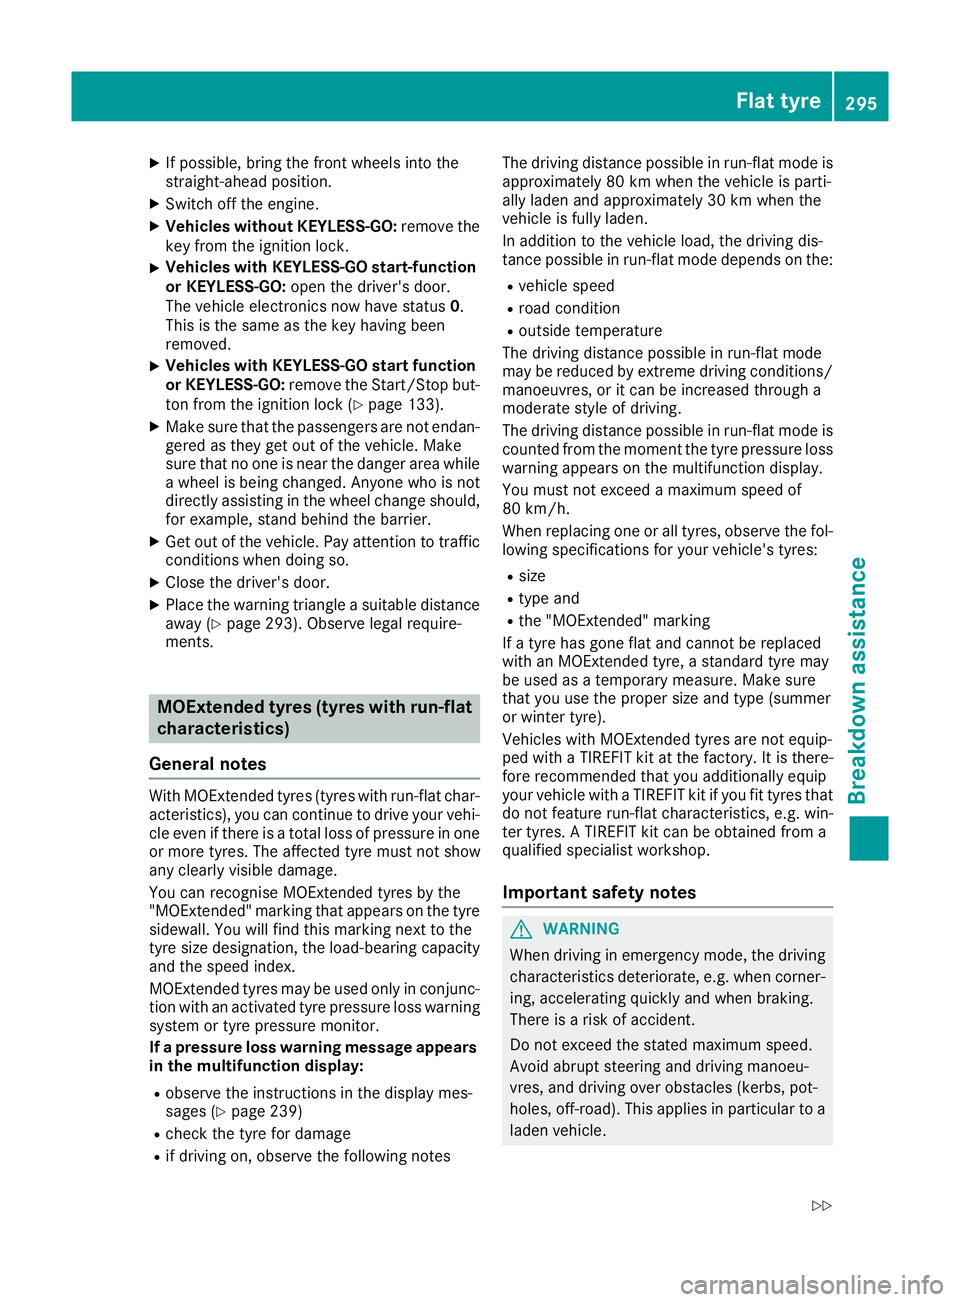
X
If possible, bring the front wheels into the
straight-ahead position.
X Switch off the engine.
X Vehicles without KEYLESS-GO: remove the
key from the ignition lock.
X Vehicles with KEYLESS-GO start-function
or KEYLESS-GO: open the driver's door.
The vehicle electronics now have status 0.
This is the same as the key having been
removed.
X Vehicles with KEYLESS-GO start function
or KEYLESS-GO: remove the Start/Stop but-
ton from the ignition lock (Y page 133).
X Make sure that the passengers are not endan-
gered as they get out of the vehicle. Make
sure that no one is near the danger area while
a wheel is being changed. Anyone who is not directly assisting in the wheel change should, for example, stand behind the barrier.
X Get out of the vehicle. Pay attention to traffic
conditions when doing so.
X Close the driver's door.
X Place the warning triangle a suitable distance
away (Y page 293). Observe legal require-
ments. MOExtended tyres (tyres with run-flat
characteristics)
General notes With MOExtended tyres (tyres with run-flat char-
acteristics), you can continue to drive your vehi- cle even if there is a total loss of pressure in one
or more tyres. The affected tyre must not show
any clearly visible damage.
You can recognise MOExtended tyres by the
"MOExtended" marking that appears on the tyre sidewall. You will find this marking next to the
tyre size designation, the load-bearing capacity
and the speed index.
MOExtended tyres may be used only in conjunc- tion with an activated tyre pressure loss warning
system or tyre pressure monitor.
If a pressure loss warning message appears in the multifunction display:
R observe the instructions in the display mes-
sages (Y page 239)
R check the tyre for damage
R if driving on, observe the following notes The driving distance possible in run-flat mode is
approximately 80 km when the vehicle is parti-
ally laden and approximately 30 km when the
vehicle is fully laden.
In addition to the vehicle load, the driving dis-
tance possible in run-flat mode depends on the:
R vehicle speed
R road condition
R outside temperature
The driving distance possible in run-flat mode
may be reduced by extreme driving conditions/ manoeuvres, or it can be increased through a
moderate style of driving.
The driving distance possible in run-flat mode is
counted from the moment the tyre pressure loss warning appears on the multifunction display.
You must not exceed a maximum speed of
80 km/h.
When replacing one or all tyres, observe the fol-
lowing specifications for your vehicle's tyres:
R size
R type and
R the "MOExtended" marking
If a tyre has gone flat and cannot be replaced
with an MOExtended tyre, a standard tyre may
be used as a temporary measure. Make sure
that you use the proper size and type (summer
or winter tyre).
Vehicles with MOExtended tyres are not equip-
ped with a TIREFIT kit at the factory. It is there-
fore recommended that you additionally equip
your vehicle with a TIREFIT kit if you fit tyres that do not feature run-flat characteristics, e.g. win-
ter tyres. A TIREFIT kit can be obtained from a
qualified specialist workshop.
Important safety notes G
WARNING
When driving in emergency mode, the driving characteristics deteriorate, e.g. when corner-
ing, accelerating quickly and when braking.
There is a risk of accident.
Do not exceed the stated maximum speed.
Avoid abrupt steering and driving manoeu-
vres, and driving over obstacles (kerbs, pot-
holes, off-road). This applies in particular to a laden vehicle. Flat tyre
295Breakdown assistance
Z
Page 303 of 345
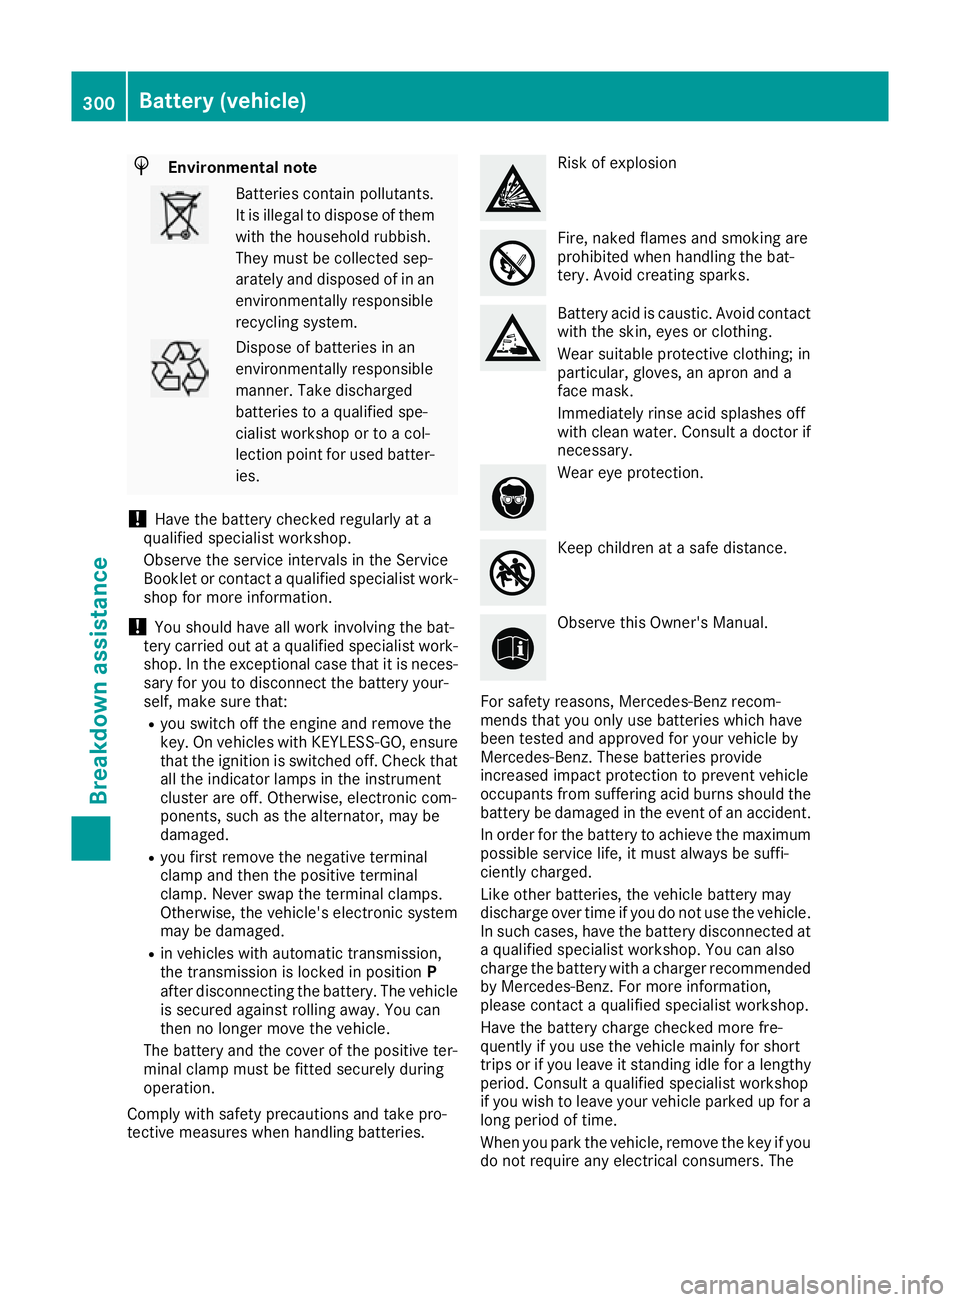
H
Environmental note Batteries contain pollutants.
It is illegal to dispose of them with the household rubbish.
They must be collected sep-
arately and disposed of in anenvironmentally responsible
recycling system. Dispose of batteries in an
environmentally responsible
manner. Take discharged
batteries to a qualified spe-
cialist workshop or to a col-
lection point for used batter-
ies.
! Have the battery checked regularly at a
qualified specialist workshop.
Observe the service intervals in the Service
Booklet or contact a qualified specialist work- shop for more information.
! You should have all work involving the bat-
tery carried out at a qualified specialist work-
shop. In the exceptional case that it is neces-
sary for you to disconnect the battery your-
self, make sure that:
R you switch off the engine and remove the
key. On vehicles with KEYLESS-GO, ensure
that the ignition is switched off. Check that all the indicator lamps in the instrument
cluster are off. Otherwise, electronic com-
ponents, such as the alternator, may be
damaged.
R you first remove the negative terminal
clamp and then the positive terminal
clamp. Never swap the terminal clamps.
Otherwise, the vehicle's electronic system
may be damaged.
R in vehicles with automatic transmission,
the transmission is locked in position P
after disconnecting the battery. The vehicle
is secured against rolling away. You can
then no longer move the vehicle.
The battery and the cover of the positive ter-
minal clamp must be fitted securely during
operation.
Comply with safety precautions and take pro-
tective measures when handling batteries. Risk of explosion
Fire, naked flames and smoking are
prohibited when handling the bat-
tery. Avoid creating sparks.
Battery acid is caustic. Avoid contact
with the skin, eyes or clothing.
Wear suitable protective clothing; in
particular, gloves, an apron and a
face mask.
Immediately rinse acid splashes off
with clean water. Consult a doctor if
necessary. Wear eye protection.
Keep children at a safe distance.
Observe this Owner's Manual.
For safety reasons, Mercedes-Benz recom-
mends that you only use batteries which have
been tested and approved for your vehicle by
Mercedes-Benz. These batteries provide
increased impact protection to prevent vehicle
occupants from suffering acid burns should the battery be damaged in the event of an accident.
In order for the battery to achieve the maximum possible service life, it must always be suffi-
ciently charged.
Like other batteries, the vehicle battery may
discharge over time if you do not use the vehicle.In such cases, have the battery disconnected ata qualified specialist workshop. You can also
charge the battery with a charger recommended
by Mercedes-Benz. For more information,
please contact a qualified specialist workshop.
Have the battery charge checked more fre-
quently if you use the vehicle mainly for short
trips or if you leave it standing idle for a lengthy period. Consult a qualified specialist workshop
if you wish to leave your vehicle parked up for a
long period of time.
When you park the vehicle, remove the key if you do not require any electrical consumers. The 300
Battery (vehicle)Breakdown assistance
Page 308 of 345
For towing distances over 50 km, the front
axle or the entire vehicle must be raised and
transported.
! To tow vehicles with KEYLESS-GO, use the
key instead of the Start/Stop button. The
automatic transmission may otherwise
switch to position Pwhen you open the driv-
er's or front-passenger door which could
damage the transmission.
! Vehicles with automatic transmission must
not be tow-started. The transmission may
otherwise be damaged.
Observe the legal requirements for the relevant
countries when towing and tow-starting.
It is better to have the vehicle transported than
to have it towed.
If the vehicle can no longer be driven because of an accident or breakdown, you have the follow- ing options:
R transporting the vehicle
As a rule, you should have the vehicle trans-
ported.
R towing the vehicle with a tow rope or tow bar
Only tow the vehicle in exceptional cases.
The battery must be connected and charged.
Otherwise, you:
R cannot turn the key to position 2in the igni-
tion lock
R cannot release the electric parking brake
R cannot shift the transmission to position Non
vehicles with automatic transmission
The function of the electric parking brake and
the parking lock is dependent on the on-board
voltage.
If the on-board voltage is low or if there is a sys-
tem malfunction:
R it may not be possible to apply the released
parking brake or
R it may not be possible to shift the transmis-
sion to position P
Switch off non-essential consumers, e.g. the
radio.
Deactivate the automatic locking feature before towing the vehicle (Y page 211). You could oth-
erwise be locked out when pushing or towing
the vehicle.
Deactivate tow-away protection before the vehi-
cle is towed away (Y page 74). Fitting/removing the towing eye
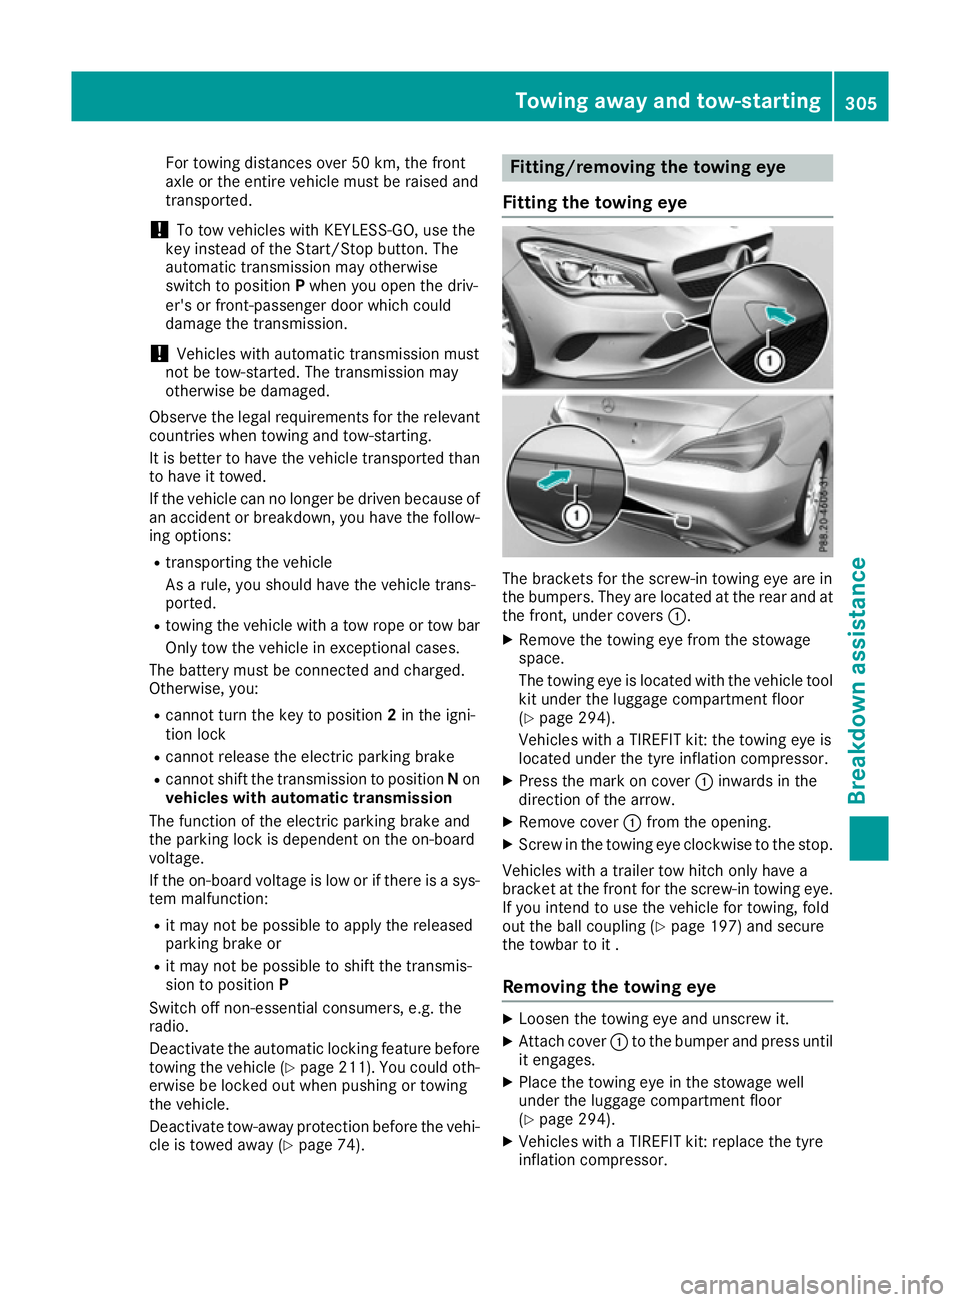
Fitting the towing eye The brackets for the screw-in towing eye are in
the bumpers. They are located at the rear and at
the front, under covers :.
X Remove the towing eye from the stowage
space.
The towing eye is located with the vehicle tool
kit under the luggage compartment floor
(Y page 294).
Vehicles with a TIREFIT kit: the towing eye is
located under the tyre inflation compressor.
X Press the mark on cover :inwards in the
direction of the arrow.
X Remove cover :from the opening.
X Screw in the towing eye clockwise to the stop.
Vehicles with a trailer tow hitch only have a
bracket at the front for the screw-in towing eye.
If you intend to use the vehicle for towing, fold
out the ball coupling (Y page 197) and secure
the towbar to it .
Removing the towing eye X
Loosen the towing eye and unscrew it.
X Attach cover :to the bumper and press until
it engages.
X Place the towing eye in the stowage well
under the luggage compartment floor
(Y page 294).
X Vehicles with a TIREFIT kit: replace the tyre
inflation compressor. Towing away and tow-starting
305Breakdown assistance Z