2016 MERCEDES-BENZ CLA COUPE rear view mirror
[x] Cancel search: rear view mirrorPage 107 of 345

mirror using button
=as long as the indicator
lamp is lit.
X Press button =up, down, or to the right or
left until you have adjusted the exterior mirror
to the correct position. You should have a
good overview of traffic conditions.
The convex exterior mirrors provide a larger field of vision.
After the engine has been started, the exterior
mirrors are automatically heated at low outside
temperatures. Heating takes a maximum of ten
minutes.
i The exterior mirrors can also be heated
manually by switching on the rear window
heating.
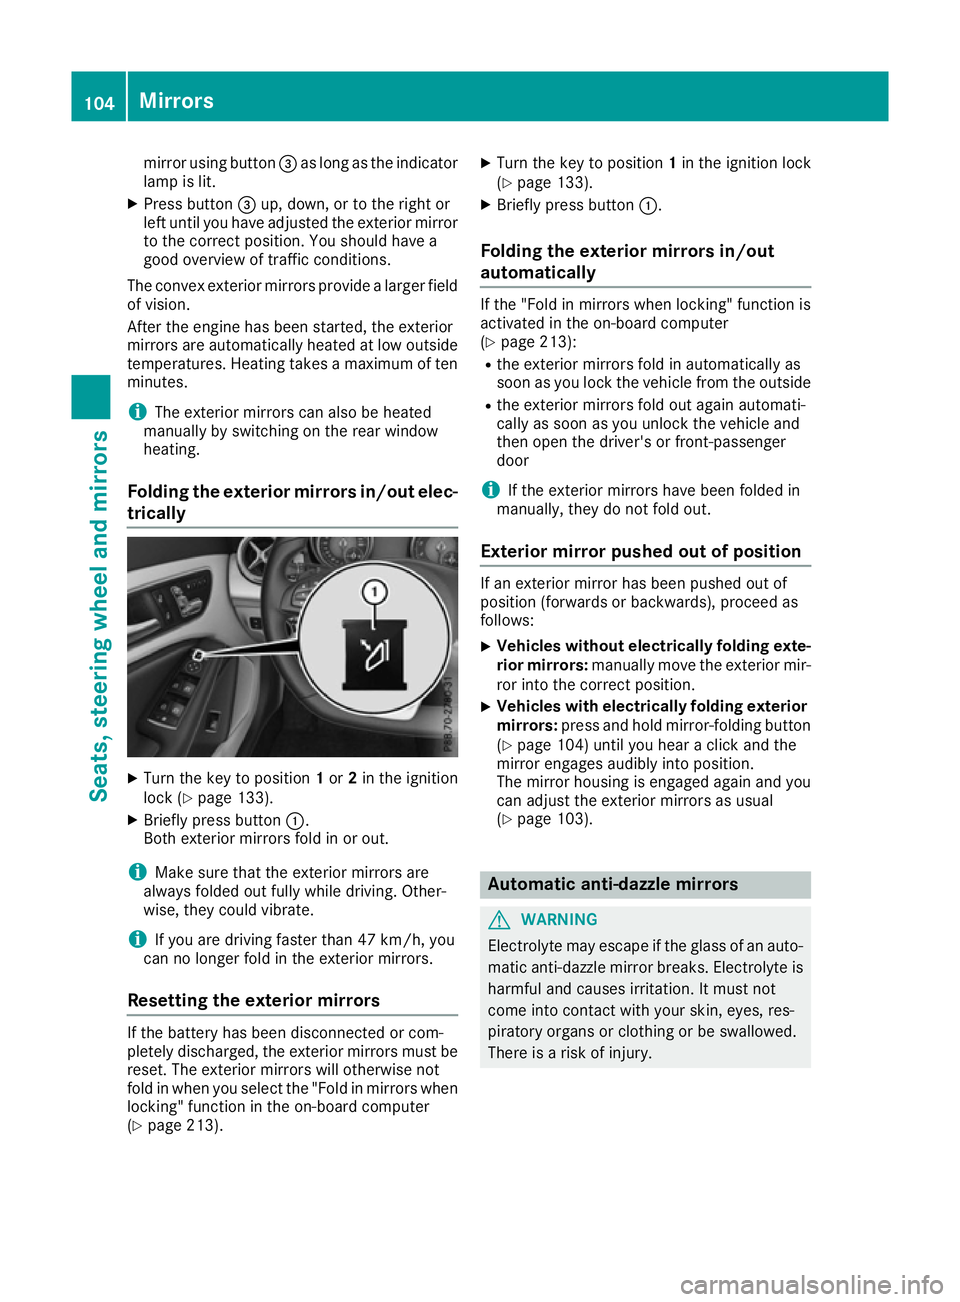
Folding the exterior mirrors in/out elec- trically X
Turn the key to position 1or 2in the ignition
lock (Y page 133).
X Briefly press button :.
Both exterior mirrors fold in or out.
i Make sure that the exterior mirrors are
always folded out fully while driving. Other-
wise, they could vibrate.
i If you are driving faster than 47 km/h, you
can no longer fold in the exterior mirrors.
Resetting the exterior mirrors If the battery has been disconnected or com-
pletely discharged, the exterior mirrors must be
reset. The exterior mirrors will otherwise not
fold in when you select the "Fold in mirrors when locking" function in the on-board computer
(Y page 213). X
Turn the key to position 1in the ignition lock
(Y page 133).
X Briefly press button :.
Folding the exterior mirrors in/out
automatically If the "Fold in mirrors when locking" function is
activated in the on-board computer
(Y page 213):
R the exterior mirrors fold in automatically as
soon as you lock the vehicle from the outside
R the exterior mirrors fold out again automati-
cally as soon as you unlock the vehicle and
then open the driver's or front-passenger
door
i If the exterior mirrors have been folded in
manually, they do not fold out.
Exterior mirror pushed out of position If an exterior mirror has been pushed out of
position (forwards or backwards), proceed as
follows:
X Vehicles without electrically folding exte-
rior mirrors: manually move the exterior mir-
ror into the correct position.
X Vehicles with electrically folding exterior
mirrors: press and hold mirror-folding button
(Y page 104) until you hear a click and the
mirror engages audibly into position.
The mirror housing is engaged again and you
can adjust the exterior mirrors as usual
(Y page 103). Automatic anti-dazzle mirrors
G
WARNING
Electrolyte may escape if the glass of an auto- matic anti-dazzle mirror breaks. Electrolyte is
harmful and causes irritation. It must not
come into contact with your skin, eyes, res-
piratory organs or clothing or be swallowed.
There is a risk of injury. 104
MirrorsSeats, steering wheel and mirrors
Page 108 of 345

If you come into contact with electrolyte,
observe the following:
R immediately rinse off electrolyte from your
skin with water.
R immediately and thoroughly rinse electro-
lyte out of eyes using clean water.
R if electrolyte is swallowed, immediately
rinse out your mouth thoroughly. Do not
induce vomiting.
R if electrolyte comes into contact with skin
or eyes or is swallowed, seek medical atten- tion immediately.
R immediately change out of clothing that has
been in contact with electrolyte.
R if an allergic reaction occurs, seek medical
attention immediately.
The "Automatic anti-dazzle mirrors" function is
only available if the vehicle is equipped with the
"Mirror package".
The rear-view mirror and the exterior mirror on
the driver's side automatically go into anti-daz-
zle mode if:
R the ignition is switched on and
R incident light from headlamps strikes the sen-
sor in the rear-view mirror
The mirrors do not dip if reverse gear is engaged or if the interior lighting is switched on. Parking position of the exterior mirror
on the front-passenger side
Setting and storing the parking position You can set the front-passenger side exterior
mirror such that you can see the rear wheel on
that side as soon as you engage reverse gear.
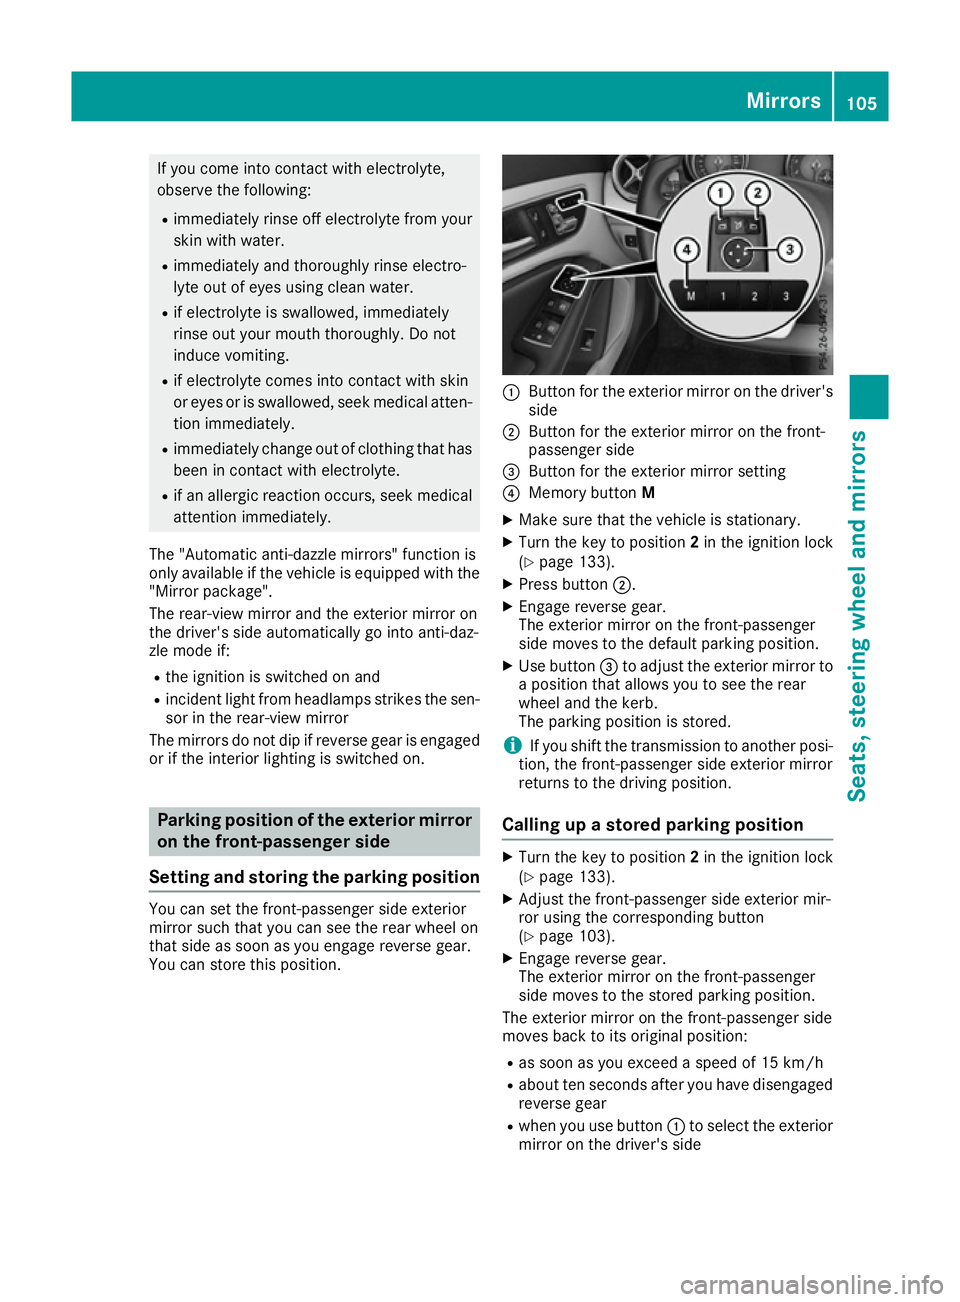
You can store this position. :
Button for the exterior mirror on the driver's
side
; Button for the exterior mirror on the front-
passenger side
= Button for the exterior mirror setting
? Memory button M
X Make sure that the vehicle is stationary.
X Turn the key to position 2in the ignition lock
(Y page 133).
X Press button ;.
X Engage reverse gear.
The exterior mirror on the front-passenger
side moves to the default parking position.
X Use button =to adjust the exterior mirror to
a position that allows you to see the rear
wheel and the kerb.
The parking position is stored.
i If you shift the transmission to another posi-
tion, the front-passenger side exterior mirror
returns to the driving position.
Calling up a stored parking position X
Turn the key to position 2in the ignition lock
(Y page 133).
X Adjust the front-passenger side exterior mir-
ror using the corresponding button
(Y page 103).
X Engage reverse gear.
The exterior mirror on the front-passenger
side moves to the stored parking position.
The exterior mirror on the front-passenger side
moves back to its original position:
R as soon as you exceed a speed of 15 km/h
R about ten seconds after you have disengaged
reverse gear
R when you use button :to select the exterior
mirror on the driver's side Mirrors
105Seats, steering wheel and mirrors Z
Page 188 of 345

vehicle with guide lines in the multimedia sys-
tem display.
The area behind the vehicle is displayed as a
mirror image, as in the rear-view mirror.
i The text shown in the multimedia system
display depends on the language setting. The following are examples of reversing camera
messages in the multimedia system display.
See the notes on cleaning (Y page 289).
Important safety notes The reversing camera is only an aid. It is not a
substitute for your attention to the immediate
surroundings. The responsibility for safe
manoeuvring and parking remains with you.
Make sure that there are no persons, animals or
objects in range while manoeuvring and parking.
The reversing camera will not function or will
function only in a limited manner:
R If the boot lid is open
R In heavy rain, snow or fog
R At night or in very dark places
R If the camera is exposed to very bright light
R If the area is lit by fluorescent lamps or LED
lighting (the display may flicker)
R If there is a sudden change in temperature,
e.g. when driving into a heated garage in win- ter
R If the camera lens is dirty or obstructed.
Observe the notes on cleaning
(Y page 289)
R If the rear of your vehicle is damaged. In this
case, have the camera position and setting
checked at a qualified specialist workshop
The field of vision and other functions of the
reversing camera may be restricted due to addi-
tional accessories on the rear of the vehicle (e.g. licence plate holder, bicycle rack). Activating/deactivating the reversing
camera X
To activate: make sure that the key is in
position 2in the ignition lock.
X Make sure that the Activation by R gear Activation by R gear
function is selected in the multimedia system; see the Digital Owner's Manual.
X Engage reverse gear.
The area behind the vehicle is shown with
guide lines in the multimedia system display.
The image from the reversing camera is avail-
able throughout the manoeuvring process.
X To switch the function mode for vehicles
with trailer tow hitch: using the controller,
select symbol :for the "Reverse parking"
function or symbol ;for "Coupling up a
trailer".
The symbol of the selected function is high-
lighted.
To deactivate: the reversing camera deacti-
vates if you shift the transmission to Por after
driving forwards a short distance.
Messages in the multimedia system dis-
play The reversing camera may show a distorted view
of obstacles, show them incorrectly or not at all.
Obstacles are not shown by the reversing cam-
era in the following locations:
R Very close to the rear bumper
R Under the rear bumper
R In the area immediately above the recessed
handle on the boot lid
! Objects not at ground level may appear to
be further away than they actually are, e.g.:
R the bumper of a parked vehicle
R the drawbar of a trailer Driving systems
185Driving and parking Z
Page 278 of 345

X
Fold down the rear seat armrest.
X To open: press the front of cup holder :
or ;.
Cup holder :or; extends automatically.
X To close: slide cup holder :or; back until
it engages. Sun visors
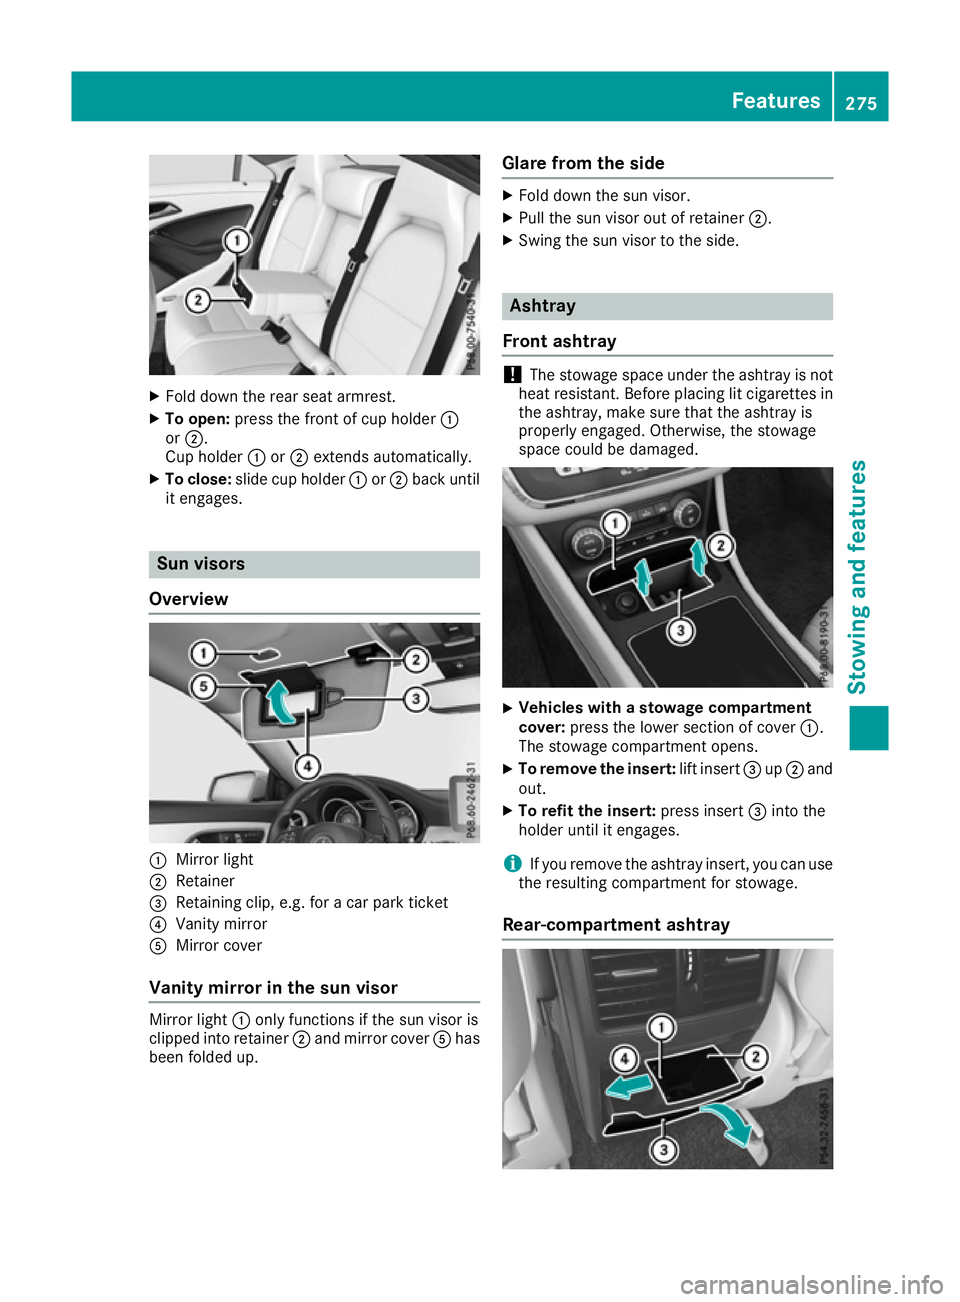
Overview :
Mirror light
; Retainer
= Retaining clip, e.g. for a car park ticket
? Vanity mirror
A Mirror cover
Vanity mirror in the sun visor Mirror light
:only functions if the sun visor is
clipped into retainer ;and mirror cover Ahas
been folded up. Glare from the side X
Fold down the sun visor.
X Pull the sun visor out of retainer ;.
X Swing the sun visor to the side. Ashtray
Front ashtray !
The stowage space under the ashtray is not
heat resistant. Before placing lit cigarettes in the ashtray, make sure that the ashtray is
properly engaged. Otherwise, the stowage
space could be damaged. X
Vehicles with a stowage compartment
cover:
press the lower section of cover :.
The stowage compartment opens.
X To remove the insert: lift insert=up; and
out.
X To refit the insert: press insert=into the
holder until it engages.
i If you remove the ashtray insert, you can use
the resulting compartment for stowage.
Rear-compartment ashtray Features
275Stowing and features Z