2016 MERCEDES-BENZ CLA COUPE fuel
[x] Cancel search: fuelPage 27 of 345
Environmental protection
General notes
H
Environmental note
Daimler's declared policy is one of compre-
hensive environmental protection.
Our objectives are to use the natural resour-
ces which form the basis of our existence on
this planet sparingly and in a manner which
takes the requirements of both nature and
humanity into consideration.
You too can help to protect the environment
by operating your vehicle in an environmen-
tally-responsible manner.
Fuel consumption and the rate of engine,
transmission, brake and tyre wear depend on
the following factors:
R operating conditions of your vehicle
R your personal driving style
You can influence both factors. Therefore,
please bear the following in mind:
Operating conditions:
R avoid short trips, as these increase fuel
consumption.
R observe the correct tyre pressure.
R do not carry any unnecessary weight in the
vehicle.
R remove the roof rack once you no longer
need it.
R a regularly serviced vehicle will contribute
to environmental protection. You should
therefore adhere to the service intervals.
R all maintenance work should be carried out
at a qualified specialist workshop.
Personal driving style:
R do not depress the accelerator pedal when
starting the engine.
R do not warm up the engine when the vehicle
is stationary.
R drive carefully and maintain a safe distance
from the vehicle in front.
R avoid frequent, sudden acceleration and
braking. R
change gear in good time and use each gear
only up to Ôof its maximum engine speed.
R switch off the engine in stationary traffic.
R monitor the vehicle's fuel consumption. Take-back of end-of-life vehicles
EU countries only:
Mercedes-Benz will take back your end-of-life
vehicle for environmentally-friendly disposal in
accordance with the European Union (EU) End-
Of-Life Vehicles Directive.
A network of vehicle take-back points and dis-
mantlers has been established for you to return
your vehicle. You can leave it at any of these
points free of charge. This makes an important
contribution to closing the recycling circle and
conserving resources.
For further information about the recycling and
disposal of end-of-life vehicles, and the take-
back conditions, please visit the national
Mercedes-Benz website for your country. Genuine Mercedes-Benz parts
H
Environmental note
Daimler AG also supplies reconditioned
assemblies and parts which are of the same
quality as new parts. For these, the same war-
ranty applies as for new parts.
! Airbags and seat belt tensioners, as well as
control units and sensors for these restraint
systems, may be installed in the following
areas of your vehicle:
R doors
R door pillars
R door sills
R seats
R dashboard
R instrument cluster
R centre console
Do not install accessories such as audio sys-
tems in these areas. Do not carry out repairs or welding. You could impair the operating
efficiency of the restraint systems. 24
Genuine Mercedes-Benz partsIntroduction
Page 31 of 345
vehicle. This particularly applies to work rele-
vant to safety.
Observe the notes in the Service Booklet.
Always have the following work carried out at a
qualified specialist workshop:
R work relevant to safety
R service and maintenance work
R repair work
R modifications, installations and conversions
R work on electronic components
Mercedes-Benz recommends that you use a
Mercedes-Benz Service Centre. Vehicle registration
Mercedes-Benz may ask its Service Centres to
carry out technical inspections on certain vehi-
cles. The quality or safety of the vehicle is
improved as a result of the inspection.
Mercedes-Benz can only inform you about vehi-
cle checks if it has your registration data.
It is possible that your vehicle has not yet been
registered in your name in the following cases:
R if your vehicle was not purchased at an
authorised specialist dealer
R if your vehicle has not yet been inspected at a
Mercedes-Benz Service Centre
It is advisable to register your vehicle with a
Mercedes-Benz Service Centre.
Inform Mercedes-Benz as soon as possible
about any change in address or vehicle owner-
ship. You can do this at a Mercedes-Benz Ser-
vice Centre, for example. Correct use
If you remove any warning stickers, you or oth-
ers could fail to recognise certain dangers.
Leave warning stickers in position.
Observe the following information when driving
your vehicle:
R the safety notes in this manual
R technical data for the vehicle
R traffic rules and regulations
R laws and safety standards pertaining to motor
vehicles Implied warranty
! Follow the instructions in this manual about
the proper operation of your vehicle as well as about possible vehicle damage. Damage to
your vehicle that arises from culpable contra- ventions against these instructions are not
covered either by Mercedes-Benz implied
warranty or by the New or Used-Vehicle War-
ranty. QR code for rescue card
The QR code is secured in the fuel filler flap and
on the opposite side on the B-pillar. In the event of an accident, rescue services can use the QR
code to quickly find the appropriate rescue card
for your vehicle. The current rescue card con-
tains, in a compact form, the most important
information about your vehicle, e.g. the routing
of the electric cables.
You can find more information under
www.mercedes-benz.de/qr-code. Data stored in the vehicle
Many of the electronic components in your vehi- cle can store data.
These data memories temporarily or perma-
nently store technical information about:
R the vehicle's operating state
R events
R faults
In general, this technical information docu-
ments the state of a component, a module, a
system or the surroundings.
This includes, for example:
R operating conditions of system components,
e.g. fluid levels
R status messages concerning the vehicle and
its individual components, e.g. number of
wheel revolutions/speed, deceleration in
movement, lateral acceleration, accelerator
pedal position
R malfunctions and defects in important system
components, e.g. lights, brakes
R vehicle reactions and operating conditions in
special driving situations, e.g. airbag deploy- 28
Data stored in the vehicleIntroduction
Page 35 of 345
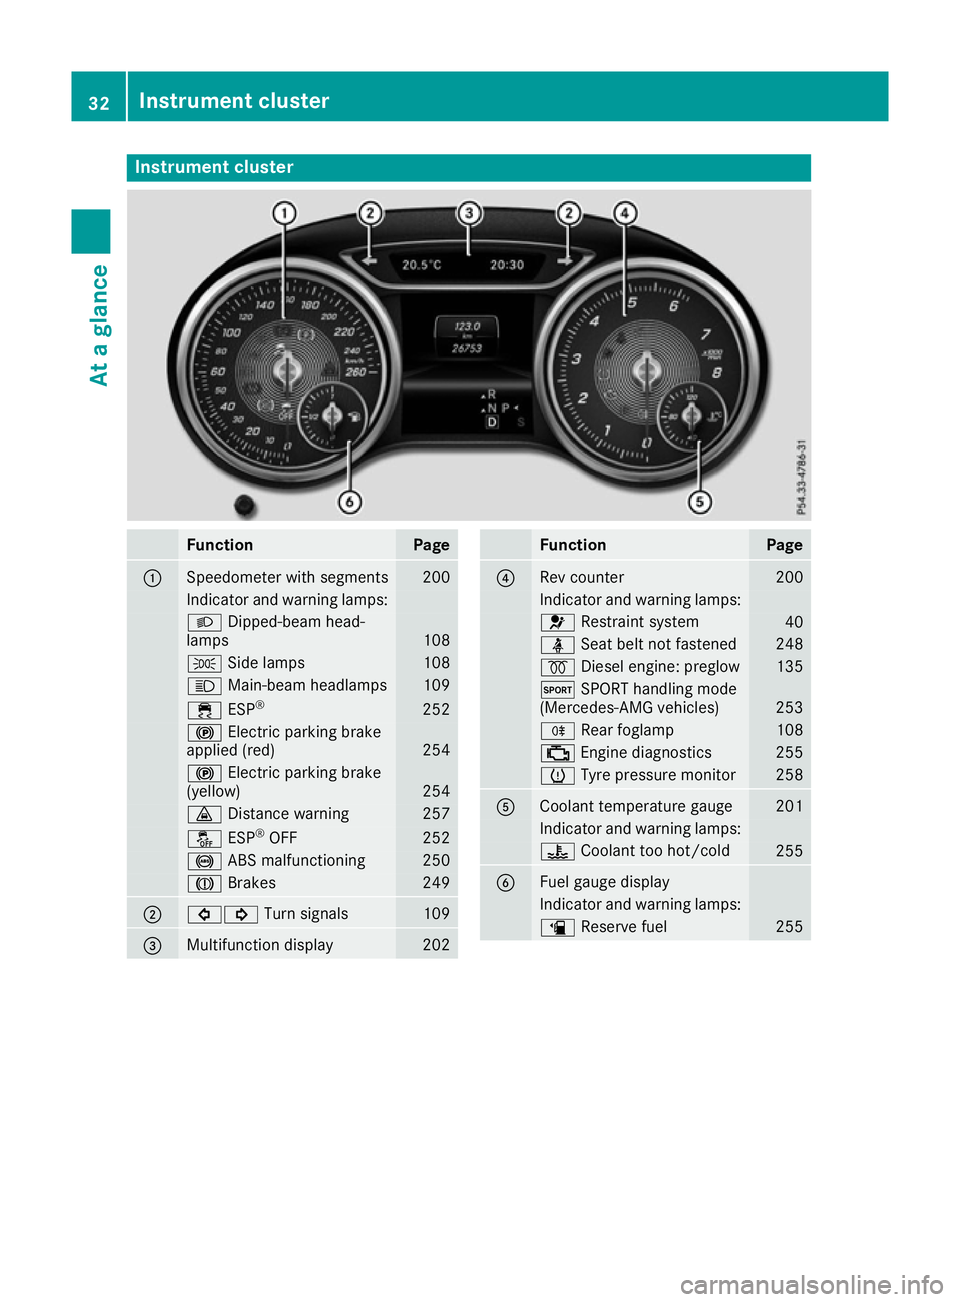
Instrument cluster
Function Page
:
Speedometer with segments 200
Indicator and warning lamps:
L
Dipped-beam head-
lamps 108
T
Side lamps 108
K
Main-beam headlamps 109
÷
ESP® 252
!
Electric parking brake
applied (red) 254
!
Electric parking brake
(yellow) 254
·
Distance warning 257
å
ESP®
OFF 252
!
ABS malfunctioning 250
J
Brakes 249
;
#!
Turn signals 109
=
Multifunction display 202 Function Page
?
Rev counter 200
Indicator and warning lamps:
6
Restraint system 40
ü
Seat belt not fastened 248
%
Diesel engine: preglow 135
M
SPORT handling mode
(Mercedes-AMG vehicles) 253
R
Rear foglamp 108
;
Engine diagnostics 255
h
Tyre pressure monitor 258
A
Coolant temperature gauge 201
Indicator and warning lamps:
?
Coolant too hot/cold 255
B
Fuel gauge display
Indicator and warning lamps:
æ
Reserve fuel 25532
Instrument clusterAt a glance
Page 56 of 345

on the front-passenger side deploys under the
following conditions:
- an occupant is detected in the front-
passenger seat or
- the seat belt buckle tongue is engaged in
the belt buckle of the front-passenger seat
R Windowbag on the side on which an impact
occurs, independently of seat belt usage and
regardless of whether the front-passenger
seat is occupied
R Seat belt tensioners, if the system determines
that deployment can offer additional protec-
tion for the vehicle occupants in this situation
i Not all airbags are deployed in an accident.
The different airbag systems work independ-
ently of each other.
How the airbag system works is determined
by the severity of the accident detected,
especially the vehicle deceleration or accel-
eration, and the apparent type of accident:
R frontal collision
R side impact PRE-SAFE
®
(anticipatory occupant
protection)
Introduction In certain hazardous situations, PRE-SAFE
®
takes pre-emptive measures to protect the vehi-
cle occupants.
Important safety notes !
Make sure that there are no objects in the
footwell or behind the seats. There is a risk
that the seats and/or the objects could be
damaged when PRE-SAFE ®
is activated.
Although your vehicle is equipped with PRE-
SAFE ®
, the possibility of injury in the event of an
accident cannot be ruled out. Always adapt your
driving style to suit the prevailing road and
weather conditions and maintain a safe distance from the vehicle in front. Drive carefully. Function PRE-SAFE
®
intervenes:
R in emergency braking situations, e.g. when
BAS is activated
R in critical driving situations, e.g. when physi-
cal limits are exceeded and the vehicle under- steers or oversteers severely
R when active Brake Assist intervenes power-
fully
PRE-SAFE ®
takes the following measures
depending on the hazardous situation detected:
R the front seat belts are pre-tensioned.
R if the vehicle skids, the side windows and the
panorama sliding sunroof are closed.
R vehicles with the memory function: the front-
passenger seat is adjusted if it is in an unfav-
ourable position.
If the hazardous situation passes without result- ing in an accident, PRE-SAFE ®
slackens the belt
pre-tensioning. All settings made by PRE-SAFE ®
can then be reversed.
If the seat belt pre-tensioning is not reduced:
X Move the seat backrest or seat back slightly
when the vehicle is stationary.
Seat belt pre-tensioning is reduced and the
locking mechanism is released.
The seat-belt adjustment is an integral part of
the PRE-SAFE ®
convenience function. Informa-
tion about the convenience function can be
found under "Belt adjustment" (Y page 43). Automatic measures after an acci-
dent
Immediately after an accident, the following
measures may be implemented, depending on
the type and severity of the impact: R the hazard warning lamps are activated
R the emergency lighting is activated
R the vehicle doors are unlocked
R the front side windows are lowered
R the engine is switched off and the fuel supply
is cut off
R vehicles with the Mercedes-Benz emergency
call system: automatic emergency call Occupant safety
53Safety Z
Page 80 of 345
X
To lock: press the &button.
The key centrally locks/unlocks: R the doors
R the boot lid
R the fuel filler flap
During unlocking, the turn signals flash once.
During locking, they flash three times.
When the locator lighting is activated via the
multimedia system, it also lights up when it is
dark after the vehicle is unlocked with the
remote control (see the separate operating
instructions).
You can also set an audible signal to confirm
that the vehicle has been locked. The audible
signal can be activated or deactivated using the on-board computer (Y page 211).
X To open the boot lid automatically: press
and hold the Fbutton until the boot lid
opens (Y page 87). KEYLESS-GO
General notes Bear in mind that the engine can be started by
any of the vehicle occupants if there is a key in
the vehicle.
Locking and unlocking You can start, lock or unlock the vehicle using
KEYLESS-GO. To do this, you need to carry the
key with you. You can combine the KEYLESS-GO
functions with the functions of a conventional
key. Unlock the vehicle using KEYLESS-GO, for
instance, and lock it using the &button on
the key.
The driver's door and the door at which the han- dle is used must both be closed. The key must beoutside the vehicle. When locking or unlocking
with KEYLESS-GO, the distance between the key
and the corresponding door handle must not be greater than 1 m.
A check that periodically establishes a radio
connection between the vehicle and the key
determines whether a valid key is in or in the
direct vicinity of the vehicle. This occurs, for
example:
R during engine start
R during driving R
when using HANDS-FREE ACCESS
R when the external door handles are touched
R during convenience closing X
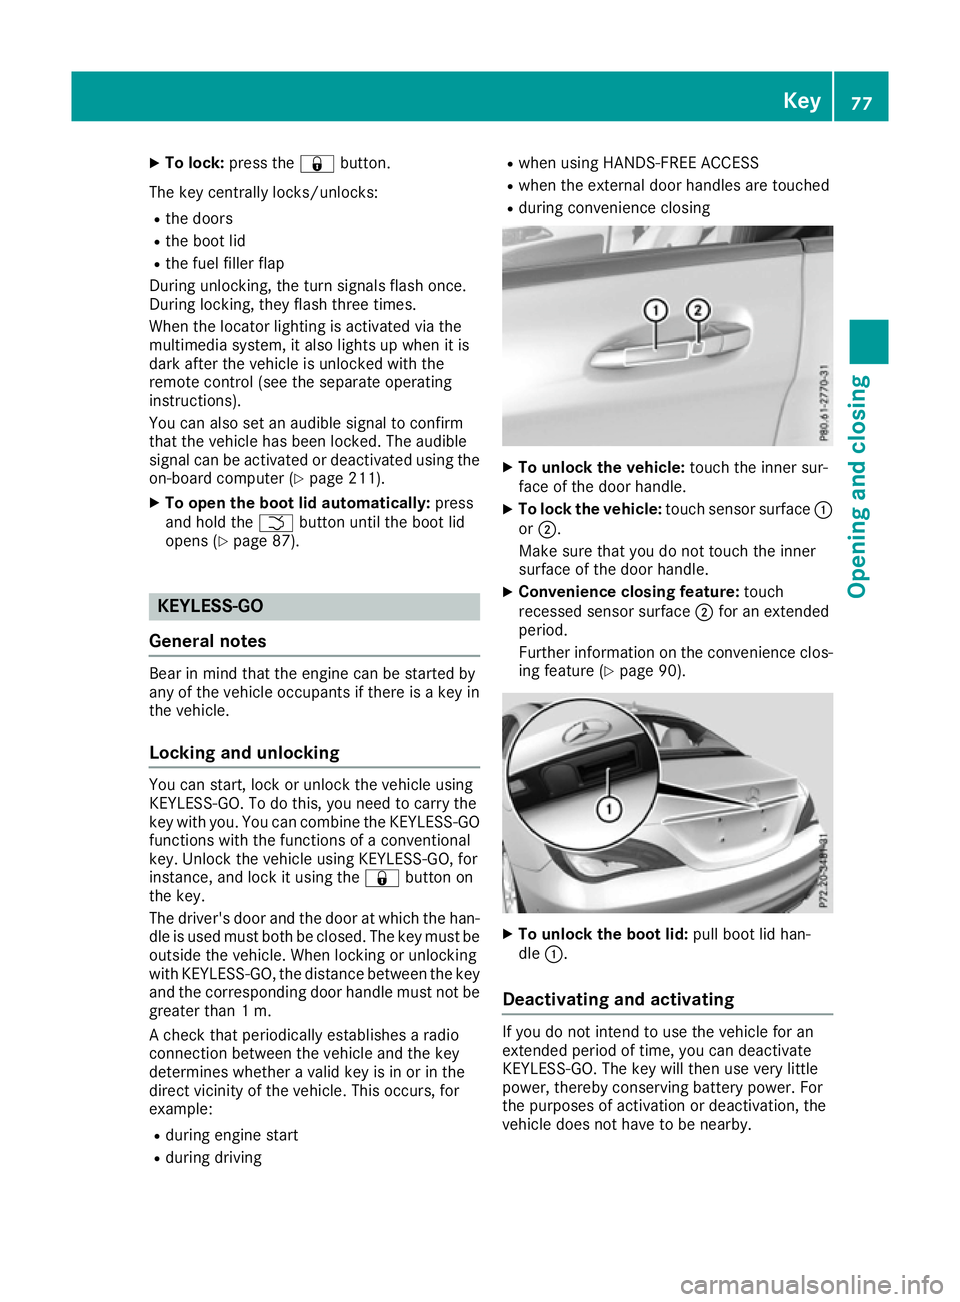
To unlock the vehicle: touch the inner sur-
face of the door handle.
X To lock the vehicle: touch sensor surface :
or ;.
Make sure that you do not touch the inner
surface of the door handle.
X Convenience closing feature: touch
recessed sensor surface ;for an extended
period.
Further information on the convenience clos-
ing feature (Y page 90). X
To unlock the boot lid: pull boot lid han-
dle :.
Deactivating and activating If you do not intend to use the vehicle for an
extended period of time, you can deactivate
KEYLESS-GO. The key will then use very little
power, thereby conserving battery power. For
the purposes of activation or deactivation, the
vehicle does not have to be nearby. Key
77Opening and closing Z
Page 81 of 345
X
To deactivate: press the&button on the
key twice in rapid succession.
The battery check lamp of the key flashes
twice briefly and lights up once; KEYLESS-GO is deactivated (Y page 79).
X To activate: press any button on the key.
or X Insert the key into the ignition lock.
KEYLESS-GO and all its associated features
are available again. KEYLESS-GO start function
General notes Bear in mind that the engine can be started by
any of the vehicle occupants if there is a key in
the vehicle. Changing the settings of the locking
system
You can change the settings of the locking sys-
tem. This means that only the driver's door and the fuel filler flap are unlocked when the vehicle
is unlocked. This is useful if you frequently travel alone.
X To change the setting: press and hold down
the % and& buttons simultaneously
for about six seconds until the battery indica-
tor lamp flashes twice (Y page 79).
If the setting of the locking system is changed
within the signal range of the vehicle, pressing
the & or% button:
R locks or
R unlocks the vehicle
The key now functions as follows:
X To unlock: press the%button once.
X To unlock centrally: press the%button
twice.
X To lock centrally: press the&button. The KEYLESS-GO function is changed as fol-
lows:
X
To unlock the driver's door: touch the inner
surface of the door handle on the driver's
door.
X To unlock centrally: touch the inner surface
of the door handle on the front-passenger
door or the rear door.
X To lock centrally: touch the outer sensor
surface on one of the door handles.
X To restore the factory settings: press and
hold down the %and& buttons simul-
taneously for approximately six seconds until
the battery check lamp flashes twice
(Y page 79). Emergency key element
General notes If the vehicle can no longer be unlocked with the
key or KEYLESS-GO, use the emergency key ele-
ment.
If you use the emergency key element to unlock
and open the driver's door or the boot lid, the
anti-theft alarm system will be triggered
(Y page 73).
There are several ways to deactivate the alarm:
X To deactivate the alarm with the key: press
the % or& button on the key.
or X Insert the key into the ignition lock.
or X To deactivate the alarm with KEYLESS-GO:
press the Start/Stop button in the ignition
lock. The key must be in the vehicle.
or X Lock or unlock the vehicle using KEYLESS-
GO. The key must be outside the vehicle.
If you unlock the vehicle using the emergency
key element, the fuel filler flap will not be
unlocked automatically.
X To unlock the fuel filler flap: insert the key
into the ignition lock. 78
KeyOpening and closing
Page 87 of 345
out, e.g. in hazardous situations. There is a
risk of injury.
Therefore, do not leave any people unsuper-
vised in the vehicle, particularly children, eld- erly people or people in need of special assis-
tance. Do not activate the double lock when
people are in the vehicle.
If the vehicle has been locked from the outside, the double lock function is activated as stand-
ard. It is then not possible to open the doors
from inside the vehicle. You can deactivate the
double lock function by deactivating the interior
motion sensor (Y page 75). The doors can then
be opened from the inside after the vehicle has been locked from the outside. You can open the
rear doors from inside the vehicle if they are not secured by the child-proof locks (Y page 65).
The anti-theft alarm system is triggered if the
door is opened from the inside. Switch off the
alarm (Y page 73). Centrally locking and unlocking the
vehicle from the inside
You can centrally lock or unlock the vehicle from
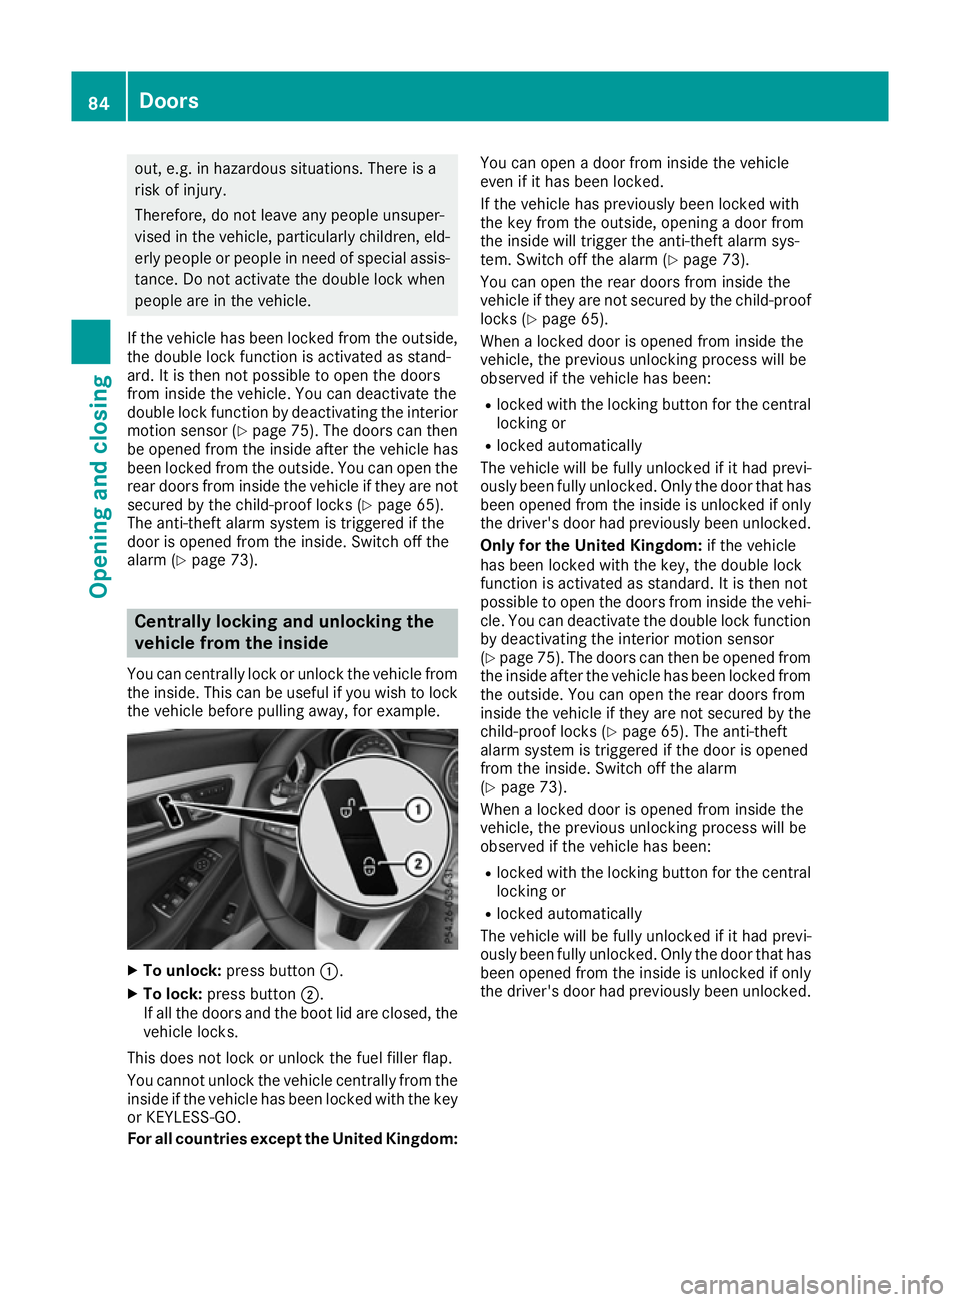
the inside. This can be useful if you wish to lock the vehicle before pulling away, for example. X
To unlock: press button :.
X To lock: press button ;.
If all the doors and the boot lid are closed, the
vehicle locks.
This does not lock or unlock the fuel filler flap.
You cannot unlock the vehicle centrally from the
inside if the vehicle has been locked with the key or KEYLESS-GO.
For all countries except the United Kingdom: You can open a door from inside the vehicle
even if it has been locked.
If the vehicle has previously been locked with
the key from the outside, opening a door from
the inside will trigger the anti-theft alarm sys-
tem. Switch off the alarm (Y page 73).
You can open the rear doors from inside the
vehicle if they are not secured by the child-proof locks (Y page 65).
When a locked door is opened from inside the
vehicle, the previous unlocking process will be
observed if the vehicle has been:
R locked with the locking button for the central
locking or
R locked automatically
The vehicle will be fully unlocked if it had previ-
ously been fully unlocked. Only the door that has been opened from the inside is unlocked if only
the driver's door had previously been unlocked.
Only for the United Kingdom: if the vehicle
has been locked with the key, the double lock
function is activated as standard. It is then not
possible to open the doors from inside the vehi- cle. You can deactivate the double lock function
by deactivating the interior motion sensor
(Y page 75). The doors can then be opened from
the inside after the vehicle has been locked from
the outside. You can open the rear doors from
inside the vehicle if they are not secured by the child-proof locks (Y page 65). The anti-theft
alarm system is triggered if the door is opened
from the inside. Switch off the alarm
(Y page 73).
When a locked door is opened from inside the
vehicle, the previous unlocking process will be
observed if the vehicle has been:
R locked with the locking button for the central
locking or
R locked automatically
The vehicle will be fully unlocked if it had previ-
ously been fully unlocked. Only the door that has been opened from the inside is unlocked if only
the driver's door had previously been unlocked. 84
DoorsOpening and closing
Page 89 of 345
X
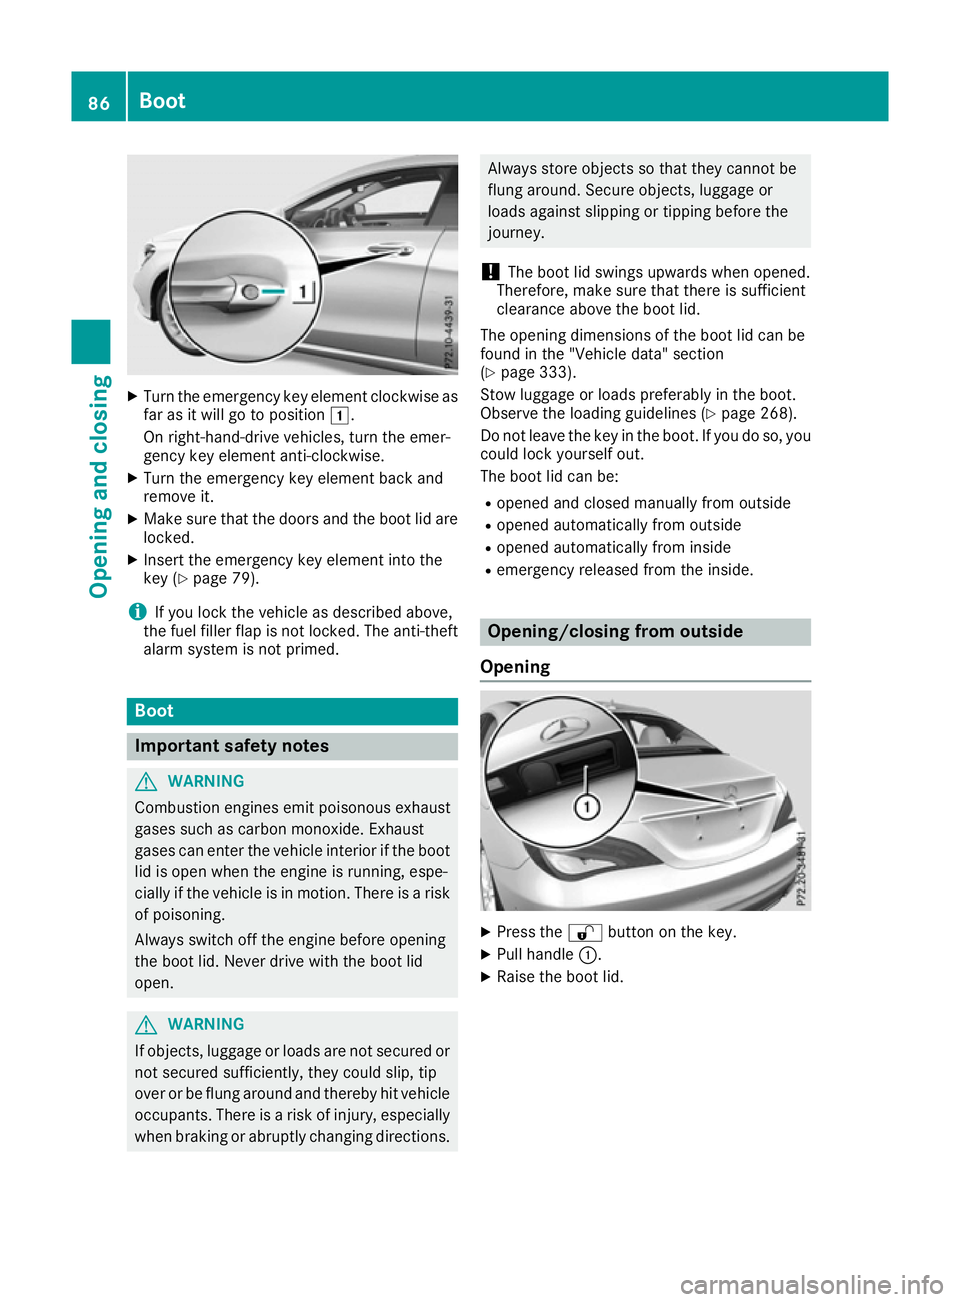
Turn the emergency key element clockwise as
far as it will go to position 1.
On right-hand-drive vehicles, turn the emer-
gency key element anti-clockwise.
X Turn the emergency key element back and
remove it.
X Make sure that the doors and the boot lid are
locked.
X Insert the emergency key element into the
key (Y page 79).
i If you lock the vehicle as described above,
the fuel filler flap is not locked. The anti-theft
alarm system is not primed. Boot
Important safety notes
G
WARNING
Combustion engines emit poisonous exhaust
gases such as carbon monoxide. Exhaust
gases can enter the vehicle interior if the boot
lid is open when the engine is running, espe-
cially if the vehicle is in motion. There is a risk of poisoning.
Always switch off the engine before opening
the boot lid. Never drive with the boot lid
open. G
WARNING
If objects, luggage or loads are not secured or not secured sufficiently, they could slip, tip
over or be flung around and thereby hit vehicle
occupants. There is a risk of injury, especially when braking or abruptly changing directions. Always store objects so that they cannot be
flung around. Secure objects, luggage or
loads against slipping or tipping before the
journey.
! The boot lid swings upwards when opened.
Therefore, make sure that there is sufficient
clearance above the boot lid.
The opening dimensions of the boot lid can be
found in the "Vehicle data" section
(Y page 333).
Stow luggage or loads preferably in the boot.
Observe the loading guidelines (Y page 268).
Do not leave the key in the boot. If you do so, you
could lock yourself out.
The boot lid can be:
R opened and closed manually from outside
R opened automatically from outside
R opened automatically from inside
R emergency released from the inside. Opening/closing from outside
Opening X
Press the %button on the key.
X Pull handle :.
X Raise the boot lid. 86
BootOpening and closing