2016 MERCEDES-BENZ CLA COUPE warning light
[x] Cancel search: warning lightPage 203 of 345
Important safety notes
G
WARNING
Operating the integrated information systems and communications equipment in the vehicle
while driving will distract you from traffic con-
ditions. You could then lose control of the
vehicle. There is a risk of an accident.
Only operate these devices if road traffic con-
ditions permit. If you are unsure about the
surrounding conditions, pull over to a safe
location and make entries only while the vehi-
cle is stationary.
You must observe the legal requirements for the country in which you are currently driving whenoperating the on-board computer. G
WARNING
If the instrument cluster has failed or mal-
functioned, you may not recognise function
restrictions relevant to safety. The operating
safety of your vehicle may be impaired. There is a risk of an accident.
Drive on carefully. Have the vehicle checked
at a qualified specialist workshop immedi-
ately.
The on-board computer only shows messages or warnings from certain systems in the multifunc-tion display. You should therefore make sure
your vehicle is operating safely at all times.
If the operating safety of your vehicle is
impaired, park the vehicle safely as soon as pos- sible. Contact a qualified specialist workshop.
For an overview, see the instrument panel illus-
tration (Y page 32). Displays and operation
Instrument cluster lighting
The light sensor in the instrument cluster auto-
matically controls the brightness of the multi-
function display. In daylight, the displays in the
instrument cluster are not illuminated.
The lighting in the instrument cluster, in the dis- plays and the controls in the vehicle interior can
be adjusted using the brightness control knob. The brightness control knob is located on the
bottom left of the instrument cluster
(Y
page 32).
X Turn the brightness control knob clockwise or
anti-clockwise.
If the light switch is set to the Ã,Tor
L position, the brightness is dependent
upon the brightness of the ambient light. Speedometer with segments
The speedometer is divided into segments on
vehicles with Distance Pilot DISTRONIC.
The segments in the speedometer indicate
which speed range is available. R Variable speed limiter is activated
(Y page 165):
The segments light up from the start of the
scale to the selected speed limitation.
R Distance Pilot DISTRONIC is activated
(Y page 167):
One or two segments in the stored speed
range light up.
R Distance Pilot DISTRONIC detects a vehicle in
front moving more slowly than the stored
speed:
The segments between the speed of the vehi- cle in front and the stored speed light up. Rev counter
! Do not drive in the overrevving range. Doing
so will damage the engine.
The red band in the rev counter indicates the
engine's overrevving range.
The engine is limited within a range to protect
the engine when the red band is reached. Outside temperature display
You should pay special attention to road condi-
tions when temperatures are around freezing
point.
Bear in mind that the outside temperature dis-
play indicates the measured air temperature
and not the road surface temperature.
The outside temperature display is in the multi-
function display (Y page 202).200
Displays and operationOn-board computer and displays
Page 212 of 345
Further information about Traffic Sign Assist
(Y page 190).
Activating/deactivating ESP ®Observe the important safety notes on ESP
®
(Y page 70). G
WARNING
If you deactivate ESP ®
, ESP ®
no longer sta-
bilises the vehicle. There is an increased risk
of skidding and an accident.
Only deactivate ESP ®
in the situations descri-
bed in the following.
It may be best to deactivate ESP ®
in the follow-
ing situations:
R when using snow chains
R in deep snow
R on sand or gravel
Deactivating/activating ESP ®
on Mercedes-
AMG vehicles (Y page 71).
For further information about ESP ®
, see
(Y page 69).
X Start the engine.
X Press the =or; button on the steering
wheel to select the Assist. Assist.menu.
X Press 9or: to select ESP ESP.
X Press ato confirm.
The current selection appears.
X To activate/deactivate: pressaagain.
ESP ®
is deactivated if the åwarning lamp
in the instrument cluster lights up continu-
ously when the engine is running.
If the ÷ andå warning lamps light up
continuously, ESP ®
is not available due to a mal-
function.
Observe the information on warning lamps
(Y page 252).
Observe the information on display messages
(Y page 217).
Activating/deactivating Active Brake
Assist X
Press the =or; button on the steering
wheel to select the Assist. Assist.menu.
X Press the 9or: button to select
Brake Assist
Brake Assist. X
Press ato confirm.
The current selection appears.
X To activate/deactivate: pressaagain.
When Active Brake Assist is deactivated, the
æ symbol appears in the multifunction dis-
play in the assistance graphic display.
Further information on Active Brake Assist
(Y page 67).
Activating/deactivating ATTENTION
ASSIST X
Press the =or; button on the steering
wheel to select the Assist. Assist.menu.
X Press the 9or: button to select
Attention Assist
Attention Assist.
X Press ato confirm.
The current selection appears.
X Press ato confirm.
X Press the :or9 button to set Off
Off,
Standard
Standard orSensitive
Sensitive.
X Press the abutton to save the setting.
When ATTENTION ASSIST is deactivated, the
é symbol appears in the multifunction dis-
play in the assistance graphic display.
For further information about ATTENTION
ASSIST, see (Y page 189).
Activating/deactivating Blind Spot
Assist X
Press the =or; button on the steering
wheel to select the Assist. Assist.menu.
X Press the 9or: button to select
Blind Spot Assist
Blind Spot Assist.
X Press ato confirm.
The current selection appears.
X To activate/deactivate: pressaagain.
Further information about Blind Spot Assist
(Y page 192).
Activating/deactivating Lane Keeping
Assist X
Press the =or; button on the steering
wheel to select the Assist. Assist.menu.
X Press the 9or: button to select
Lane Keeping Assist
Lane Keeping Assist.
X Press ato confirm.
The current selection appears.
X Press aagain to confirm. Menus and submenus
209On-board computer and displays Z
Page 213 of 345

X
Press the :or9 button to set Off Off,
Standard Standard orAdaptive
Adaptive.
X Press the abutton to save the setting.
When Lane Keeping Assist is activated, the
multifunction display shows the lane mark-
ings as bright lines in the assistance graphic.
For further information about Lane Keeping
Assist, see (Y page 193). Service menu
Depending on the equipment fitted in the vehi-
cle, you have the following options in the Serv. Serv.
menu:
R Calling up display messages in the message
memory (Y page 216)
R Restarting the tyre pressure loss warning sys-
tem (Y page 315)
R Calling up the service due date
(Y page 285) Settings menu
Introduction Depending on the equipment fitted in the vehi-
cle, in the Settings Settings menu you have the follow-
ing options:
R Changing the instrument cluster settings
R Changing the light settings
R Changing the vehicle settings
R Changing the heating settings
R Changing the convenience settings
R Restoring the factory settings
Instrument cluster Selecting the unit of measurement for dis-
tance
The Display unit Speed-/odometer:
Display unit Speed-/odometer: func-
tion allows you to choose whether certain dis-
plays appear in kilometres or miles in the mul-
tifunction display.
X Press the =or; button on the steering
wheel to select the Settings
Settings menu.
X Press the :or9 button to select the
Instrument cluster
Instrument cluster submenu.
X Press ato confirm. X
Press the :or9 button to select the
Display unit Speed-/odometer Display unit Speed-/odometer function.
You will see the selected setting: km
kmormiles
miles.
X Press the abutton to save the setting.
The selected unit of measurement for distance
applies to the following:
R digital speedometer in the Trip Tripmenu
R total distance recorder and the trip meter
R trip computer
R current fuel consumption and approximate
range
R navigation instructions in the Navi Navimenu
R cruise control
R speed limiter
R Distance Pilot DISTRONIC
R ASSYST PLUS service interval display
Switching the additional speedometer
on/off United Kingdom: this function is unavailable.
If the additional speedometer is switched on,
the speed is shown in the status bar of the mul- tifunction display instead of the outside tem-
perature.
The speed display is inverse to your speedome-
ter.
X Press the =or; button on the steering
wheel to select the Settings Settingsmenu.
X Press the :or9 button to select the
Instrument cluster
Instrument cluster submenu.
X Press ato confirm.
X Press the :or9 button to select the
Dig. speedo [mph]
Dig. speedo [mph] function.
You will see the selected setting: on
onoroff
off.
X Press the abutton to save the setting.
Selecting permanent display
United Kingdom: this function is unavailable.
The Permanent display: Permanent display: function allows you
to choose whether the multifunction display
always shows the outside temperature or the
speed.
The speed display is inverse to your speedome-
ter.
X Press the =or; button on the steering
wheel to select the Settings Settingsmenu.
X Press the :or9 button to select the
Instrument cluster
Instrument cluster submenu.
X Press ato confirm. 210
Menus and submenusOn-board computer and displays
Page 215 of 345
tion system, e.g. a garage. If the vehicle is
stuck in snow and you must leave the auxiliary heating running, keep the exhaust pipe and
the area around the vehicle clear of snow. To guarantee a sufficient supply of fresh air, open
a window on the side of the vehicle away from
the wind. G
WARNING
When the auxiliary heating is switched on,
parts of the vehicle can become very hot.
Flammable materials such as leaves, grass or twigs may ignite if they come into contact
with:
R hot parts of the exhaust system
R the exhaust gas itself
There is a risk of fire.
When the auxiliary heating is switched on,
make sure that:
R no flammable materials come into contact
with hot vehicle components
R the exhaust gas can escape from the
exhaust pipe unhindered
R the exhaust gas does not come into contact
with flammable materials.
! Operating the auxiliary heating/ventilation
draws on the vehicle battery. After you have
heated or ventilated the vehicle a maximum of two times, drive for a longer distance.
Only vehicles with auxiliary heating have this
function.
In the Heating
Heating submenu, you can select a
stored departure time or change a departure
time.
The auxiliary heating timer function calculates
the switch-on time according to the outside
temperature so that the vehicle is preheated by the departure time. When the departure time isreached, the auxiliary heating continues to heat
for a further five minutes and then switches off. The auxiliary heating adopts the set air condi-
tioning or THERMOTRONIC temperature set-
ting.
You can switch off the auxiliary heating by using
the remote control or the auxiliary heating but-
ton on the centre console. i
Switch the auxiliary heating on regularly
once a month for about ten minutes.
Further information on auxiliary heating
(Y page 126).
Selecting the departure time or deactivat- ing a selected departure time
X Press the =or; button on the steering
wheel to select the Settings
Settings menu.
X Press the :or9 button to select the
Heating Heating submenu.
X Press ato confirm.
The current setting appears.
X Press aagain.
X Press the :or9 button to select one
of the three departure times or Timer
Timeroff
off(no
timer active).
X Press ato confirm.
If a departure time is selected, the yellow
indicator lamp lights up on the auxiliary heat-
ing button.
Changing the departure time
X Press the =or; button on the steering
wheel to select the Settings
Settingsmenu.
X Press the :or9 button to select the
Heating
Heating submenu.
X Press ato confirm.
The current setting appears.
X Press the :or9 button to select
Change A
Change A, Change B
Change BorChange C
Change C.
X Press ato confirm.
You can now change the departure time.
X Press the =or; button to select the
display to be changed: hours, minutes.
X Press the :or9 button to set the
selected display.
X Press the abutton to store the entry.
The yellow indicator lamp on the auxiliary
heating button lights up.
Comfort Switching belt adjustment on/off
X Press the =or; button on the steering
wheel to select the Settings Settingsmenu.
X Press the :or9 button to select the
Convenience
Convenience submenu.
X Press ato confirm. 212
Menus and submenusOn-board computer and displays
Page 220 of 345
Safety systems
Display messages
Possible causes/consequences and
M
MSolutions !÷
currently unavaila‐
currently unavaila‐
ble ble See
SeeOwner's
Owner's Man‐
Man‐
ual
ual ABS (Anti-lock Braking System), BAS (Brake Assist System), ESP
®
(Electronic Stability Program), ESP ®
trailer stabilisation, the HOLD
function, hill start assist and PRE-SAFE ®
are temporarily unavailable.
Adaptive brake lights and Active Brake Assist may have also failed.
In addition, the !,÷andå warning lamps may light up in
the instrument cluster.
ATTENTION ASSIST is deactivated.
Possible causes:
R Self-diagnosis is not yet complete.
R The on-board voltage may be insufficient.
G WARNING
The brake system continues to function normally, but without the
functions listed above. The wheels could therefore lock if you brake
hard, for example.
The steerability and braking characteristics may be severely affected. The braking distance may increase in an emergency braking situation.
If ESP ®
is not operational, ESP ®
is unable to stabilise the vehicle.
Increased risk of skidding and/or accident!
X Carefully drive on a suitable stretch of road, making slight steering
movements, at a speed above 20 km/h.
If the display message disappears, the functions mentioned above
are available again.
If the multifunction display still shows the display message:
X Drive on carefully.
X Consult a qualified specialist workshop immediately. !÷
inoperative inoperative See
See Own‐
Own‐
er's Manual
er's Manual ABS, BAS, ESP
®
, ESP ®
trailer stabilisation, the HOLD function, hill
start assist and PRE-SAFE ®
are unavailable due to a malfunction.
Adaptive brake lights and Active Brake Assist may have also failed.
The !, ÷,åandJ warning lamps may also light up in the
instrument cluster.
ATTENTION ASSIST is deactivated.
G WARNING
The brake system continues to function normally, but without the
functions listed above. The wheels could therefore lock if you brake
hard, for example.
The steerability and braking characteristics may be severely affected. The braking distance may increase in an emergency braking situation.
If ESP ®
is not operational, ESP ®
is unable to stabilise the vehicle.
Increased risk of skidding and/or accident!
X Drive on carefully.
X Consult a qualified specialist workshop immediately. Display messages
217On-board computer and displays Z
Page 221 of 345
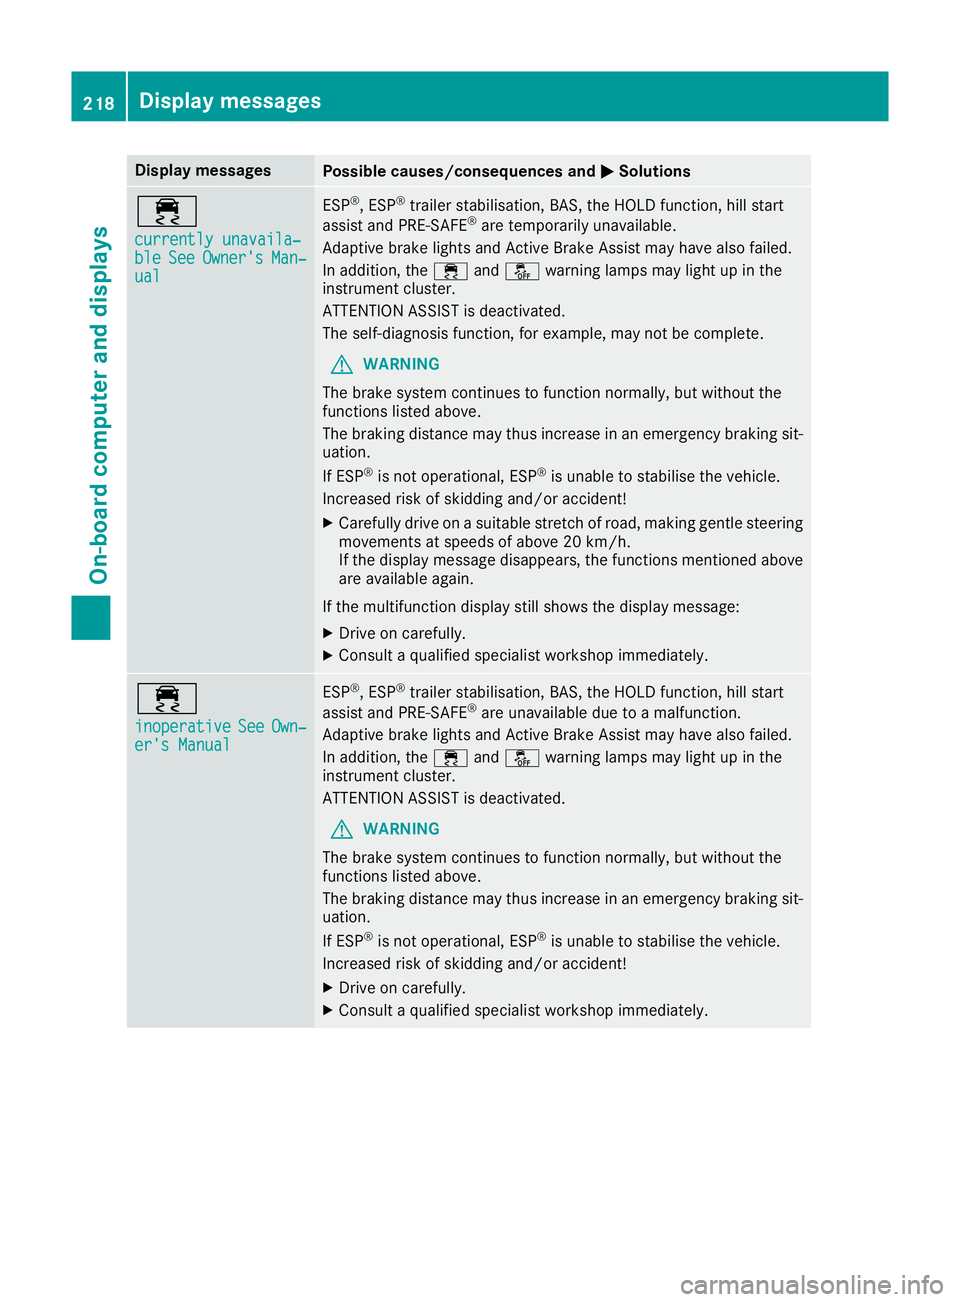
Display messages
Possible causes/consequences and
M
MSolutions ÷
currently unavaila‐ currently unavaila‐
ble ble
See
SeeOwner's
Owner's Man‐
Man‐
ual
ual ESP
®
, ESP ®
trailer stabilisation, BAS, the HOLD function, hill start
assist and PRE-SAFE ®
are temporarily unavailable.
Adaptive brake lights and Active Brake Assist may have also failed.
In addition, the ÷andå warning lamps may light up in the
instrument cluster.
ATTENTION ASSIST is deactivated.
The self-diagnosis function, for example, may not be complete.
G WARNING
The brake system continues to function normally, but without the
functions listed above.
The braking distance may thus increase in an emergency braking sit-
uation.
If ESP ®
is not operational, ESP ®
is unable to stabilise the vehicle.
Increased risk of skidding and/or accident!
X Carefully drive on a suitable stretch of road, making gentle steering
movements at speeds of above 20 km/h.
If the display message disappears, the functions mentioned above
are available again.
If the multifunction display still shows the display message:
X Drive on carefully.
X Consult a qualified specialist workshop immediately. ÷
inoperative inoperative
See
SeeOwn‐
Own‐
er's Manual
er's Manual ESP
®
, ESP ®
trailer stabilisation, BAS, the HOLD function, hill start
assist and PRE-SAFE ®
are unavailable due to a malfunction.
Adaptive brake lights and Active Brake Assist may have also failed.
In addition, the ÷andå warning lamps may light up in the
instrument cluster.
ATTENTION ASSIST is deactivated.
G WARNING
The brake system continues to function normally, but without the
functions listed above.
The braking distance may thus increase in an emergency braking sit-
uation.
If ESP ®
is not operational, ESP ®
is unable to stabilise the vehicle.
Increased risk of skidding and/or accident!
X Drive on carefully.
X Consult a qualified specialist workshop immediately. 218
Display
messagesOn-board computer and displays
Page 222 of 345
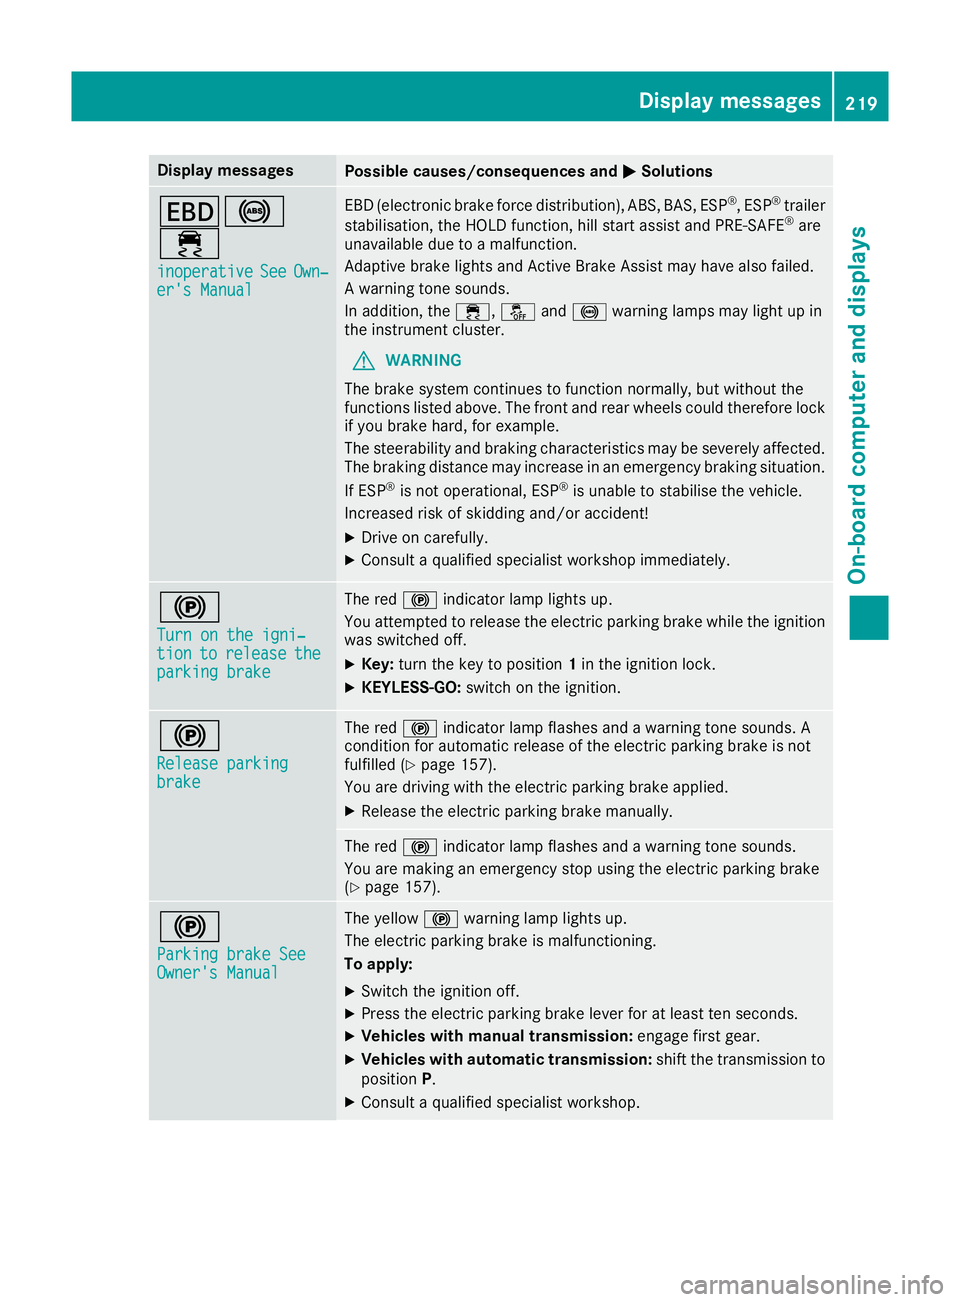
Display messages
Possible causes/consequences and
M
MSolutions T!
÷
inoperative inoperative See
SeeOwn‐
Own‐
er's Manual
er's Manual EBD (electronic brake force distribution), ABS, BAS, ESP
®
, ESP ®
trailer
stabilisation, the HOLD function, hill start assist and PRE-SAFE ®
are
unavailable due to a malfunction.
Adaptive brake lights and Active Brake Assist may have also failed.
A warning tone sounds.
In addition, the ÷,åand! warning lamps may light up in
the instrument cluster.
G WARNING
The brake system continues to function normally, but without the
functions listed above. The front and rear wheels could therefore lock
if you brake hard, for example.
The steerability and braking characteristics may be severely affected. The braking distance may increase in an emergency braking situation.
If ESP ®
is not operational, ESP ®
is unable to stabilise the vehicle.
Increased risk of skidding and/or accident!
X Drive on carefully.
X Consult a qualified specialist workshop immediately. !
Turn on the igni‐ Turn on the igni‐
tion tion
to
torelease
release the
the
parking brake
parking brake The red
!indicator lamp lights up.
You attempted to release the electric parking brake while the ignition
was switched off.
X Key: turn the key to position 1in the ignition lock.
X KEYLESS-GO: switch on the ignition. !
Release parking Release parking
brake brake The red
!indicator lamp flashes and a warning tone sounds. A
condition for automatic release of the electric parking brake is not
fulfilled (Y page 157).
You are driving with the electric parking brake applied.
X Release the electric parking brake manually. The red
!indicator lamp flashes and a warning tone sounds.
You are making an emergency stop using the electric parking brake
(Y page 157). !
Parking brake See Parking brake See
Owner's Manual Owner's Manual The yellow
!warning lamp lights up.
The electric parking brake is malfunctioning.
To apply:
X Switch the ignition off.
X Press the electric parking brake lever for at least ten seconds.
X Vehicles with manual transmission: engage first gear.
X Vehicles with automatic transmission: shift the transmission to
position P.
X Consult a qualified specialist workshop. Display
messages
219On-board computer and displays Z
Page 223 of 345
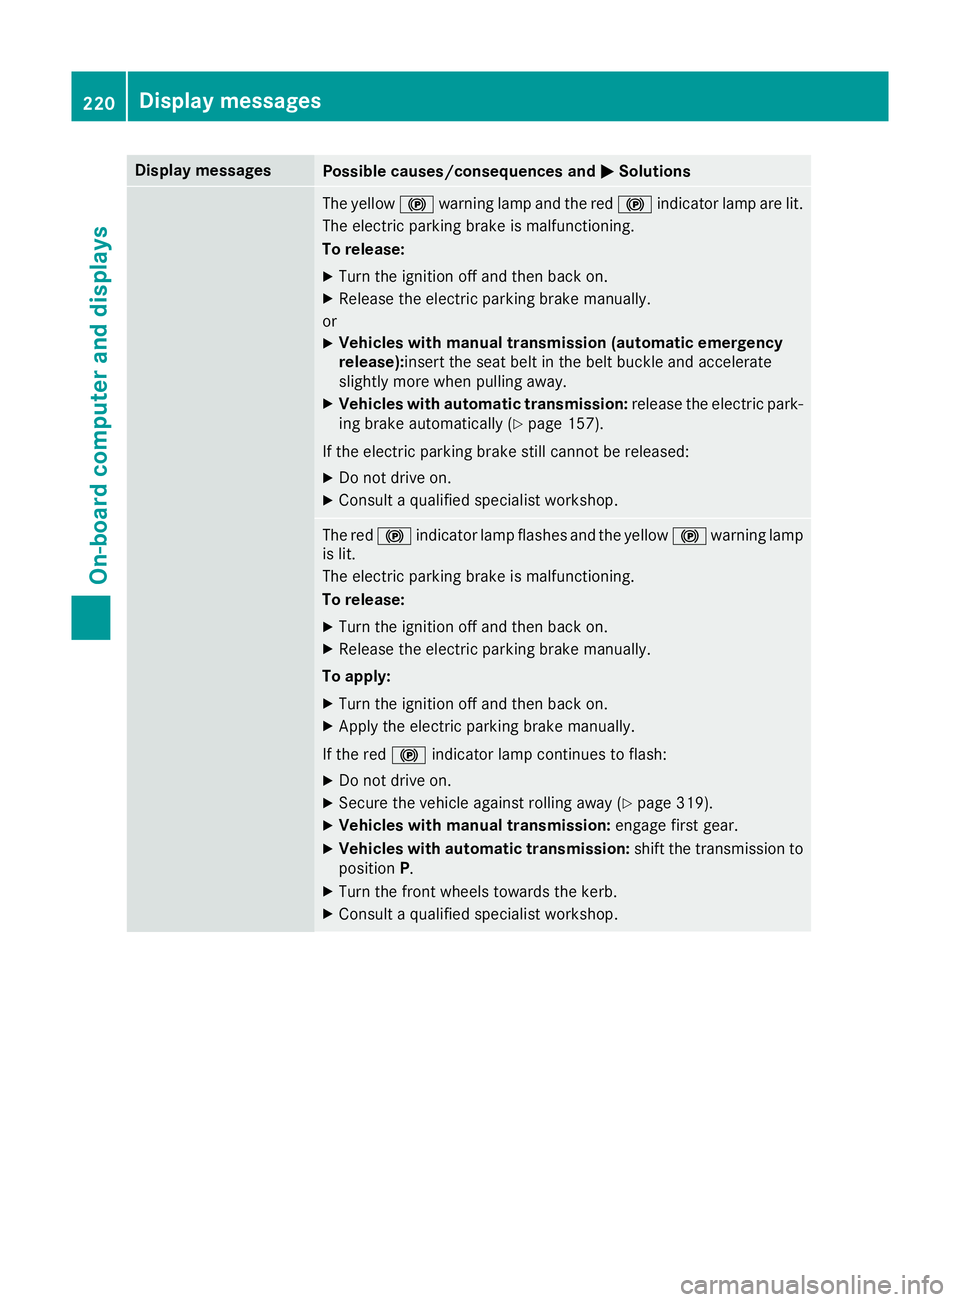
Display messages
Possible causes/consequences and
M
MSolutions The yellow
!warning lamp and the red !indicator lamp are lit.
The electric parking brake is malfunctioning.
To release:
X Turn the ignition off and then back on.
X Release the electric parking brake manually.
or
X Vehicles with manual transmission (automatic emergency
release):
insert the seat belt in the belt buckle and accelerate
slightly more when pulling away.
X Vehicles with automatic transmission: release the electric park-
ing brake automatically (Y page 157).
If the electric parking brake still cannot be released:
X Do not drive on.
X Consult a qualified specialist workshop. The red
!indicator lamp flashes and the yellow !warning lamp
is lit.
The electric parking brake is malfunctioning.
To release:
X Turn the ignition off and then back on.
X Release the electric parking brake manually.
To apply: X Turn the ignition off and then back on.
X Apply the electric parking brake manually.
If the red !indicator lamp continues to flash:
X Do not drive on.
X Secure the vehicle against rolling away (Y page 319).
X Vehicles with manual transmission: engage first gear.
X Vehicles with automatic transmission: shift the transmission to
position P.
X Turn the front wheels towards the kerb.
X Consult a qualified specialist workshop. 220
Display
messagesOn-board computer and displays