2016 MERCEDES-BENZ CLA COUPE dimensions
[x] Cancel search: dimensionsPage 9 of 345
Important safety notes .................. 126
Problem (display message) ............ 130
Setting the departure time .............1
28
Auxiliary ventilation
Activating/deactivating ................. 127
Activating/deactivating (on the
centre console ).............................. 127
Remote control .............................. 127
Axle load, permissible (trailer tow-
ing) ...................................................... 334 B
Back button ....................................... 260
Ball coupling
Folding in ....................................... 197
Folding in/out ................................ 197
Folding out ..................................... 197
BAS (Brake Assist System) ................. 66
Battery (key)
Checking .......................................... 79
Important safety notes .................... 79
Replacing ......................................... 79
Battery (vehicle)
Charging ........................................ 301
Display message ............................ 232
Important safety notes .................. 299
Jump starting ................................. 301
Belt
see Seat belts
Belt tensioner
Activation ......................................... 51
Blind Spot Assist
Activating/deactivating (on-
board computer) ............................ 209
Display message ............................ 235
Notes/function .............................. 192
Trailer towing ................................. 193
Blootooth ®
Connecting a different mobile
phone ............................................ 263
Bluetooth ®
Searching for a mobile phone ........ 263
See also Digital Owner's Manua l... 259
Telephony ...................................... 262
Bonnet
Active bonnet (pedestrian protec-tion) ............................................... 280 Closing ........................................... 282
Display message ............................ 244
Important safety notes .................. 280
Opening ......................................... 281
Boot
Emergency release .......................... 88
Important safety notes .................... 86
Opening (automatically from out-
side) ................................................. 87
Opening (from outside the vehi-
cle, HANDS-FREE ACCESS) .............. 87
Opening automatically from
inside ............................................... 88
Opening/closing (manually from
outside) ............................................ 86
Boot lid
Display message ............................ 244
Opening dimensions ...................... 333
Boot load (maximum) ........................ 333
Brake
EBD .................................................. 72
Brake Assist
see BAS (Brake Assist System)
Brake fluid
Display message ............................ 223
Notes ............................................. 331
Brake force distribution
see EBD (electronic brake force
distribution)
Brake lamp
Replacing bulb s............................. 113
Brake lamps
Adaptive ........................................... 69
Display message ............................ 229
Brakes
ABS .................................................. 66
BAS .................................................. 66
Brake fluid (notes) ......................... 331
Braking assistance appropriate to
the situation ..................................... 68
Display message ............................ 217
Driving tip s.................................... 160
Hill start assist ............................... 136
HOLD function ............................... 172
Important safety notes .................. 160
Parking brake ................................ 157
Warning lamp ................................. 249 6
Index
Page 25 of 345
Vehicle dimensions
........................... 333
Vehicle emergency locking ................ 85
Vehicle identification number
see VIN
Vehicle identification plate .............. 326
Vehicle tool kit .................................. 294
Ventilation
Setting the vents ........................... 130
Video
Operating the DVD ......................... 206
See also Digital Owner's Manua l... 259
VIN
Seat ............................................... 327
Type plate ...................................... 326 W
Warning and indicator lamps ABS ................................................ 250
Active Brake Assist ........................ 257
Brakes ........................................... 249
Distance warning signal ................. 257
ESP ®
.............................................. 252
ESP ®
OFF ....................................... 253
Fuel tank ........................................ 255
LIM (cruise control) ........................ 163
LIM (Distance Pilot DISTRONIC) .... 168
LIM (variable limiter) ...................... 165
Overview .......................................... 32
PASSENGER AIR BAG ...................... 40
Reserve fue l................................... 255
Seat belt ........................................ 248
Tyre pressure monitor ................... 258
Warning triangle ................................ 293
Washer fluid
Display message ............................ 246
Weather display (COMAND Online)
See also Digital Owner's Manua l... 259
Wheel and tyre combinations
Tyres .............................................. 323
Wheel bolt tightening torque ........... 322
Wheel chock ...................................... 319
Wheels
Changing a whee l.......................... 318
Changing/replacing ....................... 318
Checking ........................................ 310
Cleaning ......................................... 288
Emergency spare whee l................. 323 Fitting a new wheel ........................ 321
Important safety notes .................. 310
Information on driving .................... 310
Removing a whee
l.......................... 321
Storing ........................................... 319
Tightening torque ........................... 322
Wheel size/tyre size ...................... 323
Windowbag
Display message ............................ 225
Operation ......................................... 46
Windows
Cleaning ......................................... 288
see Side windows
Windscreen
Demisting ...................................... 123
Windscreen washer system
Important safety notes .................. 332
Topping up ..................................... 284
Windscreen wipers
Display message ............................ 246
Problem (malfunction) ................... 116
Replacing the wiper blades ............ 115
Switching on/of f........................... 114
Winter driving
General notes ................................ 312
Winter operation
Slippery road surfaces ................... 162
Snow chains .................................. 313
Winter tyres
Limiting the speed (on-board com-
puter) ............................................. 211
M+S tyre s...................................... 312
Wiper blades
Cleaning ......................................... 288
Important safety notes .................. 115
Wooden trim (cleaning instruc-
tions) .................................................. 291
Workshop
see Qualified specialist workshop Z
ZONE function Switching on/of f........................... 123 22
Index
Page 89 of 345
X
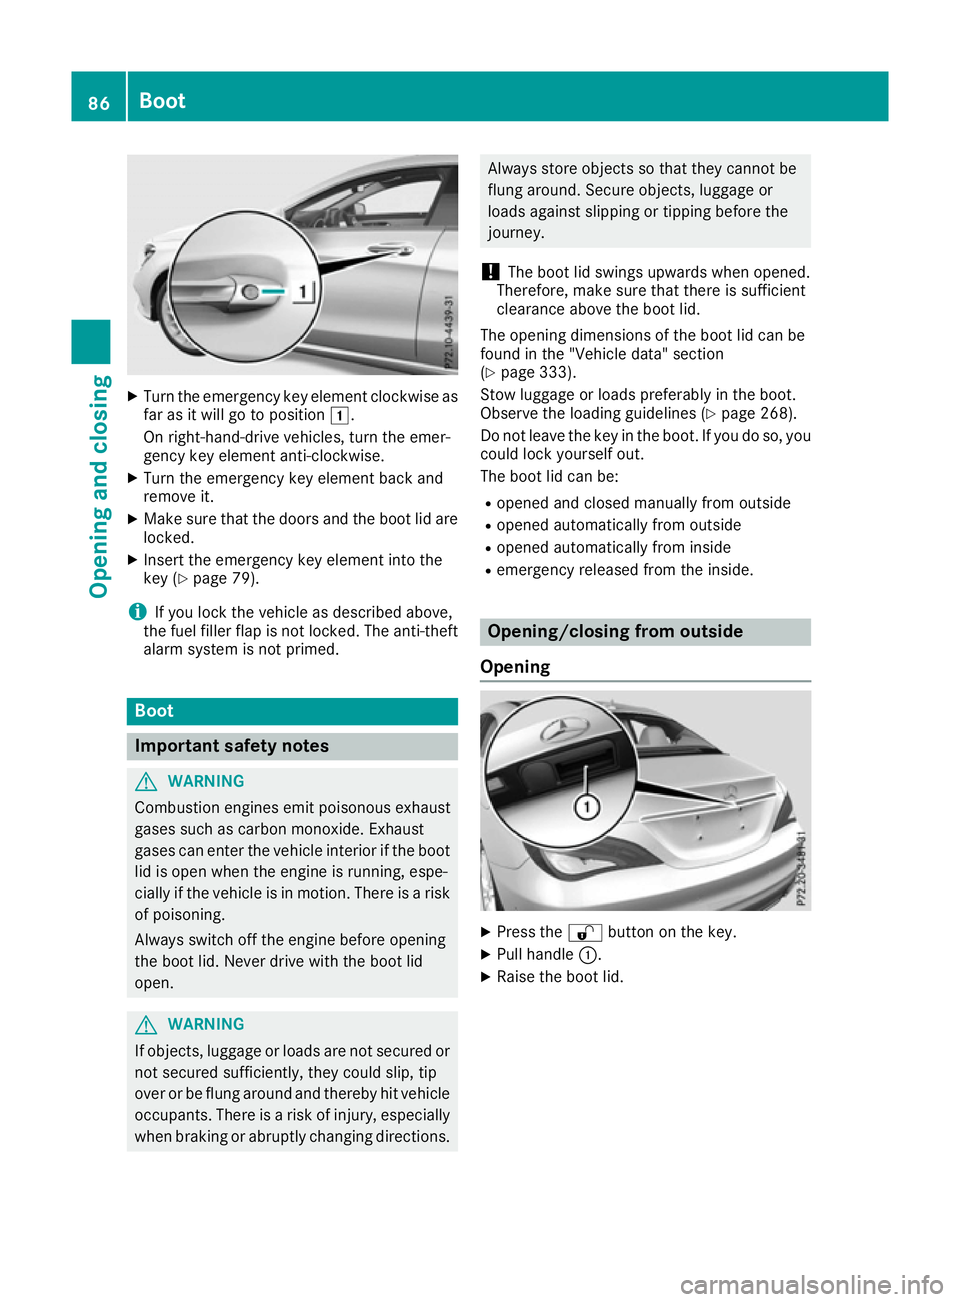
Turn the emergency key element clockwise as
far as it will go to position 1.
On right-hand-drive vehicles, turn the emer-
gency key element anti-clockwise.
X Turn the emergency key element back and
remove it.
X Make sure that the doors and the boot lid are
locked.
X Insert the emergency key element into the
key (Y page 79).
i If you lock the vehicle as described above,
the fuel filler flap is not locked. The anti-theft
alarm system is not primed. Boot
Important safety notes
G
WARNING
Combustion engines emit poisonous exhaust
gases such as carbon monoxide. Exhaust
gases can enter the vehicle interior if the boot
lid is open when the engine is running, espe-
cially if the vehicle is in motion. There is a risk of poisoning.
Always switch off the engine before opening
the boot lid. Never drive with the boot lid
open. G
WARNING
If objects, luggage or loads are not secured or not secured sufficiently, they could slip, tip
over or be flung around and thereby hit vehicle
occupants. There is a risk of injury, especially when braking or abruptly changing directions. Always store objects so that they cannot be
flung around. Secure objects, luggage or
loads against slipping or tipping before the
journey.
! The boot lid swings upwards when opened.
Therefore, make sure that there is sufficient
clearance above the boot lid.
The opening dimensions of the boot lid can be
found in the "Vehicle data" section
(Y page 333).
Stow luggage or loads preferably in the boot.
Observe the loading guidelines (Y page 268).
Do not leave the key in the boot. If you do so, you
could lock yourself out.
The boot lid can be:
R opened and closed manually from outside
R opened automatically from outside
R opened automatically from inside
R emergency released from the inside. Opening/closing from outside
Opening X
Press the %button on the key.
X Pull handle :.
X Raise the boot lid. 86
BootOpening and closing
Page 90 of 345

Closing
X
Pull down the boot lid using handle :.
X Let the boot lid drop into the lock.
X If necessary, lock the vehicle with the &
button on the key or with KEYLESS-GO. Opening automatically from outside
General notes !
The boot lid swings upwards when opened.
Therefore, make sure that there is sufficient
clearance above the boot lid.
i The opening dimensions of the boot lid can
be found under "Vehicle data" (Y page 333).
Opening automatically You can open the boot lid automatically using
the key or the handle in the boot lid.
X Press and hold the Fbutton on the key
until the boot lid opens.
or X If the boot lid is unlocked, pull the boot lid
handle and release it again immediately. HANDS-FREE ACCESS
Important safety notes G
WARNING
The vehicle exhaust system can become very
hot. If you use HANDS-FREE ACCESS, you
could burn yourself by touching the exhaust
system. There is a risk of injury. Always ensure that you only make a leg movement
within the detection range of sensors.
! If the key is within the rear detection range
of KEYLESS-GO, the following situations, for
example, could lead to the boot lid opening
unintentionally:
R using a car wash
R using a high-pressure cleaner
Make sure that the key is at least 3 m away
from the vehicle.
i You can also deactivate KEYLESS-GO. Fur-
ther information on deactivating and activat-
ing KEYLESS-GO (Y page 77).
General notes With KEYLESS-GO and HANDS-FREE ACCESS,
you can open the boot lid without using your
hands. This is useful if you have your hands full.
To do this, make a kicking movement under the bumper with your foot.
Observe the following points:
R Carry your KEYLESS-GO key with you. The key
must be in the KEYLESS-GO detection range
to the rear of the vehicle.
R When making the kicking movement, make
sure that you are standing firmly on the
ground and that there is sufficient clearance
to the rear of the vehicle. You could otherwise
lose your balance, e.g. on ice. R
Always ensure that you only make a kicking
movement within the detection range of sen-
sors :.
R Stand at least 30 cm away from the rear area
while doing so.
R Do not come into contact with the bumper
while making the kicking movement. Other-
wise, the sensors may not function correctly. Boot
87Opening and closing Z
Page 91 of 345
R
HANDS-FREE ACCESS does not function dur-
ing engine start.
R Dirt caused by road salt around sensors :
may restrict functionality.
Using HANDS-FREE ACCESS with a pros-
thetic leg may restrict functionality.
R If a KEYLESS-GO key is in the KEYLESS-GO
detection range to the rear of the vehicle,
HANDS-FREE ACCESS could be triggered.
The boot lid could thus be opened uninten-
tionally, for example, when you:
- fold the ball coupling in or out
- couple or uncouple a trailer
- fit or remove a rear-mounted bicycle rack
- load/unload bicycles on/from a rear-
mounted bicycle rack
- set down or lift up an object behind the
vehicle
- polish the rear of the vehicle
Do not carry the KEYLESS-GO key with you in
such situations. This will prevent the uninten- tional opening of the boot lid.
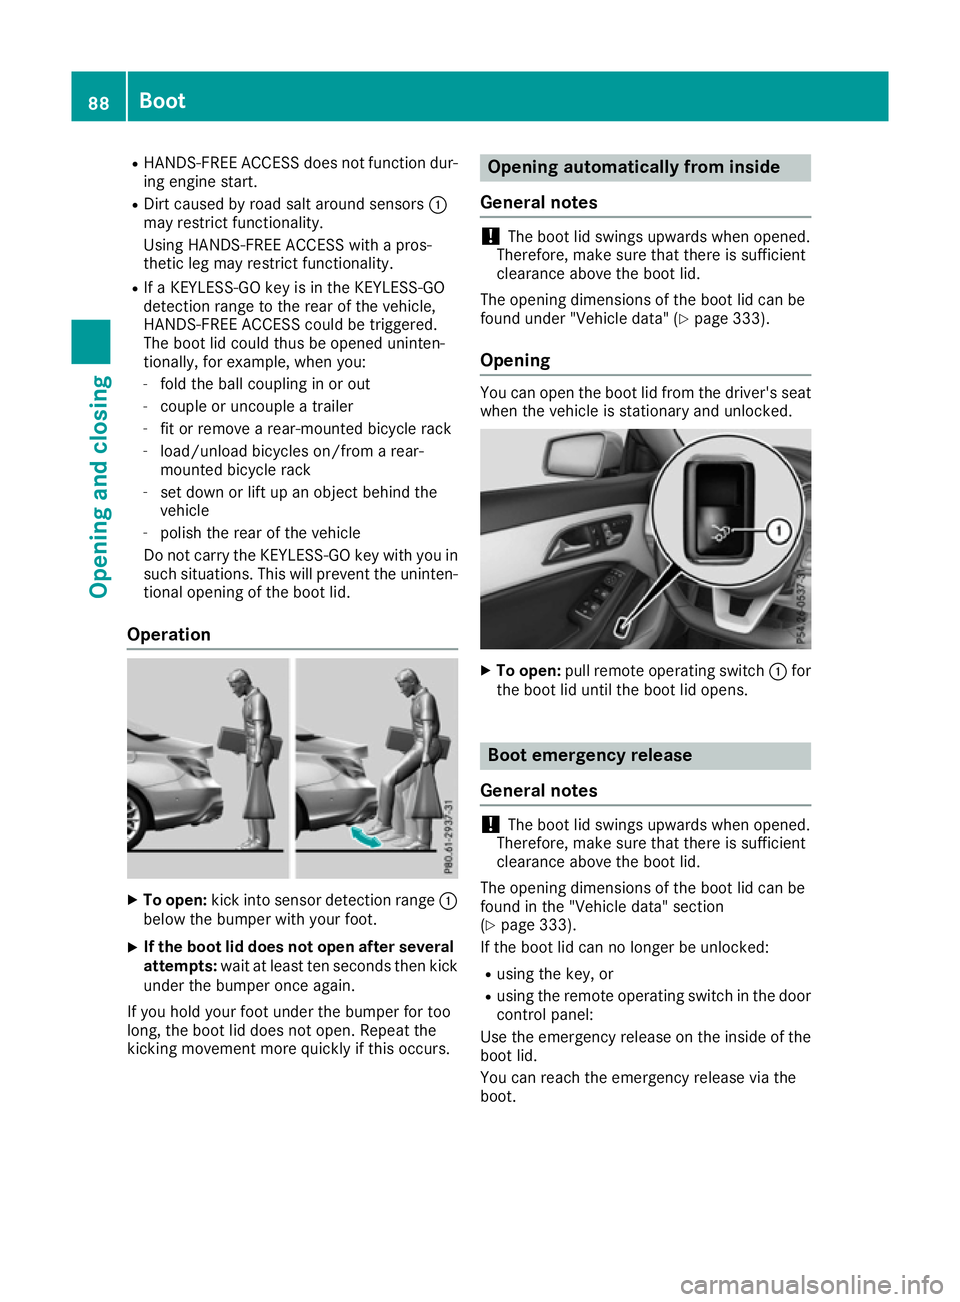
Operation X
To open: kick into sensor detection range :
below the bumper with your foot.
X If the boot lid does not open after several
attempts: wait at least ten seconds then kick
under the bumper once again.
If you hold your foot under the bumper for too
long, the boot lid does not open. Repeat the
kicking movement more quickly if this occurs. Opening automatically from inside
General notes !
The boot lid swings upwards when opened.
Therefore, make sure that there is sufficient
clearance above the boot lid.
The opening dimensions of the boot lid can be
found under "Vehicle data" (Y page 333).
Opening You can open the boot lid from the driver's seat
when the vehicle is stationary and unlocked. X
To open: pull remote operating switch :for
the boot lid until the boot lid opens. Boot emergency release
General notes !
The boot lid swings upwards when opened.
Therefore, make sure that there is sufficient
clearance above the boot lid.
The opening dimensions of the boot lid can be
found in the "Vehicle data" section
(Y page 333).
If the boot lid can no longer be unlocked:
R using the key, or
R using the remote operating switch in the door
control panel:
Use the emergency release on the inside of the boot lid.
You can reach the emergency release via the
boot. 88
BootOpening and closing
Page 199 of 345

not exceed the maximum permissible speed for
your vehicle/trailer combination. Notes on towing a trailer
General notes Trailer towing is not possible on the following
models:
R CLA 180 d BlueEFFICIENCY Edition
R CLA 250 Sport
R CLA 250 Sport 4MATIC
R Mercedes‑AMG CLA 45 4MATIC
When towing a trailer, set the tyre pressure on
the rear axle of the towing vehicle for the max-
imum load. Further information on the tyre pres-
sure table in the fuel filler flap (Y page 313).
Please note that when towing a trailer, the fol-
lowing driving systems have limited availability
or are not available at all.
R Parking Assist PARKTRONIC (Y page 177)
R Blind Spot Assist (Y page 192)
The height of the ball coupling changes with the
load of the vehicle. If necessary, use a trailer
with a height-adjustable drawbar.
You will find fitting dimensions and loads under "Technical data" (Y page 334).
Driving tips Observe the notes on ESP
®
trailer stabilisation
(Y page 72).
The maximum permissible speed for vehicle/
trailer combinations depends on the type of
trailer. Before beginning the journey, check the
trailer's documents to see what the maximum
permitted speed is. Observe the legally prescri-
bed maximum speed in the relevant country.
For certain Mercedes-Benz vehicles, the maxi-
mum permissible rear axle load is increased
when towing a trailer. See the "Technical data"
section to find out whether this applies to your
vehicle. If you utilise any of the added maximum rear axle load when towing a trailer, the vehicle/
trailer combination may not exceed a maximum speed of 100 km/h for reasons concerning the
operating permit. This also applies in countries
in which the permissible maximum speed for
vehicle/trailer combinations is above
100 km/h. When towing a trailer, your vehicle's handling
characteristics will be different to when driving
without a trailer and the vehicle will consume
more fuel.
Shift into a lower gear in good time on long and steep downhill gradients. For vehicles with auto-
matic transmission, you need to have selected
manual drive program M(Y page 150).
This also applies if you have activated cruise
control, SPEEDTRONIC or Distance Pilot
DISTRONIC.
This will use the braking effect of the engine, so
less braking will be required to maintain the
vehicle speed. This relieves the load on the
brake system and prevents the brakes from
overheating and wearing too quickly. If you need additional braking, depress the brake pedal
repeatedly rather than continuously.
Briefly depressing the accelerator pedal on
downhill gradients while the manual drive pro-
gram Mis temporarily activated (vehicles with
automatic transmission): the automatic trans-
mission may switch back to the last active auto-
matic drive program Eor S. The automatic trans-
mission may shift to a higher gear. This can
reduce the engine's braking effect.
Driving tips R
Maintain a greater distance to the vehicle in
front than when driving without a trailer.
R Avoid braking abruptly. If possible, brake gen-
tly at first to allow the trailer to run on. Then,
increase the braking force rapidly.
R The values given for gradient-climbing capa-
bilities from a standstill refer to sea level.
When driving in mountainous areas, note that
the power output of the engine, and conse-
quently the vehicle's gradient-climbing capa-
bility from a standstill, decrease with increas-
ing altitude.
If the trailer swings from side to side:
X Do not accelerate under any circumstances
X Do not countersteer
X Brake, if necessary 196
Towing a trailerDriving an
d parking
Page 321 of 345
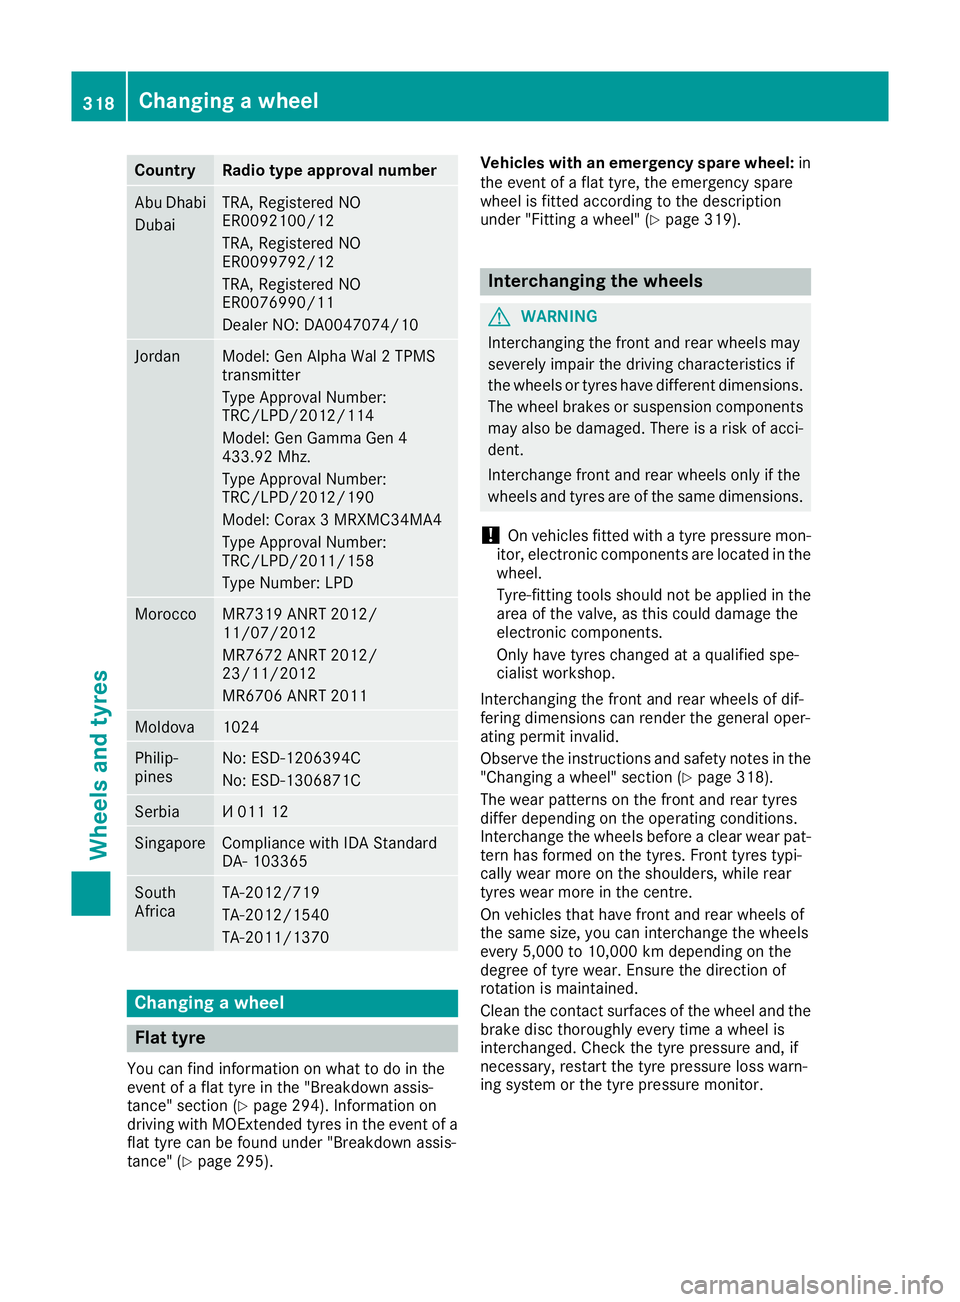
Country Radio type approval number
Abu Dhabi
Dubai TRA, Registered NO
ER0092100/12
TRA, Registered NO
ER0099792/12
TRA, Registered NO
ER0076990/11
Dealer NO: DA0047074/10
Jordan Model: Gen Alpha Wal 2 TPMS
transmitter
Type Approval Number:
TRC/LPD/2012/114
Model: Gen Gamma Gen 4
433.92 Mhz.
Type Approval Number:
TRC/LPD/2012/190
Model: Corax 3 MRXMC34MA4
Type Approval Number:
TRC/LPD/2011/158
Type Number: LPD Morocco MR7319 ANRT 2012/
11/07/2012
MR7672 ANRT 2012/
23/11/2012
MR6706 ANRT 2011
Moldova 1024
Philip-
pines No: ESD-1206394C
No: ESD-1306871C
Serbia И 011 12
Singapore Compliance with IDA Standard
DA- 103365
South
Africa TA-2012/719
TA-2012/1540
TA-2011/1370
Changing a wheel
Flat tyre
You can find information on what to do in the
event of a flat tyre in the "Breakdown assis-
tance" section (Y page 294). Information on
driving with MOExtended tyres in the event of a flat tyre can be found under "Breakdown assis-
tance" (Y page 295). Vehicles with an emergency spare wheel:
in
the event of a flat tyre, the emergency spare
wheel is fitted according to the description
under "Fitting a wheel" (Y page 319). Interchanging the wheels
G
WARNING
Interchanging the front and rear wheels may
severely impair the driving characteristics if
the wheels or tyres have different dimensions. The wheel brakes or suspension components may also be damaged. There is a risk of acci-
dent.
Interchange front and rear wheels only if the
wheels and tyres are of the same dimensions.
! On vehicles fitted with a tyre pressure mon-
itor, electronic components are located in the wheel.
Tyre-fitting tools should not be applied in thearea of the valve, as this could damage the
electronic components.
Only have tyres changed at a qualified spe-
cialist workshop.
Interchanging the front and rear wheels of dif-
fering dimensions can render the general oper-
ating permit invalid.
Observe the instructions and safety notes in the "Changing a wheel" section (Y page 318).
The wear patterns on the front and rear tyres
differ depending on the operating conditions.
Interchange the wheels before a clear wear pat-
tern has formed on the tyres. Front tyres typi-
cally wear more on the shoulders, while rear
tyres wear more in the centre.
On vehicles that have front and rear wheels of
the same size, you can interchange the wheels
every 5,000 to 10,000 km depending on the
degree of tyre wear. Ensure the direction of
rotation is maintained.
Clean the contact surfaces of the wheel and the
brake disc thoroughly every time a wheel is
interchanged. Check the tyre pressure and, if
necessary, restart the tyre pressure loss warn-
ing system or the tyre pressure monitor. 318
Changing a wheelWheels and tyres
Page 326 of 345
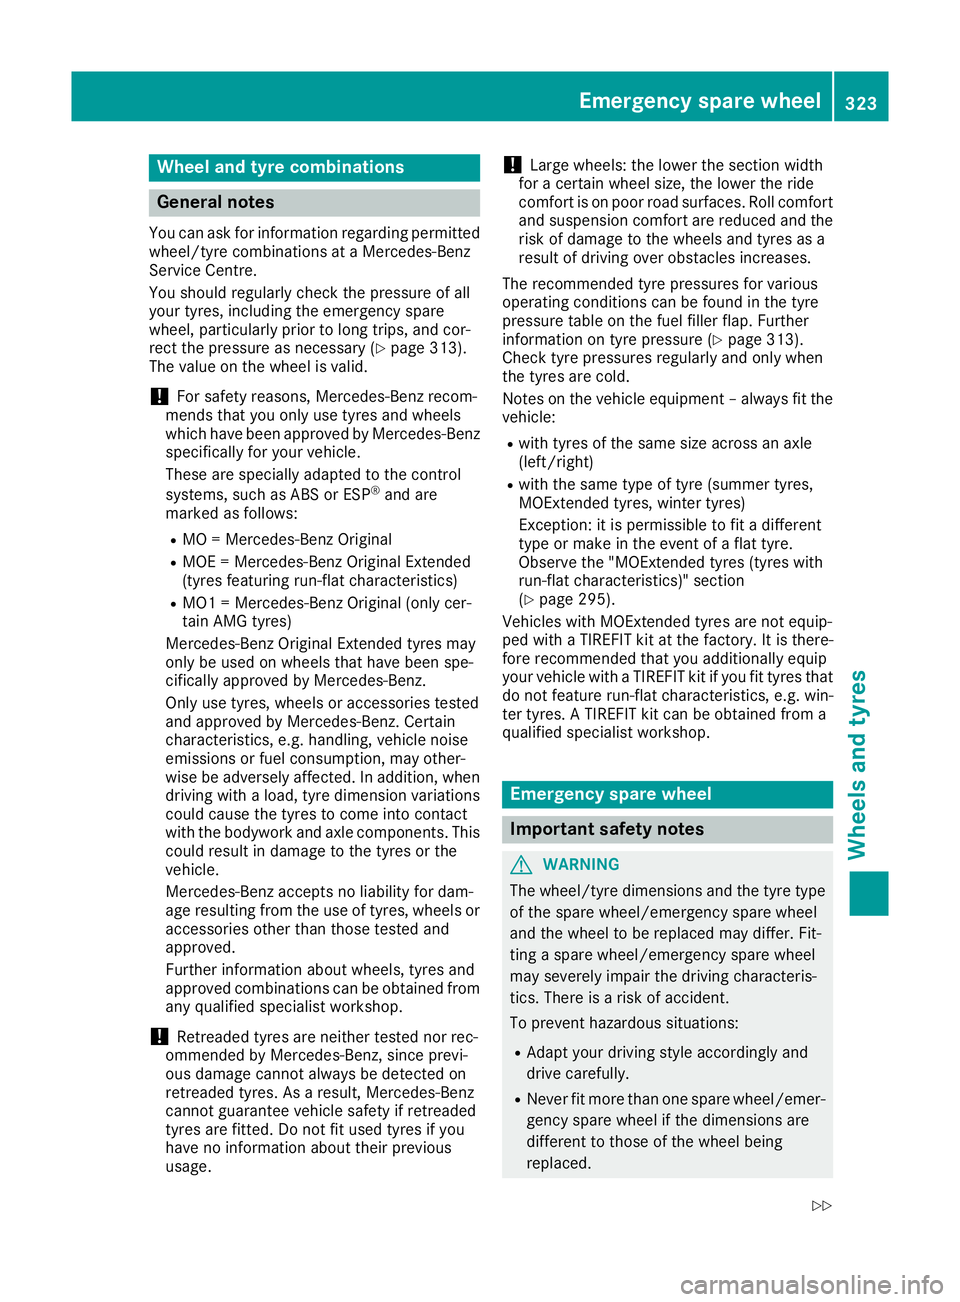
Wheel and tyre combinations
General notes
You can ask for information regarding permitted wheel/tyre combinations at a Mercedes-Benz
Service Centre.
You should regularly check the pressure of all
your tyres, including the emergency spare
wheel, particularly prior to long trips, and cor-
rect the pressure as necessary (Y page 313).
The value on the wheel is valid.
! For safety reasons, Mercedes-Benz recom-
mends that you only use tyres and wheels
which have been approved by Mercedes-Benz specifically for your vehicle.
These are specially adapted to the control
systems, such as ABS or ESP ®
and are
marked as follows:
R MO = Mercedes-Benz Original
R MOE = Mercedes-Benz Original Extended
(tyres featuring run-flat characteristics)
R MO1 = Mercedes-Benz Original (only cer-
tain AMG tyres)
Mercedes-Benz Original Extended tyres may
only be used on wheels that have been spe-
cifically approved by Mercedes-Benz.
Only use tyres, wheels or accessories tested
and approved by Mercedes-Benz. Certain
characteristics, e.g. handling, vehicle noise
emissions or fuel consumption, may other-
wise be adversely affected. In addition, when
driving with a load, tyre dimension variations
could cause the tyres to come into contact
with the bodywork and axle components. This
could result in damage to the tyres or the
vehicle.
Mercedes-Benz accepts no liability for dam-
age resulting from the use of tyres, wheels or accessories other than those tested and
approved.
Further information about wheels, tyres and
approved combinations can be obtained from
any qualified specialist workshop.
! Retreaded tyres are neither tested nor rec-
ommended by Mercedes-Benz, since previ-
ous damage cannot always be detected on
retreaded tyres. As a result, Mercedes-Benz
cannot guarantee vehicle safety if retreaded
tyres are fitted. Do not fit used tyres if you
have no information about their previous
usage. !
Large wheels: the lower the section width
for a certain wheel size, the lower the ride
comfort is on poor road surfaces. Roll comfort and suspension comfort are reduced and therisk of damage to the wheels and tyres as a
result of driving over obstacles increases.
The recommended tyre pressures for various
operating conditions can be found in the tyre
pressure table on the fuel filler flap. Further
information on tyre pressure (Y page 313).
Check tyre pressures regularly and only when
the tyres are cold.
Notes on the vehicle equipment – always fit the
vehicle:
R with tyres of the same size across an axle
(left/right)
R with the same type of tyre (summer tyres,
MOExtended tyres, winter tyres)
Exception: it is permissible to fit a different
type or make in the event of a flat tyre.
Observe the "MOExtended tyres (tyres with
run-flat characteristics)" section
(Y page 295).
Vehicles with MOExtended tyres are not equip-
ped with a TIREFIT kit at the factory. It is there-
fore recommended that you additionally equip
your vehicle with a TIREFIT kit if you fit tyres that do not feature run-flat characteristics, e.g. win-
ter tyres. A TIREFIT kit can be obtained from a
qualified specialist workshop. Emergency spare wheel
Important safety notes
G
WARNING
The wheel/tyre dimensions and the tyre type of the spare wheel/emergency spare wheel
and the wheel to be replaced may differ. Fit-
ting a spare wheel/emergency spare wheel
may severely impair the driving characteris-
tics. There is a risk of accident.
To prevent hazardous situations:
R Adapt your driving style accordingly and
drive carefully.
R Never fit more than one spare wheel/emer-
gency spare wheel if the dimensions are
different to those of the wheel being
replaced. Emergency spare wheel
323Wheels and tyres
Z