2016 MERCEDES-BENZ C-Class SEDAN Eco start
[x] Cancel search: Eco startPage 85 of 398

KEYLESS-GOstart function
Gene ral notes
Bear in min dthat th eengin ecan be started by
any of th evehicl eoccupant sif there is aSmart -
Key in th evehicle.
Changing the settings ofthe locking
system
You can chang eth esetting sof th elocking sys-
tem. This mean sthat only th edriver's door and
th efuel filler flap are unlocke dwhen th evehicl e
is unlocked. This is useful if you frequentl ytravel
on your own .
XTo change th esetting: press and hold down
th e% and& buttons simultaneousl y
for approximately six seconds until th ebat -
tery chec klamp flashes twice (
Ypage 84).
If th esetting of th elocking system is changed
within th esignal range of th evehicle, pressing
th e& or% button:
Rlocks or
Runlocks th evehicl e
The SmartKey no wfunction sas follows :
XTo unlock: press the% buttononce .
XTo unlock centrally: press the% button
twice .
XTo lock: press the& button.
The KEYLESS-GO function scan be changed as
follows :
XTo unlock th edriver's door :touch th einner
surfac eof th edoor handle on th edriver's
door .
XTo unlock centrally: touch theinner surfac e
of th edoor handle on th efront-passenger
door or th erear door .
XTo lock centrally: touch theouter sensor
surfac eon on eof th edoor handles .
XTo restoreth efactory settings: press and
hold th e% and& buttons sim ultane-
ousl yfor approximately six seconds until th e
battery chec klamp flashes twice
(
Ypage 84) .
Mechanical key
Gene ral notes
If th evehicl ecan no longer be locke dor
unlocke dwit hth eSmartKey or KEYLESS-GO ,
use th emechanical key.
If you use th emechanical ke yto unloc kand
open th edriver's door ,th eanti-thef talarm sys-
te m will be triggered .Switc hoff th ealarm
(
Ypage 79) .
If you unloc kth evehicl eusin gth emechanical
key, th efuel filler flap will no tbe unlocke dauto -
matically.
XTo unlock th efuel filler flap: insert the
SmartKey int oth eignition lock.
Removing the mechanical key
XPush release catch :in th edirection of th e
arrow and at th esam etime remove mechan -
ical ke y; from th eSmartKey.
Further information :
RUnlocking thedriver's door (Ypage 89)
RLocking th evehicl e (Ypage 89 )
Inserting the mechanical key
XPush mechanical ke y; completely int oth e
SmartKey until it engage sand release
catch :is bac kin it sbasic position .
SmartKey83
Opening and closing
Z
Page 94 of 398
Vehicles with trunk lid remote closing fea-
ture and KEYLESS-GO:when the driver's door
is closed you can simultaneously close the trunk
lid and lock the vehicle. The KEYLESS-GO key
must be in the rear detection range of the vehi-
cle.
XPress locking button ;in the trunk lid.
If KEYLESS-GO detects a SmartKey outside
the vehicle, the trunk lid closes. The vehicle is locked.
If KEYLESS-GO detects a SmartKey in the trunk,
the trunk lid opens again after it is closed.
If KEYLESS-GO detects a second SmartKey out-
side the vehicle, the trunk lid remains closed.
If KEYLESS-GO detects a SmartKey in the trunk
before the closing procedure starts, the trunk lid
remains open.
HANDS-FREE ACCESS
Important safety notes
GWARNING
The vehicle's exhaust system may be very hot. You could burn yourself by touching the
exhaust system if you use HANDS-FREE
ACCESS. There is a risk of injury. Always
ensure that you only make the kicking move-
ment within the detection range of sensors.
!If the SmartKey is within the rear detection
range of KEYLESS-GO, the following situa-
tions, for example, could lead to the uninten-
tional opening of the trunk:
Rusing a car wash
Rusing a power washer
Make sure that the SmartKey is at least 10 ft
(3 m) away from the vehicle.
General notes
With KEYLESS-GO and HANDS-FREE ACCESS,
you can open or close the trunk lid or stop the
procedure without using your hands. This is use- ful if you have your hands full. To do this, make
a kicking movement under the bumper with your
foot. Observe the following points:
RCarry your KEYLESS-GO key about your per-
son. The KEYLESS-GO key must be in the rear
detection range of the vehicle.
RWhen making the kicking movement, make
sure that you are standing firmly on the
ground and that there is sufficient clearance
to the rear of the vehicle. You could otherwise
lose your balance e.g. on ice.
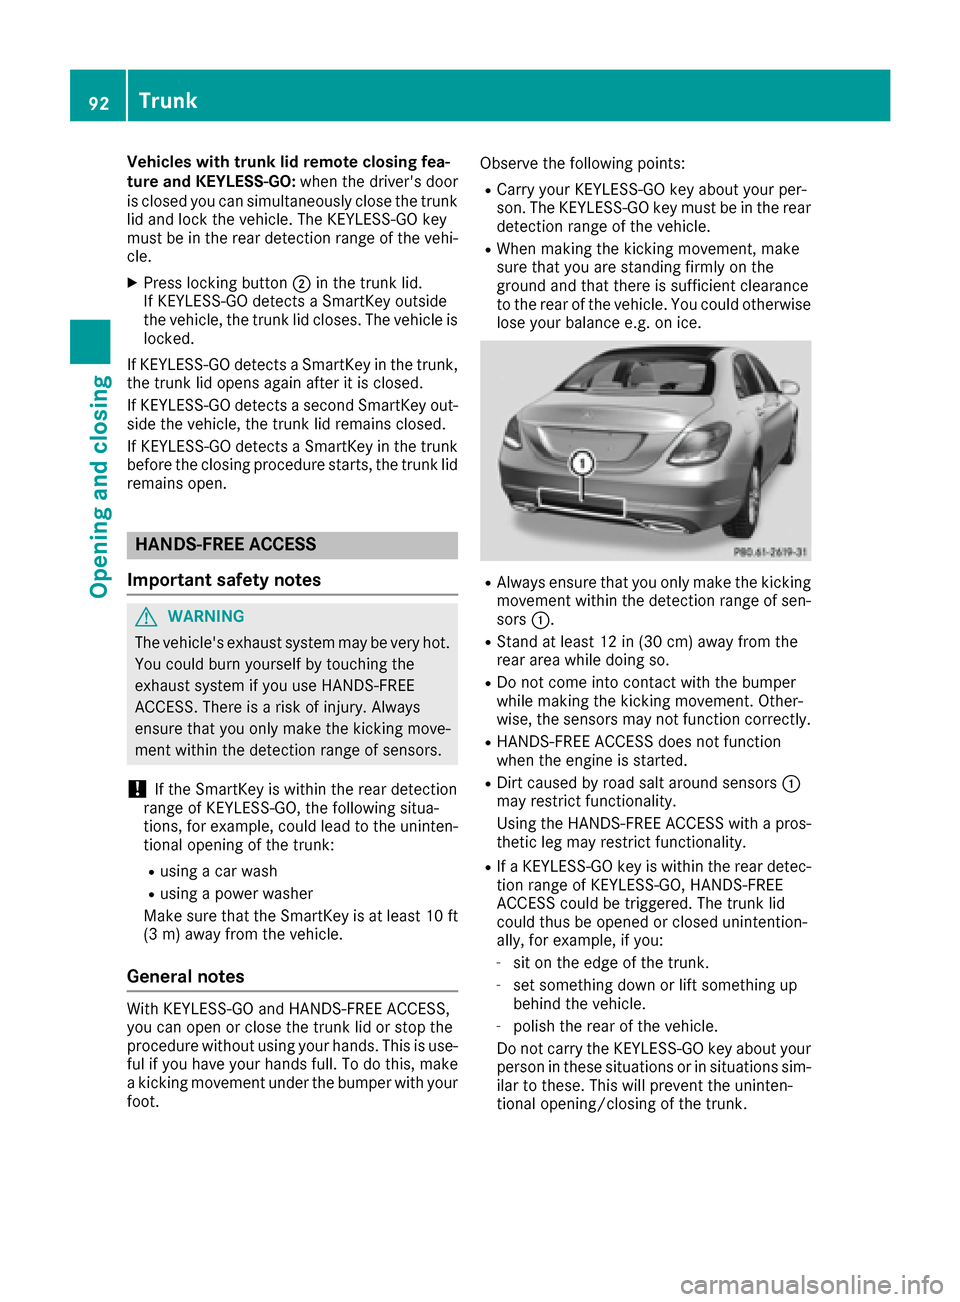
RAlways ensure that you only make the kicking
movement within the detection range of sen-
sors
:.
RStand at least 12 in (30 cm) away from the
rear area while doing so.
RDo not come into contact with the bumper
while making the kicking movement. Other-
wise, the sensors may not function correctly.
RHANDS-FREE ACCESS does not function
when the engine is started.
RDirt caused by road salt around sensors :
may restrict functionality.
Using the HANDS-FREE ACCESS with a pros-
thetic leg may restrict functionality.
RIf a KEYLESS-GO key is within the rear detec-
tion range of KEYLESS-GO, HANDS-FREE
ACCESS could be triggered. The trunk lid
could thus be opened or closed unintention-
ally, for example, if you:
-sit on the edge of the trunk.
-set something down or lift something up
behind the vehicle.
-polish the rear of the vehicle.
Do not carry the KEYLESS-GO key about your
person in these situations or in situations sim-
ilar to these. This will prevent the uninten-
tional opening/closing of the trunk.
92Trunk
Opening and closing
Page 97 of 398

body becomes trapped, release the switch or
pull the switch to close the side window again.
GWARNING
While closing the side windows, body parts in
the closing area could become trapped. There is a risk of injury.
When closing make sure that no parts of the
body are in the closing area. If somebody
becomes trapped, release the switch or press
the switch to open the side window again.
GWARNING
If children operate the side windows they
could become trapped, particularly if they are left unsupervised. There is a risk of injury.
Activate the override feature for the rear side
windows. When leaving the vehicle, always
take the SmartKey with you and lock the vehi-
cle. Never leave children unsupervised in the
vehicle.
Side window reversing feature
The side windows are equipped with an auto-
matic reversing feature. If a solid object blocks
or restricts a side window from traveling
upwards during the automatic closing process,
the side window opens again automatically. Dur-
ing the manual closing process, the side windowonly opens again automatically after the corre-
sponding switch is released. The automatic
reversing feature is only an aid and is no substi-
tute for your attention when closing a side win-
dow.
GWARNING
The reversing feature does not react:
Rto soft, light and thin objects, e.g. small fin-
gers
Rwhile resetting
This means that the reversing feature cannot
prevent someone being trapped in these sit-
uations. There is a risk of injury.
Make sure that no body parts are in close
proximity during the closing procedure. If
someone becomes trapped, press the switch
to open the side window again.
Opening and closing the side win-
dows
The switches for all side windows are located on the driver's door. There is also a switch on each
door for the corresponding side window.
The switches on the driver's door take prece-
dence.
:Front left
;Front right
=Rear right
?Rear left
XTurn the SmartKey to position 1or 2in the
ignition lock.
XTo open manually: press and hold the cor-
responding switch.
XTo open fully: press the switch beyond the
point of resistance and release it.
Automatic operation is started.
XTo close manually: pull the corresponding
switch and hold it.
XTo close fully: pull the switch beyond the
point of resistance and release it.
Automatic operation is started.
XTo interrupt automatic operation: press/
pull the corresponding switch again.
If you press the switch beyond the point of
resistance and release, automatic operation is
started in the corresponding direction. You can
stop automatic operation by pressing/pulling
the switch again.
You can continue to operate the side windows
after you switch off the engine or remove the
SmartKey. This function remains active for five
minutes or until you open a front door.
Side windows95
Opening and closing
Z
Page 98 of 398

The side windows cannot be operated from the
rear when the override feature for the side win-
dows is activated (
Ypage 67).
Information on opening and closing the roller
sunblinds on the rear side windows
(
Ypage 317).
Convenience opening
General notes
If the SmartKey is in close proximity to the vehi-
cle, the convenience opening function is availa-
ble.
Vehicles with KEYLESS-GO or KEYLESS-GO
start function: you can ventilate the vehicle
before you start driving.
To do this, the SmartKey is used to carry out the following functions simultaneously:
Runlock the vehicle
Ropen the side windows
Ropen the sliding sunroof or the panorama roofwith power tilt/sliding panel and the roller
sunblind
Rswitch on the seat ventilation for the driver's
seat
The "convenience opening" feature is also avail-
able when the vehicle is unlocked.
Convenience opening
XPress and hold the %button on the Smart-
Key until the side windows and the sliding
sunroof or the panorama roof with power tilt/
sliding panel are in the desired position.
If the roller sunblinds of the panorama roof
with power tilt/sliding panel are closed, the
roller sunblinds are opened first.
XPress and hold the %button once more
until the panorama roof with power tilt/slid-
ing panel reaches the desired position.
XTo interrupt convenience opening: release
the % button.
Convenience closing feature
Important safety notes
GWARNING
When the convenience closing feature is oper- ating, parts of the body could become trapped
in the closing area of the side window and the
sliding sunroof. There is a risk of injury.
Observe the complete closing procedure
when the convenience closing feature is oper-
ating. Make sure that no body parts are in
close proximity during the closing procedure.
Vehicles with KEYLESS-GO or KEYLESS-GO
start function: if the SmartKey is in close prox-
imity to the vehicle, the convenience closing
function is available.
When you lock the vehicle, you can simultane-
ously:
Rclose the side windows
Rclose the sliding sunroof or the panorama roof
with power tilt/sliding panel
On vehicles with a panorama roof with power
tilt/sliding panel, you can then close the roller
sunblinds.
Notes on the automatic reversing feature for:
Rthe side window (Ypage 95)
Rthe sliding sunroof or the panorama roof with power tilt/sliding panel (Ypage 99)
Using the SmartKey
XPress and hold the &button until the side
windows and the sliding sunroof or the pano-
rama roof with power tilt/sliding panel are
fully closed.
XMake sure that all the side windows and the
sliding sunroof or panorama roof with power
tilt/sliding panel are closed.
XVehicles with panorama roof with power
tilt/sliding panel: press and hold the&
button once more until the roller sunblinds of the panorama roof with power tilt/sliding
panel close.
XTo interrupt convenience closing: release
the & button.
96Side windows
Opening and closing
Page 101 of 398

!Only open the sliding sunroof if it is free of
snow and ice. Otherwise, malfunctions may
occur.
Do not allow anything to protrude from the
sliding sunroof. Otherwise, the seals could be
damaged.
!The weather can change abruptly. It could
start to rain or snow. Make sure that the slid-
ing sunroof is closed when you leave the vehi-
cle. The vehicle electronics can be damaged if
water enters the vehicle interior.
Resonance noises can occur in addition to the
usual airflow noises when the sliding sunroof is
open. They are caused by minor pressure fluc-
tuations in the vehicle interior. Change the posi-
tion of the sliding sunroof or open a side window
slightly to reduce or eliminate these noises.
Only for vehicles with panorama roof with
power tilt/sliding panel:
GWARNING
At high speeds the raised sliding sunroof auto-
matically lowers slightly at the rear. This could
trap you or other persons. There is a risk of
injury. Make sure that nobody reaches into
the sweep of the sliding sunroof whilst the
vehicle is in motion.
If somebody becomes trapped, immediately
pull back the sliding sunroof switch. The slid-
ing sunroof lifts during opening.
Sliding sunroof reversing feature
Your vehicle may be equipped with a sliding
sunroof or a panorama roof with power tilt/slid-
ing panel. In this section, the term "sliding sun-
roof" refers to both types of sliding sunroof.
The sliding sunroof is equipped with an auto-
matic reversing feature. If a solid object blocks
or restricts the sliding sunroof during the closing
process, the sliding sunroof opens again auto-
matically. The automatic reversing feature is
only an aid and is no substitute for your attention
when closing the sliding roof.
GWARNING
The reversing feature does not react:
Rto soft, light and thin objects, e.g. small fin-
gers
Rover the last 1/6 in (4 mm) of the closing
movement
Rduring resetting
Rwhen closing the sliding sunroof again man- ually immediately after automatic reversing
This means that the reversing feature cannot
prevent someone being trapped in these sit-
uations. There is a risk of injury.
Make sure that no body parts are in close
proximity during the closing procedure.
If somebody becomes trapped:
Rrelease the switch immediately, or
Rpress the switch in any direction during the
automatic closing process
The closing process is stopped.
Operating the sliding sunroof
Opening and closing
:To raise
;To open
=To close/lower
XTurn the SmartKey to position 1or 2in the
ignition lock.
XPress or pull the 3switch in the corre-
sponding direction.
If you press or pull the 3switch beyond the
point of resistance, automatic operation is star-
ted in the corresponding direction. You can stop
Sliding sunroof99
Opening and closing
Z
Page 103 of 398
roof carrier approved by Mercedes-Benz, the
sunroof will lower slightly but remain raised at
the rear.
Rain-closing feature
The raised panorama roof with power tilt/sliding
panel automatically lowers when driving if it
starts to rain. The sliding sunroof is lowered
depending on:
Rthe road speed and
Rthe intensity of the rain
You can manually cancel the automatic closing
procedure. Press or pull the 3switch in any
direction.
To raise the panorama roof with power tilt/slid-
ing panel again, press the 3switch in direc-
tion :.
The rain-closing feature is then deactivated until
you:
Rpress or pull the 3switch in any direction
or
Rturn the SmartKey to another position in the
ignition lock (Ypage 146)
Operating the roller sunblinds for the
panorama roof with power tilt/sliding
panel
Important safety notes
GWARNING
Parts of the body could become trapped
between the roller sunblind and frame or slid-
ing sunroof during automatic opening or clos-
ing. There is a risk of injury.
When opening or closing, make sure that no
body parts are in the sweep of the roller sun-
blind.
If somebody becomes trapped:
Rrelease the switch immediately, or
Rduring automatic operation, push the
switch briefly in any direction
The opening or closing procedure will be stop- ped.
The roller sunblinds shield the vehicle interior
from sunlight. The roller sunblinds can only be opened and closed when the panorama roof
with power tilt/sliding panel is closed.
Roller sunblind reversing feature
The roller sunblinds are equipped with an auto-
matic reversing feature. If a solid object blocks
or restricts a roller sunblind during the closing
process, the roller sunblind opens again auto-
matically. However, the automatic reversing
feature is only an aid and does not relieve you of
the responsibility of paying attention when clos-
ing the roller sunblinds.
GWARNING
The reversing feature does not react in par-
ticular to soft, light and thin objects, e.g. small
fingers. This means that the reversing feature
cannot prevent someone being trapped in
these situations. There is a risk of injury.
When closing the roller sunblind, make sure
that no body parts are in the sweep area.
If somebody becomes trapped:
Rrelease the switch immediately, or
Rpress the switch in any direction during the
automatic closing process
The closing process is stopped.
Opening and closing the roller sun-
blinds
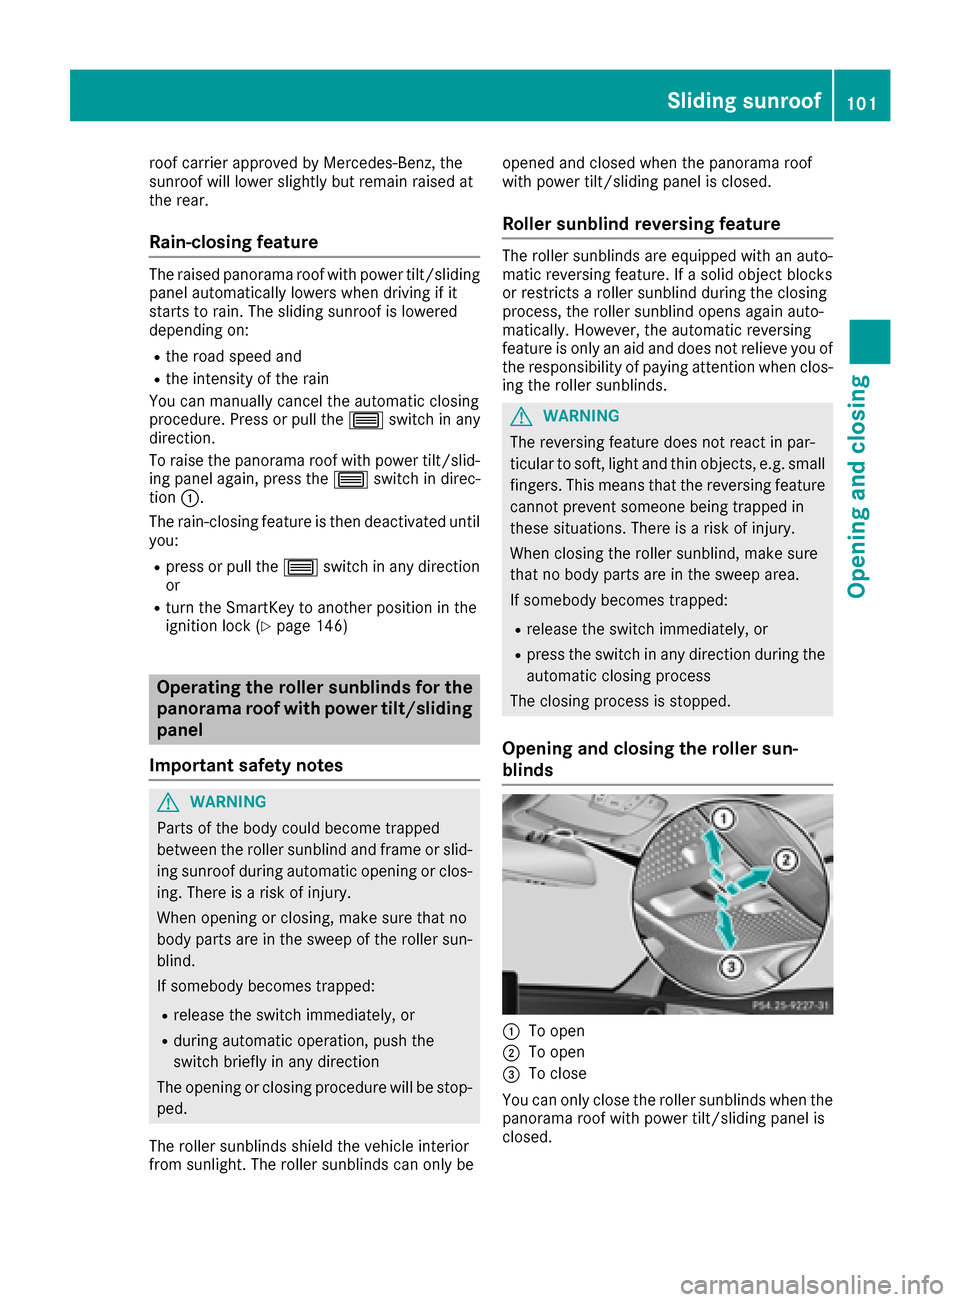
:To open
;To open
=To close
You can only close the roller sunblinds when the
panorama roof with power tilt/sliding panel is
closed.
Sliding sunroof101
Opening and closing
Z
Page 106 of 398

Correct driver's seat position
GWARNING
You could lose control of your vehicle if you do the following while driving:
Radjust the driver's seat, head restraint,
steering wheel or mirrors
Rfasten the seat belt
There is a risk of an accident.
Adjust the driver's seat, head restraint, steer-
ing wheel and mirror and fasten your seat belt before starting the engine.
Observe the following when adjusting steering
wheel :, seat belt ;and driver's seat =:
Ryou are as far away from the driver's air bag as
possible.
Ryou are sitting in a normal upright position.
Ryour thighs are slightly supported by the seat
cushion.
Ryour legs are not entirely stretched and you
can depress the pedals properly.
Rthe back of your head is supported at eye level
by the center of the head restraint.
Ryou can hold the steering wheel with your
arms slightly bent.
Ryou can move your legs freely.
Ryou can see all the displays in the instrument
cluster clearly.
Ryou should have a good overview of traffic
conditions.
Rthe seat belt is pulled snugly against the bodyand is routed across the center of your shoul-
der and across your hips in the pelvic area.
Further related subjects:
R
R
Electrical seat adjustment (Ypage 106)
RAdjusting the steering wheel mechanically
(Ypage 110) or electrically (Ypage 111).
RFastening the seat belt correctly (Ypage 50).
RAdjusting the rear-view mirror and exterior
mirrors (Ypage 113).
RYou can store the seat, steering wheel, exte-
rior mirror and head-up display settings with
the memory function (
Ypage 116).
Seats
Important safety notes
GWARNING
Children could become trapped if they adjust
the seats, particularly when unattended.
There is a risk of injury.
When leaving the vehicle, always take the
SmartKey with you and lock the vehicle. Never
leave children unsupervised in the vehicle.
The seats can still be adjusted when there is no
SmartKey in the ignition lock.
GWARNING
When you adjust a seat, you or other vehicle
occupants could become trapped, e.g. on the seat guide rail. There is a risk of injury.
Make sure when adjusting a seat that no one
has any body parts in the sweep of the seat.
Observe the safety notes on "Air bags"
(
Ypage 51) and "Children in the Vehicle"
(Ypage 62).
GWARNING
If the driver's seat is not engaged, it could
move unexpectedly while the vehicle is in
motion. This could cause you to lose control of the vehicle. There is a risk of an accident.
104Seats
Seats, steering wheel and mirrors
Page 107 of 398

Always make sure that the driver's seat is
engaged before starting the vehicle.
GWARNING
You could lose control of your vehicle if you do the following while driving:
Radjust the driver's seat, head restraint,
steering wheel or mirrors
Rfasten the seat belt
There is a risk of an accident.
Adjust the driver's seat, head restraint, steer-
ing wheel and mirror and fasten your seat belt before starting the engine.
GWARNING
If you adjust the seat height carelessly, you or
other vehicle occupants could be trapped and
thereby injured. Children in particular could
accidentally press the electrical seat adjust-
ment buttons and become trapped. There is a
risk of injury.
While moving the seats, make sure that your
hands or other body parts do not get under the
lever assembly of the seat adjustment sys-
tem.
GWARNING
If the head restraints are not installed or not
adjusted correctly, they cannot provide pro-
tection as intended. There is an increased risk
of injury in the head and neck area, e.g. in the event of an accident or when braking.
Always drive with the head restraints instal-
led. Before driving off, make sure for every
vehicle occupant that the center of the head
restraint supports the back of the head at
about eye level.
GWARNING
The seat belt does not offer the intended level of protection if you have not moved the back-
rest to an almost vertical position. When brak-
ing or in the event of an accident, you could
slide underneath the seat belt and sustain
abdomen or neck injuries, for example. This
poses an increased risk of injury or even fatal injury.
Adjust the seat properly before beginning
your journey. Always ensure that the backrest
is in an almost vertical position and that the
shoulder section of your seat belt is routed
across the center of your shoulder.
!To avoid damage to the seats and the seat
heating, observe the following information:
Rkeep liquids from spilling on the seats. If
liquid is spilled on the seats, dry them as
soon as possible.
Rif the seat covers are damp or wet, do not
switch on the seat heating. The seat heat-
ing should also not be used to dry the seats.
Rclean the seat covers as recommended;
see "Interior care".
Rdo not transport heavy loads on the seats.
Do not place sharp objects on the seat
cushions, e.g. knives, nails or tools. The
seats should only be occupied by passen-
gers, if possible.
Rwhen the seat heating is in operation, do
not cover the seats with insulating materi-
als, e.g. blankets, coats, bags, seat covers,
child seats or booster seats.
!Make sure that there are no objects in the
footwell under or behind the seats when mov-
ing the seats back. There is a risk that the
seats and/or the objects could be dama
ged.
iThe rear-compartment head restraints can
be removed (Ypage 107).
Vehicles without the through-loading feature:
the head restraints cannot be removed from
the rear compartment seats.
For more information, contact a qualified spe-
cialist workshop.
iRelated topic:
RRear bench seat through-loading feature
(Ypage 311)
Seats105
Seats, steering wheel and mirrors
Z