2016 MERCEDES-BENZ B-Class ELECTRIC ECU
[x] Cancel search: ECUPage 146 of 342
As a result of its basic characteristics, the
amount of energy available from the high-
voltage battery decreases over the course of
its life.
This reduces:
Rthe maximum range that can be achieved
by the vehicle
Rthe maximum output (acceleration) of the
vehicle
You can actively reduce the energy consump-
tion of your vehicle in a number of ways, for
example, by:
Ran anticipatory driving style
Rreducing the use of electrical consumers
Rhaving the vehicle regularly maintained
The charging time of the high-voltage battery may change over the course of its life.
Observe the displays on energy usage
(
Ypage 188) and range (Ypage 188).
RANGE PLUS
If you activate RANGE PLUS, the operating
window of the battery will be extended at thenext charging process. An extended driving
range will be available to you for the next
journey.
Using RANGE PLUS shortens the service life
of the battery. Therefore, only use RANGE
PLUS if, for example:
Rlong journeys are planned or
Rthe availability of charging stations at the
destination is limited
The more often RANGE PLUS is used, the
more the extended range is reduced.
Therefore always check the range display
before every journey (
Ypage 188).
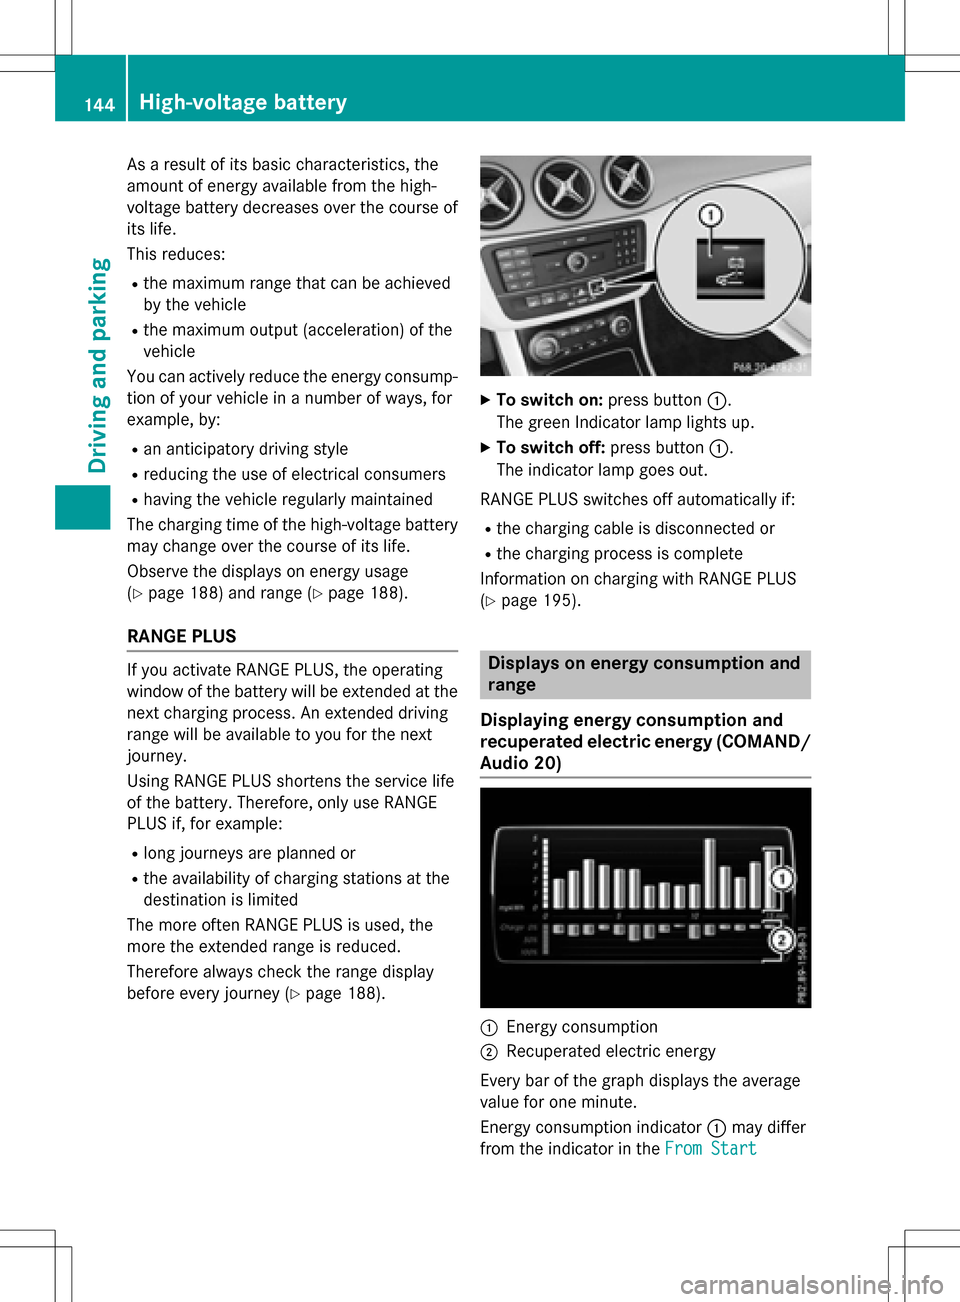
XTo switch on: press button:.
The green Indicator lamp lights up.
XTo switch off: press button:.
The indicator lamp goes out.
RANGE PLUS switches off automatically if:
Rthe charging cable is disconnected or
Rthe charging process is complete
Information on charging with RANGE PLUS
(
Ypage 195).
Displays on energy consumption and
range
Displaying energy consumption and
recuperated electric energy (COMAND/
Audio 20)
:Energy consumption
;Recuperated electric energy
Every bar of the graph displays the average
value for one minute.
Energy consumption indicator :may differ
from the indicator in the From Start
144High-voltage battery
Driving and parking
Page 147 of 342
(Ypage 187) trip computer in theTrip
menu.
Displaying energy consumption and recu-
perated electric energy:
XSwitch on Audio 20/COMAND (see the
separate operating instructions).
XTo select Vehiclefrom the main function
bar: turn and press the controller.
The vehicle menu is displayed.
XTo select Consumption: turn and press the
controller.
Energy consumption :and recuperated
electric energy ;for the last 15 minutes of
the journey are shown.
Exiting the vehicle settings:
XPress the %button on the controller.
or
XTo select %: slide 6and press the
controller.
To reset values: the values are reset along
with the From Start
trip computer
(
Ypage 189).
Displaying range on the map
(COMAND/Audio 20)
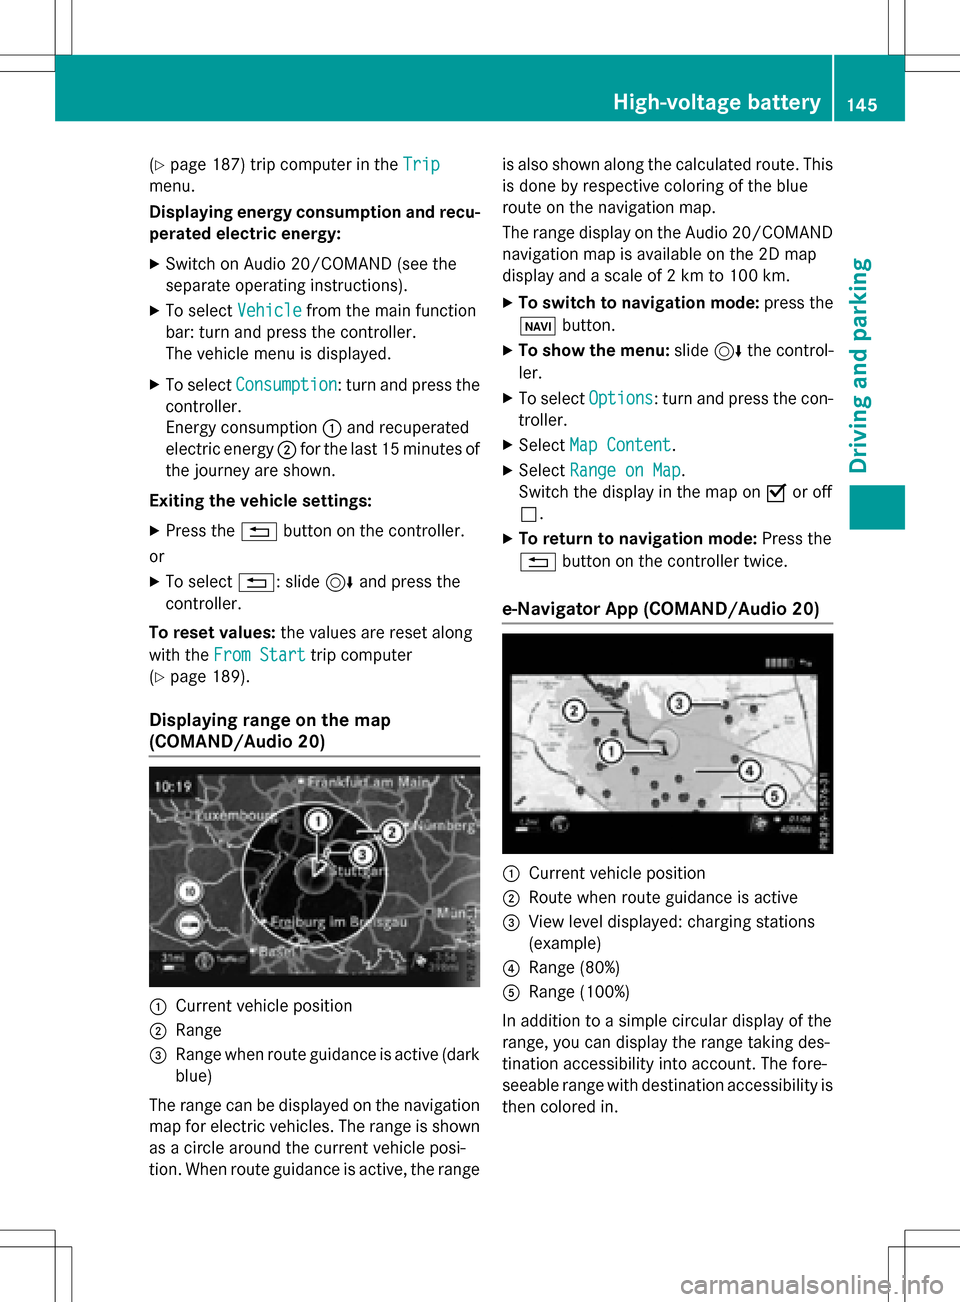
:Current vehicle position
;Range
=Range when route guidance is active (dark
blue)
The range can be displayed on the navigation
map for electric vehicles. The range is shown
as a circle around the current vehicle posi-
tion. When route guidance is active, the range is also shown along the calculated route. This
is done by respective coloring of the blue
route on the navigation map.
The range display on the Audio 20/COMAND
navigation map is available on the 2D map
display and a scale of 2 km to 100 km.
XTo switch to navigation mode:
press the
ß button.
XTo show the menu: slide6the control-
ler.
XTo select Options: turn and press the con-
troller.
XSelect Map Content.
XSelectRange on Map.
Switch the display in the map on Oor off
ª.
XTo return to navigation mode: Press the
% button on the controller twice.
e-Navigator App (COMAND/Audio 20)
:Current vehicle position
;Route when route guidance is active
=View level displayed: charging stations
(example)
?Range (80%)
ARange (100%)
In addition to a simple circular display of the
range, you can display the range taking des-
tination accessibility into account. The fore-
seeable range with destination accessibility is
then colored in.
High-voltage battery145
Driving and parking
Z
Page 149 of 342
If you use the supplied 12 A charging cable to
charge a high-voltage battery:
Rthe charge time increases considerably
Relectrical consumption increases consider-
ably
Where possible, charge the high-voltage bat-
tery at a charging station (
Ypage 149). Only
then can certified electrical energy consump-
tion levels be reached.
iThe charging process can vary depending
on the charging station. Therefore, always
observe the local information.
Stowing the charging cable
The charging cable can be stowed in a bag in
the trunk of the vehicle. To do so, the bag
must be secured to the cargo tie-down rings
using the retaining strap provided.
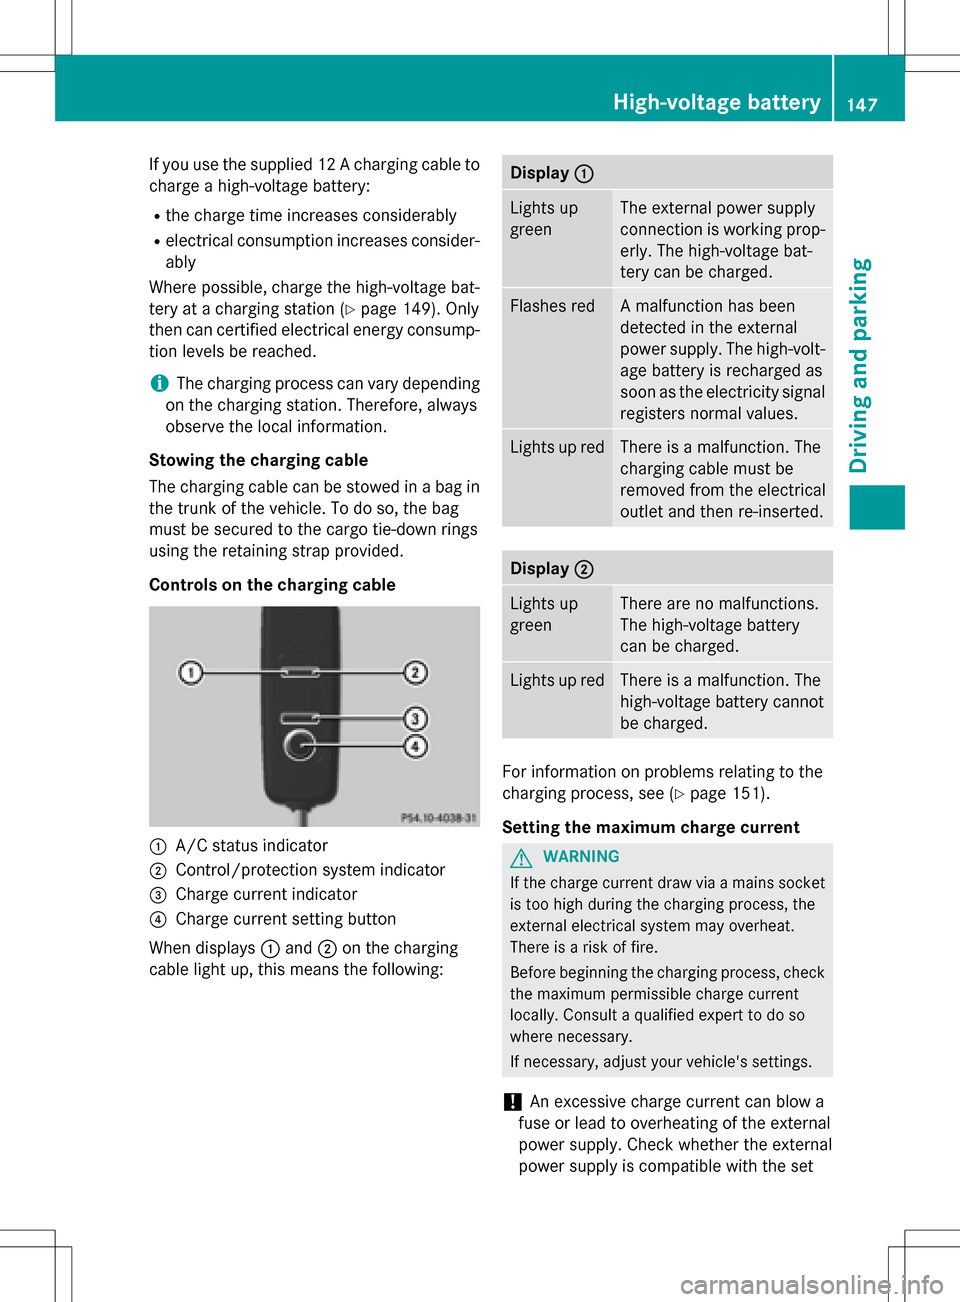
Controls on the charging cable
:A/C status indicator
;Control/protection system indicator
=Charge current indicator
?Charge current setting button
When displays :and ;on the charging
cable light up, this means the following:
Display :
Lights up
greenThe external power supply
connection is working prop-
erly. The high-voltage bat-
tery can be charged.
Flashes redA malfunction has been
detected in the external
power supply. The high-volt-
age battery is recharged as
soon as the electricity signal
registers normal values.
Lights up redThere is a malfunction. The
charging cable must be
removed from the electrical
outlet and then re-inserted.
Display;
Lights up
greenThere are no malfunctions.
The high-voltage battery
can be charged.
Lights up redThere is a malfunction. The
high-voltage battery cannot
be charged.
For information on problems relating to the
charging process, see (
Ypage 151).
Setting the maximum charge current
GWARNING
If the charge current draw via a mains socket
is too high during the charging process, the
external electrical system may overheat.
There is a risk of fire.
Before beginning the charging process, check
the maximum permissible charge current
locally. Consult a qualified expert to do so
where necessary.
If necessary, adjust your vehicle's settings.
!An excessive charge current can blow a
fuse or lead to overheating of the external
power supply. Check whether the external
power supply is compatible with the set
High-voltage battery147
Driving and parking
Z
Page 156 of 342
GWARNING
If you leave children unsupervised in the vehi-
cle, they could set it in motion by, for example:
Rrelease the parking brake.
Rshift the transmission out of park position
P.
Rstart the vehicle's drive system.
They could also operate the vehicle's equip-
ment. There is a risk of an accident and injury.
When leaving the vehicle, always take the
SmartKey with you and lock the vehicle. Never
leave children unsupervised in the vehicle.
!While the vehicle is rolling, do not shift the
transmission directly from Dto R, from Rto
D or directly to P.
Do not open the driver's door while the
vehicle is in motion. Otherwise, at low
speeds in transmission position Dor R,
park position Pis engaged automatically
and the electrical parking brake is applied.
The transmission could be damaged.
!Always secure the vehicle correctly
against rolling away. Otherwise, the vehicle
or its drivetrain could be damaged.
To ensure that the vehicle is secured against
rolling away unintentionally:
Rthe electric parking brake must be applied.
Rthe transmission must be in position P.
Rthe SmartKey in the ignition lock must be
turned to position0and removed from the
ignition lock.
Ron steep uphill or downhill gradients, turn
the front wheels towards the curb.
Switching off the drive system
GWARNING
If you switch off the ignition while driving,
safety-relevant functions are only available
with limitations, or not at all. This can affect
the power steering and the brake boosting
effect, for example. You will require consider-
ably more effort to steer and brake. There is a risk of an accident.
Do not switch off the ignition while driving.
XShift the DIRECT SELECT lever to position
P.
XWith the SmartKey: turn the SmartKey to
position 0in the ignition lock and remove it.
The immobilizer is activated.
XWith the Start/Stop button: press the
Start/Stop button (
Ypage 131).
The drive system and all the indicator lamps
in the instrument cluster go out.
When the driver's door is closed, this cor-
responds to SmartKey position 1. When the
driver's door is open, this corresponds to
SmartKey position 0: "SmartKey removed".
If you switch the engine off with the trans-
mission in position Ror D, the transmission
automatically shifts to N.
With the SmartKey: if you then open the
driver's door or the front-passenger door or
remove the SmartKey from the ignition, the
transmission automatically shifts to P.
With the Start/Stop button: if you then
open the driver's door or the front-passenger
door, the transmission automatically shifts to
P.
If you want the transmission to remain in neu-
tral N, e.g. when having the vehicle cleaned in
an automatic car wash with a towing system:
Using the SmartKey:
XSwitch on the ignition.
XDepress the brake pedal and keep it
depressed.
XShift to neutral N.
XRelease the brake pedal.
XRelease the electric parking brake.
XSwitch off the ignition and leave the Smart-
Key in the ignition lock.
154Parking
Driving and parking
Page 157 of 342
With the Start/Stop button:
XRemove the Start/Stop button from the
ignition lock.
XInsert the SmartKey into the ignition lock.
XSwitch on the ignition.
XDepress the brake pedal and keep it
depressed.
XShift to neutralN.
XRelease the brake pedal.
XRelease the electric parking brake.
XSwitch off the ignition and leave the Smart-
Key in the ignition lock.
If you try to switch off the drive system when
the transmission is not in position P:
Ra message appears in the multifunction dis-
play
Ra warning signal sounds
Electric parking brake
General notes
GWARNING
If you leave children unsupervised in the vehi-
cle, they could set it in motion by, for example:
Rrelease the parking brake.
Rshift the transmission out of park position
P.
Rstart the vehicle's drive system.
They could also operate the vehicle's equip-
ment. There is a risk of an accident and injury.
When leaving the vehicle, always take the
SmartKey with you and lock the vehicle. Never
leave children unsupervised in the vehicle.
The function of the electric parking brake and
the parking lock is dependent on the on-board voltage. If the on-board voltage is low or if
there is a malfunction in the system, it may
not be possible to apply the released parking
brake or to shift the transmission to the P
position.
XIf this is the case, only park the vehicle on
level ground and secure it to prevent it roll-
ing away.
XShift the transmission to position P.
It may not be possible to release an applied
parking brake if the on-board voltage is low or
there is a malfunction in the system. Contact a qualified specialist workshop.
The electric parking brake carries out a func-
tion check at regular intervals when the drive
system is switched off. The sounds that can
be heard while this is occurring are normal.
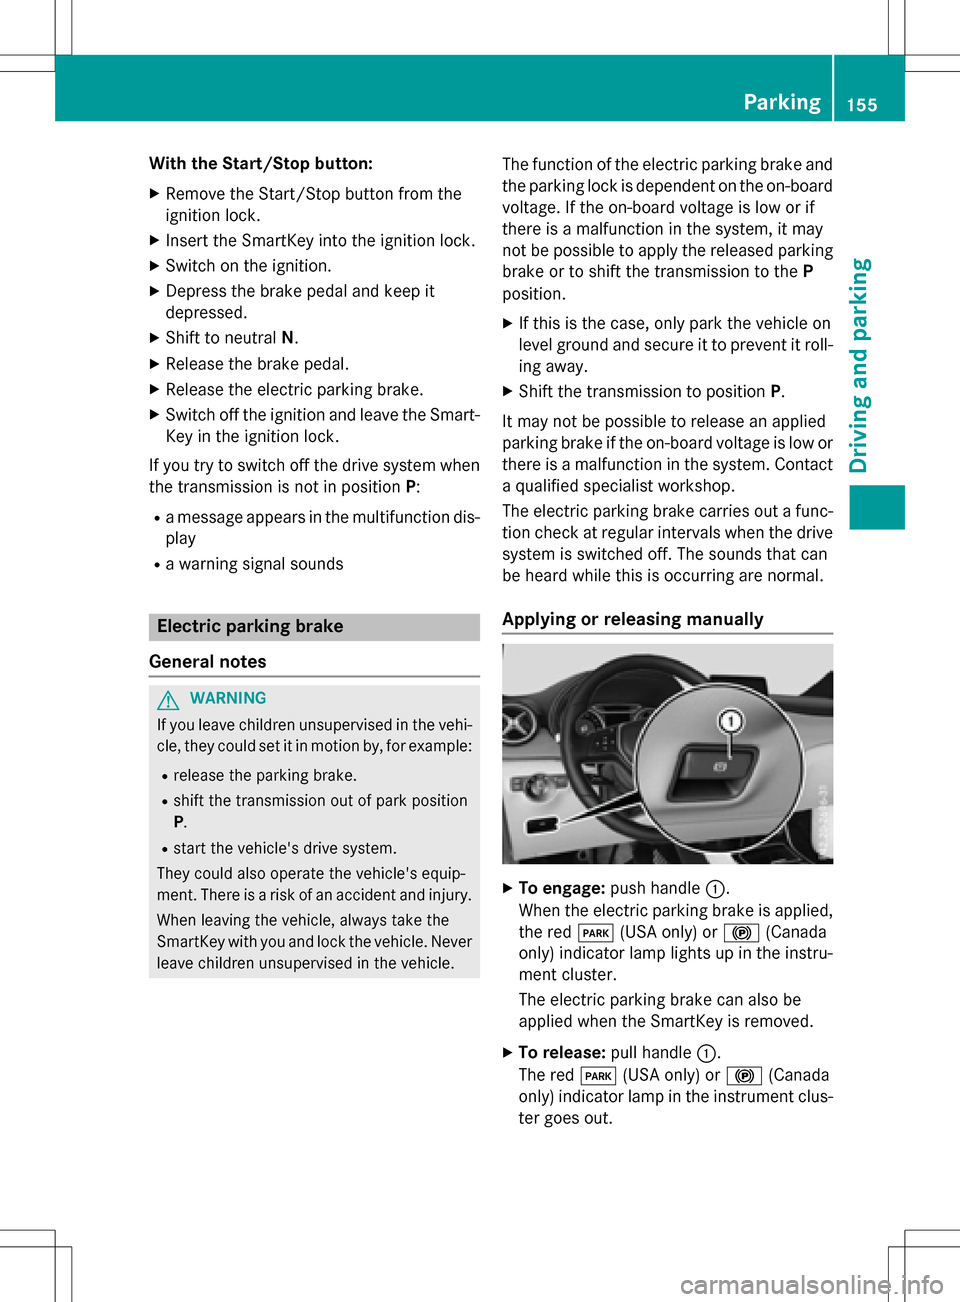
Applying or releasing manually
XTo engage: push handle :.
When the electric parking brake is applied,
the red F(USA only) or !(Canada
only) indicator lamp lights up in the instru-
ment cluster.
The electric parking brake can also be
applied when the SmartKey is removed.
XTo release: pull handle:.
The red F(USA only) or !(Canada
only) indicator lamp in the instrument clus-
ter goes out.
Parking155
Driving and parking
Z
Page 160 of 342
The ECO display does not indicate the actual
fuel consumption. A fixed percentage count
in the ECO display does not indicate a fixed
consumption.
Apart from driving style, consumption is
dependent on many factors such as, e.g.:
Rload
RTire pressure
Rcold start
Rchoice of route
Relectrical consumers switched on
These factors are not included in the ECO dis-
play.
The evaluation of your driving style is carried out using the following three categories:
RAcceleration(evaluation of all accelera-
tion processes):
-The bar fills up: moderate acceleration,
especially at higher speeds
-The bar empties: sporty acceleration
RConstant(assessment of driving behavior
at all times)
-The bar fills up: constant speed and
avoidance of unnecessary acceleration
and deceleration
-The bar empties: fluctuations in speed
RCoasting(assessment of all deceleration
processes)
-The bar fills up: anticipatory driving,
keeping your distance and early release
of the accelerator. The vehicle can coast
without use of the brakes.
-The bar empties: frequent braking
To achieve a higher value in the categories
Acceleration
and Constant, drive the vehi-
cle in drive program E+orE.
On long journeys at a constant speed, e.g. on
the highway, only the bar for Constant
will
change.
The ECO display summarizes the driving char-
acteristics from the start of the journey to its
completion. For this reason, the bars change
dynamically at the beginning of the journey.
On longer journeys, there are fewer changes. For more dynamic changes, carry out a man-
ual reset.
For further information on the ECO display,
see (
Ypage 187).
Braking
Important safety notes
GWARNING
If you increase the recuperation level on slip-
pery road surfaces, the drive wheels may lose
their traction. There is an increased danger of
skidding and accidents.
Do not increase the recuperation level on slip-
pery road surfaces.
The braking performance of the electric
motor using recuperative braking is, in some
operating modes, either reduced or not effec- tive:
Rwhen the condition of charge of the high-
voltage battery increases
Rif the high-voltage battery is not yet at a
normal operating temperature
Rwhen driving close to the maximum speed
Rwhen the vehicle is almost stationary
Rin transmission position N
Rduring and after ESP stability control
If you do not make an additional effort to
apply the brake yourself, the braking effect
may not be sufficient. If necessary, counter-
act the reduced regenerative braking effect
by applying the brake yourself.
Downhill gradients
On long, steep gradients, you must reduce the
load on the brakes by selecting maximum
recuperation. This helps you to avoid over-
heating the brakes and wearing them out
excessively.
Recuperation allows the vehicle to be decel-
erated without placing a load on the braking
system.
158Driving tips
Driving and parking
Page 162 of 342

All checks and maintenance work on the
brake system must be carried out at a quali-
fied specialist workshop.
Have brake pads installed and brake fluid
replaced at a qualified specialist workshop.
If the brake system has only been subject to
moderate loads, you should test the function-
ality of your brakes at regular intervals.
You can find a description of Brake Assist
(BAS) on (
Ypage 63).
Mercedes-Benz recommends that you only
have brake pads/linings installed on your
vehicle which have been approved for
Mercedes-Benz vehicles or which correspond
to an equivalent quality standard. Brake
pads/linings which have not been approved
for Mercedes-Benz vehicles or which are not
of an equivalent quality could affect your vehi-
cle's operating safety.
Mercedes-Benz recommends that you only
use brake fluid that has been specially
approved for your vehicle by Mercedes-Benz,
or which corresponds to an equivalent quality
standard. Brake fluid which has not been
approved for Mercedes-Benz vehicles or
which is not of an equivalent quality could
affect your vehicle's operating safety.
Checking brake lining thickness
You can measure the break pad/lining thick- ness using a test gage. Color-coding (green or
red) on the test gage allows you to determinewhether the brake pad/lining thickness is still
sufficient. The test gage is in the vehicle docu-
ment wallet in the glove box.
Front wheel
Rear wheel
XBring the vehicle and wheels into a suitable
position so that you can attach test gage
A.
XSecure the vehicle against rolling away
(
Ypage 153).
XEngage park position P.
XSwitch off the drive system.
XPlace test gageAbetween the wheel's
spokes on brake pad/lining =.
160Driving tips
Driving and parking
Page 163 of 342

XHold test gageAvertically on brake
disc :and slide measuring pin ;onto
brake disc :.
XCheck which color field ?the arrow on
measuring pin ;is pointing to.
Green: the brake pad/lining thickness is
sufficient.
Red: the brake pad/lining thickness is not
sufficient. Have the brake pads/lining
checked at a qualified specialist workshop.
To avoid an inaccurate measurement:
Rmake sure you position the wheels suitably
Rdo not put the measuring pin on a recess in
the brake disc
Driving on wet roads
Hydroplaning
If water has accumulated to a certain depth
on the road surface, there is a danger of
hydroplaning occurring, even if:
Ryou drive at low speeds.
Rthe tires have adequate tread depth.
For this reason, in the event of heavy rain or in conditions in which hydroplaning may occur,
you must drive in the following manner:
Rlower your speed.
Ravoid ruts.
Ravoid sudden steering movements.
Rbrake carefully.
Driving on flooded roads
!Do not drive through flooded areas.
Check the depth of any water before driving through it. Drive slowly through standing
water. Otherwise, water may enter the
vehicle interior or the engine compartment.
This can damage the electronic compo-
nents in the engine or the automatic trans-
mission. Water can also be drawn in by the
engine's air suction nozzles and this can
cause engine damage.
Winter driving
GWARNING
If you increase the recuperation level on slip-
pery road surfaces, the drive wheels may lose
their traction. There is an increased danger of
skidding and accidents.
Do not increase the recuperation level on slip-
pery road surfaces.
Have your vehicle winter-proofed at a quali-
fied specialist workshop at the onset of win-
ter.
Drive particularly carefully on slippery road
surfaces. Avoid sudden acceleration, steering and braking maneuvers. Do not use cruise
control.
If the vehicle threatens to skid or cannot be
stopped when moving at low speed:
XShift the DIRECT SELECT lever to position
N.
The outside temperature indicator is not
designed to serve as an ice-warning device
and is therefore unsuitable for that purpose.
Changes in the outside temperature are dis-
played after a short delay.
Indicated temperatures just above the freez-
ing point do not guarantee that the road sur-
face is free of ice. The road may still be icy,
especially in wooded areas or on bridges.
You should pay special attention to road con-
ditions when temperatures are around freez-
ing point.
For more information on driving with snow
chains, see (
Ypage 305).
For more information on driving with summer
tires, see (
Ypage 304).
Observe the notes in the "Winter operation"
section (
Ypage 304).
Driving tips161
Driving and parking
Z