2016 MERCEDES-BENZ B-Class ELECTRIC keyless
[x] Cancel search: keylessPage 113 of 342
!Never open the hood/tailgate if a wiper
arm has been folded away from the wind-
shield/rear window.
Never fold a windshield wiper arm without a
wiper blade back onto the windshield/rear
window.
Hold the windshield wiper arm firmly when
you change the wiper blade. If you release
the wiper arm without a wiper blade and it
falls onto the windshield/rear window, the
windshield/rear window may be damaged
by the force of the impact.
Mercedes-Benz recommends that you have
the wiper blades changed at a qualified
specialist workshop.
Replacing the windshield wiper blades
(variant 1)
Removing the wiper blades
XVehicles without KEYLESS-GO: remove
the SmartKey from the ignition lock.
XVehicles with KEYLESS-GO: switch off
the engine.
XFold the wiper arm away from the wind-
shield.
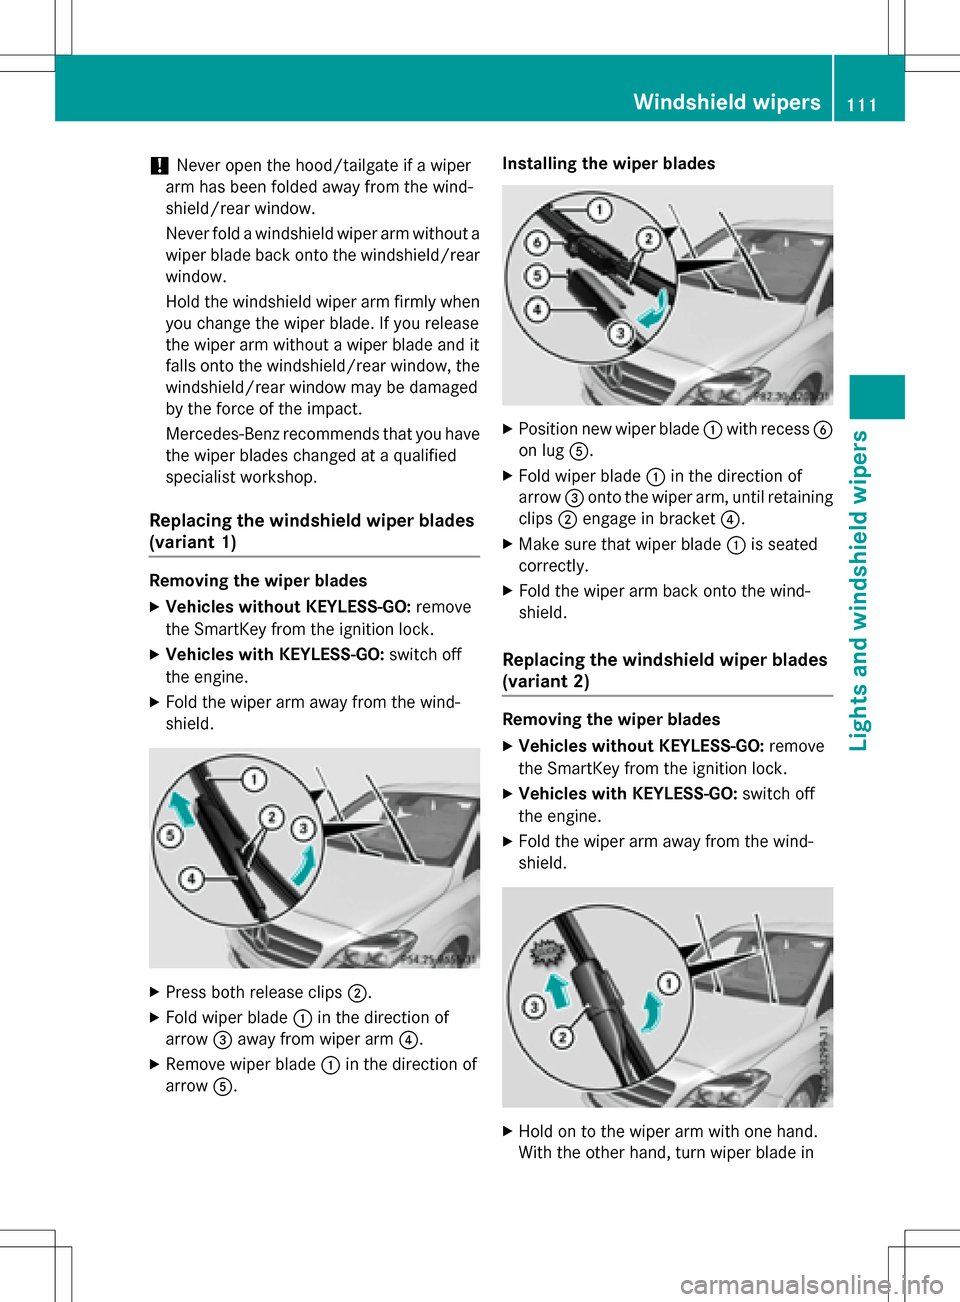
XPress both release clips ;.
XFold wiper blade:in the direction of
arrow =away from wiper arm ?.
XRemove wiper blade:in the direction of
arrow A. Installing the wiper blades
XPosition new wiper blade
:with recess B
on lug A.
XFold wiper blade :in the direction of
arrow =onto the wiper arm, until retaining
clips ;engage in bracket ?.
XMake sure that wiper blade :is seated
correctly.
XFold the wiper arm back onto the wind-
shield.
Replacing the windshield wiper blades
(variant 2)
Removing the wiper blades
XVehicles without KEYLESS-GO: remove
the SmartKey from the ignition lock.
XVehicles with KEYLESS-GO: switch off
the engine.
XFold the wiper arm away from the wind-
shield.
XHold on to the wiper arm with one hand.
With the other hand, turn wiper blade in
Windshield wipers111
Lights and windshield wipers
Z
Page 126 of 342
theW switch in the door to stop the move-
ment of the side windows. To continue closing
the side window, pull on the Wswitch.
XConvenience closing feature: press and
hold the ebutton until the side win-
dows are closed.
The indicator lamp in the ebutton lights
up. Air-recirculation mode is activated.
If parts of the body are in the closing area
during convenience closing, proceed as fol-
lows:
XPress the Wbutton for opening/closing
the side windows.
The side window stops.
XTo then open the side windows, press the
W button again.
or
XPress the ebutton for longer than two
seconds.
The side windows move in the opposite
direction.
XConvenience opening feature: press and
hold the ebutton until the side win-
dows are opened. The side windows move
back to their original positions.
The indicator lamp in the ebutton goes
out. Air-recirculation mode is deactivated.
Notes on the automatic reversing feature for
the side windows (
Ypage 83).
If you open the side windows manually after
closing them with the convenience closing
feature, they will remain in this position when
opened using the convenie nce opening fea-
ture.
Pre-entry climate control via Smart-
Key
Before getting in, the vehicle interior can be
briefly warmed or ventilated in advance. In
addition, the air from the air vent can be pre-
cooled. The high-voltage battery must be sufficiently
charged before the "Pre-entry climate control
via key" function can be activated.
Activating/deactivating the pre-entry cli-
mate control (via key)
When the vehicle is unlocked using the Smart-
Key or KEYLESS-GO, the climate control func-
tions are activated.
The pre-cooling and pre-heating climate con-
trol functions last 5 minutes.
When the vehicle is pre-cooled, the following functions are activated as necessary:
RClimate control system
RCooling with air dehumidification
RBlower
When the vehicle is pre-heated, the following
functions are activated as necessary:
RClimate control system
RBlower
RSeat heating
RWindshield heating
RRear window defroster
Pre-entry climate control is automatically
switched off when operational readiness
mode is requested.
Activating/deactivating pre-entry cli-
mate control (via key)
You can activate and deactivate the pre-entry
climate control (via key) function using the
on-board comp uter in theE-CELL
submenu
(
Ypage 196).
iIf the condition of charge of the high-volt-
age battery is below the specified minimum
condition of charge, pre-entry climate con-
trol will not be activated even if it has been
set.
124Operating the climate control systems
Climate control
Page 133 of 342
Rin transmission positionN
Rduring and after ESP stability control
If you do not make an additional effort to
apply the brake yourself, the braking effect
may not be sufficient. If necessary, counter-
act the reduced regenerative braking effect
by applying the brake yourself.
Before commencing your journey, ensure that the charging cable required for charging the
high-voltage battery is in the vehicle.
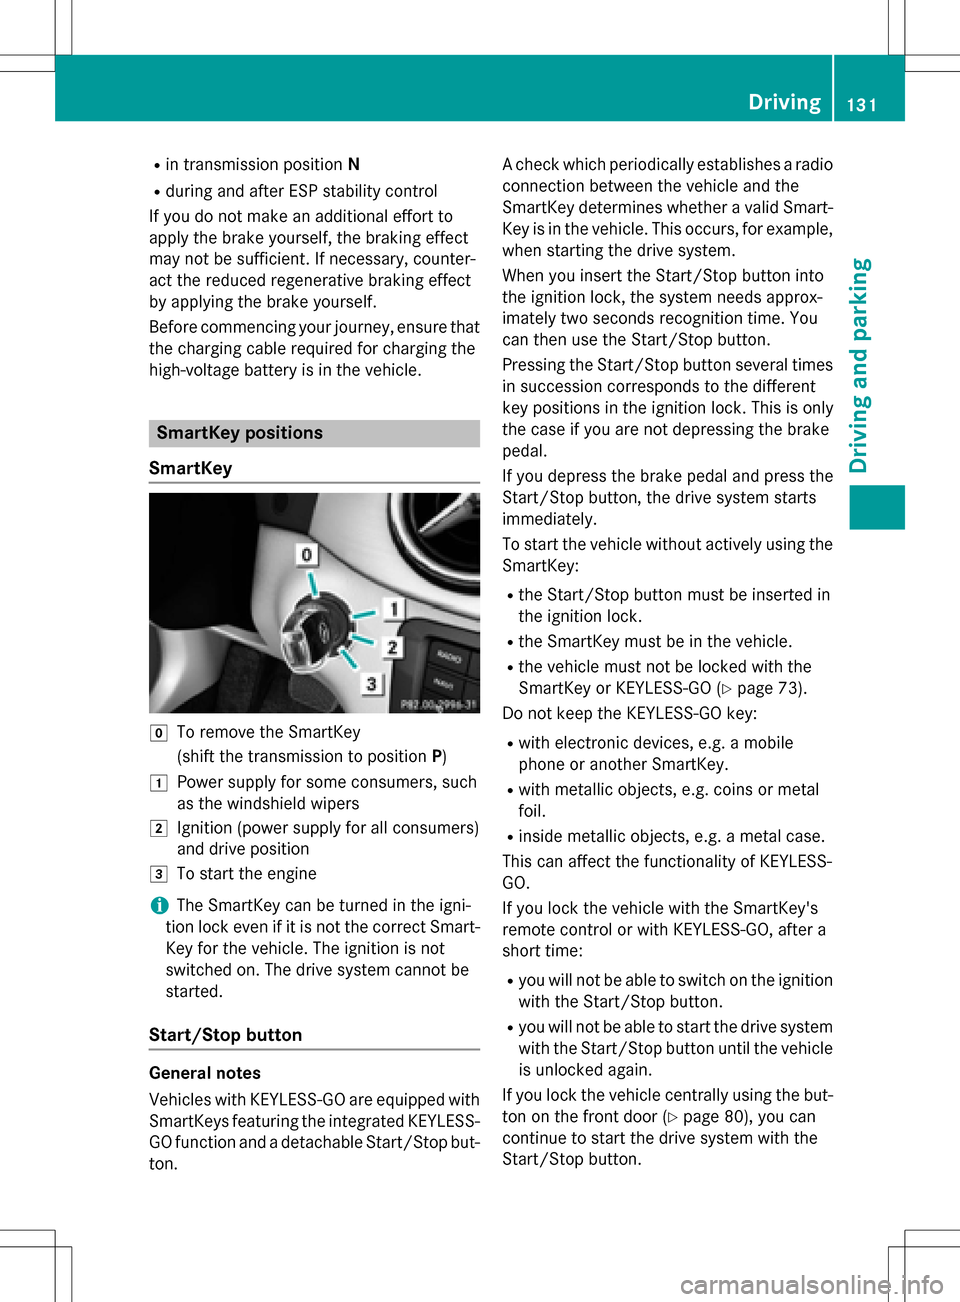
SmartKey positions
SmartKey
gTo remove the SmartKey
(shift the transmission to position P)
1Power supply for some consumers, such
as the windshield wipers
2Ignition (power supply for all consumers)
and drive position
3To start the engine
iThe SmartKey can be turned in the igni-
tion lock even if it is not the correct Smart- Key for the vehicle. The ignition is not
switched on. The drive system cannot be
started.
Start/Stop button
General notes
Vehicles with KEYLESS-GO are equipped with
SmartKeys featuring the integrated KEYLESS-GO function and a detachable Start/Stop but-
ton. A check which periodically establishes a radio
connection between the vehicle and the
SmartKey determines whether a valid Smart-
Key is in the vehicle. This occurs, for example,
when starting the drive system.
When you insert the Start/Stop button into
the ignition lock, the system needs approx-
imately two seconds recognition time. You
can then use the Start/Stop button.
Pressing the Start/Stop button several times
in succession corresponds to the different
key positions in the ignition lock. This is only
the case if you are not depressing the brake
pedal.
If you depress the brake pedal and press the
Start/Stop button, the drive system starts
immediately.
To start the vehicle without actively using the
SmartKey:
Rthe Start/Stop button must be inserted in
the ignition lock.
Rthe SmartKey must be in the vehicle.
Rthe vehicle must not be locked with the
SmartKey or KEYLESS-GO (
Ypage 73).
Do not keep the KEYLESS-GO key:
Rwith electronic devices, e.g. a mobile
phone or another SmartKey.
Rwith metallic objects, e.g. coins or metal
foil.
Rinside metallic objects, e.g. a metal case.
This can affect the functionality of KEYLESS-
GO.
If you lock the vehicle with the SmartKey's
remote control or with KEYLESS-GO, after a
short time:
Ryou will not be able to switch on the ignition
with the Start/Stop button.
Ryou will not be able to start the drive system
with the Start/Stop button until the vehicle is unlocked again.
If you lock the vehicle centrally using the but-
ton on the front door (
Ypage 80), you can
continue to start the drive system with the
Start/Stop button.
Driving131
Driving and parking
Z
Page 207 of 342

Display messagesPossible causes/consequences andMSolutions
T!
÷
Inoperative See
Operator's Manual
EBD (electronic brake force distribution), ABS, BAS, ESP®,th e
HOLD function , RBS and hill start assist are not available due to a
malfunction.
COLLISION PREVENTION ASSIST PLUS may also have failed.
A warning tone sounds.
The ÷, å,!andé (USA only) or J(Canada only)
warning lamps in the instrument cluster may also light up.
GWARNING
The braking performance of the electric motor using recuperative
braking may be either reduced or not effective. If you do not make
an additional effort to apply the brake yourself, the braking effect
may no t be sufficient. If necessary, counteract the reduced regen-
erative braking effect by applying the brake yourself.
The brake system continues to function normally, but without the
functions listed above. The front and rear wheels could therefore
lock if you brake hard, for example.
The steerability and braking characteristics may be severely affec-
ted. The braking distance in an emergency braking situation can
increase.
If ES P
®is not operational, ESP®is unable to stabilize the vehicle.
There is an increased risk of skidding and an accident.
XDrive on carefully.
XVisit a qualified specialist workshop immediately.
F(USA
only)
!(Canada
only)
Turn On the Igni‐
tion to Release
the Parking Brake
The red F(USA only) or !(Canada only) indicator lamp
lights up.
You attempted to release the electric parking brake while the igni-
tion was switched off.
XSmartKey: turnthe SmartKey to position 1in the ignition lock.
XKEYLESS-GO: switch on the ignition.
F(USA
only)
!(Canada
only)
Please Release
Parking Brake
The red F(USA only) or !(Canada only) indicator lamp
flashes and a warning tone sounds. A condition for automatic
release of the electric parking brake is not fulfilled (
Ypage 155).
You are driving with the electric parking brake applied.
XRelease the electric parking brake manually.
The red F(USA only) or !(Canada only) indicator lamp
flashes and a warning tone sounds.
You are using the electric parking brake foremergenc y braking
(
Ypage 155).
Display messages20 5
On-board computer and displays
Z
Page 231 of 342
Display messagesPossible causes/consequences andMSolutions
Â
Key Not Detected
(white display mes-
sage)
The SmartKey is currently undetected.
XChange the location of theSmartKey in the vehicle.
If th e SmartKey still cannot be detected:
XOperate the vehicle with theSmartKey in th e ignition lock.
Â
Remove'Start'But‐
ton and Insert Key
The SmartKey is continually undetected.
KEYLESS-GO is temporarily malfunctioning or is defective. A warn-
ing tone also sounds.
XInserttheSmartKey into th e ignition lock and turn it to the
desired position.
XVisit a qualified specialist workshop.
Warning and indicator lamps in the instrument cluster
General notes
Some systems carry out a self-diagnosis when the ignition is switched on. Therefore, some
indicator and warning lamps may light up or flash temporarily. This behavior is non-critical.
These warning and indicator lamps only indicate a malfunction if they light up or flash after the
drive system is started or during a journey.
Safety
Seat belts
ProblemPossible causes/consequences and MSolutions
ü
After starting thedrive
system, the red seat
belt warning lamp lights
up for6 seconds.The seat belt warning lamp reminds the driver and front passenger
to fasten their seat belts.
XFasten your seat belt (Ypage 44).
ü
After starting thedrive
system, the red seat
belt warning lamp lights
up. In addition ,awarn-
ing tone sounds for up
to 6 seconds.The driver's seat belt is not fastened.
XFasten your seat belt (Ypage 44).
The warning tone ceases.
Warning and indicator lamps in the instrument cluster229
On-board computer and displays
Z
Page 285 of 342
It is therefore recommended that you addi-
tionally equip your vehicle with a TIREFIT kit if
you mount tires that do not feature run-flat
properties, e.g. winter tires. A TIREFIT kit maybe obtained from a qualified specialist work-
shop.
Information on changing and mounting
wheels (
Ypage 323).
XStop the vehicle on solid, non-slippery and
level ground, as far away as possible from
traffic.
XSwitch on the hazard warning lamps.
XSecure the vehicle against rolling away
(
Ypage 153).
XIf possible, bring the front wheels into the
straight-ahead position.
XSwitch off the drive system.
XVehicles without KEYLESS-GO: remove
the SmartKey from the ignition lock.
XVehicles with KEYLESS-GO start-func-
tion or KEYLESS-GO: open the driver's
door.
The on-board electronics now have status
0. This is the same as the SmartKey having
been removed.
XVehicles with KEYLESS-GO start-func-
tion or KEYLESS-GO: remove the Start/
Stop button from the ignition lock
(
Ypage 131).
XMake sure that the passengers are not
endangered as they do so. Make sure that
no one is near the danger area while a
wheel is being changed. Anyone who is not directly assisting in the wheel change
should, for example, stand behind the bar-
rier.
XGet out of the vehicle. Pay attention to traf-
fic conditions when doing so.
XClose the driver's door.
MOExtended tires (tires with run-flat
properties)
General notes
With MOExtended tires (tires with run flat
characteristics), you can continue to drive
your vehicle even if there is a total loss of
pressure in one or more tires. The affected
tire must not show any clearly visible damage.
You can recognize MOExtended tires by the
MOExtended marking which appears on the
sidewall of the tire. You will find this marking next to the tire size designation, the load-
bearing capacity and the speed index
(
Ypage 317).
MOExtended tires may only be used in con-
junction with an active tire pressure monitor.
If a pressure loss warning message
appears in the multifunction display:
Robserve the instructions in the display mes-
sages (
Ypage 223).
Rcheck the tire for damage.
Rif driving on, observe the following notes.
The driving distance possible in run-flat mode
is approximately 50 miles (80 km) when the
vehicle is partially laden. When the vehicle is
fully laden it is approximately
19 miles(30 km).
In addition to the vehicle load, the driving dis-
tance possible depends upon:
Rvehicle speed
Rroad condition
Routside temperature
The driving distance possible in run-flat mode
may be reduced by extreme driving condi-
tions or maneuvers, or it can be increased
through a moderate style of driving.
The driving distance possible in run-flat mode
is counted from the moment the tire pressure
loss warning appears in the multifunction dis-
play.
You must not exceed a maximum speed of
50 mph (80 km/h).
Flat tire283
Breakdown assistance
Page 297 of 342

!When towing, pull away slowly and
smoothly. If the tractive power is too high,
the vehicles could be damaged.
!The vehicle can be towed a maximum of
30 miles (50km). The towing speed of
30 mph (50km/h) must not be exceeded.
If the vehicle has to be towed more than
30 miles (50km), the front axle must be
raised or the entire vehicle raised and
transported.
!Do not tow with sling-type equipment.
This could damage the vehicle.
!To tow vehicles with KEYLESS-GO, use
the SmartKey instead of the Start/Stop
button. The transmission may otherwise
shift to position Pwhen you open the driv-
er's or front-passenger door, which could
damage the transmission.
Observe the legal requirements for the rele-
vant countries when towing away.
Make sure that no charging cable is plugged
in. The parking lock cannot be released if a
charging cable is plugged in.
It is better to have the vehicle transported
than to have it towed away.
If the vehicle can no longer be driven because
of an accident or breakdown, you have the
following options:
RTransporting the vehicle
As a rule, you should have the vehicle trans-
ported.
RTowing the vehicle with a tow rope or tow
bar
Only tow the vehicle in exceptional cases.
Observe the following notes.
The vehicle may not be towed and must
always be transported if:
Rthe multifunction display is not working
Rone of more of the following warning lamps
is lit up:
-Drive system
-12 V battery
Rone or both of the following display mes-
sages have appeared:
-Stop Switch Engine off
-Do Not Shift Gears Visit Dealer
Ryou have to tow the vehicle over a longer
distance than 30 miles (50 km).
The battery must be connected and charged.
Otherwise, you:
Rcannot turn the SmartKey to position 2in
the ignition lock
Rcannot release the electric parking brake
Rcannot shift the transmission to position N
The function of the electric parking brake and
the parking lock is dependent on the on-board voltage.
If the on-board voltage is low or there is a
system malfunction, it is possible that:
Rthe electric parking brake may not be
applied in certain circumstances, or
Rthe transmission may not be shifted to P
Switch off non-essential consumers, e.g. the
radio.
Disarm the automatic locking feature before
the vehicle is towed (
Ypage 198). You could
otherwise be locked out when pushing or
towing the vehicle.
Towing295
Breakdown assistance
Z
Page 298 of 342

Installing/removing the towing eye
Installing the towing eye
The brackets for the screw-in towing eye are
located in the bumpers. They are at the rear
and at the front, under covers :.
XRemove the towing eye from the stowage
space.
The towing eye is located in the stowage
well under the cargo compartment floor.
Vehicles with the TIREFIT kit: the to wing
eye is beneath the tire inflation compres-
sor.
XPress the mark on cover :inwards in the
direction of the arrow.
XTake cover :off the opening.
XScrew in the towing eye clockwise to the
stop.
Removing the towing eye
XUnscrew and remove the towing eye.
XPlace the towing eye in the stowage well
beneath the cargo compartment floor in
the cargo compartment (
Ypage 282).
XVehicles with the TIREFIT kit: put back the
tire inflation compressor.
Towing a vehicle with both axles on
the ground
It is important that you observe the safety
instructions when towing away your vehicle
(
Ypage 294).
XOn vehicles with KEYLESS-GO or the
KEYLESS-GO start function: you must
use the SmartKey instead of the Start /S top
button (
Ypage 132).
The transmission automatically shifts to posi-
tion Pwhen you open the driver's or front-
passenger door or when you remove the
Sm artKey from the ignition lock. In order to
ensure that the transmission stays in position
N when towing the vehicle, you must observe
the following points:
XMake sure that the vehicle is stationary.
XTurn the SmartKey to position 2in the igni-
tion lock.
XDepress and hold the brake pedal.
XSh ift the transmission to position N.
XRelease the brake pedal.
XRelease the electric parking brake.
XSwitch on the hazard warning lamps
(
Ypage 102).
XLeave the SmartKey in position 2in the
ignition lock.
If the 12 V battery indicator lamp lights up,
you must observe the following points:
XPull over and stop the vehicle safely as soon
as possible, paying attention to road and
traff iccond itions.
XShift the transmission to position P.
XApply the electric parking brake.
iIn order to signal a change of direction
when towing the vehicle with the hazard
warning lamps switched on, use the com-
bination switch as usual. In this case, only
the indicator lamps for the direction of
travel flash. After resetting the combina-
tion switch, the hazard warning lamp starts
flashing again.
296Towing
Breakdown assistance