2016 MERCEDES-BENZ B-Class ELECTRIC charging
[x] Cancel search: chargingPage 132 of 342
Useful information
i
This Operator's Manual describes all
models and all standard and optional equip-
ment of your vehicle available at the time of
publication of the Operator's Manual.
Country-specific differences are possible.
Please note that your vehicle may not be
equipped with all features described. This
also applies to safety-related systems and
functions.
iRead the information on qualified special-
ist workshops (
Ypage 26).
Notes on breaking-in a new vehicle
The sensor system of some driving and driv-
ing safety systems adjusts automatically
while a certain distance is being driven after
the vehicle has been delivered or after
repairs. Full system effectiveness is not
reached until the end of this teach-in proce-
dure.
New and replaced brake pads and discs only
reach their optimum braking effect after sev-
eral hundred kilometers of driving. Compen-
sate for this by applying greater force to the
brake pedal.
Driving
Important safety notes
GWARNING
Objects in the driver's footwell can restrict the pedal travel or obstruct a depressed pedal.
The operating and road safety of the vehicle is
jeopardized. There is a risk of an accident.
Make sure that all objects in the vehicle are
stowed correctly, and that they cannot enter
the driver's footwell. Install the floormats
securely and as specified in order to ensure
sufficient clearance for the pedals. Do not use
loose floormats and do not place floormats on
top of one another.
GWARNING
Unsuitable footwear can hinder correct usage of the pedals, e.g.:
Rshoes with thick soles
Rshoes with high heels
Rslippers
There is a risk of an accident.
Wear suitable footwear to ensure correct
usage of the pedals.
GWARNING
If you switch off the ignition while driving,
safety-relevant functions are only available
with limitations, or not at all. This could affect, for example, the power steering and the brake
boosting effect. You will require considerably
more effort to steer and brake. There is a risk
of an accident.
Do not switch off the ignition while driving.
GWARNING
If the parking brake has not been fully
released when driving, the parking brake can:
Roverheat and cause a fire
Rlose its hold function.
There is a risk of fire and an accident. Release
the parking brake fully before driving off.
!Before driving away, you must ensure
that, for your own safety and to avoid dam-
age, the charging cable has been removed
from the vehicle socket. Otherwise, you
cannot shift the transmission out of posi-
tion P.
The braking performance of the electric
motor using recuperative braking is, in some
operating modes, either reduced or not effec-
tive:
Rwhen the condition of charge of the high-
voltage battery increases
Rif the high-voltage battery is not yet at a
normal operating temperature
Rwhen driving close to the maximum speed
Rwhen the vehicle is almost stationary
130Driving
Driving and parking
Page 133 of 342
Rin transmission positionN
Rduring and after ESP stability control
If you do not make an additional effort to
apply the brake yourself, the braking effect
may not be sufficient. If necessary, counter-
act the reduced regenerative braking effect
by applying the brake yourself.
Before commencing your journey, ensure that the charging cable required for charging the
high-voltage battery is in the vehicle.
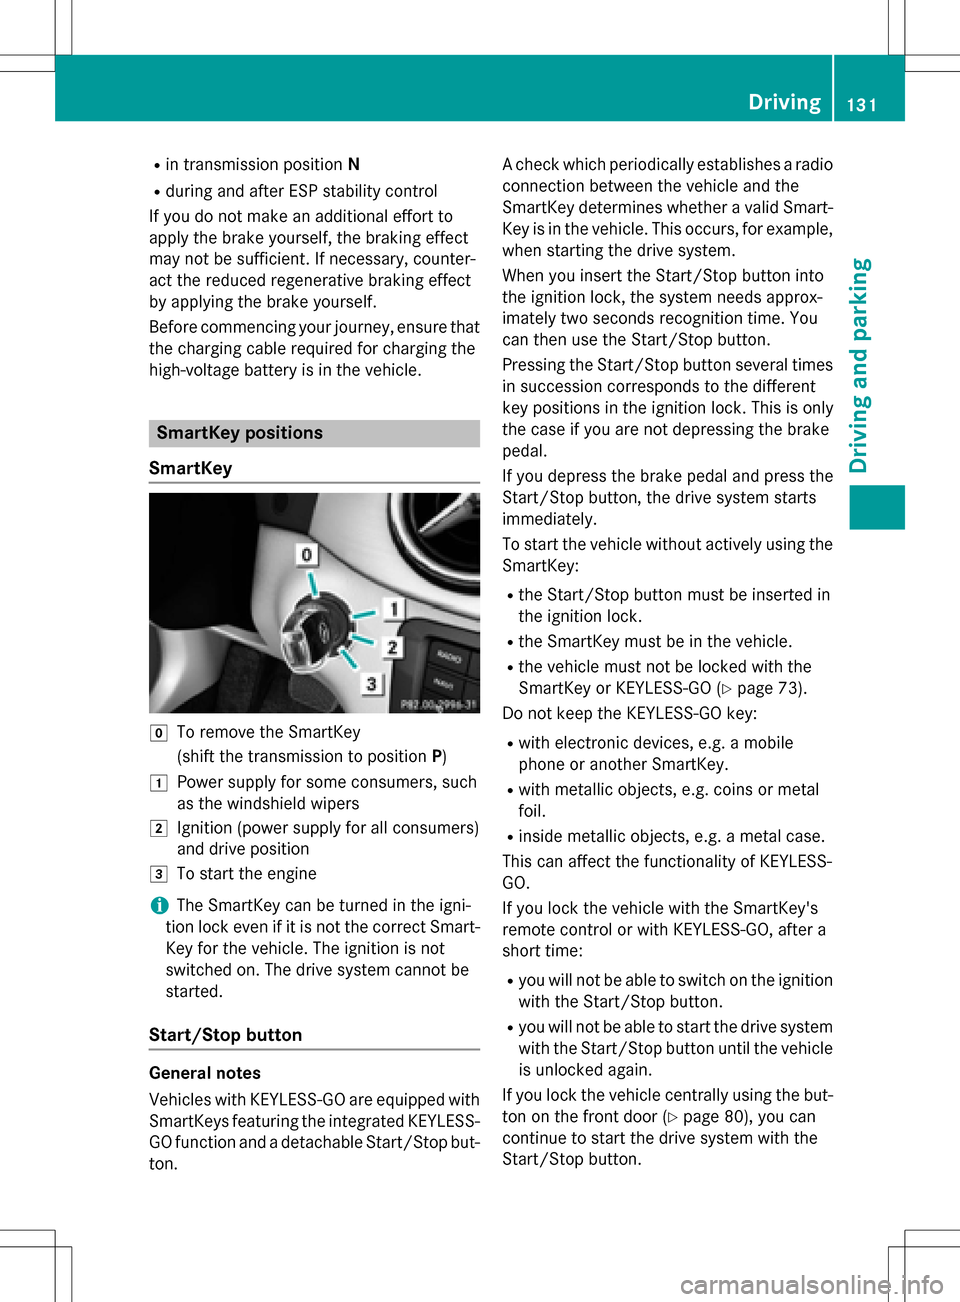
SmartKey positions
SmartKey
gTo remove the SmartKey
(shift the transmission to position P)
1Power supply for some consumers, such
as the windshield wipers
2Ignition (power supply for all consumers)
and drive position
3To start the engine
iThe SmartKey can be turned in the igni-
tion lock even if it is not the correct Smart- Key for the vehicle. The ignition is not
switched on. The drive system cannot be
started.
Start/Stop button
General notes
Vehicles with KEYLESS-GO are equipped with
SmartKeys featuring the integrated KEYLESS-GO function and a detachable Start/Stop but-
ton. A check which periodically establishes a radio
connection between the vehicle and the
SmartKey determines whether a valid Smart-
Key is in the vehicle. This occurs, for example,
when starting the drive system.
When you insert the Start/Stop button into
the ignition lock, the system needs approx-
imately two seconds recognition time. You
can then use the Start/Stop button.
Pressing the Start/Stop button several times
in succession corresponds to the different
key positions in the ignition lock. This is only
the case if you are not depressing the brake
pedal.
If you depress the brake pedal and press the
Start/Stop button, the drive system starts
immediately.
To start the vehicle without actively using the
SmartKey:
Rthe Start/Stop button must be inserted in
the ignition lock.
Rthe SmartKey must be in the vehicle.
Rthe vehicle must not be locked with the
SmartKey or KEYLESS-GO (
Ypage 73).
Do not keep the KEYLESS-GO key:
Rwith electronic devices, e.g. a mobile
phone or another SmartKey.
Rwith metallic objects, e.g. coins or metal
foil.
Rinside metallic objects, e.g. a metal case.
This can affect the functionality of KEYLESS-
GO.
If you lock the vehicle with the SmartKey's
remote control or with KEYLESS-GO, after a
short time:
Ryou will not be able to switch on the ignition
with the Start/Stop button.
Ryou will not be able to start the drive system
with the Start/Stop button until the vehicle is unlocked again.
If you lock the vehicle centrally using the but-
ton on the front door (
Ypage 80), you can
continue to start the drive system with the
Start/Stop button.
Driving131
Driving and parking
Z
Page 135 of 342
Vehicles with an electric motor generate
much less driving noise than vehicles with
internal combustion engines. As a result, your
vehicle may not be heard by other road users
in certain situations. This can happen, for
example, when you are parking and your vehi-
cle is not seen by other road users. This
requires you to adopt a particularly anticipa-
tory driving style, as it is necessary to allow
for the possibility that other road users may
behave erratically.
The vehicle is equipped with a sound gener-
ator. The sound generator is activated so that
other road users can hear your vehicle better.
The sound generator is activated at speeds of
under 20 mph (30 km/h) and switches off
automatically at higher speeds.
Starting procedure with the Start/Stop
button
The Start/Stop button can be used to start
the vehicle manually without inserting the
SmartKey into the ignition lock. The Start/
Stop button must be inserted in the ignition
lock and the SmartKey must be in the vehicle.
You can start the drive system if a valid key is
in the vehicle. Switch off the drive system and
always take the key with you when leaving the
vehicle, even if you only leave it for a short
time. Pay attention to the important safety
notes.
XDepress the brake pedal and keep it
depressed.
XPress the Start/Stop button once
(
Ypage 131).
The drive system is started. Once the vehi-
cle is ready to be driven, the Ready
display
(
Ypage 182) appears in the lower part of
the multifunction display.
Starting procedure with the SmartKey
To start the drive system using the key
instead of the Start/Stop button, pull the
Start/Stop button out of the ignition lock.
XTurn the SmartKey to position 3
(
Ypage 131) in the ignition lock and release
it.
The drive system is started. Once the vehi-
cle is ready to be driven, the Ready
display
(
Ypage 182) appears in the lower part of
the multifunction display.
Pulling away
The vehicle is equipped with a sound gener-
ator. At low speeds, an electric vehicle makes
less noise than a vehicle with a combustion
engine. The sound generator is activated so
that other road users can hear your vehicle
better. The sound generator is activated at
speeds of under 20 mph (30 km/h) and
switches off automatically at higher speeds.
XDepress the brake pedal and keep it
depressed.
XMove the DIRECT SELECT lever to position
D or R.
XRelease the brake pedal.
XCarefully depress the accelerator pedal.
The electric parking brake is automatically
released (
Ypage 155).
The red F(USA only) or !(Canada
only) indicator lamp in the instrument clus-
ter goes out.
The vehicle locks centrally once you have
pulled away. The locking knobs in the doors
drop down. You can open the doors from the
inside at any time.
It is only possible to move the DIRECT SELECT
selector lever from position Pto the desired
selector lever position if you depress the
brake pedal. The parking lock is then deacti-
vated and the electrical parking brake is
released automatically. If the brake pedal is
not depressed, the DIRECT SELECT lever can
still be moved but the parking lock remains
engaged.
Make sure that no charging cable is plugged
in. The parking lock cannot be released if a
charging cable is plugged in.
Driving133
Driving and parking
Z
Page 143 of 342
GDANGER
If you use incorrectly installed mains sockets or adapters, extension cables or similar to
connect thecharging cable to a mains socket,
this could lead to fires or an electric shock.
There is a risk of fatal injury.
To avoid hazardous situations, observe the
following:
ROnly connect the charging cable to mains
sockets that:
-are installed correctly and
-have been approved by an electrical spe-
cialist.
RFo r safety reasons, only use the charging
cables supplied with the vehicle, or charg-
ing cables which have been approved for
use with this vehicle.
RNever use a damaged charging cable.
RDo not use:
-Extension cables
-Cable drums
-Multiple sockets
RDo no t use a socket adapter to connect the
charging cable to th e mains socket. The
only exception is if the adapter has been
tested and approved by the manufacturer
for charging th e high-voltage battery in an
electric vehicle.
RAlways observe the safety notes in the
socket adapter's operating instructions.
GDANGER
Connecting the charging cable to th e wallbox
via an incorrectly installed wallbox or adapter,
extension cable or similar could causeafire or
an electric shock. There is a risk of fatal injury.
To avoid hazardous situations, observe the
following:
ROnly connect thecharging cable to a wall-
box that:
-is installed correctly and
-has been approved by an electrical spe-
cialist.
RFo r safety reasons, only use charging
cables that have been tested and approved
by the manufacturer for charging the high-
voltage battery in an electric vehicle.
RNever use damaged charging cables.
RDo no textend th e charging cable.
RDo not use an adapter.
RAlways observe the safety notes in the wall-
box's operating instructions.
The vehicle's high voltage electrical system is
under high voltage.
RDo no t handle high-voltage components or
th e orange cables of the vehicle's high-volt-
age electrical system.
RDo no t touch high-voltage components or
th e orange cables of the high-voltage elec-
trical system when a vehicle has been
involved in a crash.
RDo no ttouch any damaged components or
damaged orange cables of the vehicle's
high-voltage electrical system.
RDo no tremove th ecover s of the high-volt-
age electrical system components that are
marke d withawarning sticker.
Notes on the charging cable
Handling the charg ing cable and charg -
ing cable controls
Do no t leave thecharging cable control s
(
Ypage 147) hanging loose from an electrical
outlet. Otherwise, this could result in a poor
contact with the electrical outlet and mal-
functions when charging the vehicle.
High-voltage battery141
Driving and parking
Z
Page 144 of 342
To ensure that the brackets within the charg-
ing cable controls are not subjected to incor-
rect loads, observe the following:
RNever lift or carry the controls by the charg-ing cable connector or the mains plug.
RTo transport the charging cable, the coiled
part can be:
-wrapped around the controls or
-secured to the housing of the controls
Heat generated by the charging cable
and charging cable connector
Pay attention to the important safety notes
(
Ypage 140).
During the charging process, the charging
cable and charging cable connector may heat
up.
The charging cable and charging cable con-
nector will only heat up within the permissible
limiting values, provided that:
Rthe power supply and the charging cable
are not damaged
Rthe instructions for handling the charging
cable and controls on the charging cable
are observed
Should the permissible heating temperature
limits be exceeded, have the mains power
supply checked.
Protection device against overvoltage
!Voltage surges in the mains supply can
damage the vehicle. The vehicle is there-
fore equipped with a device which protects
it from voltage surges in the mains supply.
This device may be triggered during severe
thunderstorms, for example, and may lead
to the building's fuse being tripped and an
interruption in the power supply. These
functions protect the vehicle. After the
building fuse is switched on again, the
charging process resumes automatically.
Following an interruption in the power sup- ply without tripping of the building's fuse, it may take up to 15 minutes for charging to
resume automatically.
Switch on the building's fuse again after the
protection device against overvoltage has
been triggered. Otherwise, the charging proc-
ess cannot be continued. The high-voltage
battery will not be charged and you may not
be able to drive the vehicle.
If other devices are protected by the same
protective device, these are switched off as
well when the protective device is triggered.
Ensure that these other devices are still
operational after reactivating the protection
device.
Influences on the charging behavior
and the charge state of the high-volt-
age battery
Terms of use
Observe the following notes:
Rinformation on exceptions and limitations
in warranty documentation and in the rela-
ted Maintenance Booklet
Rmaintenance notes for the high-voltage
battery in the Maintenance Booklet
Method of operation
The vehicle is equipped with a high-voltage
battery for driving. The high-voltage battery
stores the energy needed to operate the elec-
tric motor and releases it again.
The electric motor uses energy that has been
stored in the high-voltage battery when pull-
ing away, accelerating and during the jour-
ney.
In overrun mode (except D+), kinetic energy
is converted by means of energy recuperation
into electrical energy and stored in the high-
voltage battery.
142High-voltage battery
Driving and parking
Page 145 of 342
The high-voltage battery can be charged as
follows:
Rthrough energy recuperation while the
vehicle is in motion
Rwith the charging cable at a mains socket
while the vehicle is stationary
Rwith the charging cable at a charging sta-
tion while the vehicle is stationary
The high-voltage battery can be charged
using a single-phase charging cable in a volt-
age range from 100 V to 240 V.
If the condition of charge drops to less than
13%, the high-voltage battery reserve indica-
tor lamp lights up in the instrument cluster.
Charge the high-voltage battery as soon as
possible.
Below a condition of charge of 5%, the per-
formance of the vehicle is reduced. The vehi-
cle's high-voltage electrical system switches
off at a condition of charge of 0%.
Use of the pre-entry climate control function
may mean that the high-voltage battery is not
fully charged.
High and low outside temperatures
Low outside temperatures
The efficiency of the high-voltage battery is
significantly reduced at very low outside tem-
peratures. The high-voltage battery is then no longer able to provide the normal electrical
power output.
High outside temperatures
To prevent damage to the high-voltage bat-
tery due to very high outside temperatures,
the maximum power output of the high-volt-
age battery is reduced automatically.
The E-CELL display indicates the maximum
amount of power available (
Ypage 183).
Notes on battery care
Avoid storing or transporting the vehicle in
high temperatures over a long period (e.g.
container transport). If you park the vehicle and leave it stationary
for longer periods, connect it to a power sup-
ply.
Temperatures below
Ò13‡(Ò25 †) and over
104 ‡ (40 †), which affect the vehicle for a
period of more than seven days, can cause
irreversible damage.
Discharged battery
The vehicle's high-voltage electrical system
switches off if the high-voltage battery is com-
pletely discharged. 30 seconds prior to this,
you are informed of the switch-off by the
Battery level too low. Stop and
charge immediatelymessage. This pro-
tects the battery from exhaustive discharge.
It is not possible to restart the drive system
until after charging.
Do not leave the vehicle parked for longer
than 14 days with a high-voltage battery con- dition of charge below 20%.
You can check the condition of charge in the
charge level display (
Ypage 184).
Further information on the "Energy flow dis-
play" can be found in the "Trip" menu
(
Ypage 187).
Energy consumption and range
This range is reduced by:
Rhigh and low outside temperatures
Ra non-anticipatory driving style
Rswitching on consumers, e.g. air-condition-
ing system or heating.
The battery's physical characteristics are
such that leaving the vehicle parked for an
extended period at low outdoor temperatures
without charging it can lead to:
Ra reduction in battery performance
Rlonger charge times
In extreme cases, this could mean that the
vehicle cannot be started. For this reason,
connect the charging cable when leaving the
vehicle parked for long periods at low outdoor
temperatures.
High-voltage battery143
Driving and parking
Z
Page 146 of 342
As a result of its basic characteristics, the
amount of energy available from the high-
voltage battery decreases over the course of
its life.
This reduces:
Rthe maximum range that can be achieved
by the vehicle
Rthe maximum output (acceleration) of the
vehicle
You can actively reduce the energy consump-
tion of your vehicle in a number of ways, for
example, by:
Ran anticipatory driving style
Rreducing the use of electrical consumers
Rhaving the vehicle regularly maintained
The charging time of the high-voltage battery may change over the course of its life.
Observe the displays on energy usage
(
Ypage 188) and range (Ypage 188).
RANGE PLUS
If you activate RANGE PLUS, the operating
window of the battery will be extended at thenext charging process. An extended driving
range will be available to you for the next
journey.
Using RANGE PLUS shortens the service life
of the battery. Therefore, only use RANGE
PLUS if, for example:
Rlong journeys are planned or
Rthe availability of charging stations at the
destination is limited
The more often RANGE PLUS is used, the
more the extended range is reduced.
Therefore always check the range display
before every journey (
Ypage 188).
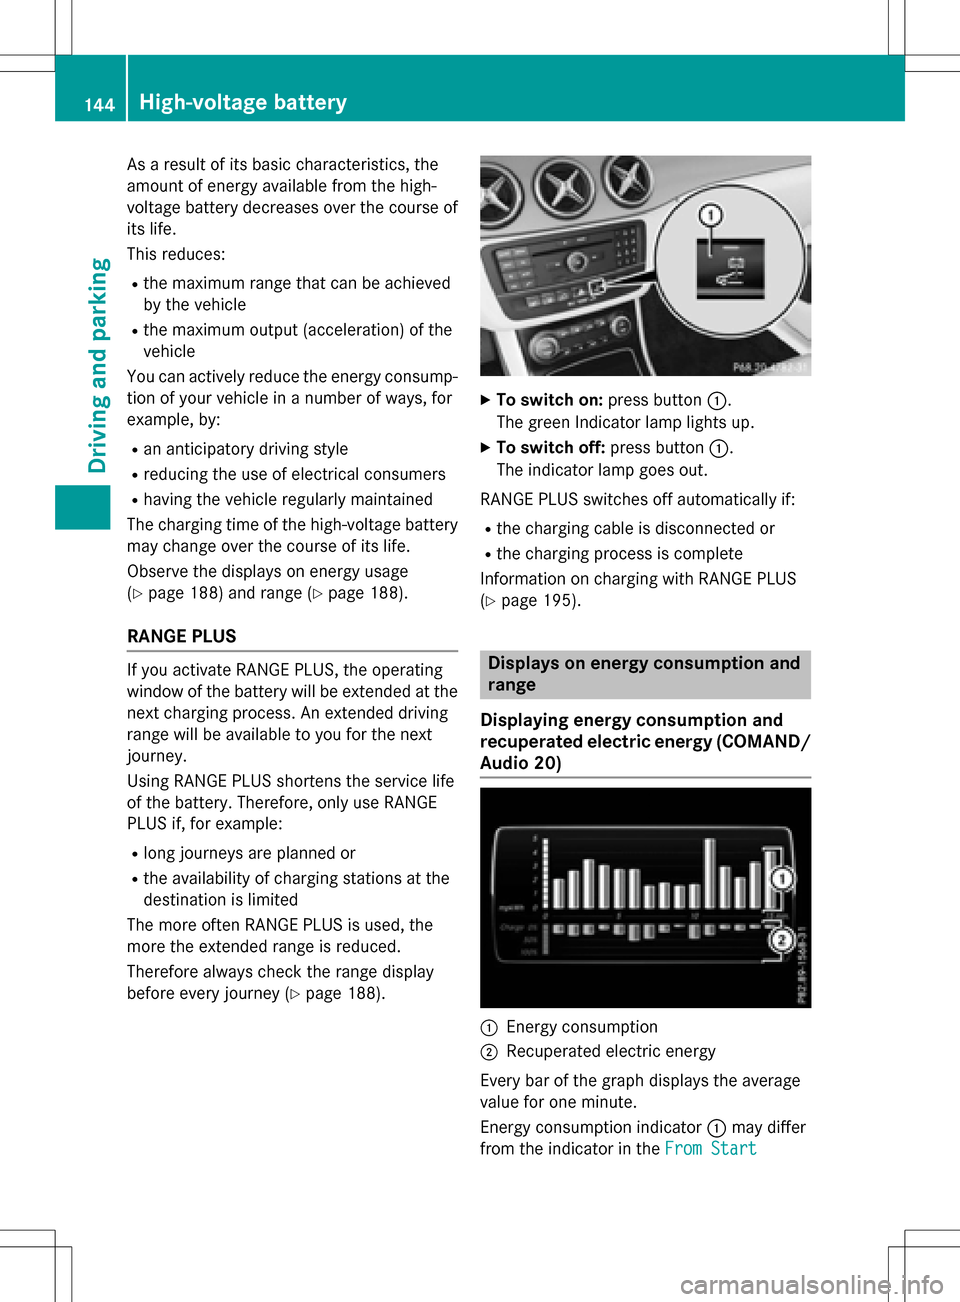
XTo switch on: press button:.
The green Indicator lamp lights up.
XTo switch off: press button:.
The indicator lamp goes out.
RANGE PLUS switches off automatically if:
Rthe charging cable is disconnected or
Rthe charging process is complete
Information on charging with RANGE PLUS
(
Ypage 195).
Displays on energy consumption and
range
Displaying energy consumption and
recuperated electric energy (COMAND/
Audio 20)
:Energy consumption
;Recuperated electric energy
Every bar of the graph displays the average
value for one minute.
Energy consumption indicator :may differ
from the indicator in the From Start
144High-voltage battery
Driving and parking
Page 147 of 342
(Ypage 187) trip computer in theTrip
menu.
Displaying energy consumption and recu-
perated electric energy:
XSwitch on Audio 20/COMAND (see the
separate operating instructions).
XTo select Vehiclefrom the main function
bar: turn and press the controller.
The vehicle menu is displayed.
XTo select Consumption: turn and press the
controller.
Energy consumption :and recuperated
electric energy ;for the last 15 minutes of
the journey are shown.
Exiting the vehicle settings:
XPress the %button on the controller.
or
XTo select %: slide 6and press the
controller.
To reset values: the values are reset along
with the From Start
trip computer
(
Ypage 189).
Displaying range on the map
(COMAND/Audio 20)
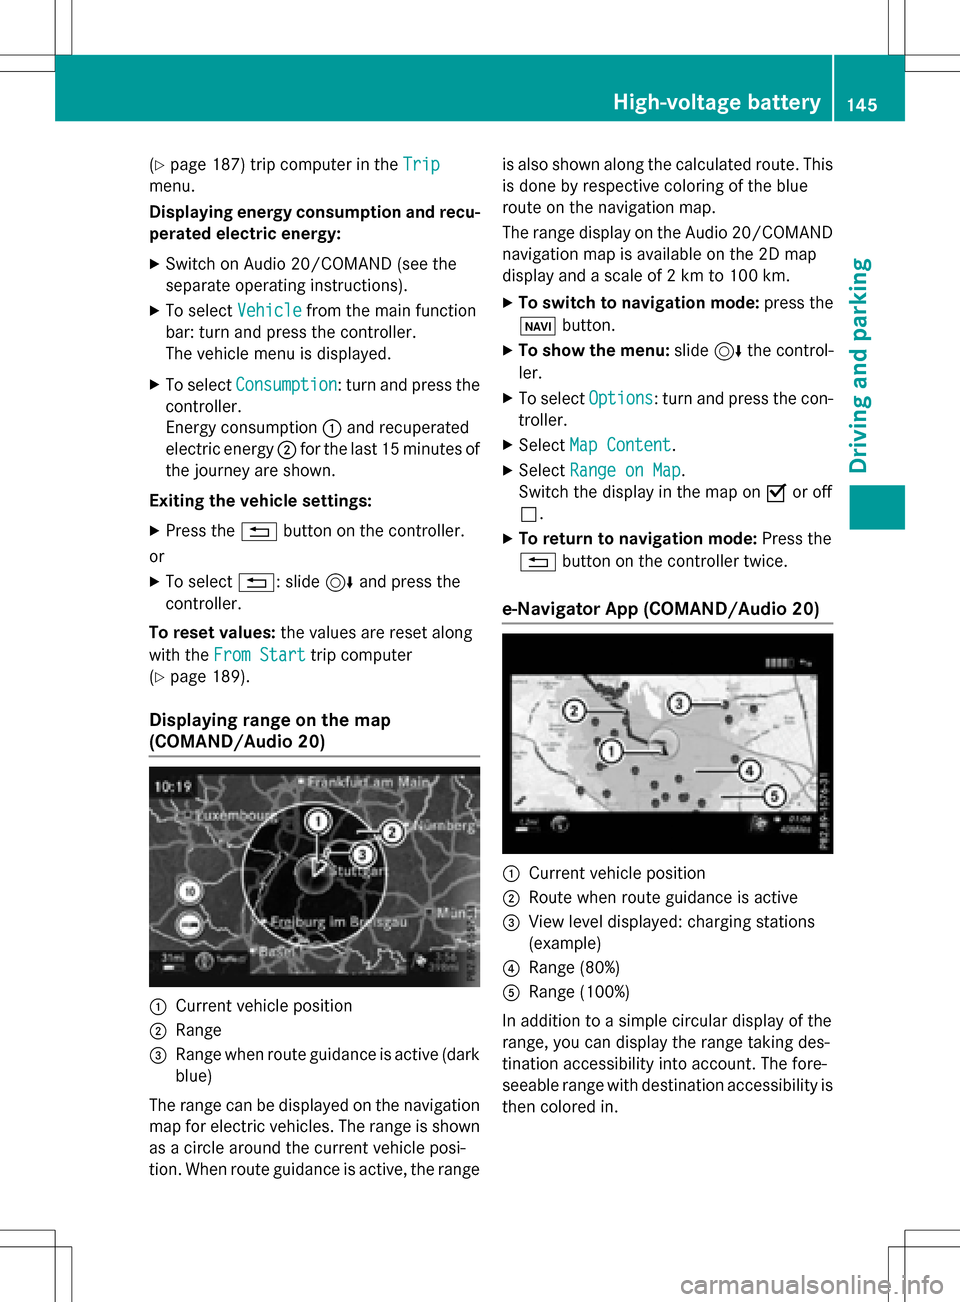
:Current vehicle position
;Range
=Range when route guidance is active (dark
blue)
The range can be displayed on the navigation
map for electric vehicles. The range is shown
as a circle around the current vehicle posi-
tion. When route guidance is active, the range is also shown along the calculated route. This
is done by respective coloring of the blue
route on the navigation map.
The range display on the Audio 20/COMAND
navigation map is available on the 2D map
display and a scale of 2 km to 100 km.
XTo switch to navigation mode:
press the
ß button.
XTo show the menu: slide6the control-
ler.
XTo select Options: turn and press the con-
troller.
XSelect Map Content.
XSelectRange on Map.
Switch the display in the map on Oor off
ª.
XTo return to navigation mode: Press the
% button on the controller twice.
e-Navigator App (COMAND/Audio 20)
:Current vehicle position
;Route when route guidance is active
=View level displayed: charging stations
(example)
?Range (80%)
ARange (100%)
In addition to a simple circular display of the
range, you can display the range taking des-
tination accessibility into account. The fore-
seeable range with destination accessibility is
then colored in.
High-voltage battery145
Driving and parking
Z