Page 113 of 342

!Never open the hood/tailgate if a wiper
arm has been folded away from the wind-
shield/rear window.
Never fold a windshield wiper arm without a
wiper blade back onto the windshield/rear
window.
Hold the windshield wiper arm firmly when
you change the wiper blade. If you release
the wiper arm without a wiper blade and it
falls onto the windshield/rear window, the
windshield/rear window may be damaged
by the force of the impact.
Mercedes-Benz recommends that you have
the wiper blades changed at a qualified
specialist workshop.
Replacing the windshield wiper blades
(variant 1)
Removing the wiper blades
XVehicles without KEYLESS-GO: remove
the SmartKey from the ignition lock.
XVehicles with KEYLESS-GO: switch off
the engine.
XFold the wiper arm away from the wind-
shield.
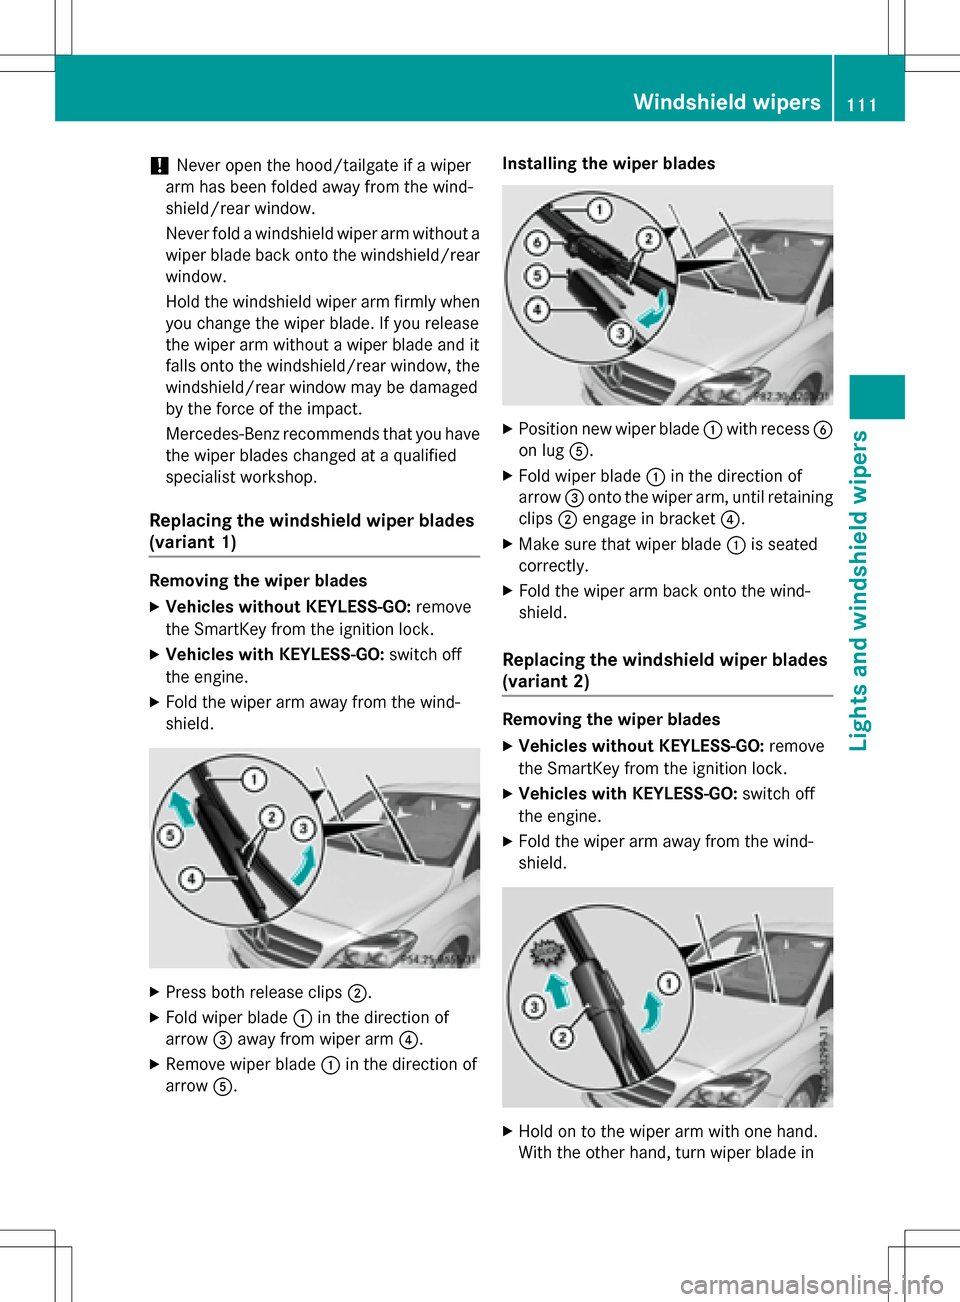
XPress both release clips ;.
XFold wiper blade:in the direction of
arrow =away from wiper arm ?.
XRemove wiper blade:in the direction of
arrow A. Installing the wiper blades
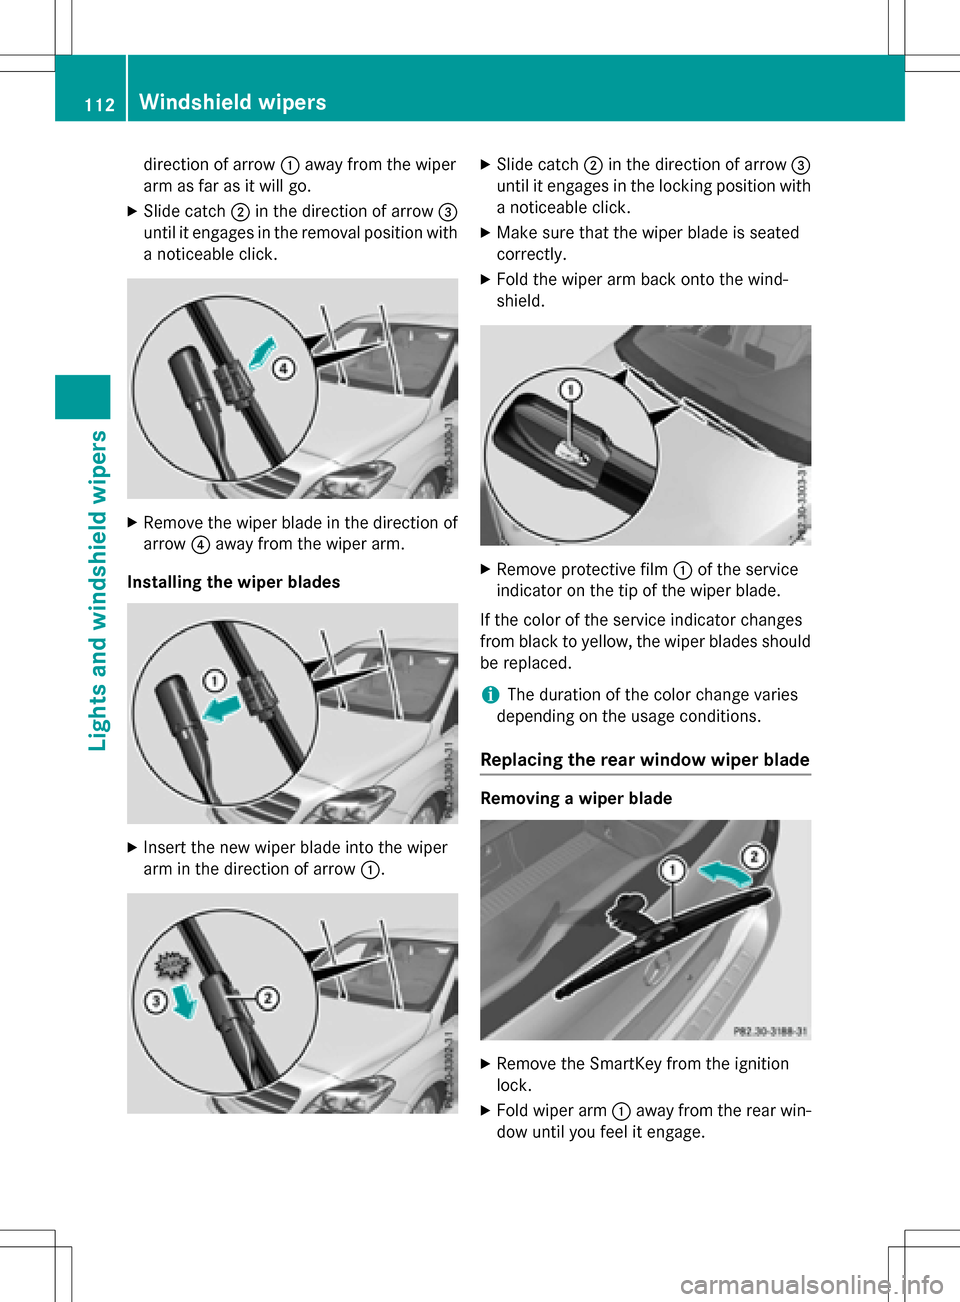
XPosition new wiper blade
:with recess B
on lug A.
XFold wiper blade :in the direction of
arrow =onto the wiper arm, until retaining
clips ;engage in bracket ?.
XMake sure that wiper blade :is seated
correctly.
XFold the wiper arm back onto the wind-
shield.
Replacing the windshield wiper blades
(variant 2)
Removing the wiper blades
XVehicles without KEYLESS-GO: remove
the SmartKey from the ignition lock.
XVehicles with KEYLESS-GO: switch off
the engine.
XFold the wiper arm away from the wind-
shield.
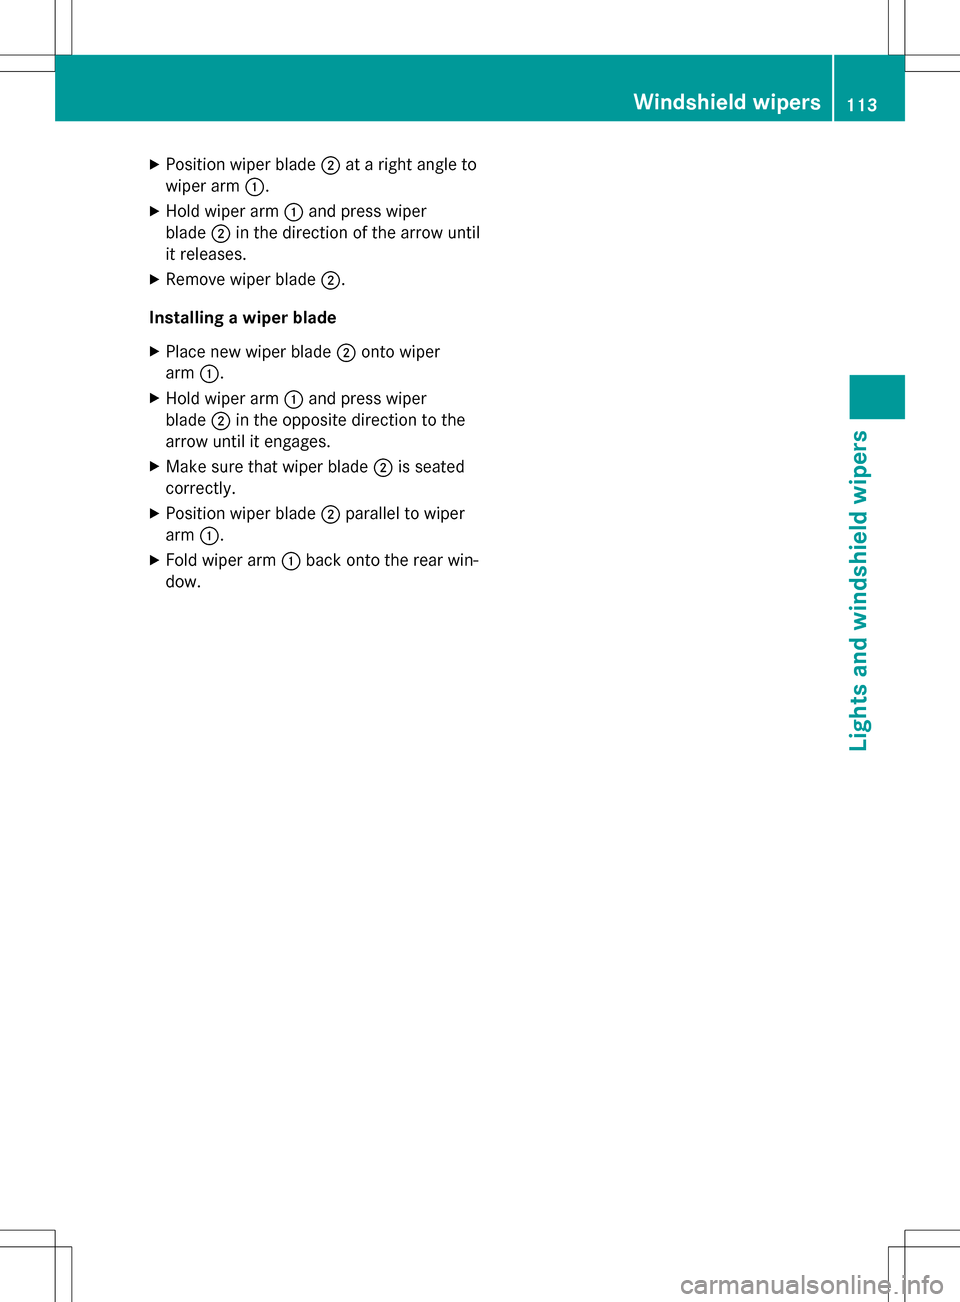
XHold on to the wiper arm with one hand.
With the other hand, turn wiper blade in
Windshield wipers111
Lights and windshield wipers
Z
Page 114 of 342

direction of arrow:away from the wiper
arm as far as it will go.
XSlide catch ;in the direction of arrow =
until it engages in the removal position with
a noticeable click.
XRemove the wiper blade in the direction of
arrow ?away from the wiper arm.
Installing the wiper blades
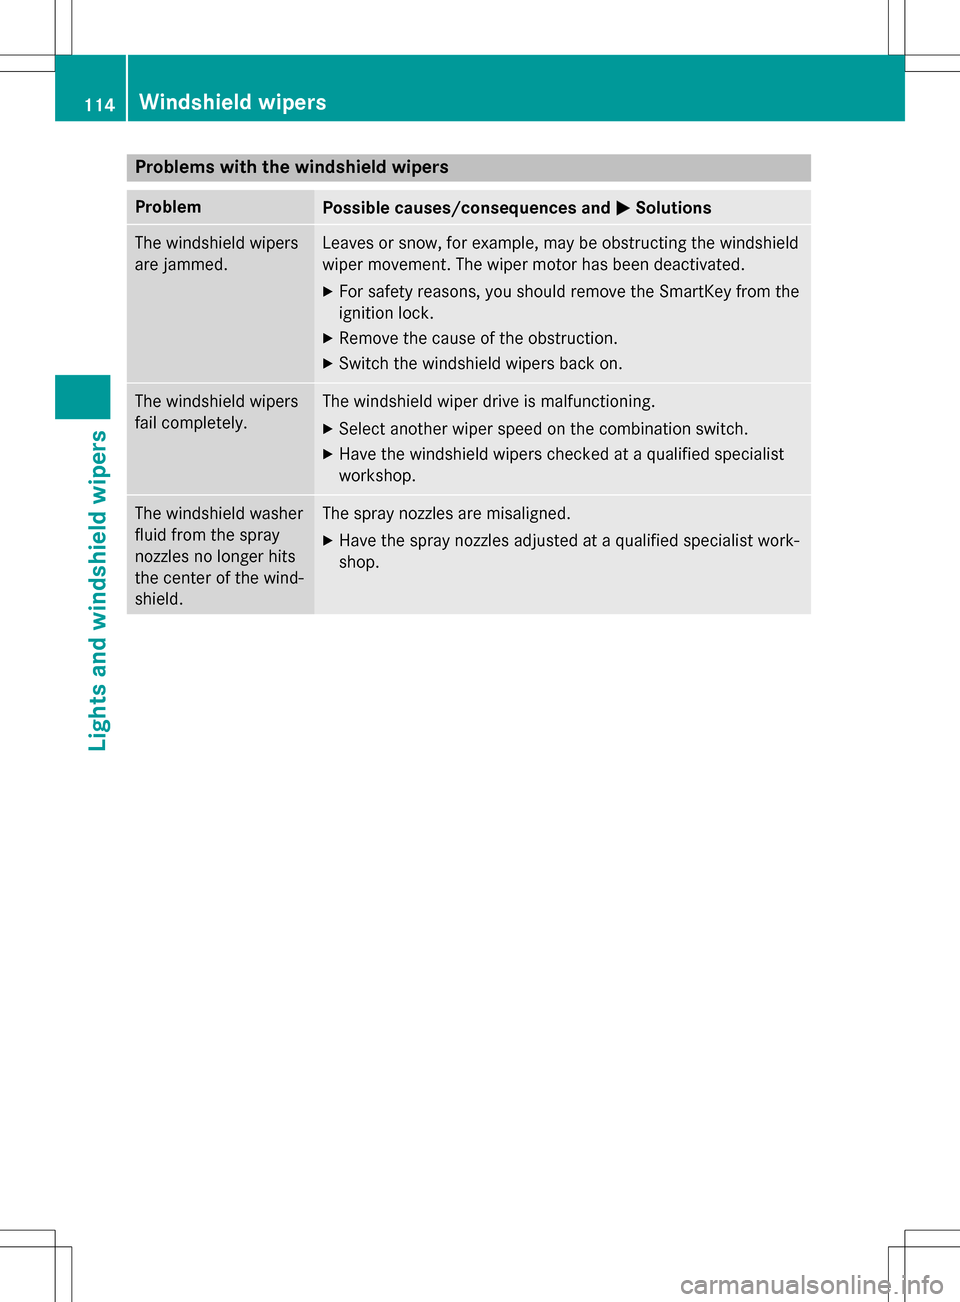
XInsert the new wiper blade into the wiper
arm in the direction of arrow :.
XSlide catch;in the direction of arrow =
until it engages in the locking position with a noticeable click.
XMake sure that the wiper blade is seated
correctly.
XFold the wiper arm back onto the wind-
shield.
XRemove protective film :of the service
indicator on the tip of the wiper blade.
If the color of the service indicator changes
from black to yellow, the wiper blades should
be replaced.
iThe duration of the color change varies
depending on the usage conditions.
Replacing the rear window wiper blade
Removing a wiper blade
XRemove the SmartKey from the ignition
lock.
XFold wiper arm :away from the rear win-
dow until you feel it engage.
112Windshield wipers
Lights and windshield wipers
Page 115 of 342
XPosition wiper blade;at a right angle to
wiper arm :.
XHold wiper arm :and press wiper
blade ;in the direction of the arrow until
it releases.
XRemove wiper blade ;.
Installing a wiper blade
XPlace new wiper blade ;onto wiper
arm :.
XHold wiper arm :and press wiper
blade ;in the opposite direction to the
arrow until it engages.
XMake sure that wiper blade ;is seated
correctly.
XPosition wiper blade ;parallel to wiper
arm :.
XFold wiper arm :back onto the rear win-
dow.
Windshield wipers113
Lights and windshield wipers
Z
Page 116 of 342
Problems with the windshield wipers
ProblemPossible causes/consequences andMSolutions
The windshield wipers
are jammed.Leaves or snow, for example, may be obstructing the windshield
wiper movement. The wiper motor has been deactivated.
XFor safety reasons, you should remove the SmartKey from the
ignition lock.
XRemove the cause of the obstruction.
XSwitch the windshield wipers back on.
The windshield wipers
fail completely.The windshield wiper drive is malfunctioning.
XSelect another wiper speed on the combination switch.
XHave the windshield wipers checked at a qualified specialist
workshop.
The windshield washer
fluid from the spray
nozzles no longer hits
the center of the wind-
shield.The spray nozzles are misaligned.
XHave the spray nozzles adjusted at a qualified specialist work-
shop.
114Windshield wipers
Lights and windshield wipers
Page 117 of 342
Useful information............................116
Overview of climate control sys-
tems ................................................... 116
Operating the climate control sys-
tems ................................................... 118
Air vents ............................................ 126
115
Climate control
Page 118 of 342

Useful information
i
This Operator's Manual describes all
models and all standard and optional equip-
ment of your vehicle available at the time of
publication of the Operator's Manual.
Country-specific differences are possible.
Please note that your vehicle may not be
equipped with all features described. This
also applies to safety-related systems and
functions.
iRead the information on qualified special-
ist workshops (
Ypage 26).
Overview of climate control systems
General notes
Observe the settings recommended on the
following pages. The windows could other-
wise fog up.
To prevent the windows from fogging up:
Rswitch off climate control only briefly
Rswitch on air-recirculation mode only
briefly
Rswitch on the cooling with air dehumidifi-
cation function
Rswitch on the defrost windshield function
briefly, if required
The automatic climate control regulates the
temperature and the humidity in the vehicle
interior and filters undesirable substances
out of the air.
Dual-zone automatic climate control is only
operational when the vehicle is ready to drive.
Optimum operation is only achieved with the
side windows closed.
Always keep the ventilation flaps behind the
side paneling in the cargo compartment clear.
Otherwise the vehicle will not be ventilated
correctly.
iVentilate the vehicle for a brief period
during warm weather, e.g. using the con-
venience opening feature (
Ypage 84). This
will speed up the cooling process and the desired interior temperature will be
reached more quickly.
iThe integrated filter filters out most par-
ticles of dust and soot and completely fil-
ters out pollen. It also reduces gaseous pol-
lutants and odors. A clogged filter reduces
the amount of air supplied to the vehicle
interior. For this reason, you should always
observe the interval for replacing the filter,
which is specified in the Maintenance
Booklet. As it depends on environmental
conditions, e.g. heavy air pollution, the
interval may be shorter than stated in the
Maintenance Booklet.
iIt is possible that under certain circum-
stances the residual heat function may be
activated automatically an hour after the
SmartKey has been removed in order to dry the automatic climate control. The vehicle
is then ventilated for 30 minutes.
116Overview of climate control systems
Climate control
Page 119 of 342

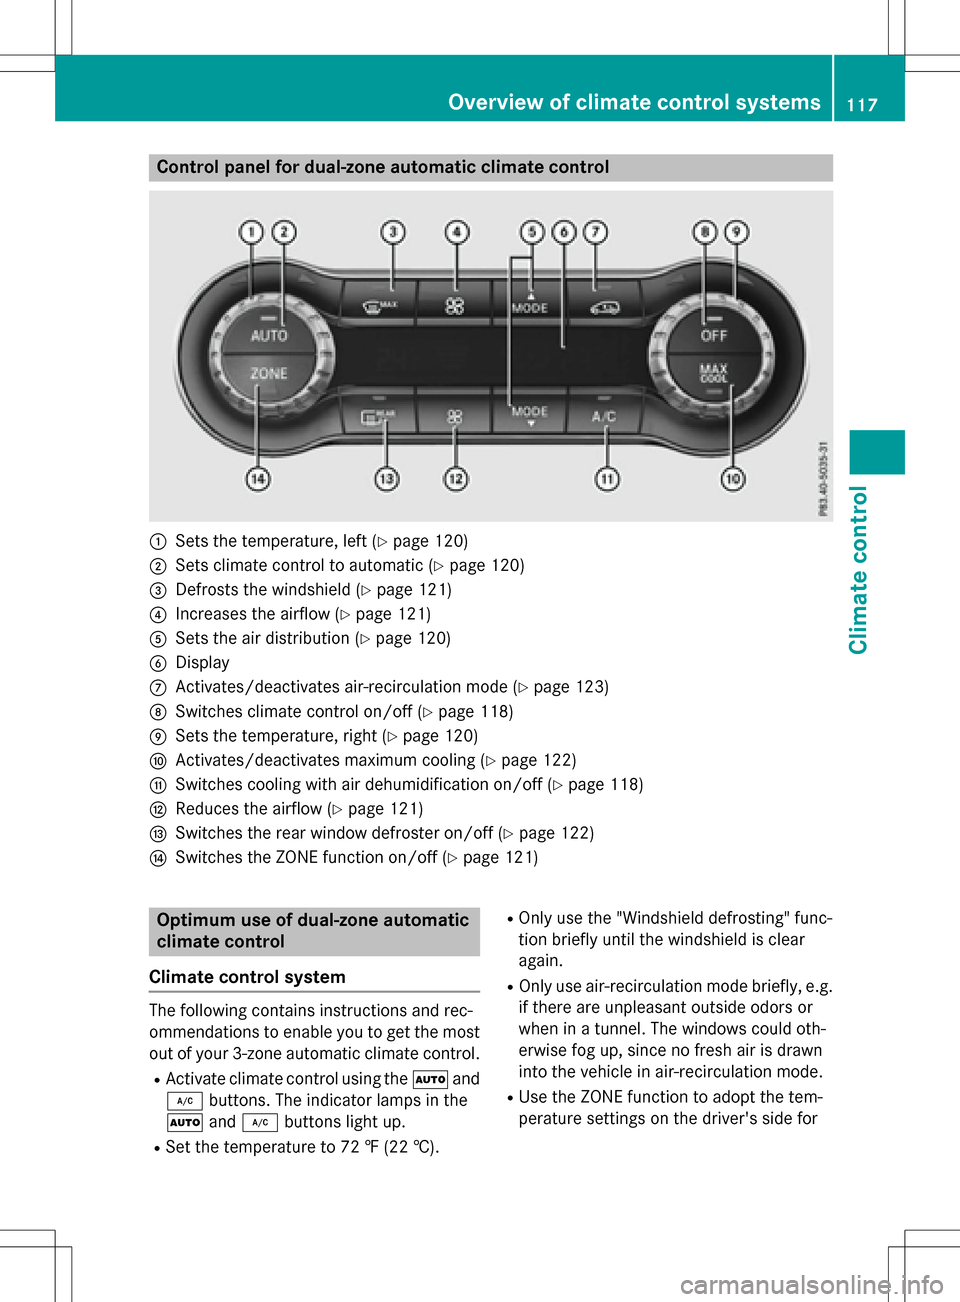
Control panel for dual-zone automatic climate control
:Sets the temperature, left (Ypage 120)
;Sets climate control to automatic (Ypage 120)
=Defrosts the windshield (Ypage 121)
?Increases the airflow (Ypage 121)
ASets the air distribution (Ypage 120)
BDisplay
CActivates/deactivates air-recirculation mode (Ypage 123)
DSwitches climate control on/off (Ypage 118)
ESets the temperature, right (Ypage 120)
FActivates/deactivates maximum cooling (Ypage 122)
GSwitches cooling with air dehumidification on/off (Ypage 118)
HReduces the airflow (Ypage 121)
ISwitches the rear window defroster on/off (Ypage 122)
JSwitches the ZONE function on/off (Ypage 121)
Optimum use of dual-zone automatic
climate control
Climate control system
The following contains instructions and rec-
ommendations to enable you to get the most
out of your 3-zone automatic climate control.
RActivate climate control using the Ãand
¿ buttons. The indicator lamps in the
à and¿ buttons light up.
RSet the temperature to 72 ‡ (22 †).
ROnly use the "Windshield defrosting" func-
tion briefly until the windshield is clear
again.
ROnly use air-recirculation mode briefly, e.g.
if there are unpleasant outside odors or
when in a tunnel. The windows could oth-
erwise fog up, since no fresh air is drawn
into the vehicle in air-recirculation mode.
RUse the ZONE function to adopt the tem-
perature settings on the driver's side for
Overview of climate control systems117
Climate control
Page 120 of 342

the front-passenger side as well. The indi-
cator lamp in theábutton goes out.
RIf you change the settings of the climate
control system, the climate status display
appears for approximately three seconds
at the bottom of the screen in the Audio/
COMAND display (see separate operating
instructions). You will see the current set-
tings of the various climate control func-
tions.
You can choose between various drive pro-
grams with the program selector button
(
Ypage 137).
If you have selected drive program E+:
Rthe cooling output is reduced when cooling
Rheat output is reduced when heating
Rthe time for which the rear window
defroster will run is reduced
If you have selected drive program Eor S, the
current climate settings are maintained.
Operating the climate control sys-
tems
Activating/deactivating climate con-
trol
General notes
When the climate control is switched off, the
air supply and air circulation are also
switched off. The windows could fog up.
Therefore, switch off climate control only
briefly
Dual-zone automatic climate control
XTurn the SmartKey to position 2in the igni-
tion lock (
Ypage 131).
XTo activate: press theÃbutton.
The indicator lamp in the Ãbutton lights
up. Airflow and air distribution are set to
automatic mode.
or
XPress the ^button.
The indicator lamp in the ^button goes
out. The previously selected settings are
restored.
XTo deactivate: press the^button.
The indicator lamp in the ^button lights
up.
iActivate climate control primarily using
the à button.
Switching cooling with air dehumidi-
fication on/off
General notes
If you deactivate the "Cooling with air-dehu-
midification" function, the air inside the vehi- cle will not be cooled. The air inside the vehi-
cle will also not be dehumidified. The win-
dows can fog up more quickly. Therefore, only
deactivate the "Cooling with air-dehumidifi-
cation" function briefly.
The "Cooling with air-dehumidification" func-
tion is operational when the vehicle is ready
to drive. The air inside the vehicle is cooled
and dehumidified according to the tempera-
ture selected.
Condensation may drip from the underside of
the vehicle when it is in cooling mode. This is
normal and not a sign that there is a malfunc- tion.
118Operating the climate control systems
Climate control