2016 MERCEDES-BENZ B-Class ELECTRIC ECU
[x] Cancel search: ECUPage 251 of 342
Cargo net
Important safety notes
GWARNING
On its own, the cargo net cannot secure or
restrain heavy objects, items of luggage and
heavy loads. You could be hit by an unsecured
load during sudden changes in direction,
braking or in the event of an accident. There is
an increased risk of injury or even fatal injury.
Always store objects so that they cannot be
flung around. Secure objects, luggage or
loads against slipping or tipping over, e.g. by
using tie downs, even if you are using the
cargo net.
It is important to use a cargo net if you load
the vehicle with small objects above the seat
backrests. For safety reasons, always use a
cargo net when transporting loads.
Damaged cargo nets can no longer fulfill their
protective function and must be replaced.
Visit a qualified specialist workshop.
Attaching and tightening the cargo net
You have two options for hooking in the cargo
net:
Rwith cargo compartment enlargement: the
brackets are behind the B ‑pillar and the
cargo tie-down rings to tension the net are
on the sides of the rear-compartment foot-
well.
Rwithout cargo compartment enlargement:
the brackets are behind the C-pillar and the cargo tie-down rings to tension the net are
in the cargo compartment (
Ypage 247).
The cargo net is located in the stowage space
under the cargo compartment floor
(
Ypage 249).
XOpen both Velcro fasteners and remove the
cargo net.
XUnroll and unfold the cargo net.
The joints on the upper and lower guide rod
should engage audibly.
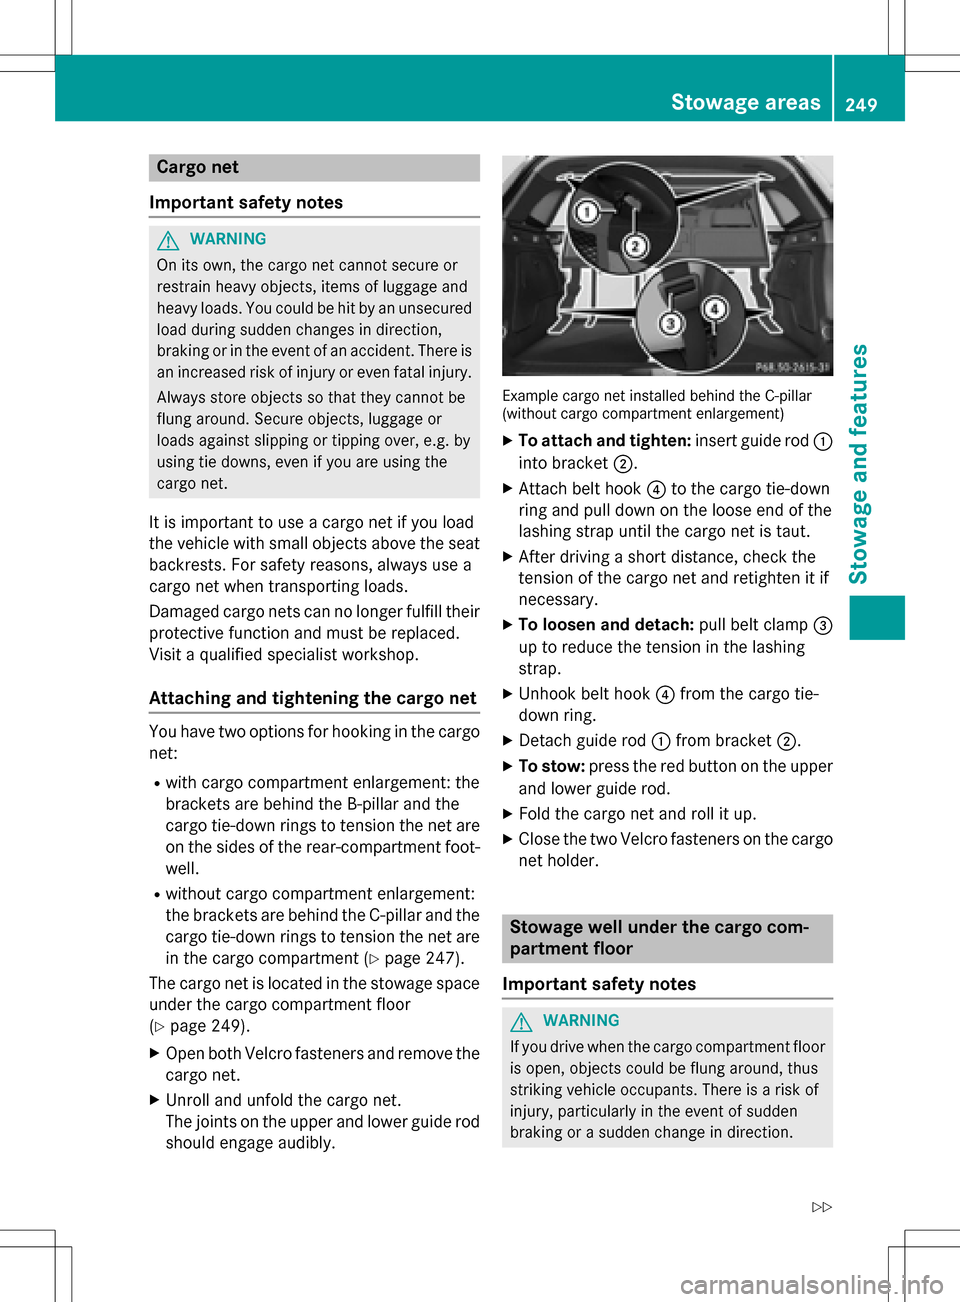
Example cargo net installed behind the C-pillar
(without cargo compartment enlargement)
XTo attach and tighten: insert guide rod:
into bracket ;.
XAttach belt hook ?to the cargo tie-down
ring and pull down on the loose end of the
lashing strap until the cargo net is taut.
XAfter driving a short distance, check the
tension of the cargo net and retighten it if
necessary.
XTo loosen and detach: pull belt clamp=
up to reduce the tension in the lashing
strap.
XUnhook belt hook ?from the cargo tie-
down ring.
XDetach guide rod :from bracket ;.
XTo stow:press the red button on the upper
and lower guide rod.
XFold the cargo net and roll it up.
XClose the two Velcro fasteners on the cargo
net holder.
Stowage well under the cargo com-
partment floor
Important safety notes
GWARNING
If you drive when the cargo compartment floor is open, objects could be flung around, thus
striking vehicle occupants. There is a risk of
injury, particularly in the event of sudden
braking or a sudden change in direction.
Stowage areas249
Stowage and features
Z
Page 253 of 342
floor away so that it engages in the guide on
the upper level.
Cargo compartment floor;engages in
the upper position.
iCarry out this step using both hands.
XTo lower: raise cargo compartment
floor ;slightly using handle :and pull it
towards you.
XLower cargo compartment floor ;again
slowly. Whilst doing so, press the cargo
compartment floor into the lower level.
Cargo compartment floor ;engages in
the lower position.
Roof carrier
Important safety notes
GWARNING
When you load the roof, the center of gravity
of the vehicle rises and the driving character-
istics change. If you exceed the maximum roof
load, the driving characteristics, as well as
steering and braking, will be greatly impaired.
There is a risk of an accident.
Never exceed the maximum roof load and
adjust your driving style.
You will find information on the maximum roof
load in the "Technical data" section
(
Ypage 338).
An incorrectly secured roof carrier or roof
load may become detached from the vehicle.
You must therefore ensure that you observe
the roof carrier manufacturer's installation
instructions.
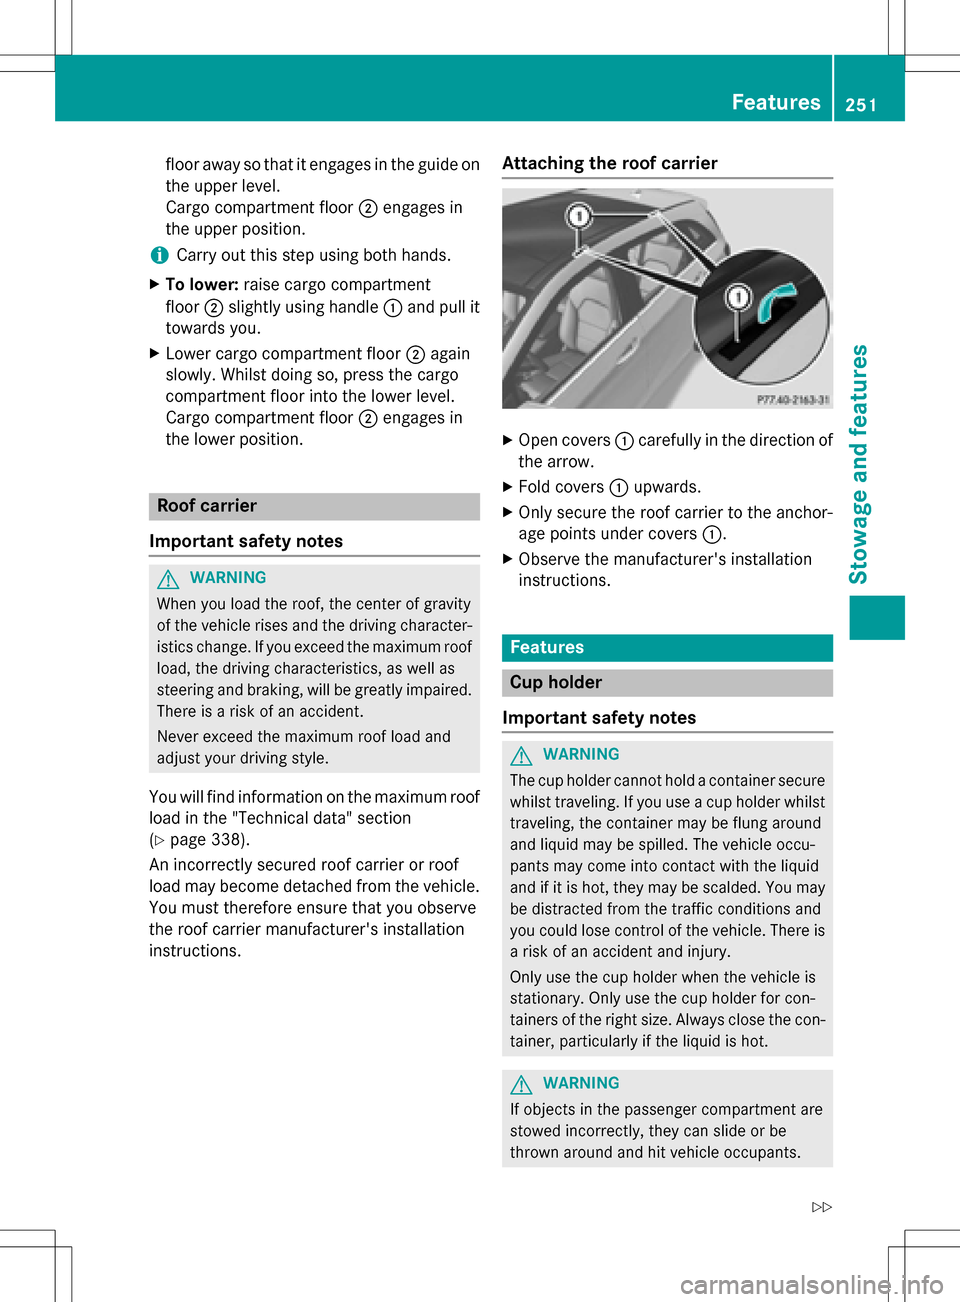
Attaching the roof carrier
XOpen covers :carefully in the direction of
the arrow.
XFold covers :upwards.
XOnly secure the roof carrier to the anchor-
age points under covers :.
XObserve the manufacturer's installation
instructions.
Features
Cup holder
Important safety notes
GWARNING
The cup holder cannot hold a container secure
whilst traveling. If you use a cup holder whilst
traveling, the container may be flung around
and liquid may be spilled. The vehicle occu-
pants may come into contact with the liquid
and if it is hot, they may be scalded. You may
be distracted from the traffic conditions and
you could lose control of the vehicle. There is a risk of an accident and injury.
Only use the cup holder when the vehicle is
stationary. Only use the cup holder for con-
tainers of the right size. Always close the con-
tainer, particularly if the liquid is hot.
GWARNING
If objects in the passenger compartment are
stowed incorrectly, they can slide or be
thrown around and hit vehicle occupants.
Features251
Stowage and features
Z
Page 254 of 342
There is a risk of injury, particularly in the
event of sudden braking or a sudden change
in direction.
RAlways stow objects so that they cannot be
thrown around in such situations.
RAlways make sure that objects do not pro-
trude from stowage spaces, parcel nets or
stowage nets.
RClose the lockable stowage spaces before
starting a journey.
RStow and secure objects that are heavy,
hard, pointed, sharp-edged, fragile or too
large in the cargo compartment.
!Only use the cup holders for containers of
the right size and which have lids. The
drinks could otherwise spill.
Observe the loading guidelines (
Ypage 242).
The stowage compartments in the doors pro-
vide space for bottles:
Rfront: capacity up to 51 fl. oz. (1.5 l)
Rrear: capacity up to 17 fl. oz. (0.5 l)
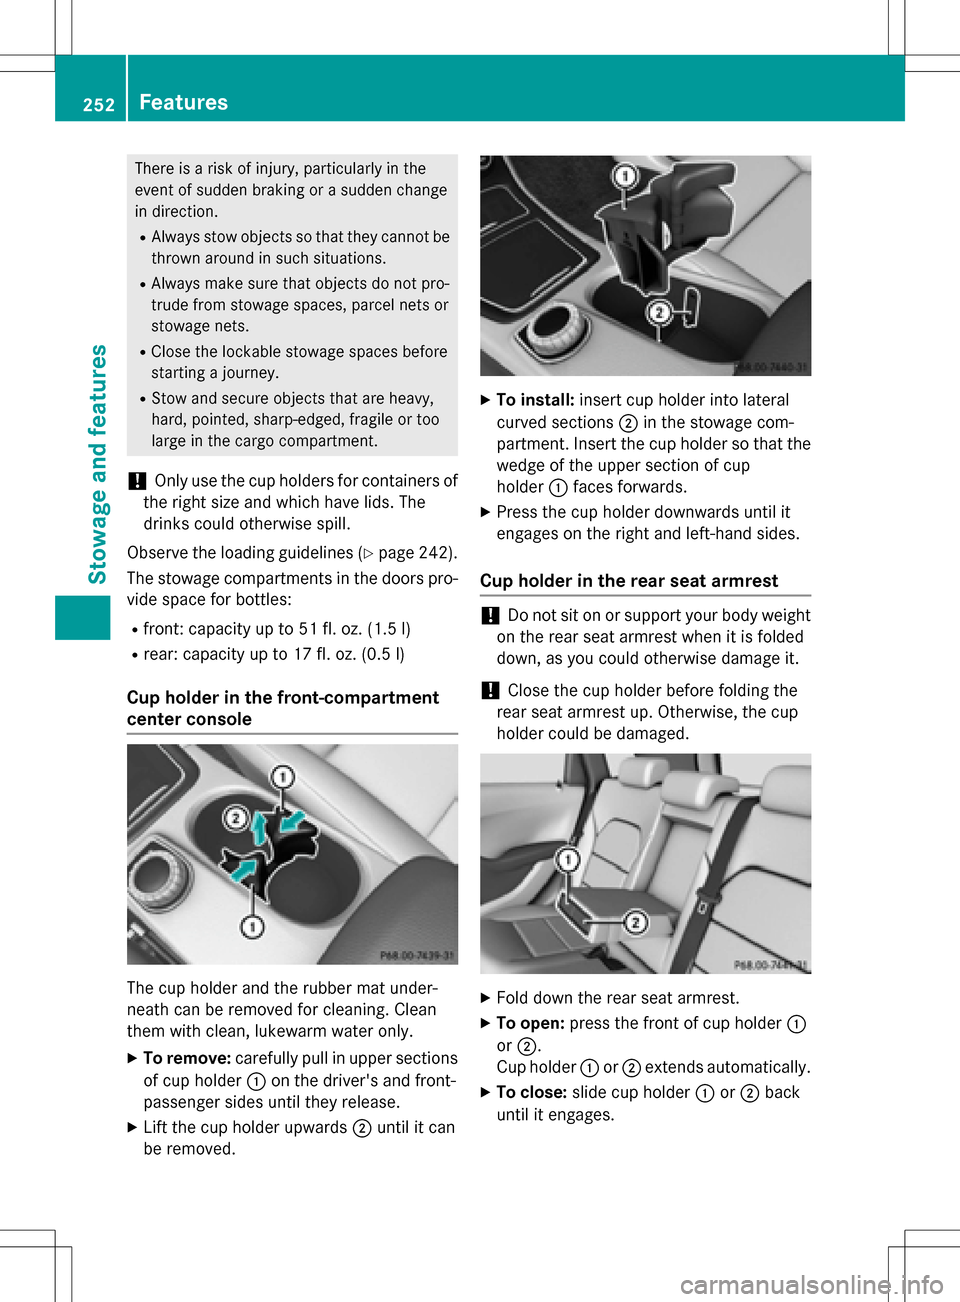
Cup holder in the front-compartment
center console
The cup holder and the rubber mat under-
neath can be removed for cleaning. Clean
them with clean, lukewarm water only.
XTo remove:carefully pull in upper sections
of cup holder :on the driver's and front-
passenger sides until they release.
XLift the cup holder upwards ;until it can
be removed.
XTo install: insert cup holder into lateral
curved sections ;in the stowage com-
partment. Insert the cup holder so that the wedge of the upper section of cup
holder :faces forwards.
XPress the cup holder downwards until it
engages on the right and left-hand sides.
Cup holder in the rear seat armrest
!Do not sit on or support your body weight
on the rear seat armrest when it is folded
down, as you could otherwise damage it.
!Close the cup holder before folding the
rear seat armrest up. Otherwise, the cup
holder could be damaged.
XFold down the rear seat armrest.
XTo open: press the front of cup holder :
or ;.
Cup holder :or; extends automatically.
XTo close: slide cup holder :or; back
until it engages.
252Features
Stowage and features
Page 258 of 342

A malfunction in the system has been detec-
ted if one of the following occurs:
RThe indicator lamp in the SOS button doesnot come on during the system self-test.
RThe indicator lamp in the FRoadside
Assistance button does not light up during
self-diagnosis of the system.
RThe indicator lamp in the ïMB Info call
button does not light up during self-diag-
nosis of the system.
RThe indicator lamp in one or more of the
following buttons continues to light up red
after the system self-diagnosis:
-SOS button
-F Roadside Assistance call button
-ïMB Info call button
RTheInoperativeor the Service Not
Activatedmessage appears in the multi-
function display after the system self-diag-
nosis.
If a malfunction is indicated as outlined
above, the system may not operate as expec-
ted. In the event of an emergency, help will
have to be summoned by other means.
Have the system checked at the nearest
authorized Mercedes-Benz Center or contact the following service hotlines:
Mercedes-Benz Customer Assistance Center
at 1-800-FOR-MERCedes (1-800-367-6372)
or 1-866-990-9007
Emergency call
Important safety notes
GWARNING
It can be dangerous to remain in the vehicle,
even if you have pressed the SOS button in an emergency if:
Ryou see smoke inside or outside of the vehi-
cle, e.g. if there is a fire after an accident
Rthe vehicle is on a dangerous section of
road
Rthe vehicle is not visible or cannot easily beseen by other road users, particularly when
dark or in poor visibility conditions
There is a risk of an accident and injury.
Leave the vehicle immediately in this or simi-
lar situations as soon as it is safe to do so.
Move to a safe location along with other vehi-
cle occupants. In such situations, secure the
vehicle in accordance with national regula-
tions, e. g. with a warning triangle.
General notes
Observe the notes on system activation
(
Ypage 255).
An emergency call is dialed automatically if an
air bag or Emergency Tensioning Device is
triggered. You cannot end an automatically
triggered emergency call yourself.
An emergency call can also be initiated man-
ually.
As soon as the emergency call has been ini-
tiated, the indicator lamp in the SOS button
flashes. The Connecting Call
message
appears in the multifunction display.
The audio output is muted.
Once the connection has been made, the
Call Connected
message appears in the
multifunction display.
256Features
Stowage and features
Page 270 of 342
the driver's footwell. Install the floormats
securely and as specified in order to ensure
sufficient clearance for the pedals. Do not use
loose floormats and do not place floormats on
top of one another.
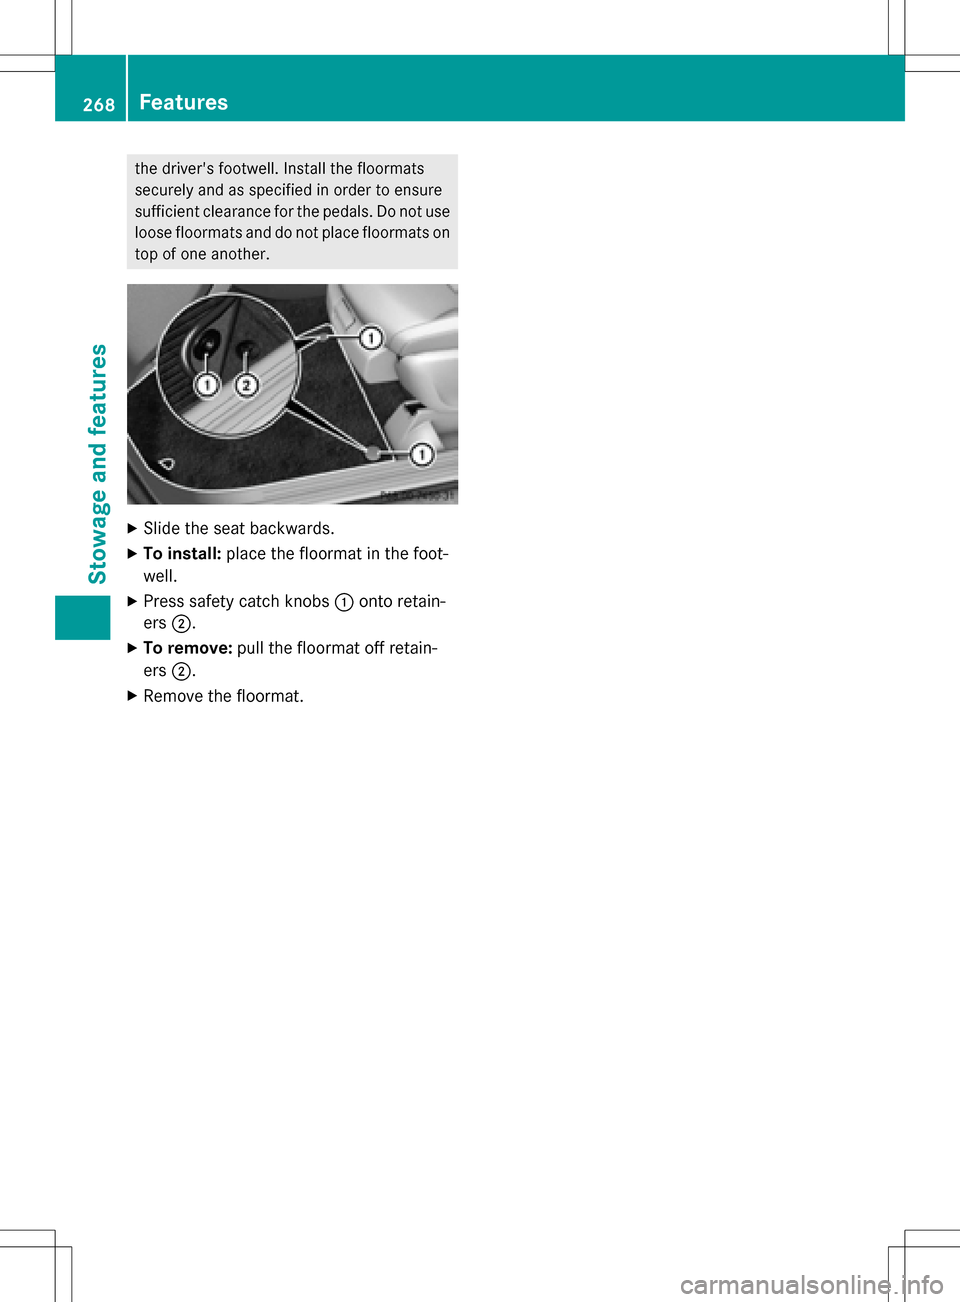
XSlide the seat backwards.
XTo install:place the floormat in the foot-
well.
XPress safety catch knobs :onto retain-
ers ;.
XTo remove: pull the floormat off retain-
ers ;.
XRemove the floormat.
268Features
Stowage and features
Page 279 of 342

ces prevent water from draining away. This
can lead to corrosion damage and damage
to electronic components.
XClean the inside and outside of the win-
dows with a damp cloth and a cleaning
product that is recommended and
approved by Mercedes-Benz.
Cleaning wiper blades
GWARNING
You could become trapped by the windshield wipers if they start moving while cleaning the
windshield or wiper blades. There is a risk of
injury.
Always switch off the windshield wipers and
the ignition before cleaning the windshield or
wiper blades.
!Only fold the windshield wipers away from
the windshield when vertical. Otherwise,
you will damage the hood.
!Do not pull the wiper blade. Otherwise,
the wiper blade could be damaged.
!Do not clean wiper blades too often and
do not rub them too hard. Otherwise, the
graphite coating could be damaged. This
could cause wiper noise.
!Hold the wiper arm securely when folding
back. The windshield could be damaged if
the wiper arm smacks against it suddenly.
XFold the windshield wiper arms away from
the windshield.
XCarefully clean the wiper blades with a
damp cloth.
XFold the windshield wiper arms back again
before switching on the ignition.
Cleaning the exterior lighting
!Only use cleaning agents or cleaning
cloths which are suitable for plastic light
lenses. Unsuitable cleaning agents or
cleaning cloths could scratch or damage
the plastic light lenses.
XClean the plastic lenses of the exterior
lights with a wet sponge and a mild cleaning
agent, e.g. Mercedes-Benz car shampoo or cleaning cloths.
Cleaning the mirror turn signals
!Only use cleaning agents or cleaning
cloths that are suitable for plastic lenses.
Unsuitable cleaning agents or cleaning
cloths could scratch or damage the plastic lenses of the mirror turn signals.
XClean the plastic lenses of the mirror turn
signals in the exterior mirror housing usinga wet sponge and mild cleaning agent, e.g.
Mercedes-Benz car shampoo or cleaning
cloths.
Cleaning the sensors
!If you clean the sensors with a power
washer, make sure that you keep a dis-
tance of at least 11.8 in (30 cm) between
the vehicle and the power washer nozzle.
Information about the correct distance is
available from the equipment manufac-
turer.
XClean sensors :of the driving systems
with water, car shampoo and a soft cloth.
Care277
Maintenance and care
Z
Page 285 of 342
It is therefore recommended that you addi-
tionally equip your vehicle with a TIREFIT kit if
you mount tires that do not feature run-flat
properties, e.g. winter tires. A TIREFIT kit maybe obtained from a qualified specialist work-
shop.
Information on changing and mounting
wheels (
Ypage 323).
XStop the vehicle on solid, non-slippery and
level ground, as far away as possible from
traffic.
XSwitch on the hazard warning lamps.
XSecure the vehicle against rolling away
(
Ypage 153).
XIf possible, bring the front wheels into the
straight-ahead position.
XSwitch off the drive system.
XVehicles without KEYLESS-GO: remove
the SmartKey from the ignition lock.
XVehicles with KEYLESS-GO start-func-
tion or KEYLESS-GO: open the driver's
door.
The on-board electronics now have status
0. This is the same as the SmartKey having
been removed.
XVehicles with KEYLESS-GO start-func-
tion or KEYLESS-GO: remove the Start/
Stop button from the ignition lock
(
Ypage 131).
XMake sure that the passengers are not
endangered as they do so. Make sure that
no one is near the danger area while a
wheel is being changed. Anyone who is not directly assisting in the wheel change
should, for example, stand behind the bar-
rier.
XGet out of the vehicle. Pay attention to traf-
fic conditions when doing so.
XClose the driver's door.
MOExtended tires (tires with run-flat
properties)
General notes
With MOExtended tires (tires with run flat
characteristics), you can continue to drive
your vehicle even if there is a total loss of
pressure in one or more tires. The affected
tire must not show any clearly visible damage.
You can recognize MOExtended tires by the
MOExtended marking which appears on the
sidewall of the tire. You will find this marking next to the tire size designation, the load-
bearing capacity and the speed index
(
Ypage 317).
MOExtended tires may only be used in con-
junction with an active tire pressure monitor.
If a pressure loss warning message
appears in the multifunction display:
Robserve the instructions in the display mes-
sages (
Ypage 223).
Rcheck the tire for damage.
Rif driving on, observe the following notes.
The driving distance possible in run-flat mode
is approximately 50 miles (80 km) when the
vehicle is partially laden. When the vehicle is
fully laden it is approximately
19 miles(30 km).
In addition to the vehicle load, the driving dis-
tance possible depends upon:
Rvehicle speed
Rroad condition
Routside temperature
The driving distance possible in run-flat mode
may be reduced by extreme driving condi-
tions or maneuvers, or it can be increased
through a moderate style of driving.
The driving distance possible in run-flat mode
is counted from the moment the tire pressure
loss warning appears in the multifunction dis-
play.
You must not exceed a maximum speed of
50 mph (80 km/h).
Flat tire283
Breakdown assistance
Page 292 of 342

Allow the frozen battery to thaw out before
charging it or jump-starting.
!Only use battery chargers with a maxi-
mum charging voltage of 14.8 V.
!Onlycharge the battery using the jump-
starting connection point.
The jump-starting connection point is in the
engine compartment (
Ypage 292).
XOpen the hood.
XConnect the battery charger to the positive terminal and ground point in the same
order as when connecting the donor bat-
tery in the jump-starting procedure
(
Ypage 292).
If the indicator/warning lamps do not light up
at low temperatures, it is very likely that the
discharged battery has frozen. In this case
you may neither jump-start the vehicle nor
charge the battery. The service life of a
thawed-out battery may be shorter. The start-
ing characteristics can be impaired, particu-
larly at low temperatures. Have the thawed-
out battery checked at a qualified specialist
workshop.
Only charge the installed battery with a bat-
tery charger which has been tested and
approved by Mercedes-Benz. A battery
charger unit specially adapted for Mercedes-
Benz vehicles and tested and approved by
Mercedes-Benz is available as an accessory.
It permits the charging of the battery in its
installed position. Contact an authorized
Mercedes-Benz Center for further informa-
tion and availability. Read the battery charg-
er's ope rating instructions before charging
the battery.
High-voltage battery – important
safety notes
GDANGER
The vehicle's high-voltage electrical system is under high voltage. If you modify components
in the vehicle's high-voltage electrical system
or touch damaged components, you may be
electrocuted. The components in the vehi-
cle's high-voltage electrical system may be
damaged in an accident, although the damage
is not visible. There is a risk of fatal injury.
Following an accident, do not touch any high-
voltage components and never modify the
vehicle's high-voltage electrical system. Have
the vehicle towed away after an accident and
the vehicle's high-voltage electrical system
checked by a qualified specialist workshop.
GWARNING
In the event of a vehicle fire, the internal pres- sure of the high-voltage battery can exceed a
critical value. In this case flammable gas
escapes through a ventilation valve on the
underbody. The gas can ignite. There is a risk
of injury.
Leave the danger zone immediately. Secure
the danger area at a suitable distance, whilst
observing legal requirements.
The vehicle's high voltage electrical system is
under high voltage.
RDo not handle high-voltage components orthe orange cables of the vehicle's high-volt-
age electrical system.
RDo not touch high-voltage components or
the orange cables of the high-voltage elec-
trical system when a vehicle has been
involved in a crash.
RDo not touch any damaged components or
the damaged orange cables of the vehicle's
high-voltage electrical system.
RDo not remove the covers of the high-volt-
age electrical system components that are
marked with a warning sticker.
Do not leave the vehicle parked for longer
than 14 days with a high-voltage battery con- dition of charge below 20%.
You can check the condition of charge in the
charge level display (
Ypage 184).
If you park the vehicle and leave it stationary
for longer periods, connect it to a power sup-
ply.
290Batteries
Breakdown assistance