2016 MERCEDES-BENZ AMG GT S cargo compartment cover
[x] Cancel search: cargo compartment coverPage 7 of 290

see Flat tire
see Towing away
Buttons on the steering wheel ......... 152
C
California
Important notice for retail cus-
tomers and lessees .......................... 22
Calling up a malfunction
see Display messages
Calling up the climate control bar
Multimedia system ........................ 204
Calling up the climate control
menu
Multimedia system ........................ 204
Car
see Vehicle
Care
Car wash ........................................2 34
Carpets .......................................... 240
Display ...........................................2 38
Exhaust pipe .................................. 238
Exterior lights ................................ 237
Gear or selector lever .................... 239
Interior ...........................................2 38
Matte finish ................................... 236
Notes ............................................. 234
Paint .............................................. 235
Plastic trim ....................................2 38
Power washer ................................ 235
Rear view camera .......................... 238
Roof lining ...................................... 240
Seat belt ........................................ 239
Seat cover ..................................... 239
Sensors ......................................... 237
Steering wheel ............................... 239
Trim pieces ....................................2 39
Washing by hand ........................... 235
Wheels ...........................................2 36
Windows ........................................ 236
Wiper blades .................................. 237
Wooden trim .................................. 239
Cargo compartment
Unlocking with KEYLESS-GO ............ 69
Cargo compartment cover
Important safety notes .................. 211
Cargo net ...........................................2 11CD
see also Digital Operator's Man-
ual ..................................................2 00
CD player (on-board computer) ........157
Center console
Overview .......................................... 32
Central locking
Locking/unlocking (SmartKey) ........6 0
Changing the media source .....
.......
.157
Charge retention
Socket ...........................................1 22
Charge-air pressure (on-board
computer) .......................................... 162
Child seat
Forward-facing restraint system ...... 51
On the front-passenger seat ............ 51
Rearward-facing restraint system .... 51
Children
Restraint systems ............................ 50
Special seat belt retractor ............... 49
Cigarette lighter ................................ 214
Cleaning
Mirror turn signal ........................... 237
Climate control
Automatic climate control (dual-
zone) ................................................ 94
Controlling automatically ................. 96
Cooling with air dehumidification ..... 95
Cooling with air dehumidification
(multimedia system) ...................... 205
Defrosting the windows ................... 97
Defrosting the windshield ................ 97
ECO start/stop function (3-zone
automatic climate control) ............... 94
General notes .................................. 93
Indicator lamp .................................. 96
Information about using auto-
matic climate control ....................... 94
Overview ........................................ 204
Overview of systems ........................ 93
Problem with the rear window
defroster .......................................... 99
Problems with cooling with air
dehumidification .............................. 96
Refrigerant ..................................... 285
Refrigerant filling capacity ............. 286
Setting the air distribution ............... 96
Setting the air vents ........................ 99
Index5
Page 62 of 290

SmartKey
Important safety notes
GWARNING
If children are left unsupervised in the vehicle,
they could:
Ropen the doors, thus endangering other
people or road users.
Rget out and disrupt traffic.
Roperate the vehicle's equipment.
Additionally, children could set the vehicle in
motion if, for example, they:
Rrelease the parking brake.
Rshifting the automatic transmission out of
park position P
RStart the engine.
There is a risk of an accident and injury.
When leaving the vehicle, always take the
SmartKey with you and lock the vehicle. Never
leave children or animals unattended in the
vehicle. Always keep the SmartKey out of
reach of children.
GWARNING
If you attach heavy or large objects to the
SmartKey, the SmartKey could be uninten-
tionally turned in the ignition lock. This could
cause the engine to be switched off. There is a risk of an accident.
Do not attach any heavy or large objects to the
SmartKey. Remove any bulky key rings before
inserting the SmartKey into the ignition lock.
!Keep the SmartKey away from strong mag-
netic fields. Otherwise, the remote control
function could be affected.
Strong magnetic fields can occur in the vicin-
ity of powerful electrical installations.
Do not keep the SmartKey:
Rwith electronic devices, e.g. a mobile phone
or another SmartKey.
Rwith metallic objects, e.g. coins or metal foil.
Rinside metallic objects, e.g. a metal case.
This can affect the functionality of the Smart- Key. Vehicles with KEYLESS-GO start function:
do
not keep the SmartKey on the cargo compart-
ment cover or in the cargo compartment. Oth-
erwise, the SmartKey may not be detected, e.g.
when starting the engine using the Start/Stop
button.
A check which periodically establishes a radio
connection between the vehicle and the Smart-
Key determines whether a valid SmartKey is in
the vehicle. This occurs, for example:
Rwhen starting the engine
Rwhilst driving
Rwhen using HANDS-FREE ACCESS
Rwhen the external door handles are touched
Rduring convenience closing
SmartKey functions
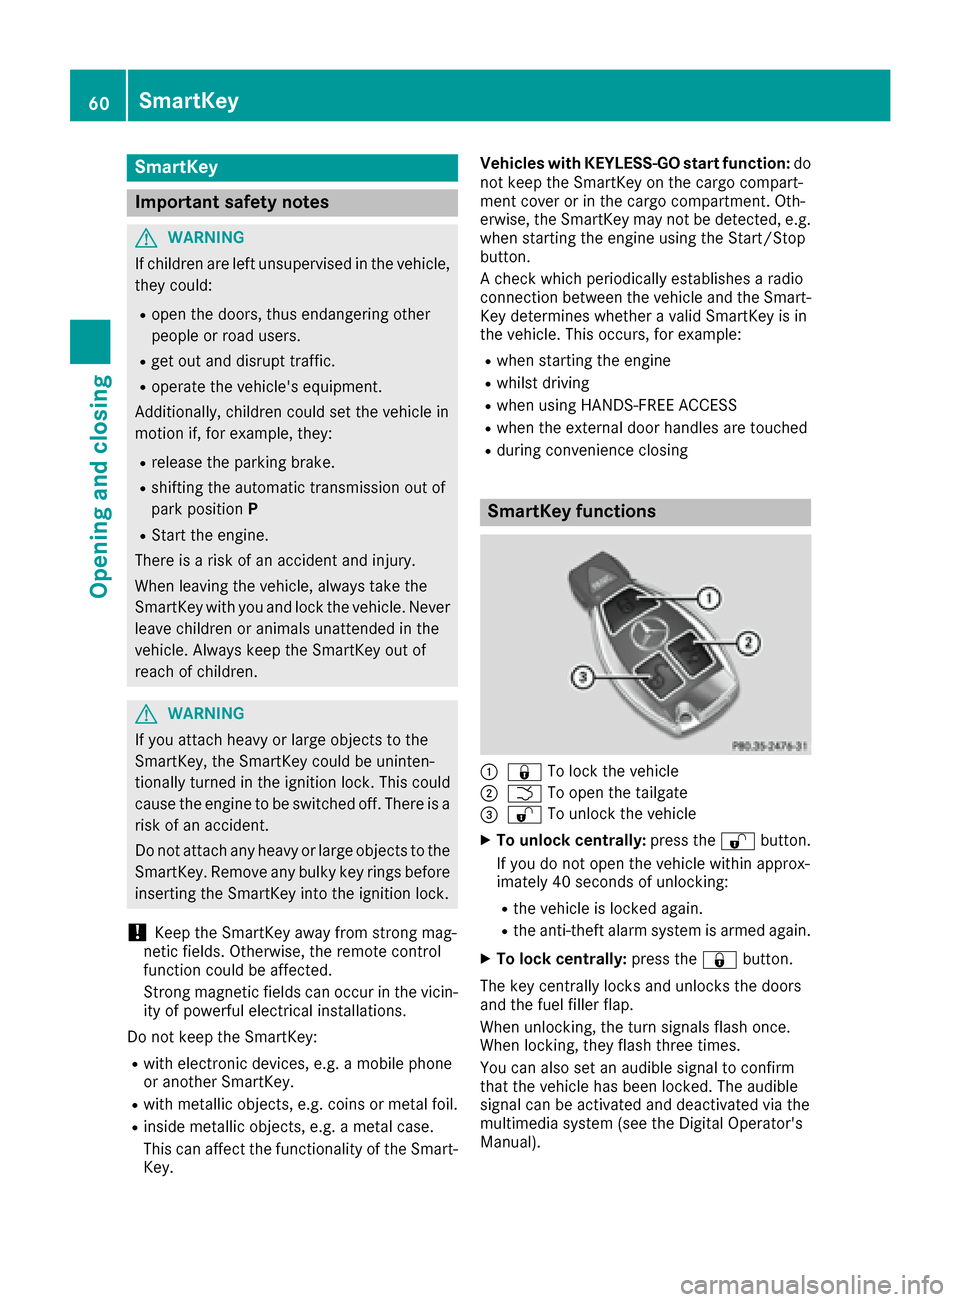
:& To lock the vehicle
;FTo open the tailgate
=%To unlock the vehicle
XTo unlock centrally: press the%button.
If you do not open the vehicle within approx-
imately 40 seconds of unlocking:
Rthe vehicle is locked again.
Rthe anti-theft alarm system is armed again.
XTo lock centrally: press the&button.
The key centrally locks and unlocks the doors
and the fuel filler flap.
When unlocking, the turn signals flash once.
When locking, they flash three times.
You can also set an audible signal to confirm
that the vehicle has been locked. The audible
signal can be activated and deactivated via the
multimedia system (see the Digital Operator's
Manual).
60SmartKey
Opening and closing
Page 73 of 290

You can open the tailgate from the driver's seat
when the vehicle is stationary and unlocked.
XPress remote operating switch:for the tail-
gate until the tailgate is unlocked.
The tailgate opens slightly.
Tailgate emergency release
Use the emergency release if the tailgate can no
longer be unlocked:
Rusing the SmartKey
Rusing HANDS-FREE ACCESS
Rusing the remote operating switch on the
instrument panel
XClimb into the cargo compartment via the
vehicle interior.
Unhook the cargo compartment cover, if nec-
essary (
Ypage 211).
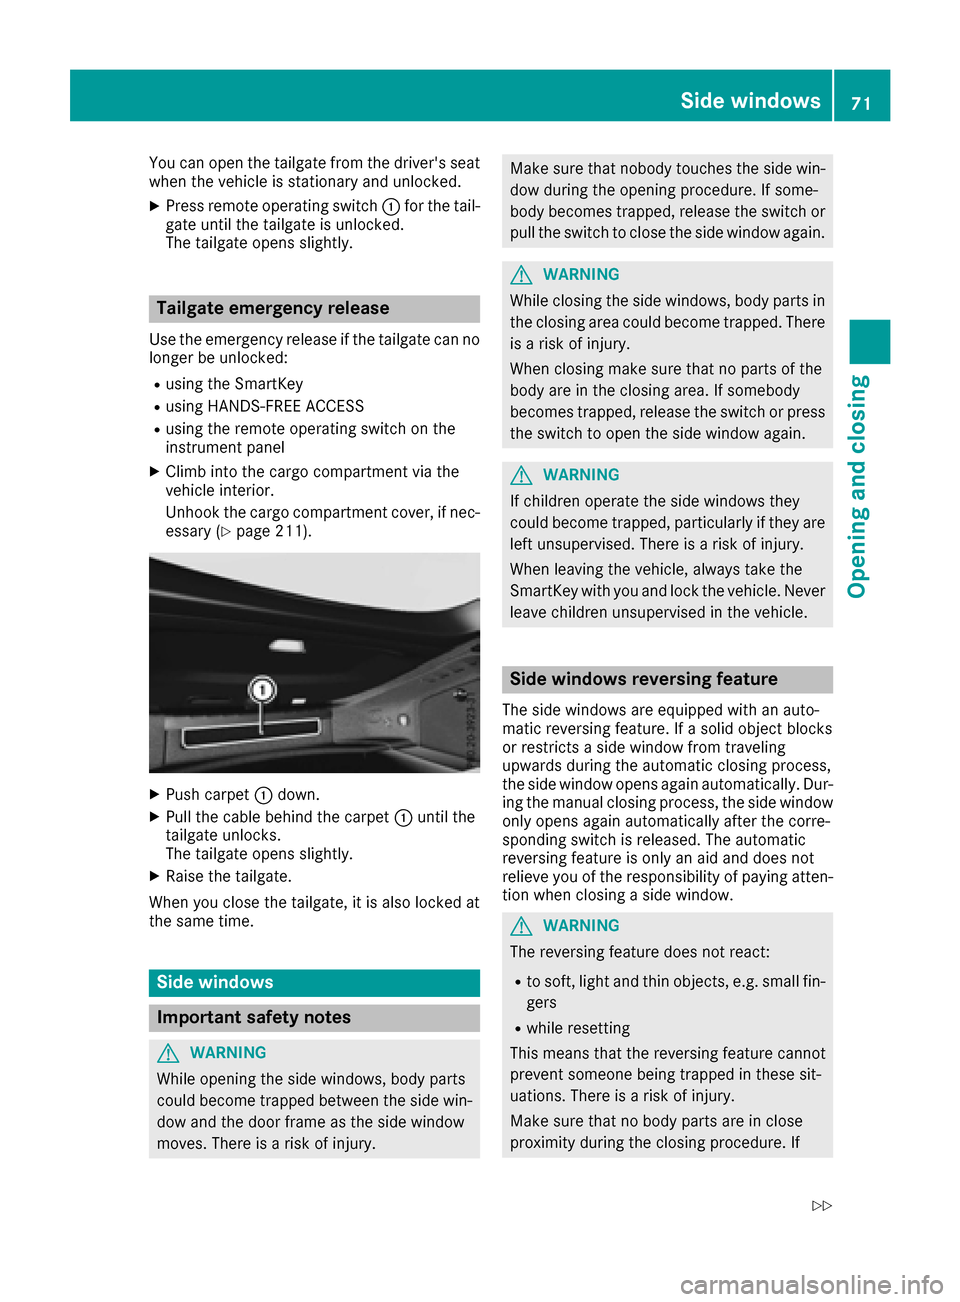
XPush carpet :down.
XPull the cable behind the carpet :until the
tailgate unlocks.
The tailgate opens slightly.
XRaise the tailgate.
When you close the tailgate, it is also locked at
the same time.
Side windows
Important safety notes
GWARNING
While opening the side windows, body parts
could become trapped between the side win-
dow and the door frame as the side window
moves. There is a risk of injury.
Make sure that nobody touches the side win- dow during the opening procedure. If some-
body becomes trapped, release the switch or
pull the switch to close the side window again.
GWARNING
While closing the side windows, body parts in
the closing area could become trapped. There is a risk of injury.
When closing make sure that no parts of the
body are in the closing area. If somebody
becomes trapped, release the switch or press
the switch to open the side window again.
GWARNING
If children operate the side windows they
could become trapped, particularly if they are left unsupervised. There is a risk of injury.
When leaving the vehicle, always take the
SmartKey with you and lock the vehicle. Never
leave children unsupervised in the vehicle.
Side windows reversing feature
The side windows are equipped with an auto-
matic reversing feature. If a solid object blocks
or restricts a side window from traveling
upwards during the automatic closing process,
the side window opens again automatically. Dur- ing the manual closing process, the side window
only opens again automatically after the corre-
sponding switch is released. The automatic
reversing feature is only an aid and does not
relieve you of the responsibility of paying atten-
tion when closing a side window.
GWARNING
The reversing feature does not react:
Rto soft, light and thin objects, e.g. small fin-
gers
Rwhile resetting
This means that the reversing feature cannot
prevent someone being trapped in these sit-
uations. There is a risk of injury.
Make sure that no body parts are in close
proximity during the closing procedure. If
Side windows71
Opening and closing
Z
Page 213 of 290

Cargo compartment cover
Important safety notes
GWARNING
On its own, the cargo compartment cover
cannot secure or restrain heavy objects,
items of luggage and heavy loads. You could
be hit by an unsecured load during sudden
changes in direction, braking or in the event of
an accident. There is an increased risk of
injury or even fatal injury.
Always store objects so that they cannot be
flung around. Secure objects, luggage or
loads against slipping or tipping over, e.g. by
using tie downs, even if you are using the
cargo compartment cover.
RThe cargo compartment cover conceals
objects in the vehicle's cargo compartment.
Attaching and detaching the cargo com-
partment cover
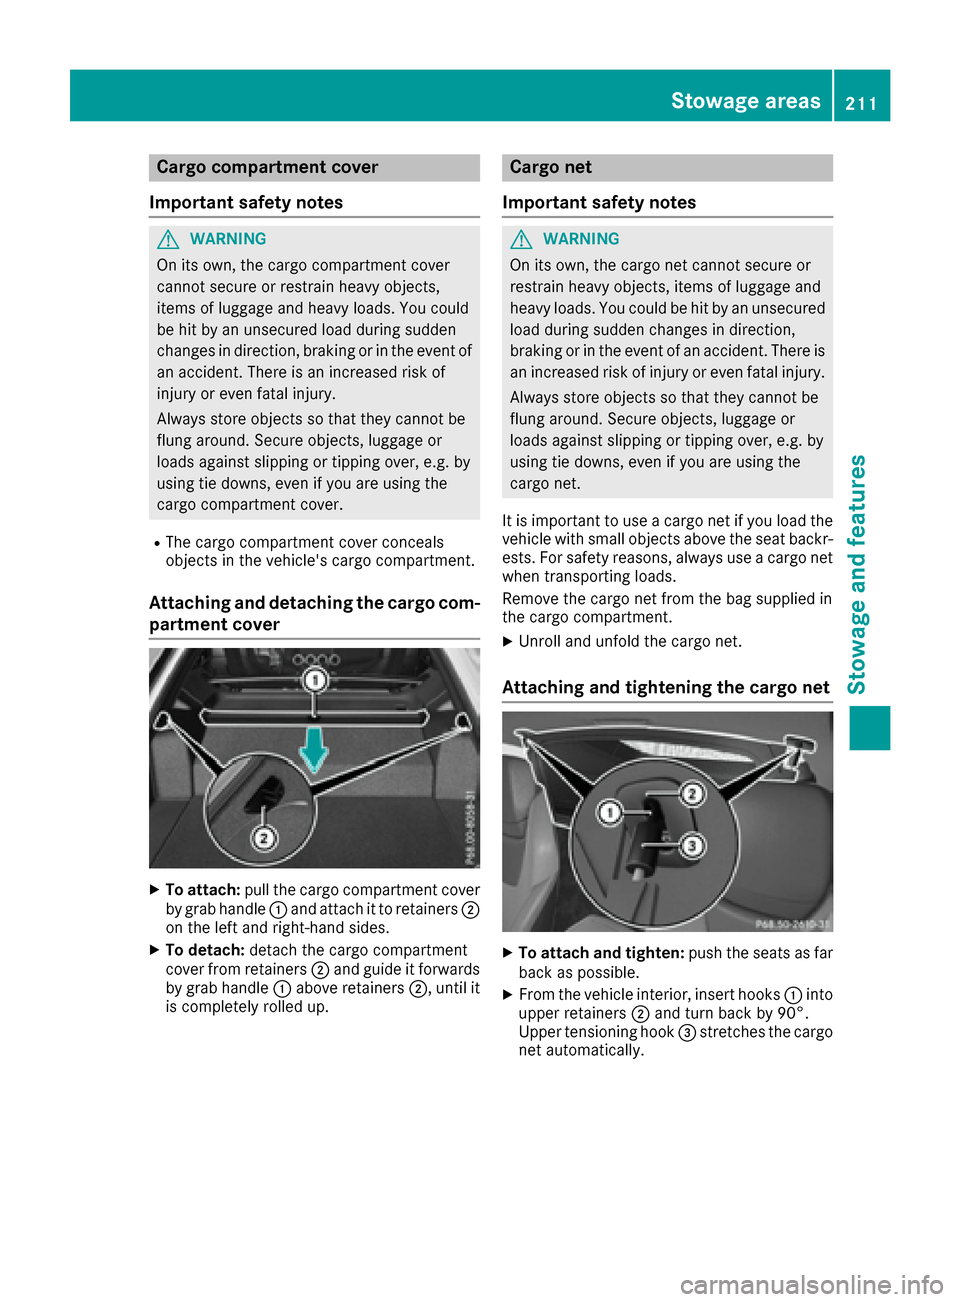
XTo attach: pull the cargo compartment cover
by grab handle :and attach it to retainers ;
on the left and right-hand sides.
XTo detach: detach the cargo compartment
cover from retainers ;and guide it forwards
by grab handle :above retainers ;, until it
is completely rolled up.
Cargo net
Important safety notes
GWARNING
On its own, the cargo net cannot secure or
restrain heavy objects, items of luggage and
heavy loads. You could be hit by an unsecured
load during sudden changes in direction,
braking or in the event of an accident. There is
an increased risk of injury or even fatal injury.
Always store objects so that they cannot be
flung around. Secure objects, luggage or
loads against slipping or tipping over, e.g. by
using tie downs, even if you are using the
cargo net.
It is important to use a cargo net if you load the
vehicle with small objects above the seat backr-
ests. For safety reasons, always use a cargo net
when transporting loads.
Remove the cargo net from the bag supplied in
the cargo compartment.
XUnroll and unfold the cargo net.
Attaching and tightening the cargo net
XTo attach and tighten: push the seats as far
back as possible.
XFrom the vehicle interior, insert hooks :into
upper retainers ;and turn back by 90°.
Upper tensioning hook =stretches the cargo
net automatically.
Stowage areas211
Stowage and features
Z
Page 214 of 290

XAttach hooks?to lower retainers A.
XAfter driving a short distance, check the ten-
sion of the cargo net.
XTo loosen and detach: turn back hooks:
by 90° and detach from upper retainer ;.
XDetach hooks?from lower retainers A.
XTo stow:fold the cargo net, roll it up and stow
it in the bag supplied.
Features
Cup holder
Important safety notes
GWARNING
If you transport objects in the vehicle interior
and these are not adequately secured, they
could slip or be flung around and thereby
strike vehicle occupants. In addition, cup
holders, open stowage spaces and mobile
phone brackets may not always be able to
hold the objects placed in them in the event of
an accident. There is a risk of injury, particu-
larly in the event of sharp braking or sudden
changes of direction.
RAlways stow objects in such a way that they cannot be tossed about in these or similar
situations.
RAlways make sure that objects do not pro-
trude out of the stowage spaces, luggage
nets or stowage nets.
REnsure that closable stowage spaces are
shut before beginning your journey.
RAlways stow and secure heavy, hard, poin-
ted, sharp-edged, fragile or large objects in
the cargo compartment.
Observe the loading guidelines (
Ypage 209).
!Only use the cup holders for containers of
the right size and which have lids. The drinks
could otherwise spill.
Cup holder in the center console
XTo open: slide cover :forwards until it
engages.
The divider in the cup holder can be removed,
e.g. for inserting smaller drinks cans.
XTo remove: pull the divider up and remove it.
XTo replace: re-insert the divider and push it
down until it engages.
You can remove the rubber mat of cup holder ;
to clean it. Clean with clear, lukewarm water
only.
Sun visors
Important safety notes
GWARNING
If the mirror cover of the vanity mirror is folded
up when the vehicle is in motion, you could be
blinded by incident light. There is a risk of an
accident.
Always keep the mirror cover folded down
while driving.
212Features
Stowag ean d features
Page 217 of 290

Socket in the cargo compartment
XLift up the cover of socket:.
mbrace
General notes
The mbrace system is only available in the USA.
You must have a license agreement to activate
the mbrace service. Make sure that your system
is activated and operational. To log in, press the
ï MB Info call button. If any of the steps
mentioned are not carried out, the system may
not be activated.
If you have questions about the activation, con-
tact one of the following telephone hotlines:
Mercedes-Benz Customer Assistance Center at
1-800-FOR-MERCedes (1-800-367-6372) or
1-866-990-9007
Shortly after successfully registering with the
mbrace service, a user ID and password will be
sent to you by mail. You can use this password
to log onto the mbrace area under "Owners
Online" at http://www.mbusa.com.
The system is available if:
Rit has been activated and is operational
Rthe corresponding mobile phone network is
available for transmitting data to the Cus-
tomer Center
Ra service subscription is available
Determining the location of the vehicle on a map
is only possible if:
RGPS reception is available.
Rthe vehicle position can be forwarded to the
Customer Assistance Center.
The mbrace system
To adjust the volume during a call, proceed as
follows:
XPress the WorX button on the multi-
function steering wheel.
or
XUse the volume control on the multimedia
system.
The system offers various services, e.g.:
RAutomatic and manual emergency call
RRoadside Assistance call
RMB Info call
You can find information and a description of all
available features under "Owners Online" at
http://www.mbusa.com.
System self-test
After you have switched on the ignition, the sys- tem carries out a self-diagnosis.
A malfunction in the system has been detected
if one of the following occurs:
RThe indicator lamp in the SOS button does notcome on during the system self-test.
RThe indicator lamp in the FRoadside
Assistance button does not light up during
self-diagnosis of the system.
RThe indicator lamp in the ïMB Info call
button does not light up during self-diagnosis
of the system.
RThe indicator lamp in one or more of the fol-
lowing buttons continues to light up red after
the system self-diagnosis:
-SOS button
-F Roadside Assistance call button
-ïMB Info call button
RTheInoperativeor the Service NotActivatedmessage appears in the multi-
function display after the system self-diagno-
sis.
If a malfunction is indicated as outlined above,
the system may not operate as expected. In the
event of an emergency, help will have to be
summoned by other means.
Have the system checked at the nearest author-
ized Mercedes-Benz Center or contact the fol-
lowing service hotlines:
Features215
Stowage and features
Z
Page 255 of 290

correct fuse rating for the system concerned.
Otherwise, components or systems could be
damaged.
!Make sure that no moisture can enter the
fuse box when the cover is open.
!When closing the cover, make sure that it is
lying correctly on the fuse box. Moisture seep-
ing in or dirt could otherwise impair the oper-
ation of the fuses.
The fuses in your vehicle serve to close down
faulty circuits. If a fuse blows, all the compo-
nents on the circuit and their functions stop
operating.
Before changing a fuse
XSwitch off the engine.
XSwitch off all electrical consumers.
XOpen the driver's door.
The on-board electronics now have status 0.
This is the same as the SmartKey having been
removed.
or, if the SmartKey is inserted in the ignition
lock:
XRemove the SmartKey from the ignition lock.
XSecure the vehicle against rolling away
(Ypage 119).
All indicator lamps in the instrument cluster
must be off.
Fuse box in the front-passenger foot-
well
!
The floor panel must be installed properly,
otherwise moisture or dirt could impair the
function of the fuses.
XOpen the front-passenger door.
XTo open: remove the carpet over the footrest.
XLoosen screws :on the floor panel using a
suitable tool.
XRemove the floor panel.
XTo close: install the floor panel again.
XScrew in and tighten screws :.
XPut in the carpet and press to secure.
Fuse box in the cargo compartment
XOpen the tailgate.
XTo open:turn fastener ;on the service flap
to the left.
XOpen service flap :.
iThe fuse allocation chart is located in a
recess at the side of the fuse box. You can find
the corresponding fuse rating and fuse type
on the fuse allocation chart.
Fuses253
Breakdown assistance
Z