2016 MERCEDES-BENZ AMG GT S ESP
[x] Cancel search: ESPPage 200 of 226
De-authorizing (deregistering)aBlue-
toot h®audi odevice
XTo selec t aBluetoot h®audio devic efrom
th eBluetoot h®devicelist :turn th econtrol-
ler .
XTo selec tth esymbol to th eright of th e
Bluetoot h®audio device: slid e9 and
press th econtroller .
XTo selectDeauthorize:press th econtrol-
ler .
A prompt appears askin gwhether you
really wish to deauthoriz ethis device.
XTo selec tYesor No:turn and press th econ-
troller.
If you selec tYes
,th edevic eis delete dfrom
th eBluetoot h®devicelist .
If you selec tNo
th eprocess is canceled.
iBefore re-authorizin gth eBluetoot h®
audio device, you should also delete th e
devic enam eMB Bluetooth
from your
Bluetoot h®audio device's Bluetoot h®list
(se eth eBluetoot h®audio device's operat -
in g instructions).
Switchin gto Bluetoot h®audiomode
Basic display
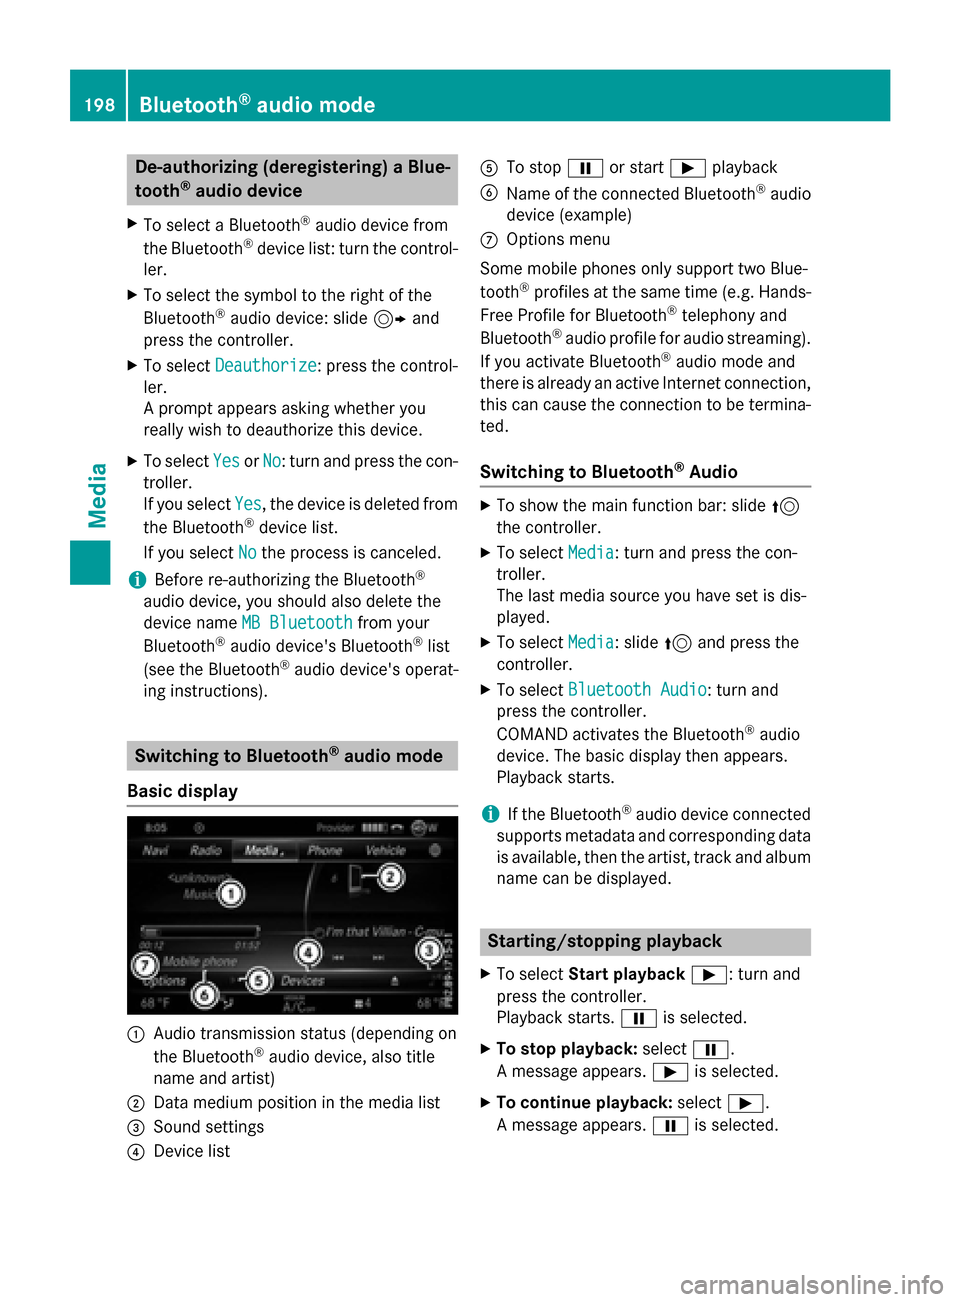
:Audio transmissio nstatus (dependin gon
th eBluetoot h®audio device, also titl e
nam eand artist )
;Data medium position in th emedia list
=Sound setting s
?Devicelist
ATo stop Ëor start Ìplayback
BNameof th econnecte dBluetoot h®audio
devic e(example)
COption smen u
Some mobile phone sonly suppor ttw oBlue-
toot h
®profiles at th esam etime (e.g. Hands-
Free Profile fo rBluetoot h®telephon yand
Bluetoot h®audio profil efo raudio streaming).
If you activat eBluetoot h®audio mode and
there is already an active Internet connection ,
this can caus eth econnection to be termina-
ted.
Switchin gto Bluetoot h®Audio
XTo showthemain function bar :slid e5
th econtroller .
XTo selectMedia:turn and press th econ-
troller.
The last media source you hav eset is dis -
played .
XTo selec tMedia:slid e5 and press th e
controller .
XTo selectBluetooth Audio:turn and
press th econtroller .
COMAN Dactivates th eBluetoot h
®audio
device. The basi cdisplay then appears .
Playback starts.
iIf th eBluetoot h®audio devic econnecte d
supports metadat aand correspondin gdat a
is available ,then th eartist ,track and album
nam ecan be displayed .
Starting/stopping playback
XTo selectStar tplayback Ì:turn and
press th econtroller .
Playback starts. Ëis selected.
XTo stop playback: selectË.
A message appears .Ì is selected.
XTo continu eplayback: selectÌ.
A message appears .Ë is selected.
198Bluetooth®audio mode
Media
Page 201 of 226

Starting playback if the Bluetooth®
audio device has been stopped
During the search for mobile phones
(
Ypage 115), the connection with the Blue-
tooth®audio device is terminated. In the
Bluetooth®audio basic display (Ypage 198)
you will see the No Bluetooth Audio
Device Connectedmessage and the Con‐
nectLastUsedPlayermenu item cannot
be selected.
When the search is finished, the Bluetooth
®
audio device can be reconnected.
XTo select Start playback: Ì: slide6
and press the controller.
Playback resumes from the beginning.
XTo select Connect Last Used Player:
press the controller.
Depending on the Bluetooth
®audio device
used, playback starts immediately or you
must start playback manually.
In this case, you will see the Bluetooth
Audio Device Pausedmessage.
iIf there is an Internet connection and the
mobile phone that is connected only sup-
ports two Bluetooth
®profiles at the same
time, the Internet connection is interrup-
ted.
iThe connection to the Bluetooth®audio
device can also be interrupted if:
Rthe connected mobile phone only sup-
ports 2 Bluetooth®profiles at the same
time.
Ryou connect to the Internet using
COMAND (
Ypage 153).
Selecting a track
The function is not supported by all Blue-
tooth®audio devices. Some mobile phones impair function with
regard to the following criteria:
Rthe number of tracks that can be selected
Rthe time period until the next or previous
track is played
XSwitch the multifunction steering wheel to
the media menu (see the vehicle Operator's
Manual).
XTo skip forwards or backwards to a
track: press the 9or: button on
the multifunction steering wheel.
XRapid scroll: press and hold the 9
or : button on the multifunction steer-
ing wheel until the desired track is reached.
If you press and hold the 9or:
buttons, the rapid scrolling speed increa-
ses after a short time.
iIn rapid scroll, track names are not
shown, but instead only Track1, Track2 etc.
The playback times for the tracks played
are not displayed. This is available as an
optional function starting with AVRCP Ver-
sion 1.3. There is also no music search
option available with Bluetooth
®Audio.
Selecting playback options
If the Bluetooth®audio device supports the
corresponding function, the following options
are available:
RNormal Track Sequence: the tracks are
played in the normal order (e.g. track 1, 2, 3
etc.).
Audio data playback is determined by the
order in which the tracks are written to the
data medium. Alphabetical order is the
most common. Once all the tracks in a
folder have been played, the tracks in the
next folder are played.
RRandomTrackList: the current track list
is played in random order (e.g. 3, 8, 5 etc.).
RRandom Medium: all tracks on the data
medium are played in random order (e.g.
track 3, 8, 5 etc.).
Bluetooth®audio mode199
Media
Z
Page 202 of 226
Playback options are optional functions
and are not, or only partially, supported by
Bluetooth
®audio devices.
Selecting playback options
XTo select Options: turn and press the con-
troller.
XSelect Playback Mode.
A # dot indicates the current setting.
XSelect the desired option.
If you select Random
TrackList, you will
see a corresponding message in the display
or selection window.
Increasing the volume using COMAND
XTo select Options: slide6and press the
controller.
XTo select Volume: turn and press the con-
troller.
A menu appears. The #dot indicates the
current setting.
XSelect StandardorBoost.
Information on sound settings
(
Ypage 210).
Operation with the Media Interface
General notes
Media Interface is a universal interface for the
connection of mobile audio and video devi-
ces. Media Interface in COMAND has two
USB connections.
Two USB connection sockets and an SD card slot are located in the stowage compartment
under the armrest.
Media Interface basic display
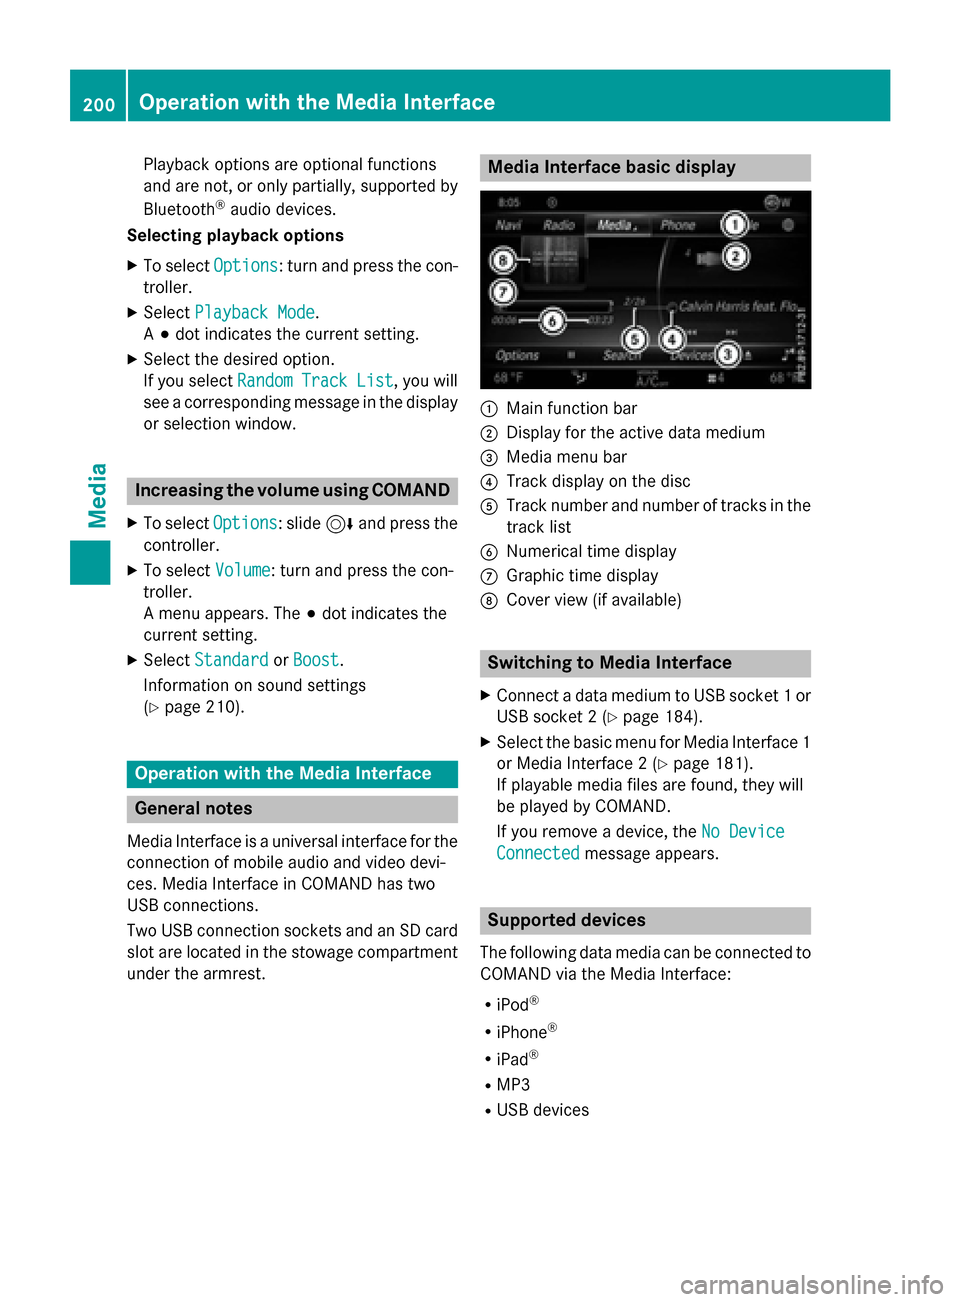
:Main function bar
;Display for the active data medium
=Media menu bar
?Track display on the disc
ATrack number and number of tracks in thetrack list
BNumerical time display
CGraphic time display
DCover view (if available)
Switching to Media Interface
XConnect a data medium to USB socket 1 or
USB socket 2 (
Ypage 184).
XSelect the basic menu for Media Interface 1
or Media Interface 2 (
Ypage 181).
If playable media files are found, they will
be played by COMAND.
If you remove a device, the No Device
Connectedmessage appears.
Supported devices
The following data media can be connected to
COMAND via the Media Interface:
RiPod®
RiPhone®
RiPad®
RMP3
RUSB devices
200Operation with the Media Interface
Media
Page 212 of 226
Your COMANDequipment
i
These operatin ginstruction sdescribe all
th estandar dan doptional equipmen tof
your COMAN Dsystem, as available at th e
time of going to print .Country-specifi cdif -
ference sare possible. Bear in min dthat
your vehicle may no tfeature all function s
described here. Thi salso applies to safety-
relevant systems an dfunctions.
iRead th einformation on qualified special-
ist workshop sin th evehicle Operator's
Manual.
Sound settings
Calling up th esound menu
You can mak evarious soun dsetting sfo rth e
differen taudio an dvideo sources. It is possi-
ble to set more bass fo rradio mode than fo r
CD audio mode, fo rexample. The respective
soun dmen ucan be called up from th emen u
of th edesire dmode.
XSwitch to radio mode (Ypage 168).
or
XSwitch to media mode (Ypage 180).
XTo switch to themen ubar :slid e6 the
controller .
XTo selectà: turn an dpress th econtrol-
ler .
The men uappears wit hth elast setting
accessed, e.g. Equalizer
.
Sound men uoverview
FunctionOptions
EqualizerSets treble ,mid -
range an dbass
BalanceAdjust sth evolume :
left/right
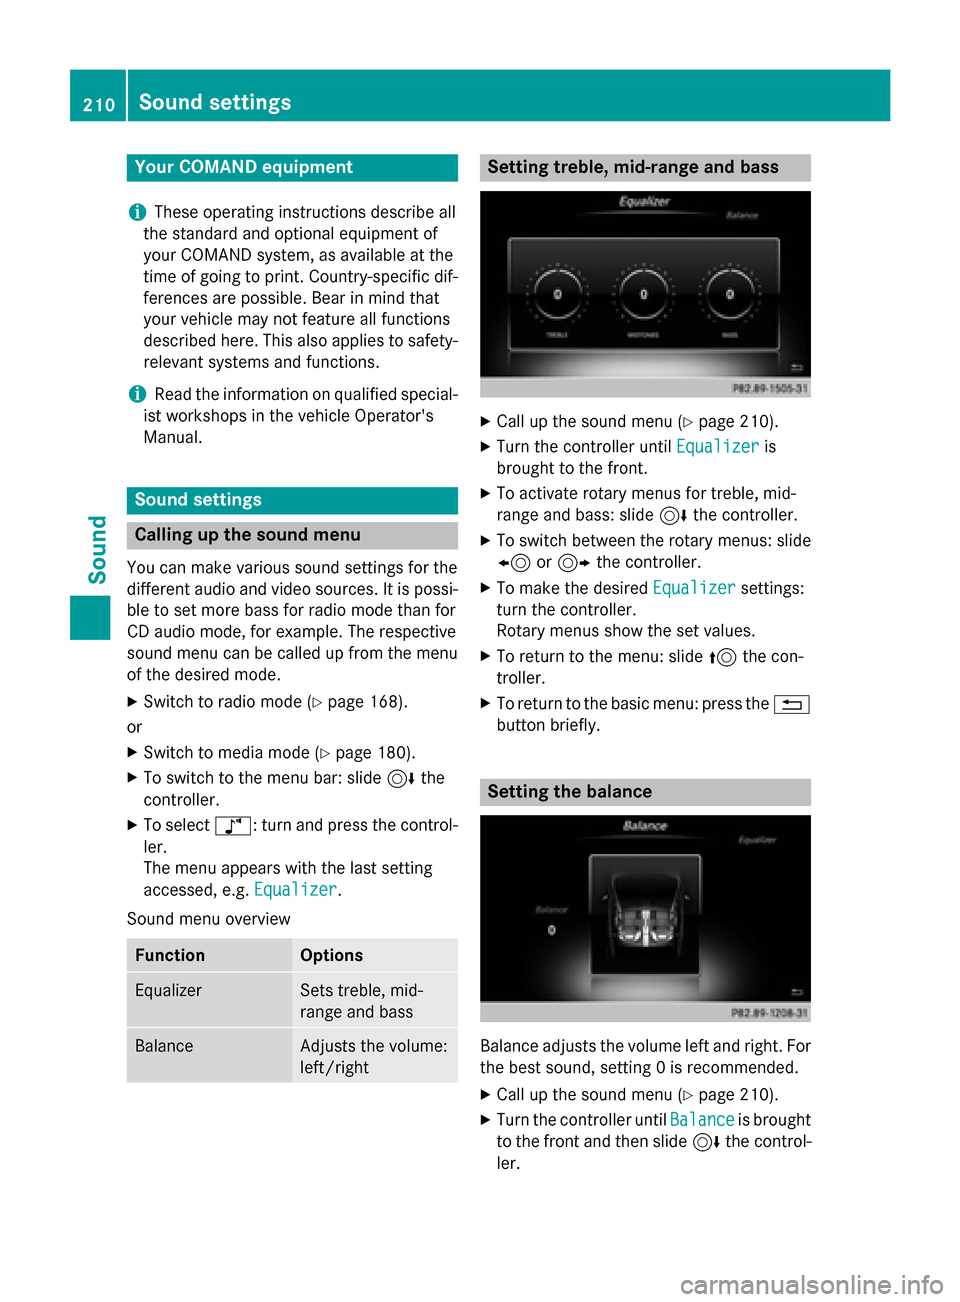
Setting treble, mid-range an dbass
XCall up th esoun dmen u (Ypage 210).
XTurnth econtroller until Equalizeris
brought to th efront.
XTo activat erotary menus fo rtreble ,mid -
range an dbass :slid e6 thecontroller .
XTo switch between th erotary menus: slid e
8 or9 thecontroller .
XTo maketh edesire dEqualize rsettings:
turn th econtroller .
Rotary menus sho wtheset values.
XTo return to th emenu: slid e5 thecon-
troller.
XTo return to th ebasi cmenu: press th e%
butto nbriefly.
Setting th ebalance
Balance adjust sth evolume lef tan dright .Fo r
th ebes tsound, setting 0is recommended.
XCall up th esoun dmen u (Ypage 210).
XTurnth econtroller until Balanceis brought
to th efron tan dthen slid e6 thecontrol-
ler .
210Sound settings
Sound
Page 213 of 226
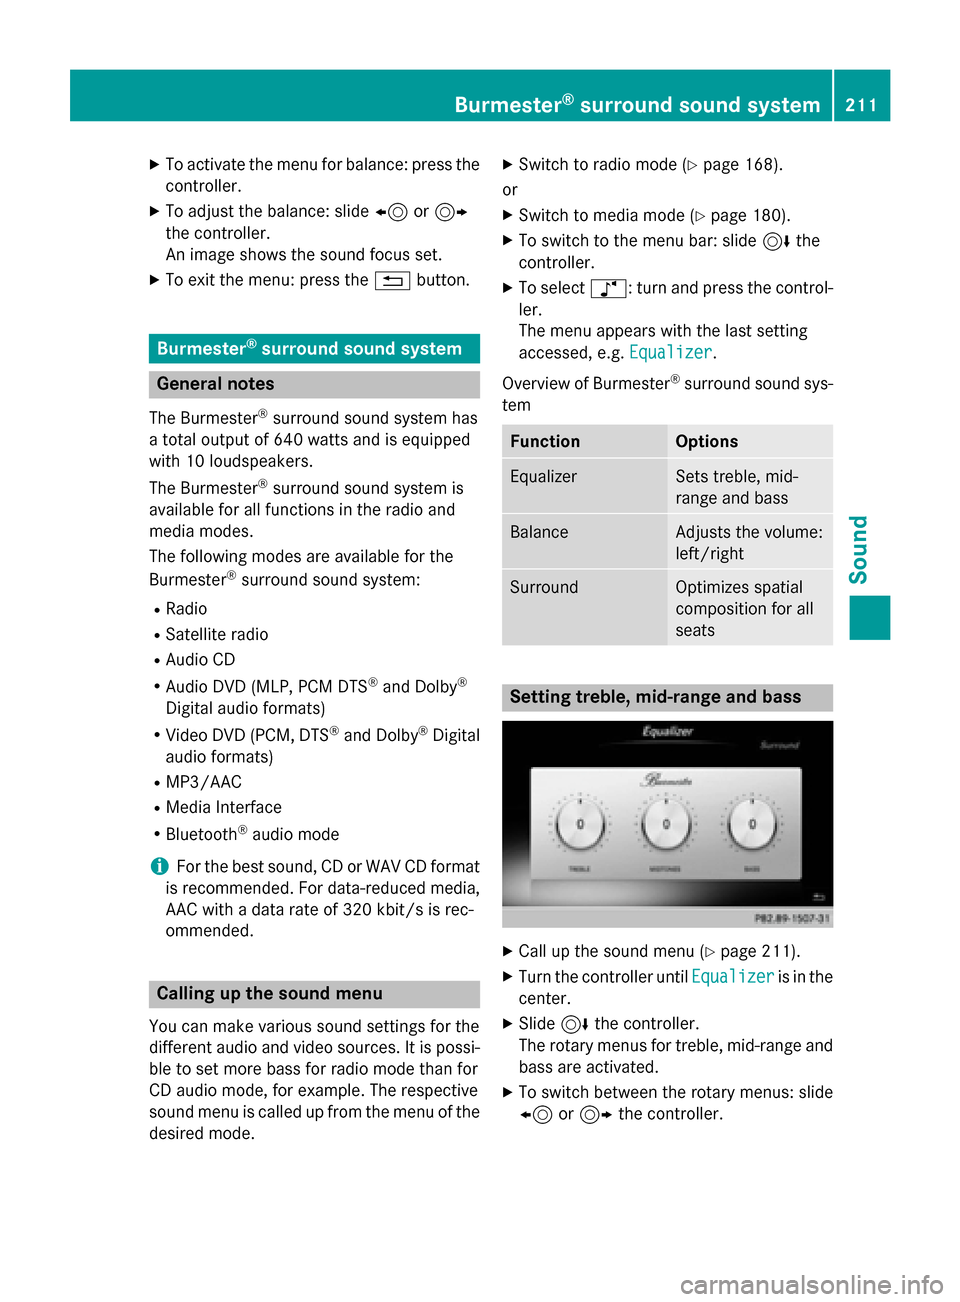
XTo activate the menu for balance: press thecontroller.
XTo adjust the balance: slide 8or9
the controller.
An image shows the sound focus set.
XTo exit the menu: press the %button.
Burmester®surround sound system
General notes
The Burmester®surround sound system has
a total output of 640 watts and is equipped
with 10 loudspeakers.
The Burmester
®surround sound system is
available for all functions in the radio and
media modes.
The following modes are available for the
Burmester
®surround sound system:
RRadio
RSatellite radio
RAudio CD
RAudio DVD (MLP, PCM DTS®and Dolby®
Digital audio formats)
RVideo DVD (PCM, DTS®and Dolby®Digital
audio formats)
RMP3/AAC
RMedia Interface
RBluetooth®audio mode
iFor the best sound, CD or WAV CD format
is recommended. For data-reduced media,
AAC with a data rate of 320 kbit/s is rec-
ommended.
Calling up the sound menu
You can make various sound settings for the
different audio and video sources. It is possi-
ble to set more bass for radio mode than for
CD audio mode, for example. The respective
sound menu is called up from the menu of the
desired mode.
XSwitch to radio mode (Ypage 168).
or
XSwitch to media mode (Ypage 180).
XTo switch to the menu bar: slide 6the
controller.
XTo select à: turn and press the control-
ler.
The menu appears with the last setting
accessed, e.g. Equalizer
.
Overview of Burmester
®surround sound sys-
tem
FunctionOptions
EqualizerSets treble, mid-
range and bass
BalanceAdjusts the volume:
left/right
SurroundOptimizes spatial
composition for all
seats
Setting treble, mid-range and bass
XCall up the sound menu (Ypage 211).
XTurn the controller until Equalizeris in the
center.
XSlide 6the controller.
The rotary menus for treble, mid-range and
bass are activated.
XTo switch between the rotary menus: slide
8 or9 the controller.
Burmester®surround sound system211
Sound
Page 215 of 226
Calling up the sound menu
You can select various sound settings while in
radio mode or another media mode. It is pos-
sible to set more bass for radio mode than for
audio CD mode, for example. The respective
sound menu can be called up from the menu
bar of the desired mode.
XSwitch to radio mode (Ypage 168).
or
XSwitch to media mode (Ypage 180).
XTo switch to the menu bar: slide 6the
controller.
XTo select à: turn and press the control-
ler.
The menu appears with the last setting
accessed, e.g. Sound Profile
.
Overview of Burmester
®high-end surround
sound system
FunctionOptions
EqualizerSets treble, mid-
range and bass
BalanceAdjusts the volume:
left/right
VIP & BAL selectionOptimizes sound
playback for individ-
ual seats
Sound profileFour defined sound
settings: PURE/
EASY LISTENING/
LIVE/SURROUND
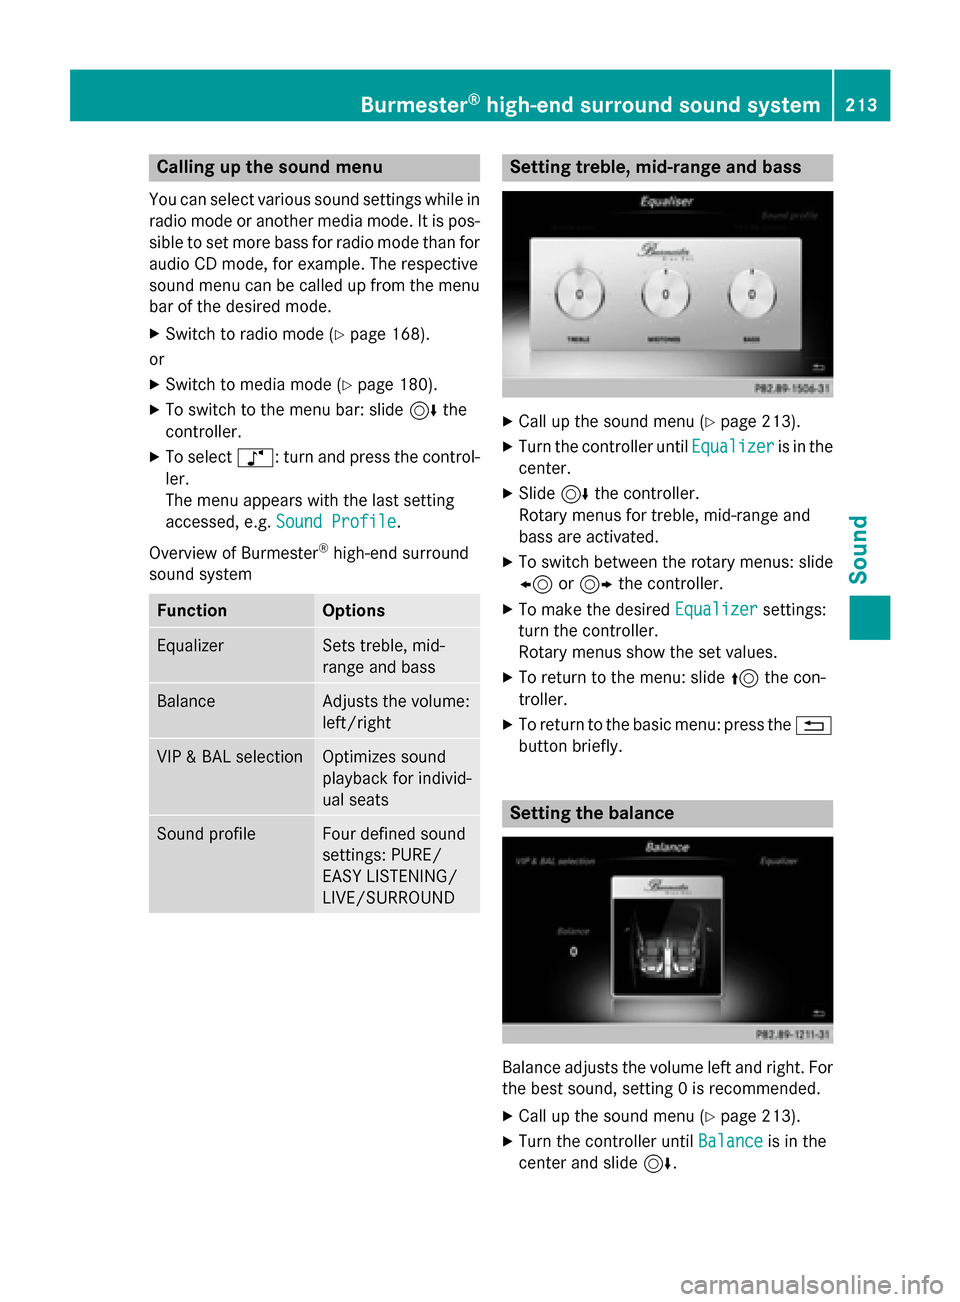
Setting treble, mid-range and bass
XCall up the sound menu (Ypage 213).
XTurn the controller until Equalizeris in the
center.
XSlide 6the controller.
Rotary menus for treble, mid-range and
bass are activated.
XTo switch between the rotary menus: slide
8 or9 the controller.
XTo make the desired Equalizersettings:
turn the controller.
Rotary menus show the set values.
XTo return to the menu: slide 5the con-
troller.
XTo return to the basic menu: press the %
button briefly.
Setting the balance
Balance adjusts the volume left and right. For
the best sound, setting 0 is recommended.
XCall up the sound menu (Ypage 213).
XTurn the controller until Balanceis in the
center and slide 6.
Burmester®high-end surround sound system213
Sound
Page 216 of 226
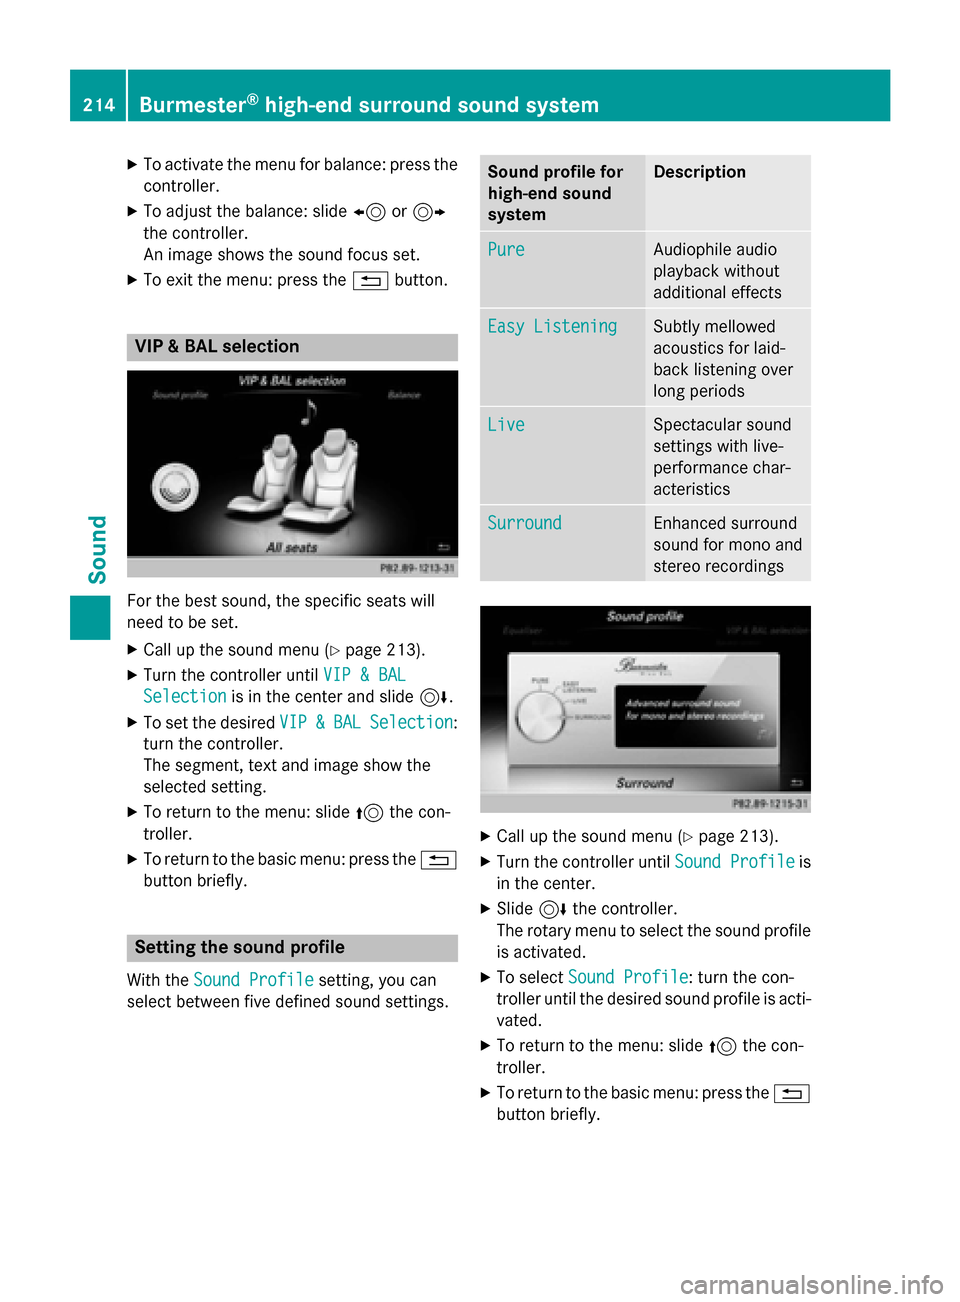
XTo activate the menu for balance: press thecontroller.
XTo adjust the balance: slide 8or9
the controller.
An image shows the sound focus set.
XTo exit the menu: press the %button.
VIP & BAL selection
For the best sound, the specific seats will
need to be set.
XCall up the sound menu (Ypage 213).
XTurn the controller until VIP & BAL
Selectionis in the center and slide 6.
XTo set the desiredVIP&BALSelection:
turn the controller.
The segment, text and image show the
selected setting.
XTo return to the menu: slide 5the con-
troller.
XTo return to the basic menu: press the %
button briefly.
Setting the sound profile
With the Sound Profilesetting, you can
select between five defined sound settings.
Sound profile for
high-end sound
systemDescription
PureAudiophile audio
playback without
additional effects
Easy ListeningSubtly mellowed
acoustics for laid-
back listening over
long periods
LiveSpectacular sound
settings with live-
performance char-
acteristics
SurroundEnhanced surround
sound for mono and
stereo recordings
XCall up the sound menu (Ypage 213).
XTurn the controller until Sound Profileis
in the center.
XSlide 6the controller.
The rotary menu to select the sound profile is activated.
XTo select Sound Profile: turn the con-
troller until the desired sound profile is acti-
vated.
XTo return to the menu: slide 5the con-
troller.
XTo return to the basic menu: press the %
button briefly.
214Burmester®high-end surround sound system
Sound
Page 221 of 226
XTo select state/province or city: enter the
first few letters by turning and pressing the
controller.
XTo switch to the list without the character
bar: slide5or select ok
.
XTo delete an entry: select 2in the char-
acter bar and press the controller.
Pressing briefly deletes the last letter
entered.
Pressing and holding longer deletes the
entire entry.
XTo select the state/province or city from
the list: turn and press the controller.
After selecting a state (or province) the list
of locations appears.
After selecting a location, the information
chart displays the weather forecast for the
selected location. The data is supplied by
the nearest weather station.
Option 2: selecting the area in the
weather map
XCall up the weather map (Ypage 219).
XMove the weather map so that the cross-
hair is over the desired area (
Ypage 219).
XPress the controller.
The information chart shows the weather
forecast for the selected area. The data is
supplied by the nearest weather station.
Memory functions
Storing the area in the weather memory
You can save locations that are called up fre-
quently in ten preset positions (0, 1-9) in the
weather memory.
XIn the weather memory: select the area
for the weather forecast (
Ypage 217).
The selected location appears at the top in
the status bar.
XTo select Positionin the information
chart: turn and press the controller.
XSelect Presets.
XSelect a preset using the controller.
XPress and hold the controller until you hear
a tone.
The area is entered on the selected preset.
Selecting an area from the weather
memory
XDirectly from the weather memory:
select Position
from the information
chart: turn and press the controller.
XSelect Presets.
XSelect the memory position which contains
the location you require.
The weather data for the selected area is
displayed.
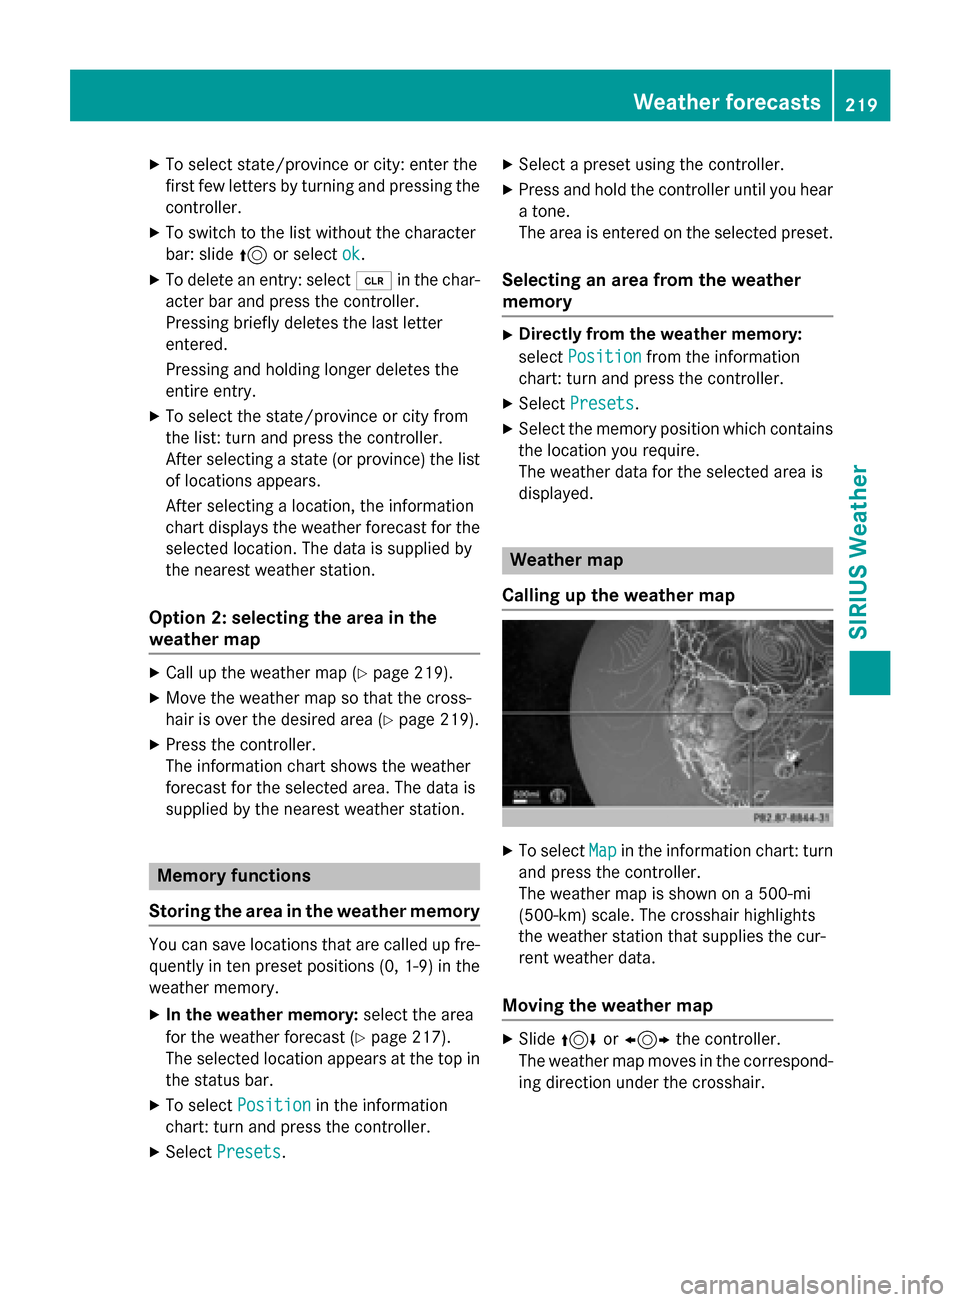
Weather map
Calling up the weather map
XTo select Mapin the information chart: turn
and press the controller.
The weather map is shown on a 500-mi
(500-km) scale. The crosshair highlights
the weather station that supplies the cur-
rent weather data.
Moving the weather map
XSlide 4 or1 the controller.
The weather map moves in the correspond-
ing direction under the crosshair.
Weather forecasts219
SIRIUS Weather