Page 181 of 526

4–77
When Driving
i-ACTIVSENSE
In the following cases, it may be difficult to view the illumination/flashing of the Blind
Spot Monitoring (BSM) warning lights equipped on the door mirrors.
Snow or ice is adhering to the door mirrors. The door glass is fogged or covered in snow, frost or dirt.
The system switches to the Rear Cross Traffic Alert function when the shift lever (manual
transmission) or the selector lever (automatic transmission) is shift\
ed to the reverse (R)
position.
Refer to Rear Cross Traffic Alert (RCTA) on page 4-81.
Blind Spot Monitoring (BSM) Warning Lights/Blind Spot Monitoring (BSM)
Warning Beep
The Blind Spot Monitoring (BSM) or Rear Cross Traffic Alert (RCTA) system notifies the
driver of the presence of vehicles in adjacent lanes to the rear of your\
vehicle using the
Blind Spot Monitoring (BSM) warning lights and the warning beep while the systems are
operational.
Blind Spot Monitoring (BSM) warning lights
The Blind Spot Monitoring (BSM) warning lights are equipped on the left and right door
mirrors. The warning lights turn on when a vehicle approaching from the rear in a\
n adjacent
lane is detected.
When the ignition is switched ON, the malfunction warning light turns on momentarily and
then turns off after a few seconds.
Forward driving (Blind Spot Monitoring (BSM) system operation)
The Blind Spot Monitoring (BSM) system detects vehicles approaching from the rear and
turns on the Blind Spot Monitoring (BSM) warning lights equipped on the door mirrors
according to the conditions. Additionally, while a Blind Spot Monitoring (BSM) warning
light is illuminated, if the turn signal lever is operated to signal a t\
urn in the direction
in which the Blind Spot Monitoring (BSM) warning light is illuminated, the Blind Spot
Monitoring (BSM) warning light flashes.
MX-5_8EU4-EA-15D_Edition1.indb 772015/03/10 9:55:17
Page 213 of 526
5–13
Interior Features
Audio System
*Some models.
Antenna
AM/FM Radio Antenna
The AM/FM radio antenna receives both
AM and FM signals.
To remove the antenna, turn it
counterclockwise.
To install the antenna, turn it clockwise.
Make sure the antenna is securely
installed.
Install
Remove
CAUTION
To prevent damage to the antenna,
remove it before passing beneath a
low overhead clearance.
NOTE
When leaving your vehicle unattended, we
recommend that you remove the antenna
and store it inside the vehicle.
Satellite Radio Antenna*
The satellite radio antenna receives
SiriusXM signals.
Satellite radio antenna
MX-5_8EU4-EA-15D_Edition1.indb 132015/03/10 9:55:24
Page 216 of 526

5–16
Interior Features
Audio System
Weak signal noise
In suburban areas, broadcast signals
become weak because of distance from the
transmitter. Reception in such fringe areas
is characterized by sound breakup.
Strong signal noise
This occurs very close to a transmitter
tower. The broadcast signals are extremely
strong, so the result is noise and sound
breakup at the radio receiver.
Station drift noise
When a vehicle reaches the area of two
strong stations broadcasting at similar
frequencies, the original station may be
temporarily lost and the second station
picked up. At this time there will be some
noise from this disturbance.
Station 2
88.3 MHzStation 1
88.1 MHz
Operating Tips for CD Player
Condensation phenomenon
Immediately after turning on the heater
when the vehicle is cold, the CD or
optical components (prism and lens) in
the CD player may become clouded with
condensation. At this time, the CD will
eject immediately when placed in the unit.
A clouded CD can be corrected simply by
wiping it with a soft cloth. Clouded optical
components will clear naturally in about
an hour. Wait for normal operation to
return before attempting to use the unit.
Handling the CD player
The following precautions should be
observed.
Do not use deformed or cracked CDs.
The disc may not eject resulting in a
malfunction.
Do not use non-conventional discs such
as heart-shaped, octagonal discs, etc.
The disc may not eject resulting in a
malfunction.
MX-5_8EU4-EA-15D_Edition1.indb 162015/03/10 9:55:25
Page 228 of 526

5–28
Interior Features
Audio System
Operating the Radio
Band selector button Channel preset buttons
Scan button Auto memory button
Tuning button
Audio display
Radio ON
Press a band selector button () to
turn the radio on.
Band selection
Successively pressing the band selector
button () switches the bands as
follows: FM1→FM2→AM.
The selected mode will be indicated.
NOTE
If the FM broadcast signal becomes weak,
reception automatically changes from
STEREO to MONO for reduced noise.
Tuning
The radio has the following tuning
methods: Manual, Seek, Scan, Preset
channel, and Auto memory tuning. The
easiest way to tune stations is to set them
on preset channels.
Manual tuning
Select the station by pressing the tuning
button (, ) lightly.
Seek tuning
Automatic search for radio stations starts
when the tuning button (, ) is pressed
until a beep sound is heard. The search
stops when a station is found.
NOTE
If you continue to press and hold the
button, the frequency will continue
changing without stopping.
Scan tuning
Press and hold the scan button () to
automatically sample strong stations.
Scanning stops at each station for about 5
seconds. To hold a station, press and hold
the scan button () again during this
interval.
Preset channel tuning
The 6 preset channels can be used to store
6 AM and 12 FM stations.
1. To set a channel first select AM, FM1,
or FM2. Tune to the desired station.
2. Press a channel preset button for
about 2 seconds until a beep is heard.
The preset channel number or station
frequency will be displayed. The
station is now held in the memory.
MX-5_8EU4-EA-15D_Edition1.indb 282015/03/10 9:55:29
Page 245 of 526

5–45
Interior Features
Audio System
Multicast channel selection (FM)
If multi-cast channels are available for an
broadcast currently being
received, the multi-cast channel list is
displayed. Select the desired radio station.
NOTE
If an analog broadcast is received once
and is received while HD1 is
selected, the audio unit switches to the
station automatically.
When the icon is illuminated, there
could be a noticeable difference in
sound quality and volume when a
change from digital to analog signals
occurs. If the sound quality and volume
become noticeably diminished or cut
off, select the icon to turn off
( icon is not illuminated). Once an analog broadcast is received
when HD1 is selected from the Favorite
channels, it is switched to
automatically. If the radio reception
conditions are poor, or HD is off,
switching to broadcasts is
not possible. When an HD specialty channel (HD2 to
HD8) is selected from the Favorite
channels, “Signal Lost” is displayed
and no audio is output until
is received. If the radio reception
conditions are poor, “Signal Lost”
continues to be displayed.
If the icon is not illuminated,
information such as song titles of the
station are received,
however, the audio output is analog.
iTunes Tagging (for Apple devices with
USB use only)
By tagging a song currently being aired,
the song can be easily purchased from the
iTunes Store. Up to 100 tags can be stored.
1. Select the icon. The tag is stored in
the audio unit.
2. Connect the device via USB. The
tag is sent to the connected device
automatically.
3. Synchronize the device with iTunes.
The tagged song can now be purchased
from the iTunes Store.
NOTE
Both AM and FM can be
used. Because iTunes Tagging only supports
purchasing from the iTunes Store, direct
downloading from the equipped vehicle
audio is not possible. If the available memory for the
connected device is insufficient, the tag
is not sent. If an error occurs while the tag is being
sent, reconnect the device.
MX-5_8EU4-EA-15D_Edition1.indb 452015/03/10 9:55:37
Page 383 of 526
6–45
Maintenance and Care
Owner Maintenance
Light Bulbs
Overhead light
Side turn signal lights
High-mount brake light
Trunk light
Front side-marker lights
Front turn signal lights
Headlights (lo w beam)
Parking lights
Headlights (High beam)
Daytime running lights
License plate lights
Brake lights
Taillights
Rear side-marker lights
Re verse lights
Rear turn signal lights
MX-5_8EU4-EA-15D_Edition1.indb 452015/03/10 9:56:13
Page 385 of 526

6–47
Maintenance and Care
Owner Maintenance
5. Disconnect the bulb from the socket.
6. Install the new bulb in the reverse order
of the removal procedure.
Front side-marker lights
1. Make sure the ignition is switched off,
and the headlight switch is off.
2. If you are changing the right bulb, start
the engine, turn the steering wheel
all the way to the right, and turn off
engine. If you are changing the left
bulb, turn the steering wheel to the left.
3. Pull the center of each plastic retainer
and remove the retainers, and then
partially peel back the mudguard.
Remova l
Installation
4. Turn the socket and bulb assembly
counterclockwise and remove it.
5. Disconnect the bulb from the socket.
6. Install the new bulb in the reverse order
of the removal procedure.
Front turn signal lights
1. Make sure the ignition is switched off,
and the headlight switch is off.
2. If you are changing the right bulb, start
the engine, turn the steering wheel
all the way to the right, and turn off
engine. If you are changing the left
bulb, turn the steering wheel to the left.
3. Pull the center of each plastic retainer
and remove the retainers, and then
partially peel back the mudguard.
Remova l
Installation
MX-5_8EU4-EA-15D_Edition1.indb 472015/03/10 9:56:14
Page 386 of 526

6–48
Maintenance and Care
Owner Maintenance
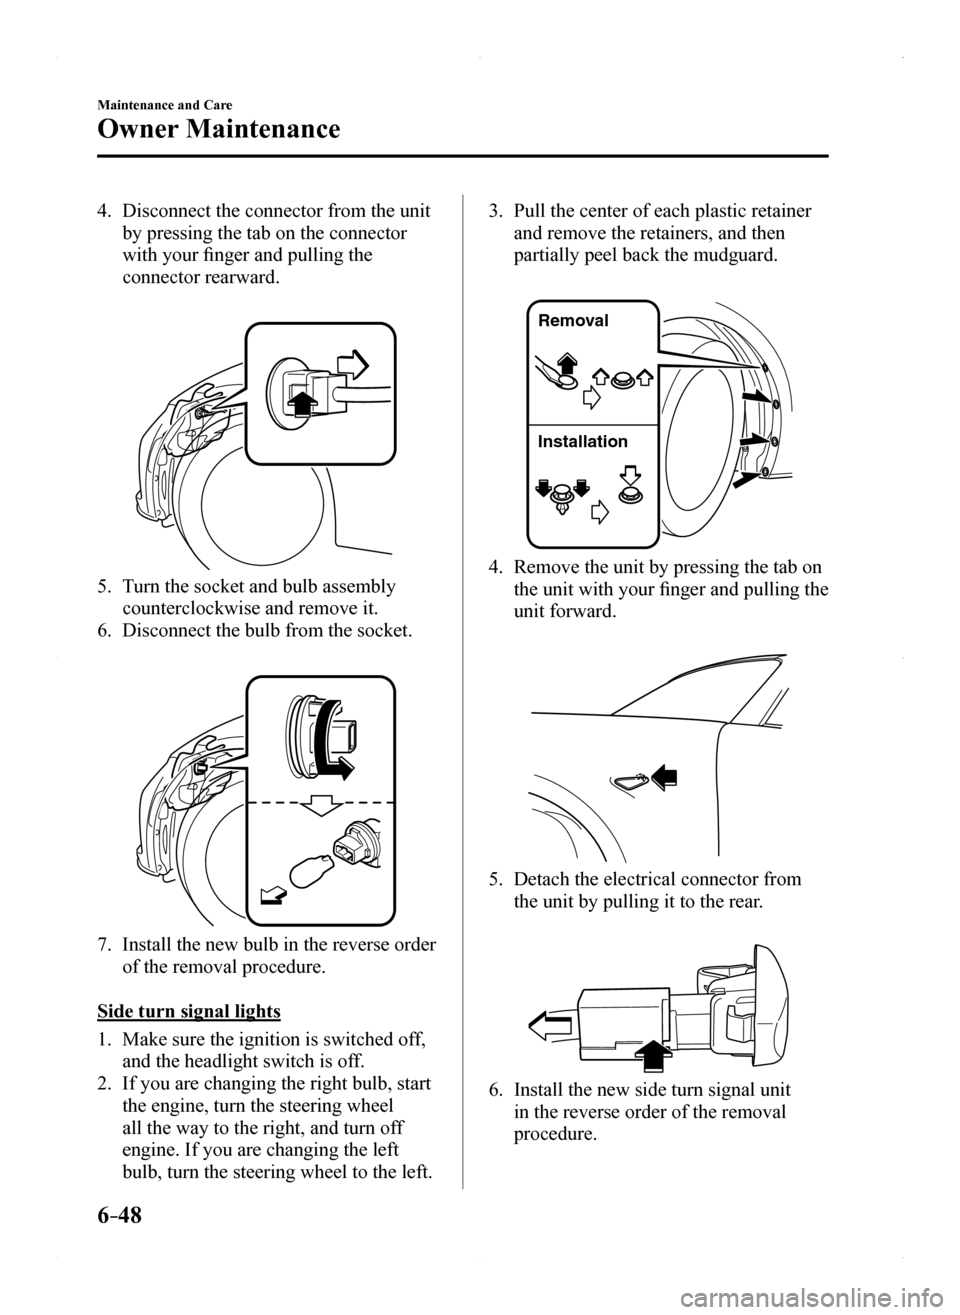
4. Disconnect the connector from the unit
by pressing the tab on the connector
with your finger and pulling the
connector rearward.
5. Turn the socket and bulb assembly
counterclockwise and remove it.
6. Disconnect the bulb from the socket.
7. Install the new bulb in the reverse order
of the removal procedure.
Side turn signal lights
1. Make sure the ignition is switched off,
and the headlight switch is off.
2. If you are changing the right bulb, start
the engine, turn the steering wheel
all the way to the right, and turn off
engine. If you are changing the left
bulb, turn the steering wheel to the left.
3. Pull the center of each plastic retainer
and remove the retainers, and then
partially peel back the mudguard.
Remova l
Installation
4. Remove the unit by pressing the tab on
the unit with your finger and pulling the
unit forward.
5. Detach the electrical connector from
the unit by pulling it to the rear.
6. Install the new side turn signal unit
in the reverse order of the removal
procedure.
MX-5_8EU4-EA-15D_Edition1.indb 482015/03/10 9:56:14