Page 9 of 46
7
Tires
TIRE PRESSURE MONITORING SYSTEM (TPMS)
For your safety, the CX-3 is equipped with TPMS that detects low tire
pressure in one or more tires. If the tire pressure starts getting low in
one or more tires, the system alerts the driver by turning on a light in the
instrument cluster (pp. 35-38) and sounding an alarm.
What to do? Don’t ignore the TPMS warning light. Stop and check your
tire pressure (when tires are cold) and inflate them to the proper pressure.
Properly inflated tires are safer, last longer, and increase fuel economy.
In the following cases, the TPMS must be “initialized” so the system can
operate normally.
• The tire pressure is adjusted (up or down) in one or more tires.
• A tire rotation is performed.
• Any tire or wheel is replaced.
• The vehicle’s battery is disconnected, replaced or completely dead.
Initialization Process
(TPMS Warning Light
is Illuminated)
1 Park the vehicle in a safe place and firmly apply the parking brake.
2 Let the tires cool, then adjust the tire pressure to the specified
pressure (See tire label located on the driver’s side door jam area) on
all four (4) tires.
3 Switch the ignition ON, but leave the vehicle parked.
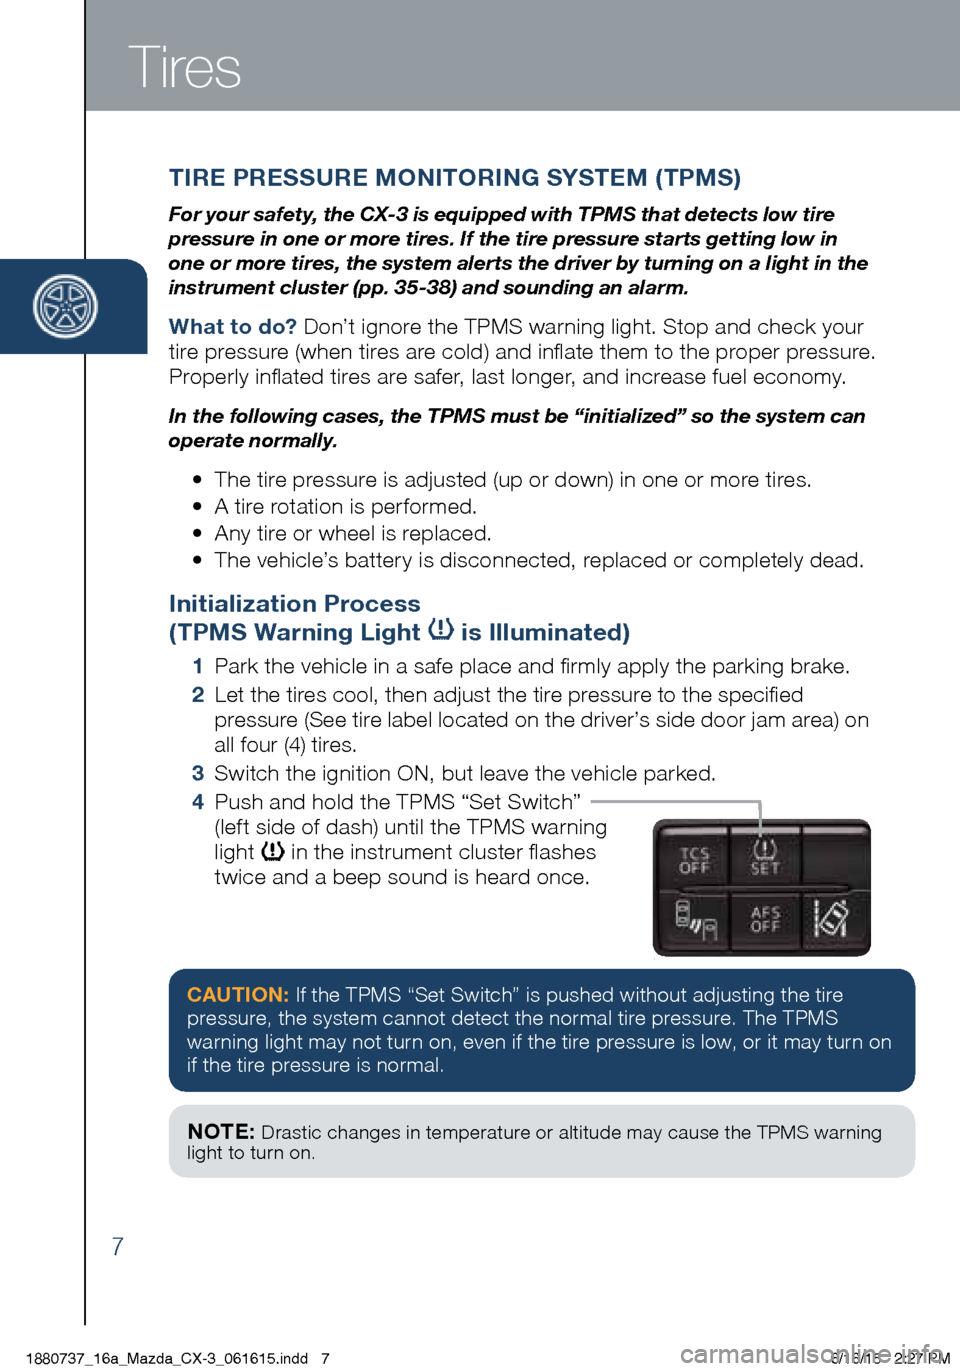
4 Push and hold the TPMS “Set Switch”
(left side of dash) until the TPMS warning
light
in the instrument cluster flashes
twice and a beep sound is heard once.
CAUTION: If the TPMS “Set Switch” is pushed without adjusting the tire
pressure, the system cannot detect the normal tire pressure. The TPMS
warning light may not turn on, even if the tire pressure is low, or it may turn on
if the tire pressure is normal.
NOTE: Drastic changes in temperature or altitude may cause the TPMS warning
light to turn on.
1880737_16a_Mazda_CX-3_061615.indd 76/16/15 2:27 PM
Page 10 of 46
8
Returning rear seats to upright position:
1 Install the headrest (if removed).
2 Raise seatbacks until they lock
into position.
3 Pull on the top of the seatbacks to
make sure they are locked.
4 Check that all seat belts are routed
properly for passenger use.
Seats and Headrests
F R O N T S E AT S
Headrests
For your safety, the front seats are equipped with active headrests that
are not adjustable forward or backward, only up and down. An active
headrest is designed to move forward in the event of a collision to close
the gap between your head and the headrest (to prevent whiplash).
REAR SEATS
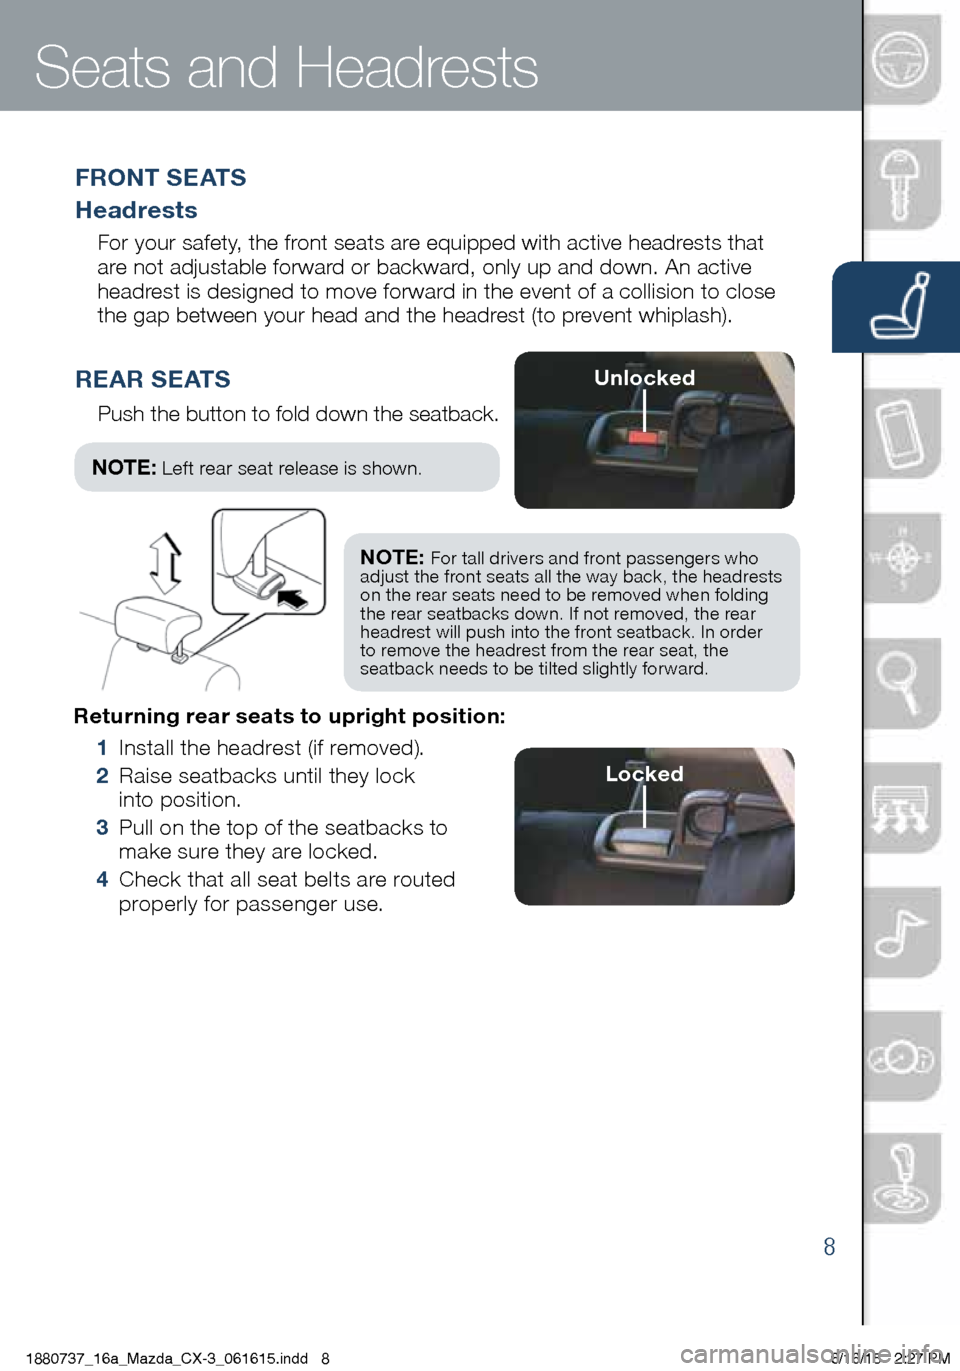
Push the button to fold down the seatback.
NOTE: For tall drivers and front passengers who
adjust the front seats all the way back, the headrests
on the rear seats need to be removed when folding
the rear seatbacks down. If not removed, the rear
headrest will push into the front seatback. In order
to remove the headrest from the rear seat, the
seatback needs to be tilted slightly forward.
NOTE: Left rear seat release is shown .
Unlocked
Locked
1880737_16a_Mazda_CX-3_061615.indd 86/16/15 2:27 PM
www.MazdaUSA.com
Page 11 of 46
9
Mazda Connect Infotainment System
Ta l k
MAZDA CONNECT INFOTAINMENT SYSTEM (if equipped)
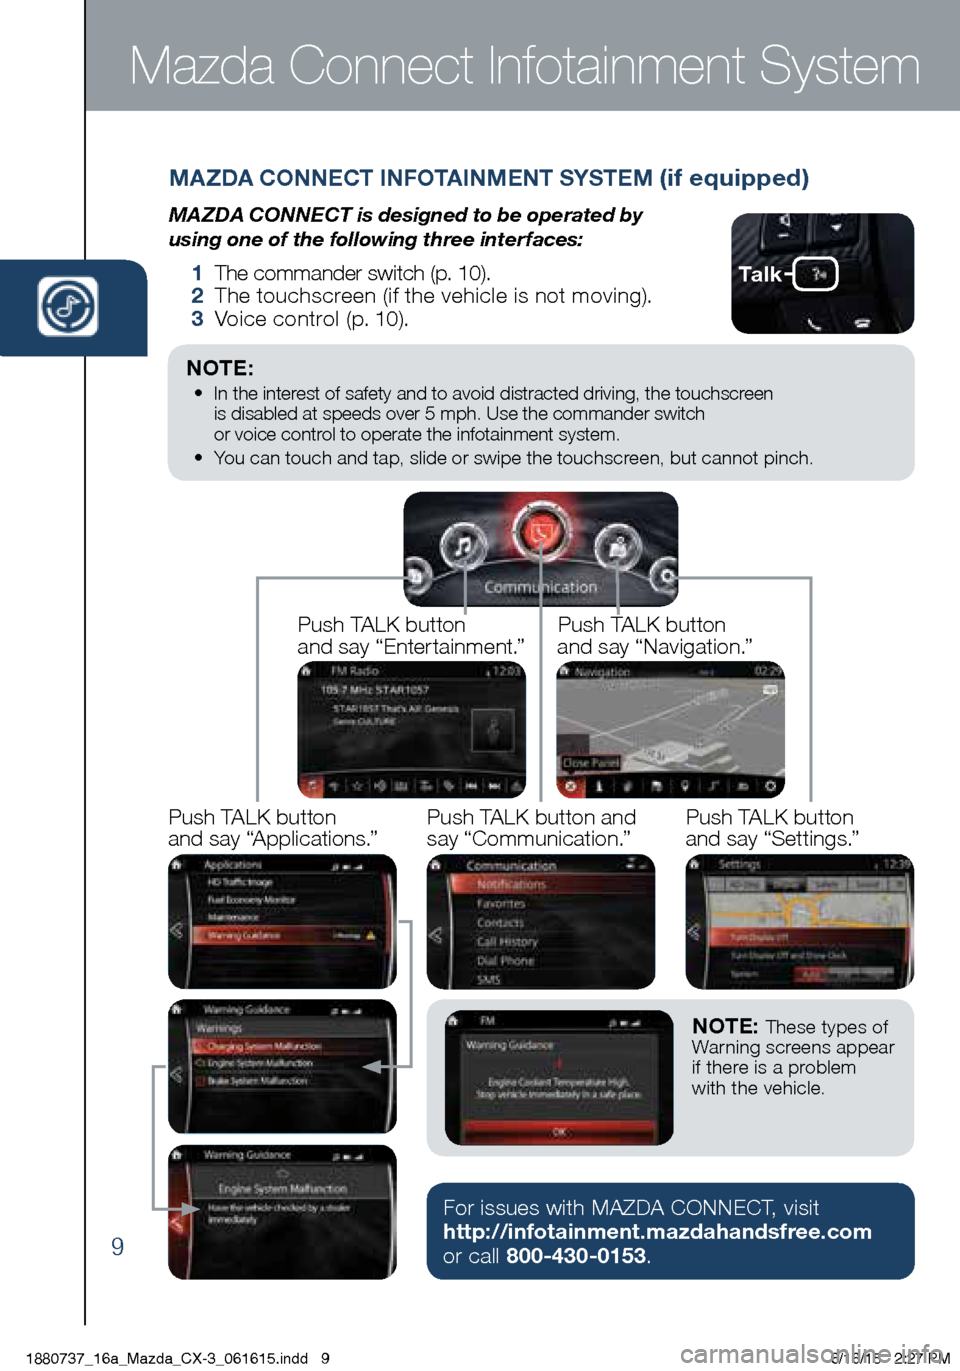
MAZDA CONNECT is designed to be operated by
using one of the following three interfaces:
1 The commander switch (p. 10).
2 The touchscreen (if the vehicle is not moving).
3 Voice control (p. 10).
NOTE: • In the interest of safety and to avoid distracted driving, the touchscreen
is disabled at speeds over 5 mph. Use the commander switch
or voice control to operate the infotainment system.
• You can touch and tap, slide or swipe the touchscreen, but cannot pinch.
Push TALK button
and say “Applications.”Push TALK button
and say “Settings.”
Push TALK button
and say “Entertainment.”
Push TALK button
and say “Navigation.”
Push TALK button and
say “Communication.”
NOTE: These types of
Warning screens appear
if there is a problem
with the vehicle.
For issues with MAZDA CONNECT, visit
http://infotainment.mazdahandsfree.com
or call 800-430-0153.
1880737_16a_Mazda_CX-3_061615.indd 96/16/15 2:27 PM
Page 12 of 46
10
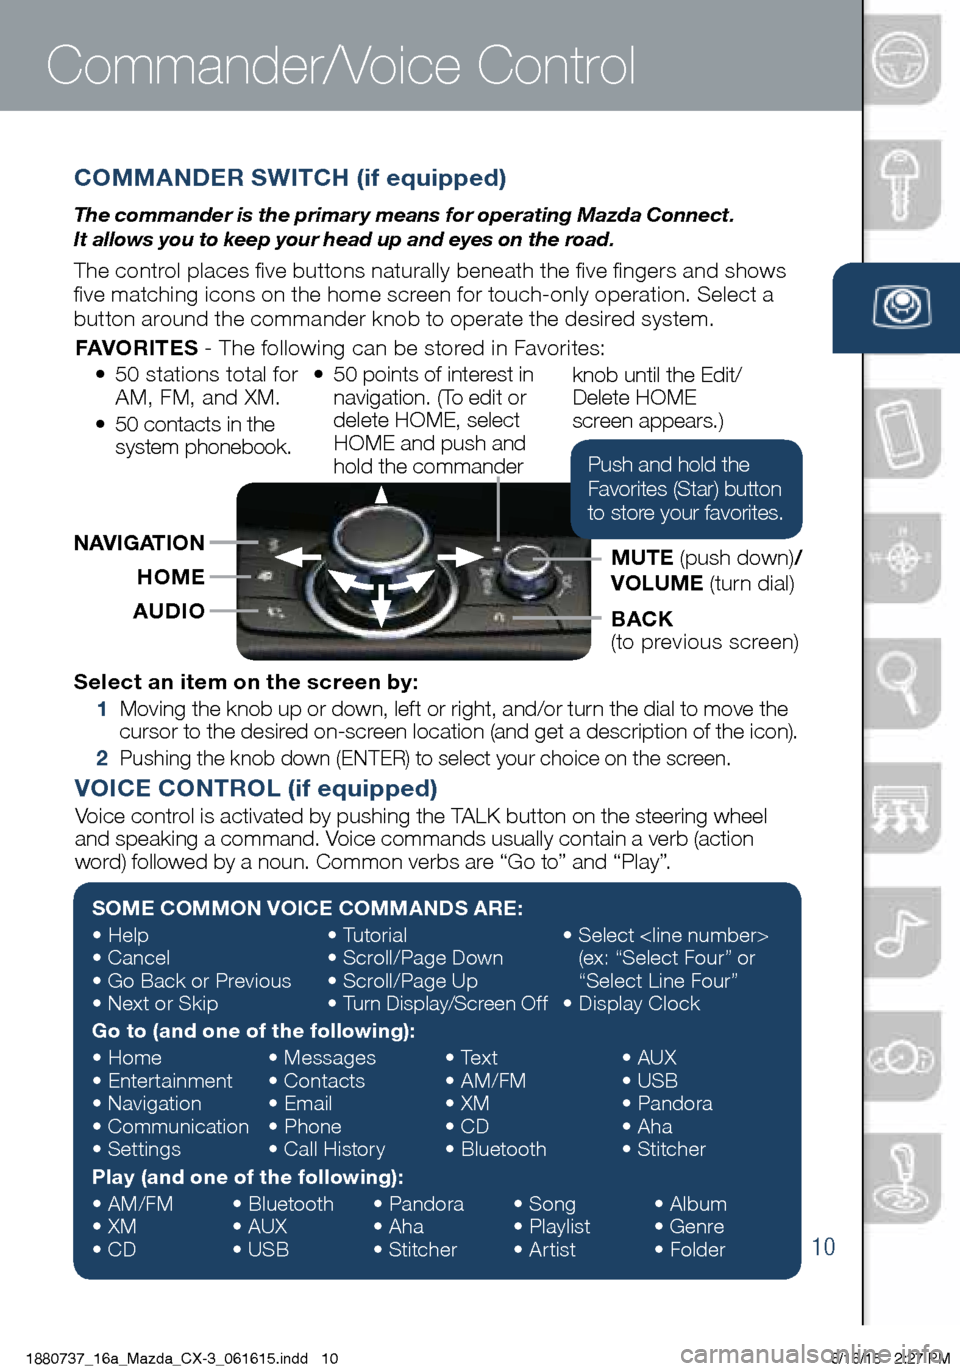
COMMANDER SWITCH (if equipped)
The commander is the primar y means for operating Mazda Connect.
It allows you to keep your head up and eyes on the road.
The control places five buttons naturally beneath the five fingers and shows
five matching icons on the home screen for touch-only operation. Select a
button around the commander knob to operate the desired system.
Commander/Voice Control
Select an item on the screen by:
1 Moving the knob up or down, left or right, and/or turn the dial to move the
cursor to the desired on-screen location (and get a description of the icon).
2 Pushing the knob down (ENTER) to select your choice on the screen.
SOME COMMON VOICE COMMANDS ARE:
• Help
• Cancel
• Go Back or Previous
• Next or Skip •
Tutorial
• Scroll/Page Down
• Scroll/Page Up
• Turn Display/Screen Off •
Select
(ex: “Select Four” or
“Select Line Four”
• Display Clock
Go to (and one of the following):
• Home
• Entertainment
• Navigation
• Communication
• Settings •
Messages
• Contacts
• Email
• Phone
• Call History •
Text
• AM/FM
• XM
• CD
• Bluetooth •
AUX
• USB
• Pandora
• Aha
• Stitcher
Play (and one of the following):
• AM/FM
• XM
• CD •
Bluetooth
• AUX
• USB •
Pandora
• Aha
• Stitcher •
Song
• Playlist
• Artist •
Album
• Genre
• Folder
VOICE CONTROL (if equipped)
Voice control is activated by pushing the TALK button on the steering wheel
and speaking a command. Voice commands usually contain a verb (action
word) followed by a noun. Common verbs are “Go to” and “Play”.
AUDIOHOME
BACK
(to previous screen)
NAVIGATION
MUTE (push down)/
VOLUME (turn dial)
FAVORITES
- The following can be stored in Favorites:
• 50 stations total for
AM, FM, and XM.
• 50 contacts in the
system phonebook. •
50 points of interest in
navigation. (To edit or
delete HOME, select
HOME and push and
hold the commander knob until the Edit/
Delete HOME
screen appears.)
Push and hold the
Favorites (Star) button
to store your favorites.
1880737_16a_Mazda_CX-3_061615.indd 106/16/15 2:27 PM
www.MazdaUSA.com
Page 13 of 46
11
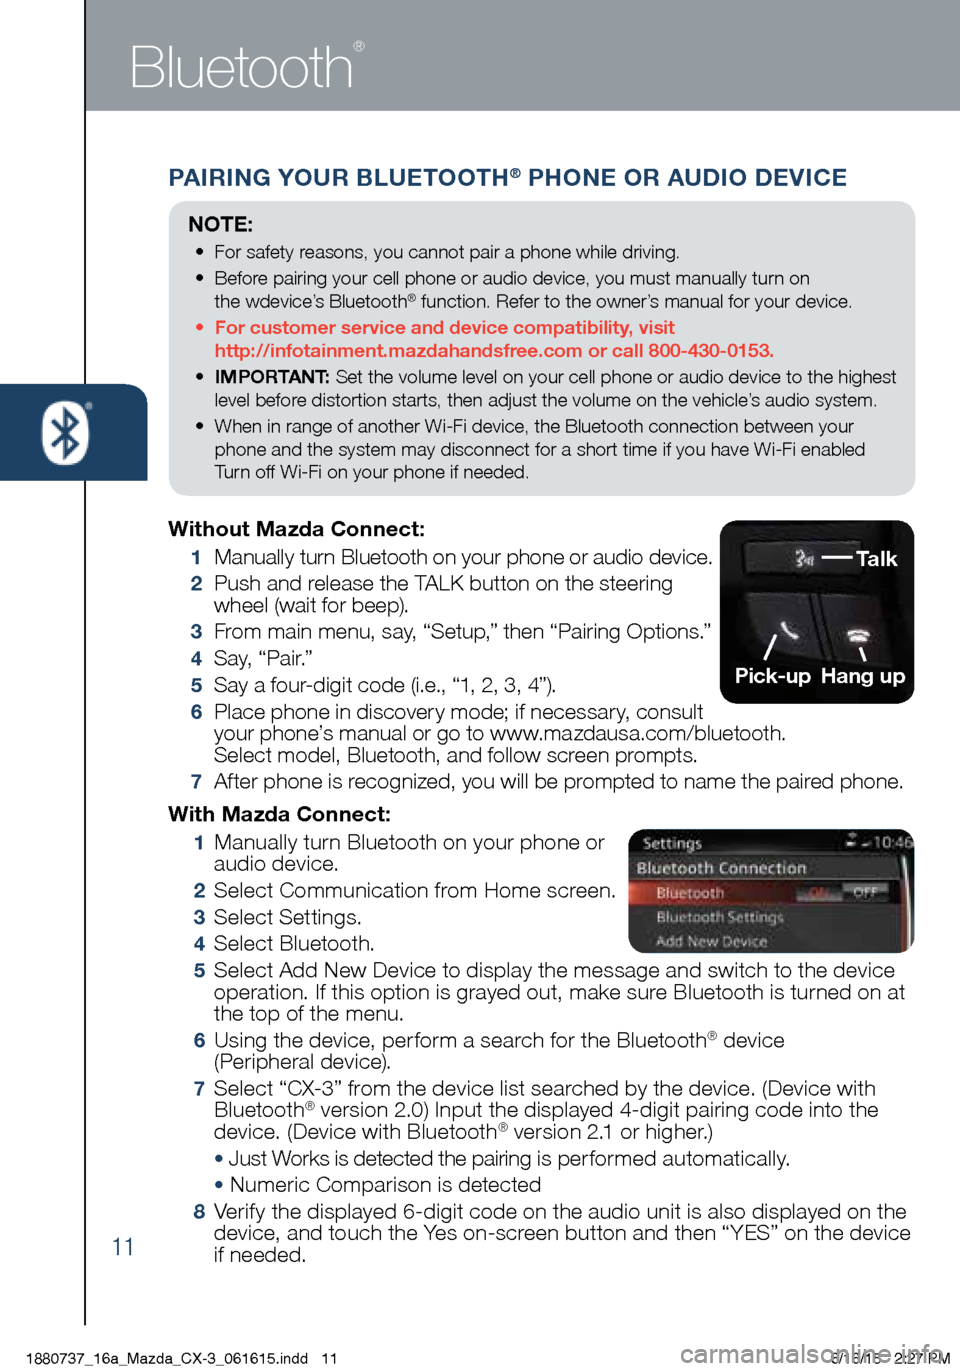
PAIRING YOUR BLUETOOTH® PHONE OR AUDIO DEVICE
Bluetooth
®
With Mazda Connect:
1 Manually turn Bluetooth on your phone or
audio device.
2 Select Communication from Home screen.
3 Select Settings.
4 Select Bluetooth.
5 Select Add New Device to display the message and switch to the device
operation. If this option is grayed out, make sure Bluetooth is turned on at
the top of the menu.
6 Using the device, perform a search for the Bluetooth® device
(Peripheral device).
7 Select “CX-3” from the device list searched by the device. (Device with
Bluetooth® version 2.0) Input the displayed 4-digit pairing code into the
device. (Device with Bluetooth® version 2.1 or higher.)
• Just Works is detected the pairing is per formed automatically.
• Numeric Comparison is detected
8 Verify the displayed 6-digit code on the audio unit is also displayed on the
device, and touch the Yes on-screen button and then “YES” on the device
if needed.
Without Mazda Connect:
1
Manually turn Bluetooth on your phone or audio device.
2 Push and release the TALK button on the steering
wheel (wait for beep).
3 From main menu, say, “Setup,” then “Pairing Options.”
4 S a y, “ P a i r.”
5 Say a four-digit code (i.e., “1, 2, 3, 4”).
6 Place phone in discovery mode; if necessary, consult
your phone’s manual or go to www.mazdausa.com/bluetooth.
Select model, Bluetooth, and follow screen prompts.
7 After phone is recognized, you will be prompted to name the paired phone.
Talk
Pick-up
Hang up
NOTE:
• For safety reasons, you cannot pair a phone while driving.
• Before pairing your cell phone or audio device, you must manually turn on
the wdevice’s Bluetooth
® function. Refer to the owner’s manual for your device.
• For customer service and device compatibility, visit
http://infotainment.mazdahandsfree.com or call 800-430-0153.
• IMPORTANT: Set the volume level on your cell phone or audio device to the highest
level before distortion starts, then adjust the volume on the vehicle’s audio system.
• When in range of another Wi-Fi device, the Bluetooth connection between your
phone and the system may disconnect for a short time if you have Wi-Fi enabled
Turn off Wi-Fi on your phone if needed.
1880737_16a_Mazda_CX-3_061615.indd 116/16/15 2:27 PM
Page 14 of 46
12
PAIRING YOUR BLUETOOTH® PHONE OR AUDIO DEVICE
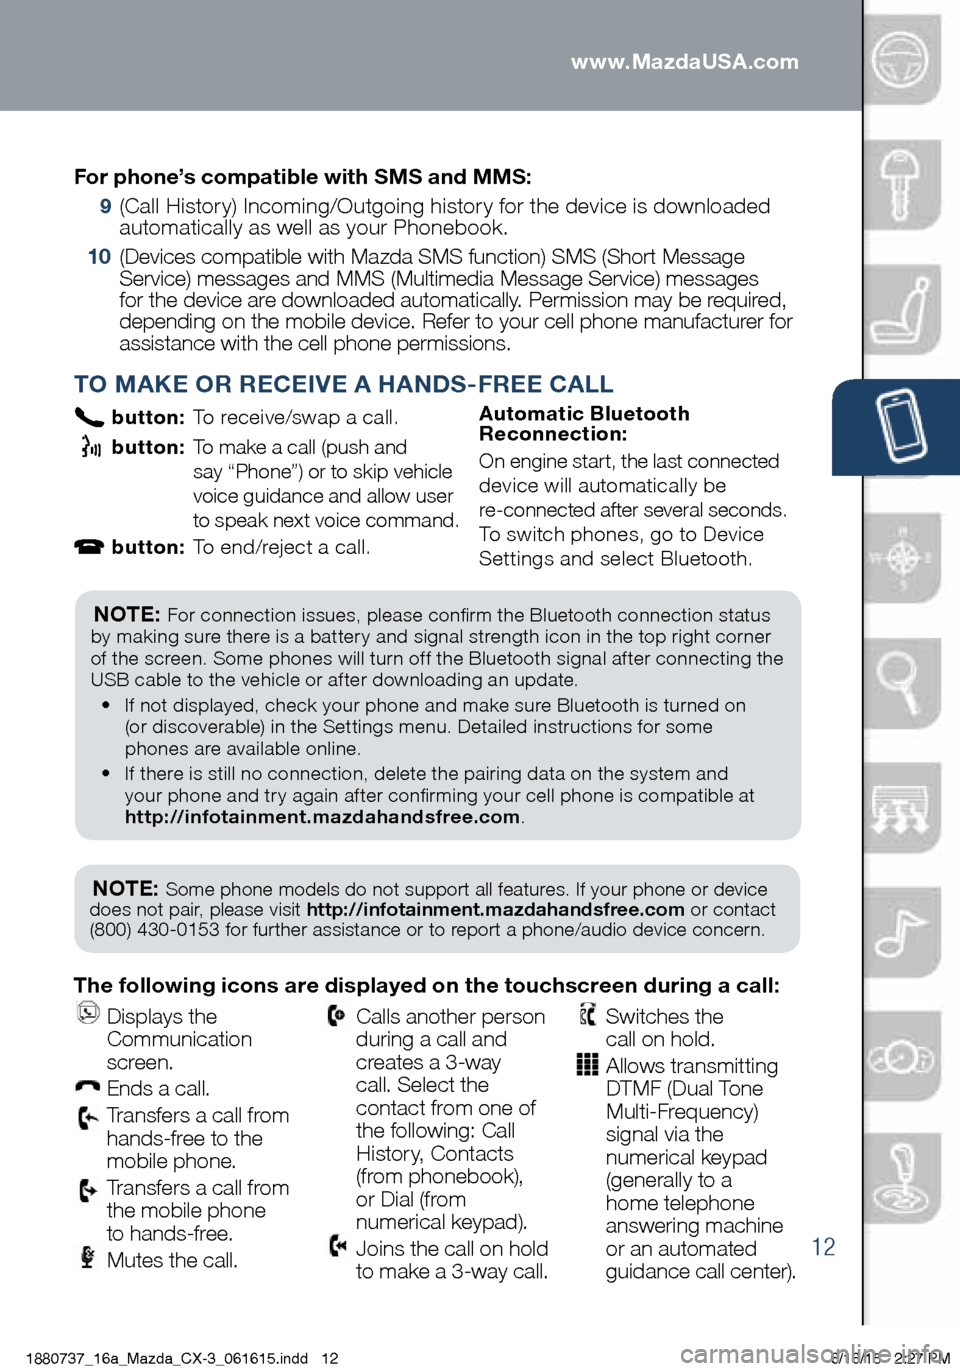
TO MAKE OR RECEIVE A HANDS-FREE CALL
button: To receive/swap a call.
button: To make a call (push and
say “Phone”) or to skip vehicle
voice guidance and allow user
to speak next voice command.
button: To end/reject a call. Automatic Bluetooth
Reconnection:
On engine start, the last connected
device will automatically be
re-connected after several seconds.
To switch phones, go to Device
Settings and select Bluetooth.
NOTE: Some phone models do not support all features. If your phone or device
does not pair, please visit http://infotainment.mazdahandsfree.com or contact
(800) 430-0153 for further assistance or to report a phone/audio device concern.
NOTE: For connection issues, please confirm the Bluetooth connection status
by making sure there is a battery and signal strength icon in the top right corner
of the screen. Some phones will turn off the Bluetooth signal after connecting the
USB cable to the vehicle or after downloading an update.
• If not displayed, check your phone and make sure Bluetooth is turned on
(or discoverable) in the Settings menu. Detailed instructions for some
phones are available online.
• If there is still no connection, delete the pairing data on the system and
your phone and try again after confirming your cell phone is compatible at
http://infotainment.mazdahandsfree.com .
The following icons are displayed on the touchscreen during a call:
Displays the
Communication
screen.
Ends a call.
Transfers a call from
hands‐free to the
mobile phone.
Transfers a call from
the mobile phone
to hands‐free.
Mutes the call.
Calls another person
during a call and
creates a 3‐way
call. Select the
contact from one of
the following: Call
History, Contacts
(from phonebook),
or Dial (from
numerical keypad).
Joins the call on hold
to make a 3‐way call.
Switches the
call on hold.
Allows transmitting
DTMF (Dual Tone
Multi‐Frequency)
signal via the
numerical keypad
(generally to a
home telephone
answering machine
or an automated
guidance call center).
For phone’s compatible with SMS and MMS:
9
(Call History) Incoming/Outgoing history for the device is downloaded
automatically as well as your Phonebook.
10 (Devices compatible with Mazda SMS function) SMS (Short Message
Service) messages and MMS (Multimedia Message Service) messages
for the device are downloaded automatically. Permission may be required,
depending on the mobile device. Refer to your cell phone manufacturer for
assistance with the cell phone permissions.
1880737_16a_Mazda_CX-3_061615.indd 126/16/15 2:27 PM
www.MazdaUSA.com
Page 15 of 46
13
To plan a route on your Navigation system, do the following:
1 Push the NAV button on the commander switch.
2 Select NEW DESTINATION .
3 Select Find Address .
NOTE: By default, the navigation system detects the country and city/town
you are in. If needed, you can change the country or state setting by selecting
Country or a new city/town by selecting City or Zipcode .
4 Enter the street name.
5 Enter the house number, then select the .
6 The system transitions to a screen where the input location can
be checked. To transition to the next screen, select
Select or to transition to the previous screen, select .
Navigation System
NAVIGATION SYSTEM (if equipped)
Planning A Route
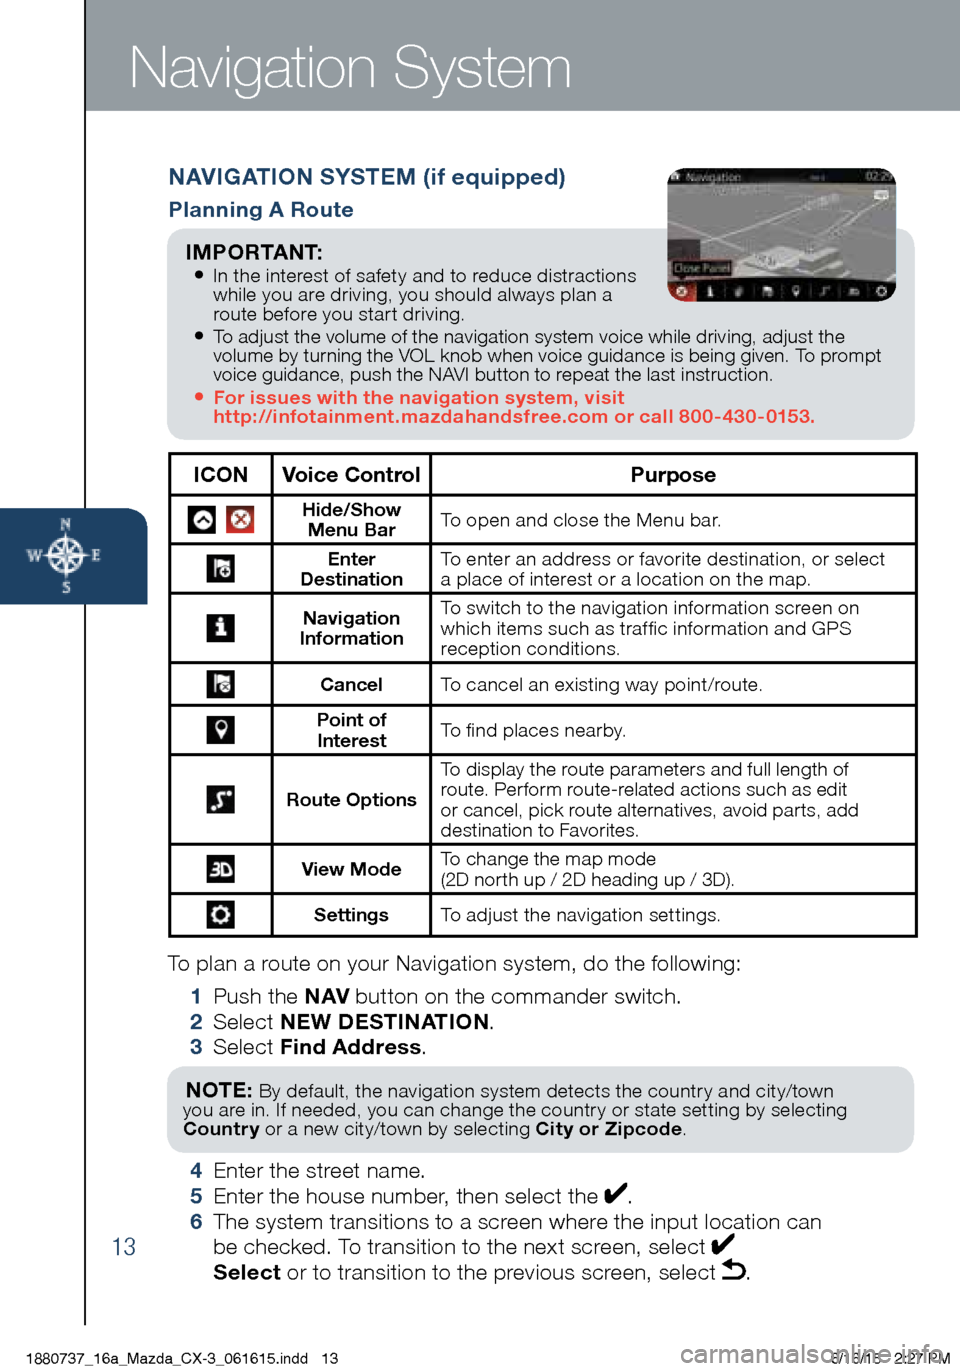
ICON Voice Control Purpose
Hide/Show
Menu Bar To open and close the Menu bar.
Enter
Destination To enter an address or favorite destination, or select
a place of interest or a location on the map.
Navigation
Information To switch to the navigation information screen on
which items such as traffic information and GPS
reception conditions.
Cancel To cancel an existing way point/route.
Point of
Interest To find places nearby.
Route Options To display the route parameters and full length of
route. Perform route-related actions such as edit
or cancel, pick route alternatives, avoid parts, add
destination to Favorites.
View Mode
To change the map mode
(2D north up / 2D heading up / 3D).
Settings
To adjust the navigation settings.
I M P O R TA N T:
• In the interest of safety and to reduce distractions
while you are driving, you should always plan a
route before you start driving.
• To adjust the volume of the navigation system voice while driving, adjust the
volume by turning the VOL knob when voice guidance is being given. To prompt
voice guidance, push the NAVI button to repeat the last instruction.
• For issues with the navigation system, visit
http://infotainment.mazdahandsfree.com or call 800-430-0153.
1880737_16a_Mazda_CX-3_061615.indd 136/16/15 2:27 PM
Page 16 of 46
14
Navigation System
7 If Go is selected or if no operation is performed with 10 seconds, the
route guidance is started. The set route can be checked by selecting MAP .
Planning A Route Using Voice Commands
You can navigate to any of the following places using your voice:
• AN address, including home
• Favorites
• Cities and towns
• POI (Point of Interest) categories •
POIs for named brands of,
for example, restaurants, gas
stations, car rental and gyms.
• A recent destination
To plan a route to an address using your voice, do the following:
1 Push the TA L K button on the steering wheel.
2 When you hear the tone, you can say, for example “Address”.
3 When on the enter an address screen say the full address (without zip code)
for your destination, for example “123 Main St., Los Angeles, California”.
The system does not recognize zip codes.
4 Say “Yes” if the address is correct. If shown a list of addresses, say the
list number for the correct address or say “none of these”.
NOTE: POI searches for points of interest near your present location.
NOTE: • For best results, say the full address without pausing between words.• Voice guidance can be skipped by pushing the talk button.• When prompt voice guidance is muted you will need to go into navigations settings
to turn the volume back on for the NAVI button to repeat the last instructions.
NOTE: Select Places Nearby for POIs (points of
interest) around the selected location, or select Add to
Favorites to register the selected location to Favorites.NOTE: The route can
be edited by selecting
other options.
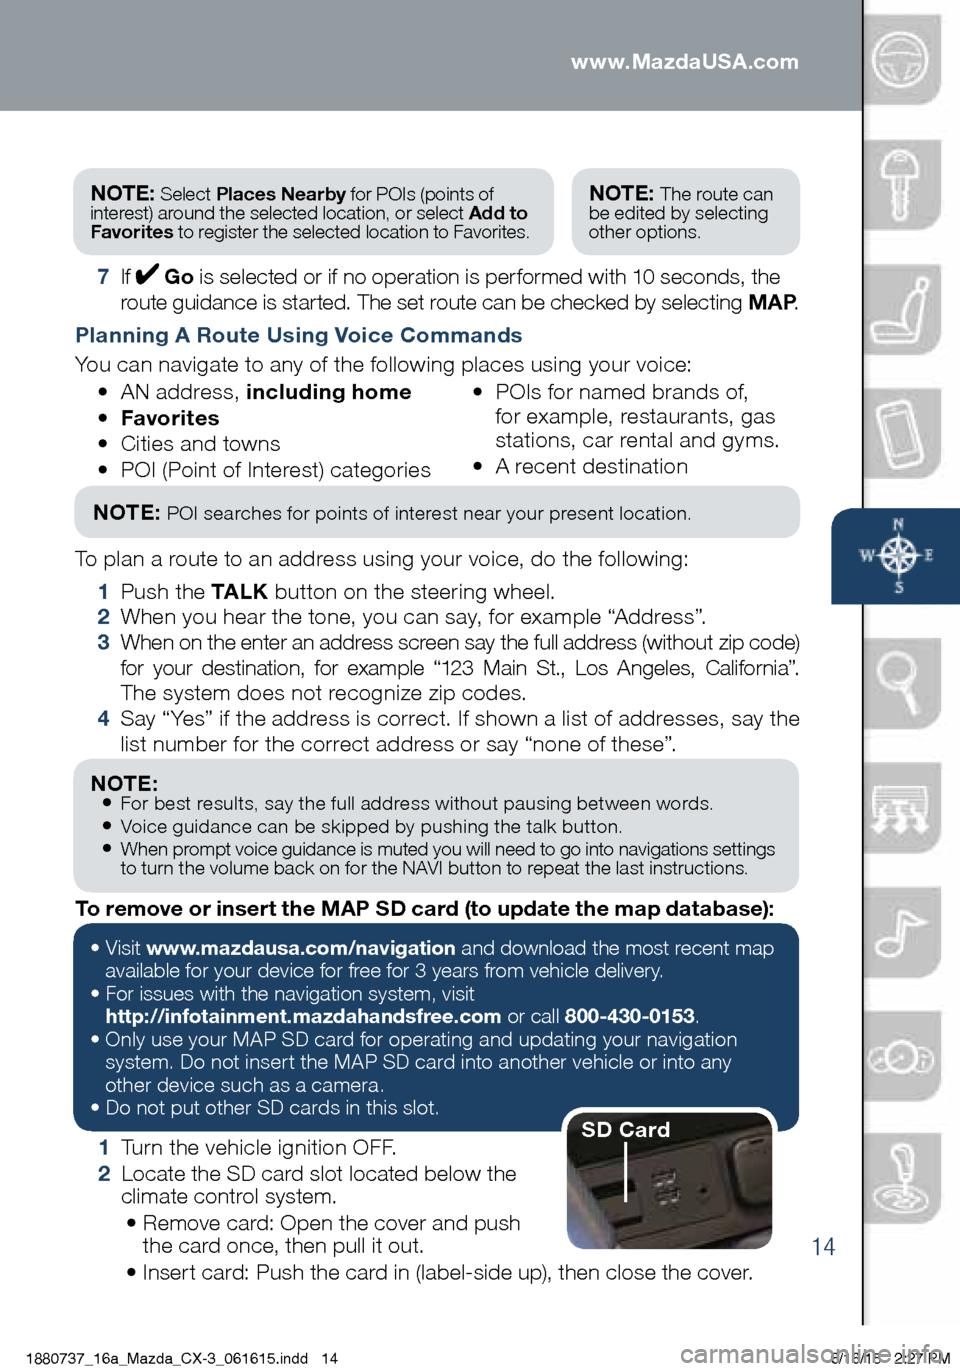
1 Turn the vehicle ignition OFF.
2 Locate the SD card slot located below the
climate control system.
• Remove card: Open the cover and push
the card once, then pull it out.
• Insert card: Push the card in (label-side up), then close the cover.
To remove or insert the MAP SD card (to update the map database):
•
Visit www.mazdausa.com/navigation and download the most recent map
available for your device for free for 3 years from vehicle delivery.
• For issues with the navigation system, visit
http://infotainment.mazdahandsfree.com or call 800-430-0153.
• Only use your MAP SD card for operating and updating your navigation
system. Do not insert the MAP SD card into another vehicle or into any
other device such as a camera.
• Do not put other SD cards in this slot.
SD Card
1880737_16a_Mazda_CX-3_061615.indd 146/16/15 2:27 PM
www.MazdaUSA.com