Page 17 of 27
 When Driving
1616For details, refer to Section 4, “Mazda Radar Cruise Control (MRCC)”.
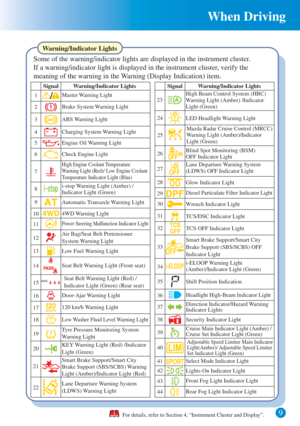
Setting the Mazda Radar Cruise Control (MRCC)
How to Set the Distance Between Vehicles During Headway Contro")
When Driving
1616For details, refer to Section 4, “Mazda Radar Cruise Control (MRCC)”.
Setting the Mazda Radar Cruise Control (MRCC)
How to Set the Distance Between Vehicles During Headway Control
The distance between vehicles is set to a shorter distance each time the switch is
pressed. The distance between vehicles is set to a longer distance by pressing the
switch. The distance-between-vehicles can be set to 4 levels; Long, medium, short,
and extremely short distance.
Distance-between-
vehicles guideline
(at 80 km/h (50 mph)
vehicle speed)
Indication on
displayLong
(about 50 m
(164 ft))Medium
(about 40 m
(131 ft))Short
(about 30 m
(98 ft))Extremely
short
(about 25 m
(82 ft))
Change the Set Vehicle Speed
Changing the set vehicle speed using the SET + / SET - switch
Press and hold the SET + or SET - switch to adjust the set vehicle speed in 10 km/h
(5 mph) increments.
The set vehicle speed can also be adjusted in 1 km/h (1 mph) (European models)
or 5 km/h (5 mph) (Except European models) increments by pressing and
releasing the SET + or SET - switch immediately.
To accelerate using the accelerator pedal
Depress the accelerator pedal and press and release the SET + or SET - switch at
the desired speed. If a switch cannot be operated, the system returns to the set
speed when you release your foot from the accelerator pedal.
Close Proximity Warning
If your vehicle rapidly closes in on the vehicle ahead
because the vehicle applies the brakes suddenly while you
are travelling in headway control, the warning sound
activates and the brake warning is indicated in the display.
Always verify the safety of the surrounding area and
depress the brake pedal while keeping a safer distance from
the vehicle ahead. Additionally, always keep a safer
distance from the vehicles behind you.
�%�:�����A���(�(�����'�'�������%�A�'�F�K�V�K�Q�P���A�3�W�K�E�M�)�W�K�F�G���K�P�F�D��������������������������������������������������
Page 18 of 27
 When Driving
17
The Smart City Brake Support (SCBS) detects a vehicle ahead by emitting a
near-infrared laser beam and receiving the beam reflected off the reflector of the
vehicle ahead, and then")
When Driving
17
The Smart City Brake Support (SCBS) detects a vehicle ahead by emitting a
near-infrared laser beam and receiving the beam reflected off the reflector of the
vehicle ahead, and then using it for the measurement. Consequently, the Smart
City Brake Support (SCBS) may not operate under the following conditions:
• Trucks with low loading platforms, vehicles travelling at extremely low
speeds, and vehicles with a high profile. Do not rely completely on the Smart City Brake Support (SCBS) system:
The Smart City Brake Support (SCBS) is a system which operates in response to a
vehicle ahead. It does not apply to two-wheeled vehicles or pedestrians.
If the vehicle height or inclination is changed, the system will not be able
to correctly detect vehicles or obstructions ahead resulting in the Smart
City Brake Support (SCBS) system not operating normally or mistakenly
operating, which could cause a serious accident.
WARNING
Do not modify the suspension:
NOTE
Smart City Brake Support (SCBS)
The Smart City Brake Support (SCBS) system is designed to reduce damage in the
event of a collision by operating the brake control (SCBS brake) when the
system's laser sensor (front) detects a vehicle ahead and determines that a collision
with the vehicle ahead is unavoidable.
It may also be possible to avoid a collision if the relative speed between your
vehicle and the vehicle ahead is less than about 20 km/h (12 mph).
For details, refer to Section 4, “Smart City Brake Support (SCBS)”.
• Under bad weather condition, such as rain, fog and snow.
• The window washer is being used or the windscreen wipers are not used
when its raining.
• The windscreen is dirty.
• The steering wheel is turned completely left or right, or the vehicle is
accelerated rapidly and comes close to the vehicle ahead.Other details are
described in the related text.
�%�:�����A���(�(�����'�'�������%�A�'�F�K�V�K�Q�P���A�3�W�K�E�M�)�W�K�F�G���K�P�F�D��������������������������������������������������
Page 19 of 27
 18
When Driving
Smart Brake Support (SBS)
Smart Brake Support (SBS) is a system which alerts the driver of a possible
collision using an indicator and warning sound in the instrument cluster while th")
18
When Driving
Smart Brake Support (SBS)
Smart Brake Support (SBS) is a system which alerts the driver of a possible
collision using an indicator and warning sound in the instrument cluster while the
vehicle is being driven at about 15 km/h or faster (10 mph or faster) and the
system's radar sensor (front) determines that your vehicle may hit a vehicle
ahead. Furthermore, if the radar sensor (front) determines that a collision is
unavoidable, the automatic brake control is performed to reduce damage in the
event of a collision.
For details, refer to Section 4, “Smart Brake Support (SBS)”.
Do not rely completely on the Smart Brake Support (SBS) system and always
drive carefully:
The Smart Brake Support (SBS) system is only designed to reduce damage in the
event of a collision. The ability to detect obstructions is limited depending on the
obstruction, weather conditions, or traffic conditions.
Check the safety of the surroundings and pay sufficient attention to the
distance between your vehicle and the vehicles travelling in front and behind.
WARNING
�%�:�����A���(�(�����'�'�������%�A�'�F�K�V�K�Q�P���A�3�W�K�E�M�)�W�K�F�G���K�P�F�D��������������������������������������������������
Page 20 of 27
 When Driving
19For details, refer to Section 4, “Smart Brake Support (SBS)”.
Smart Brake Support (SBS)
NOTE
The Smart Brake Support (SBS) system may not operate under the following�y
conditions:
�")
When Driving
19For details, refer to Section 4, “Smart Brake Support (SBS)”.
Smart Brake Support (SBS)
NOTE
The Smart Brake Support (SBS) system may not operate under the following�y
conditions:
• If there is the possibility of hitting only a part of a vehicle ahead.
Although the objects which activate the system are four-wheeled vehicles, the
radar sensor could detect the following objects, determine them to be an
obstruction, and operate the Smart Brake Support (SBS) system.
• Objects on the road at the entrance to a curve (including guardrails and
snow banks).
If there is the possibility of a collision with a vehicle or
obstruction ahead, the beep sounds continuously and a
warning is indicated in the display.
Collision Warning
Other details are described in the related text.
Other details are described in the related text.
• The vehicle is driven at the same speed as the vehicle ahead.
• The brake pedal, steering wheel, selector lever, or a direction indicator is
operated.
• A vehicle appears in the opposite lane while cornering or rounding a curve.
• When crossing a narrow bridge, passing through a low gate or tunnel, a
narrow gate, or entering an underground parking area.
• Metal objects, bumps, or protruding objects on the road.
• Two-wheeled vehicles such as motorcycles and bicycles, pedestrians, trees.
�%�:�����A���(�(�����'�'�������%�A�'�F�K�V�K�Q�P���A�3�W�K�E�M�)�W�K�F�G���K�P�F�D��������������������������������������������������
Page 21 of 27
 20
When Driving
Vehicle electric
devices
Vehicle electric
devices
Accelerator OFF
Accelerator ONEnergy
regeneration
ChargeBattery
Battery Power
Power Engine
Variable
voltage
alternator
Varia")
20
When Driving
Vehicle electric
devices
Vehicle electric
devices
Accelerator OFF
Accelerator ONEnergy
regeneration
ChargeBattery
Battery Power
Power Engine
Variable
voltage
alternator
Variable
voltage
alternator Engine
Tyre TyreCapacitor
CapacitorDC-DC converter
DC-DC converter
Kinetic energy
Electrical power
i-ELOOP System
i-ELOOP is a regenerative braking system. When you depress the brake pedal or use
engine braking, the kinetic energy that occurs is converted to electrical energy by the
power generator and the converted electrical energy is stored in the rechargeable
battery (capacitor and battery). The stored electricity is used as power to charge the
battery and the vehicle's electrical devices.
• A variable voltage alternator is incorporated in the power generator which
converts the kinetic energy to electricity and can generate electricity efficiently
according to the vehicle conditions.
For details, refer to Section 4, “i-ELOOP”.
• A capacitor is used to store large amounts of electricity instantly which can be
utilized quickly.
• A DC-DC converter is incorporated which steps down the stored electricity to
voltage useable by the vehicle's electrical devices.
�%�:�����A���(�(�����'�'�������%�A�'�F�K�V�K�Q�P���A�3�W�K�E�M�)�W�K�F�G���K�P�F�D��������������������������������������������������
Page 22 of 27
When Driving
21
Variable
voltage
alternator
CapacitorDC-DC converter
For details, refer to Section 4, “i-ELOOP”.
The i-ELOOP power generating status is displayed in the audio display.
Indication on display
Control Status Display
Control status
Displays the level of electricity generated by
regenerative braking.
Displays the amount of the electricity stored
in the rechargeable battery.
Displays the status of the electricity stored
in the rechargeable battery and being
supplied to the electrical devices (whole
vehicle in display is illuminated
simultaneously).
i-ELOOP System
CAUTION
• Variable voltage alternator
High-current electricity flows through the following parts, therefore do not touch
them.
• DC-DC converter
• Capacitor
�%�:�����A���(�(�����'�'�������%�A�'�F�K�V�K�Q�P���A�3�W�K�E�M�)�W�K�F�G���K�P�F�D��������������������������������������������������
Page 23 of 27
 22
When Driving
Diesel Particulate Filter
The diesel particulate filter collects and eliminates most of the particulate matter
(PM) in the exhaust gas of the diesel engine for improved exhaust gas")
22
When Driving
Diesel Particulate Filter
The diesel particulate filter collects and eliminates most of the particulate matter
(PM) in the exhaust gas of the diesel engine for improved exhaust gas processing
ability.
While the particulate matter (PM) collected in the diesel particulate filter is
eliminated automatically, fuel may be mixed with the engine oil increasing the
engine oil level. If the engine oil level exceeds the “X” mark on the dipstick,
replace the engine oil.
For details, refer to Section 4, “Tyre Pressure Monitoring System” or
“Diesel Particulate Filter”.
The Tyre Pressure Monitoring System (TPMS) monitors the air pressure of all
four tyres. If the air pressure of one or more tyres is too low, the system warns the
driver by indicating the tyre pressure monitoring system warning light in the
instrument cluster and operating a beep sound.
In the following cases, system initialization must be performed so that the system
operates normally.
• A tyre pressure is adjusted.
• Tyre rotation is performed.
• A tyre or wheel is replaced.
• The tyre pressure monitoring system warning
light is illuminated.
Tyre Pressure Monitoring System
�%�:�����A���(�(�����'�'�������%�A�'�F�K�V�K�Q�P���A�3�W�K�E�M�)�W�K�F�G���K�P�F�D��������������������������������������������������
Page 24 of 27
Interior Features
23
Air-conditioning System (Fully Automatic Type)
Operation of Automatic Air-conditioning
1. Set the mode selector dial to the AUTO position.
2. Set the air intake selector to the outside air position (indicator light turned off).
3. Set the fan control dial to the AUTO position.
4. Press the A/C switch to operate the air-conditioning (turn indicator light on).
5. Set the temperature control dial to the desired position.
6. To turn off the system, set the fan control dial to the 0 position.
For details, refer to Section 5, “Air-Conditioning System”.
Mode selector dial
A/C switch Air intake selector switch
Rear window defogger switch Fan control dial Temperature control dial
�%�:�����A���(�(�����'�'�������%�A�'�F�K�V�K�Q�P���A�3�W�K�E�M�)�W�K�F�G���K�P�F�D��������������������������������������������������


 When Driving
21
Variable
voltage
alternator
CapacitorDC-DC converter
For details, refer to Section 4, “i-ELOOP”.
The i-ELOOP power generating status is displayed in the audio display.
Indicat")
 Interior Features
23
Air-conditioning System (Fully Automatic Type)
Operation of Automatic Air-conditioning
1. Set the mode selector dial to the AUTO position.
2. Set the air intake selector to the ou")