Page 9 of 12

1617
Convenience
Power Running Boards*
When active, the running boards
extend down and out when you
open the doors, and return to
the stowed position after a two-
second delay when you close
the doors.
To enable and disable the power
running board feature, refer to
the Information Displays chapter
in your Owner's Manual.
Note: Do not use the running
boards, front and rear hinge
assemblies, running board
motors, or the running board
under body mounts to lift the
vehicle when jacking. Always use
proper jacking points. See your
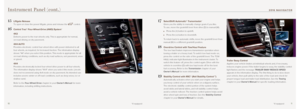
Owner's Manual for details. Power Liftgate
Press
on the instrument
panel to open or close the
power liftgate. For added
convenience, there are three
more ways to activate your
power liftgate’s capabilities:
1. On your remote entry
transmitter, press
twice
within three seconds to open
or close your power liftgate. 2.
To open using the liftgate
control in the liftgate handle:
Unlock the doors using either
the remote entry transmitter
or the power door unlock
control, and then press A.
Press B to open the glass.
3. To close using the rear
cargo area button: Press
and release the
control located on the left
rear quarter panel in the
rear cargo area. This button
automatically disables after
the liftgate latches.
Note: Keep clear of the liftgate
when operating the rear controls.
Your power liftgate includes an
obstacle detection feature that
either stops or reverts to a full
open position if it encounters
a solid object. For complete
information, see the Liftgate
section within the Locks chapter
of your Owner’s Manual.
Leather Cleaning
For cleaning and removing spots
and stains, use Motorcraft®
Premium Leather and Vinyl
Cleaner** or a commercially
available leather cleaning
product for automotive interiors.
Note: Test any cleaning product
on an inconspicuous area first.
Do not use the following
products as these may damage
the leather:
Oil and petroleum or silicone-
based leather conditioners.
Household cleaners.
Alcohol solutions.
Solvents or cleaners intended
specifically for rubber, vinyl
and plastics.
For complete information, see
the Vehicle Care chapter of your
Owner’s Manual.
*if equipped
SecuriCodeTM Keyless
Entry Keypad
Lock or unlock the doors without using a key.
You can operate the keypad with the factory-
set, 5-digit entry code. This code is on the
owner’s wallet card in the glove box.
You can also create up to three of your own
5-digit personal entry codes through the
information display. To lock all of the doors
and liftgate, press and hold 7•8 and 9•0 at
the same time. For complete information,
refer to the Locks chapter of your Owner’s
Manual.
MyKey®
MyKey allows you to program certain driving
restrictions in order to promote good driving
habits. You can set speed restrictions
and limit volume levels. For complete
information, refer to the MyKey chapter
in your Owner’s Manual.
Intelligent Access
Note: Your transmitter must be within 3 feet
(1 meter) of the vehicle for intelligent access
to function properly:
To unlock all of the doors, press the unlock
button
on the transmitter, or press any
number on the SecuriCode keyless entry
keypad to unlock all doors.
To lock the doors, press the lock button
on the transmitter, or press and hold
7•8 and 9•0 at the same time on the
SecuriCode keyless entry keypad. The transmitter also contains a key blade,
which can be used to unlock the driver's door,
if necessary. See your Owner’s Manual for
more information.
Remote Start*
Remote start allows you to start the engine
from outside your vehicle using your key.
To start, press
and then press twice
within three seconds. Your vehicle runs for 5,
10, or 15 minutes, depending on the setting.
See the Information Displays chapter in your
Owner’s Manual to select the duration of the
remote start system.
Once inside with your transmitter in the
vehicle, apply the brake while pressing
the START STOP button. Shift into drive (D)
and go.
To switch the engine off from outside
the vehicle after using your remote start,
press
once.
Note: Your transmitter's operating range is
approximately 33 feet (10 meters). Weather
conditions, nearby radio towers, structures
around the vehicle, etc. can affect your range.
*if equipped
**Do not use on the Reserve Package seats.
See the Vehicle Care chapter in your Owner's Manual for details.
2016 NAVIGATOR
A
B
Page 10 of 12

1819
PowerFold® Third-Row Seat*
The 60/40 split-
folding bench
seat uses a
power-activated
seatback release.
The three-button
system allows
you to fold both
sides down at
once, or fold each
side down independently for more flexibility. The controls are on the
right-hand rear quarter trim panel, accessible from the liftgate area.
Note: Before you fold your seats down, make sure that you place your
vehicle in park (P), open the liftgate, unfasten all safety belts and \
fold
all head restraints down.
To use:
1. Press the corresponding control(s) or use the middle control to fold
both seats down.
2. To return the seatback(s) to the original position(s), press the
corresponding control(s) again.
See the Seats chapter in your Owner's Manual for more information.
Note: The power-folding seats operate for 10 minutes after you switch
the ignition off. E-Z Entry into the Third-Row Seats*
The feature allows for easier entry and exit to
and from the third-row seats.
To enter the third-row seating area:
1. Fold the head restraint forward.
2. Pull up on Lever 1.
3. Fold down the second-row seat and
release the handle.
4. Pull the handle up again until the
seat releases from the floor.
5. Push the seat upward and fold it away
from the third row.
To return the seat to an upright
seating position:
1. Push the seat down and latch it to the floor.
2. Bring the seatback to an upright position.
It should lock into position.
3. Lift up on the head restraint until it locks
into its original position.
*if equipped
To program position 1, switch the ignition on. Move the memory
features to your preferred position. Press and hold the 1 button
until you hear a tone. Use this same procedure to set the second
position by using the 2 button
. You can now use these controls
to recall the set memory positions.
You can also program your memory seats to your transmitter. That
way, when you unlock your door with the transmitter, your memory
features automatically move into your saved position. See the Seats
chapter in your Owner's Manual for more details.
Moonroof *
You can open or close the
sliding shade manually after
you close the moonroof. Pull
the shade toward the front
of the vehicle to close it. The
moonroof control is on the
overhead console. To open,
press and release the SLIDE
control. The moonroof stops
short of the fully opened position. To fully open the moonroof, press
and release the SLIDE control again. To close, pull and release the
SLIDE control. Press and release the TILT control to vent the moonroof.
Pull and hold the TILT control to close the moonroof.
Comfort
Front Climate Controlled Seats*
To use the heated seats, press the right side of the button
. For
cooled seats, press the left side of the button
. Press the desired
button repeatedly to cycle through the settings, from the highest to the\
lowest, and then off. More indicator lights mean higher settings.
Second-Row Controls*
Located on the rear of the center console, auxiliary climate and heated \
seat controls let second-row passengers make adjustments and power
smaller accessories independently from the front-row controls.
Memory Seat Feature
The memory function saves and recalls the positions of the driver seat, \
power mirrors, adjustable pedals and steering column. Use the control
located on the side of the driver’s seat
to program and then
recall saved memory positions.
*if equipped
Lever 1
Position 2
Position 3
2016 NAVIGATOR
Page 11 of 12

with Cross Traffic Alert*
BLIS uses radar sensors to help you
determine if a vehicle may be in your blind
spot zone. The cross traffic alert feature ale")
2021
BLIS® (Blind Spot Information System)
with Cross Traffic Alert*
BLIS uses radar sensors to help you
determine if a vehicle may be in your blind
spot zone. The cross traffic alert feature alerts
you if a car is coming toward you when you
back out of a parking space. BLIS and cross
traffic alert display an amber indicator light in
your exterior mirrors. Cross traffic alert also
sounds tones and displays messages to warn
you which direction vehicles are approaching.
See the Driving Aids chapter in your Owner’s
Manual for more information.
Tire Pressure Monitoring System
Your vehicle comes with a Tire Pressure
Monitoring System (TPMS) that displays a
low tire pressure warning light
when one
or more of your tires are significantly under-
inflated. If this happens, stop and check your
tires as soon as possible. Inflate them to the
proper pressure. Refer to the Wheels and
Tires chapter of your Owner’s Manual for
more information.
Fuel Type and Fuel Tank Capacity
Your Navigator's fuel tank capacity is
28 gallons (106L). Navigator L models have
a fuel tank capacity of 33.5 gallons (126.8L).
We recommend regular unleaded gasoline
with a pump (R+M)/2 octane rating of 87.
To provide improved performance, we
recommend premium fuel for severe duty
usage such as trailer towing. Do not use E85
(ethanol), diesel, fuel-methanol, leaded fuel
or any other fuel because it could damage or
impair the emission control system.
Location of Spare Tire and Tools
The temporary spare tire is under the vehicle,
just forward of the rear bumper. Use it only
for emergency use and replace it as soon as
possible. The jack and tools are under the
access panel in the floor compartment behind
the rear seat. Make sure you switch off the
power running boards* prior to jacking,
hoisting or towing your vehicle. Refer to your
Owner’s Manual for more information.
Essential Features
Easy Fuel® System
When fueling your vehicle:
1. Put your vehicle in
park (P) and switch
the ignition off.
2. Open the fuel filler door.
3. Slowly insert the fuel filler
nozzle fully into the fuel system, and leave the
nozzle fully inserted until you are done pumping.
4. Wait at least 10 seconds before removing
the fuel pump nozzle to allow any residual
fuel to drain into the fuel tank.
When refueling the vehicle fuel tank from a
fuel container, use the plastic funnel located
in the spare wheel storage tray. Clean the
funnel or properly dispose of it.
Note: Do not use aftermarket funnels as they
will not work with the Easy Fuel system and
may cause damage. You can purchase extra
funnels from an authorized dealer if you
choose to dispose of the funnel.Lincoln Drive Control
This feature intelligently integrates chassis and
powertrain systems for personalized ride comfort,
steering, handling, powertrain response and sound.
Choose between two default settings or customize
your own.
Factory default settings include Normal Handling
and Normal Performance while you are in drive (D).
Select sport (S) to engage Sport Handling
and Sport Performance settings.
Customize your Handling and Performance settings
through the information display by navigating
through the information display menu to Settings,
Vehicle, and then Drive Control to configure:
Handling
Comfort: Provides lower steering efforts
and a more fluid suspension.
Normal: Delivers an engaging drive
experience with confident handling.
Sport: Increases handling and control
with a sporty feel.
Performance
Normal: Provides smooth power delivery
and a refined sound.
Sport: Increases engine and transmission
responsiveness, while adding a more
powerful engine tone.
*if equipped
2016 NAVIGATOR
Page 12 of 12

2223
14 *if equipped14
Function
14
Rear View Camera
The rear view camera system is on the liftgate and provides a video imag\
e of the
area behind the vehicle. The display automatically appears whenever the vehicle
is in reverse (R) and uses colored guidelines (green, yellow and red)\
to indicate
distance. Objects in the red zone are the closest to your vehicle while objects \
in
the green zone are further away.
Front and Rear Sensing Systems
The sensing systems warn you if there is an object in front of or behind\
the
vehicle. The rear sensors are active only when the transmission is in reverse (\
R).
The front sensors are active when the gearshift is in any position other\
than park
(P) and the vehicle speed is below 8 mph (13 km/h). As the vehicle m\
oves closer to
the obstacle, the rate of the audible warning increases.
Note: Visibility aids do not replace the need to watch where the vehicle is
moving. Refer to your Owner’s Manual for safety information, more details
and limitations.
Ambient Lighting*
When activated, ambient lighting illuminates key areas of your interior with a
choice of colors. To access and make adjustments, use your touchscreen:
1. Press the Settings icon > Ambient Lighting (on the second page).
2. Touch the desired color.
3. Move the color up or down to increase or decrease the color intensity.
To switch the feature on or off, touch the selected color again.
Daytime Running Lamps*
The LED lights automatically turn on when you switch on the ignition and\
the
headlamp control is in the off
, parking lamps or autolamps* positions.
*if equipped22
Basic Commands
Main menu
Go back
Cancel
List of commands
Next page
Previous page
Help
Apps
List mobile apps
Find new apps
Phone
Phone list of commands
Pair phone
Call
at home/at work>
Dial
Listen to message
Climate
Climate list of commands
Climate set temperature to
<# degrees>
Audio
AM <530-1710>
FM <87.9-107.9>
CD
USB
Sirius <0-233>
Bluetooth audio
Help
Navigation*
Navigation list of commands
Destination
Find
intersection>
Show route
Where am I?
SiriusXM Traffic and Travel
Link list of commands
• Show
map/5 day forecast/
fuel prices>
• Help
Some services may not be available in your area. For more complete infor\
mation on SYNC, refer to your SYNC Supplement, visit the website or
call the toll-free number. For U.S. customers, visit owner.lincoln.com or call 1-800-392-3673 (select Option 1 or 2 for language, then Option 3).
For Canadian customers, visit SyncMyRide.ca or call 1-800-565-3673 (select Option 1 or 2 for language, then Option 3).
Commonly Used Voice Commands SYNC.® Say the Word.
Press the voice button on the right-hand side of your steering wheel and then say:
*if equipped