2016 LEXUS RX450H lug
[x] Cancel search: lugPage 467 of 660

4676-2. Maintenance
6
Maintenance and care
RX450h_U_OM0E013U
General maintenance
Listed below are the general maintenance items that should be performed at
the intervals specified in the “Warranty and Service Guide” or “Owner’s
Manual Supplement”. It is recommende d that any problem you notice should
be brought to the attention of your Lexu s dealer or qualified service shop for
advice.
Engine compartment
ItemsCheck points
Brake fluidIs the brake fluid at the correct level? ( P. 481)
Engine/power control unit
coolantIs the engine/power control unit coolant at the correct
level?( P. 479)
Engine oilIs the engine oil at the correct level?( P. 476)
Exhaust systemThere should not be any fumes or strange sounds.
Radiator/condenserThe radiator and condenser should be free from
foreign objects. (P. 480)
Washer fluidIs there sufficient washer fluid?( P. 482)
Luggage compartment
ItemsCheck points
12-volt batteryCheck the connections. (P. 483)
Page 483 of 660

4836-3. Do-it-yourself maintenance
6
Maintenance and care
RX450h_U_OM0E013U
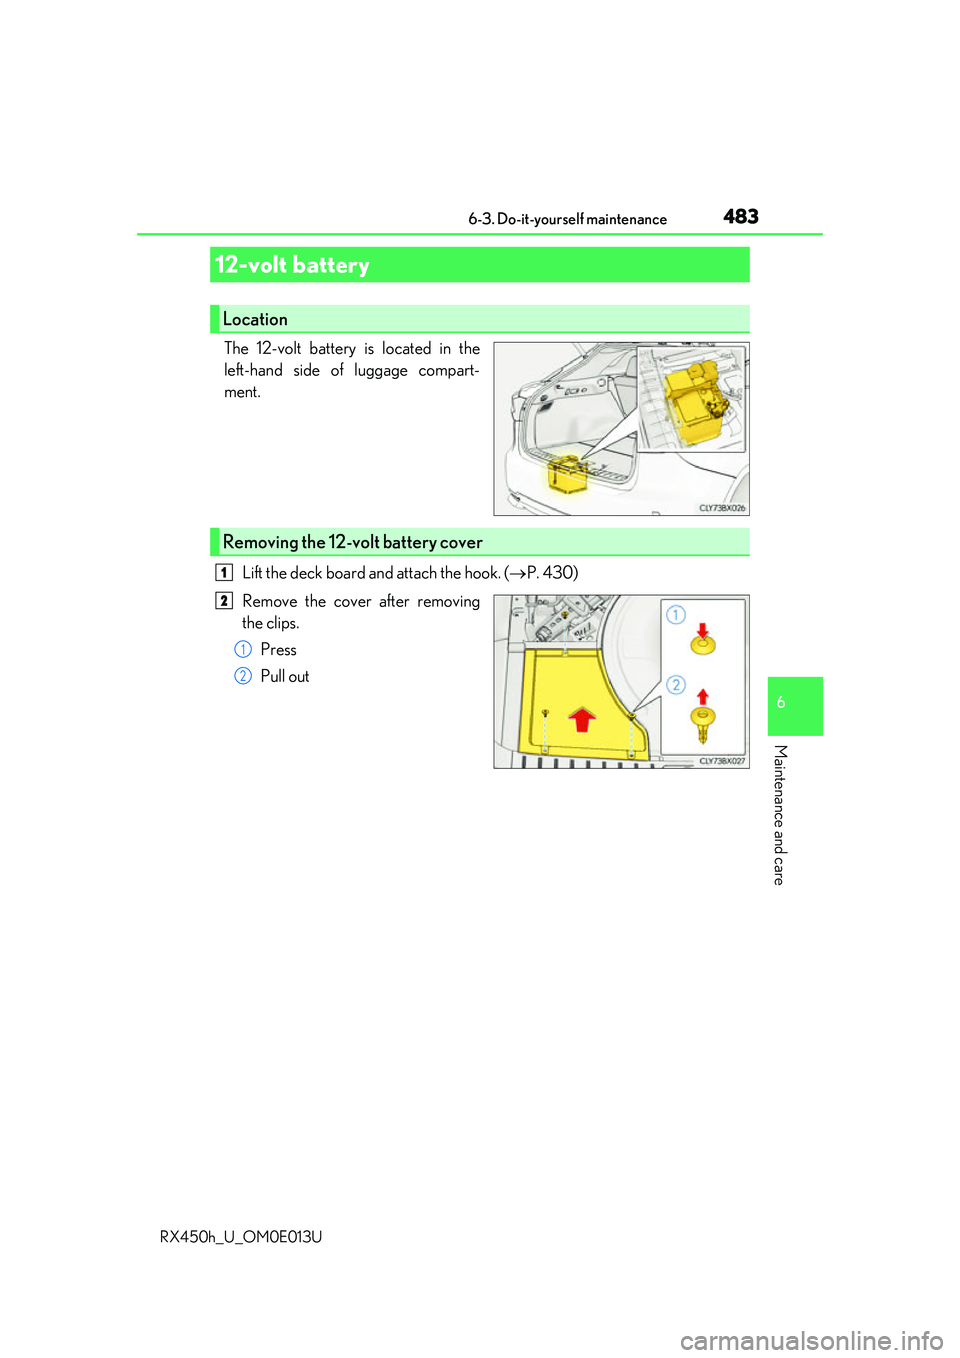
The 12-volt battery is located in the
left-hand side of luggage compart-
ment.Lift the deck board and attach the hook. ( P. 430)
Remove the cover after removing
the clips. Press
Pull out
12-volt battery
Location
Removing the 12-volt battery cover
1
2
1
2
Page 498 of 660

4986-3. Do-it-yourself maintenance
RX450h_U_OM0E013U
■Instructions for checking tire inflation pressure
When checking tire inflation pressure, ob serve the following:
●Check only when the tires are cold.
If your vehicle has been parked for at least 3 hours or has not been driven for more than
1 mile or 1.5 km, you will get an accurate cold tire inflation pressure reading.
●Always use a tire pressure gauge.
It is difficult to judge if a tire is properly inflated based only on its appearance.
●It is normal for the tire inflation pressure to be higher after driving as heat is generated
in the tire. Do not reduce tire inflation pressure after driving.
●Never exceed the vehicle capacity weight.
Passengers and luggage weight should be placed so that the vehicle is balanced.
WARNING
■Proper inflation is critical to save tire performance
Keep your tires properly inflated.
If the tires are not properly inflated, the following conditions may occur which could
lead to an accident resulting in death or serious injury:
●Excessive wear
●Uneven wear
●Poor handling
●Possibility of blowouts resu lting from overheated tires
●Air leaking from between tire and wheel
●Wheel deformation and/or tire damage
●Greater possibility of tire damage while driving (due to road hazards, expansion
joints, sharp edges in the road, etc.)
NOTICE
■When inspecting and adjust ing tire inflation pressure
Be sure to put the tire valve caps back on.
If a valve cap is not installed, dirt or moisture may get into the valve and cause an air
leak, resulting in decreased tire inflation pressure.
Page 509 of 660

5096-3. Do-it-yourself maintenance
6
Maintenance and care
RX450h_U_OM0E013U
Luggage compartment (type A fuse box)
Remove the 12-volt battery cover.
( P. 483)
Luggage compartment (type B fuse box)
Remove the terminal cover.
Remove the fuse with the pullout
tool.
Only some fuses can be removed
using the pullout tool.
Check if the fuse is blown.Normal fuse
Blown fuse
Replace the blown fuse with a new
fuse of an appropriate amperage rat-
ing. The amperage rating can be
found on the fuse box lid.
Many types of fuse are used on this
vehicle. This illustration shows a com-
mon type of fuse used on this vehicle.
3
4
1
2
Page 539 of 660

5397-2. Steps to take in an emergency
7
When trouble arises
RX450h_U_OM0E013U
*: Driver’s and front passenger’s seat belt warning buzzer:The driver’s seat belt warning buzzer sounds to alert the driver that his or her seat belt
is not fastened. Once the power switch is turned to ON mode, the buzzer sounds for
6 seconds. If the vehicle reaches a speed of 12 mph (20 km/h), the buzzer sounds
once. If the seat belt is still unfastened af ter 24 seconds, the buzzer will sound inter-
mittently for 10 seconds. Then, if the seat belt is still unfastened, the buzzer will sound
in a different tone for 20 more seconds.
The front passenger’s seat belt warning buzzer sounds to alert the front passenger
that his or her seat belt is not fastened. Th e buzzer sounds once if the vehicle reaches
a speed of 12 mph (20 km/h). If the seat belt is still unfastened after 24 seconds, the
buzzer will sound intermittently for 10 seconds. Then, if the seat belt is still unfastened,
the buzzer will sound in a different tone for 20 more seconds.
■SRS warning light
This warning light system monitors the airbag sensor assembly, front impact sensors, side
impact sensors (front door), side impact se nsors (rear), driver’s seat position sensor,
driver’s seat belt buckle sw itch, front passenger occupant classification system (ECU and
sensors), “AIR BAG ON” indicator light, “A IR BAG OFF” indicator light, front passen-
ger’s seat belt buckle switch, driver’s seat belt pretension er, front passenger’s seat belt
pretensioner and force limiter, airbags, in terconnecting wiring and power sources.
( P. 38)
■Front passenger detection sensor, seat belt reminder and warning buzzer
●If luggage is placed on the front passenger seat, the front passenger detection sensor
may cause the warning light to flash and the warning buzzer to sound even if a passen-
ger is not sittin g in the seat.
●If a cushion is placed on the seat, the sens or may not detect a passenger, and the warn-
ing light may not operate properly.
■Electric power steering system warning light (warning buzzer)
When the 12-volt battery charge becomes insufficient of the voltage temporarily drops,
the electric power steering system warning light may come on and the warning buzzer
may sound.
■If the malfunction indicator lamp comes on while driving
First check the following:
●Is the fuel tank empty?
If it is, fill the fu el tank immediately.
●Is the fuel tank cap loose?
If it is, tighten it securely.
The light will go off after several driving trips.
If the light does not go off even after severa l trips, contact your Lexus dealer as soon as
possible.
Page 552 of 660

5527-2. Steps to take in an emergency
RX450h_U_OM0E013U
When replacing tires on a vehicle with wheel lock nuts, use the following proce-
dures to remove and install the wheel lock nuts. The wheel lock key is stored in
the tray inside the luggage compartment. Always return the wheel lock key to its
original position after use, so that it does not get lost.
■Removal
For ease of removal, the wheel lock nut should always be the first one loos-
ened.
Place the wheel lock key on top of th e wheel lock nut, turning until the
wheel lock key and wheel lock nut patterns engage.
Place the wheel nut wrench on the wheel lock key, and while applying pres-
sure on the wheel lock key, loosen the wheel lock nut.
■Installation
For ease of installation, the wheel lock nut should always be the last one tight-
ened.
By hand, install a wheel lock nut on each wheel.
Place the wheel lock key on top of th e wheel lock nut, turning until the
wheel lock key and wheel lock nut patterns engage.
Place the wheel nut wrench on the wheel lock key, and while applying pres-
sure on the wheel lock key, tighten the wheel lock nut to the recommended
torque.
Wheel lock nut (if equipped)
NOTICE
Do not use an impact wrench. Using an impact wrench may cause permanent damage
to wheel lock nut and wheel lock key. If in doubt about wheel lock application, contact
your Lexus dealer.
1
2
1
2
3
Page 571 of 660

5717-2. Steps to take in an emergency
7
When trouble arises
RX450h_U_OM0E013U
■When exchanging the 12-volt battery
●Use a Central Degassing type 12-volt battery (European Regulations). Also, use 12-volt
batteries with case sizes similar to one prior the exchange and an equivalent 20 hour
rate capacity (20HR) or greater.
• If the sizes differ, the 12-volt battery cannot be properly secured.
• If the 20 hour rate capacity is low, even if the time period where the vehicle is not used is a short time, the 12-volt battery may discharge and hybrid system may not be
able to start.
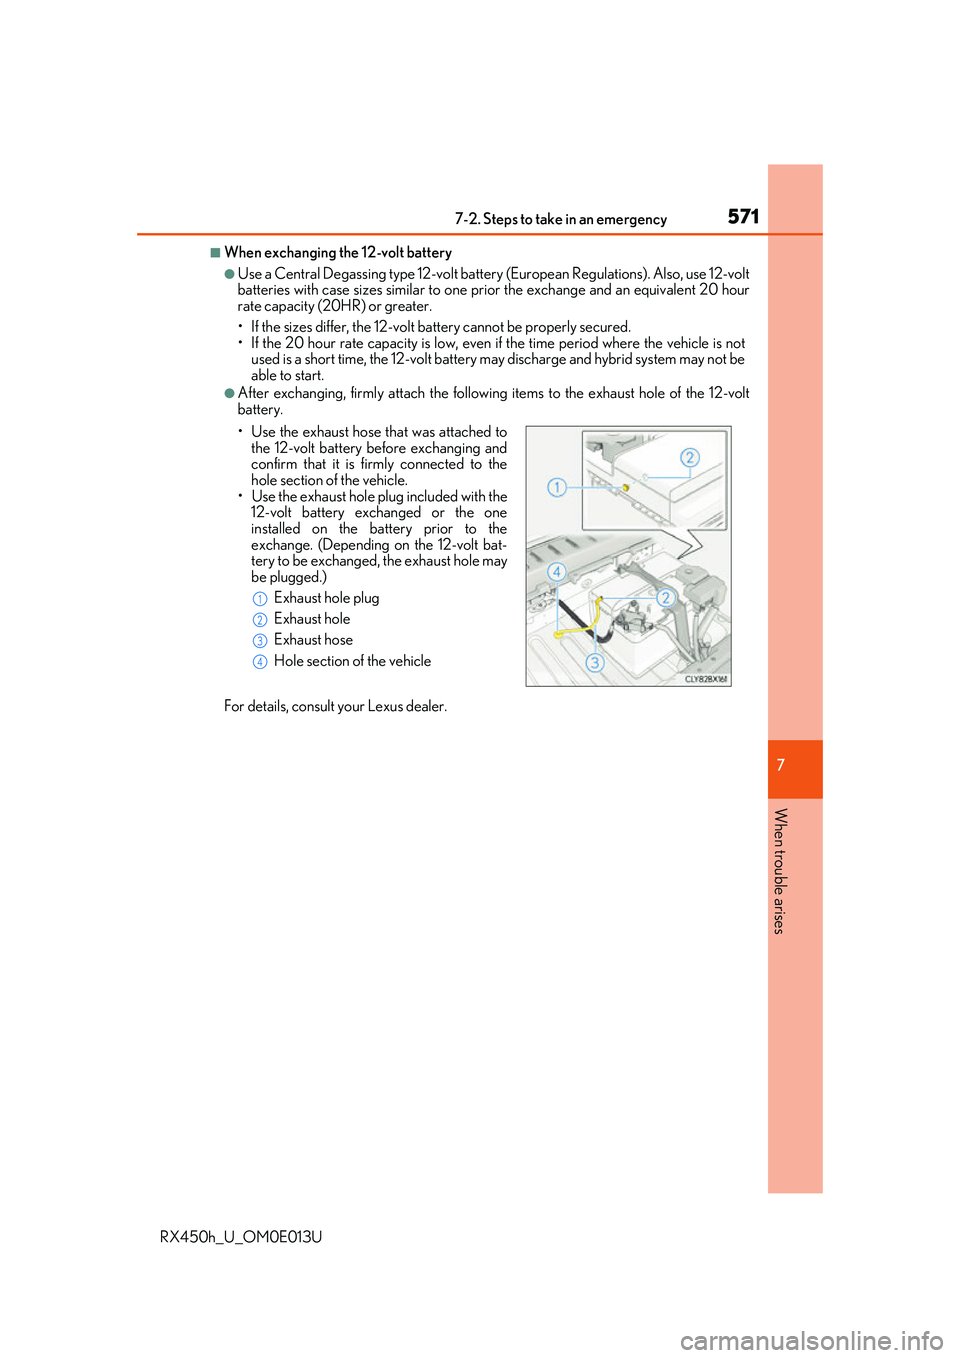
●After exchanging, firmly attach the following items to the exhaust hole of the 12-volt
battery.
For details, consult your Lexus dealer. • Use the exhaust hose that was attached to
the 12-volt battery before exchanging and
confirm that it is firmly connected to the
hole section of the vehicle.
• Use the exhaust hole plug included with the 12-volt battery exchanged or the one
installed on the battery prior to the
exchange. (Depending on the 12-volt bat-
tery to be exchanged, the exhaust hole may
be plugged.)
Exhaust hole plug
Exhaust hole
Exhaust hose
Hole section of the vehicle
1
2
3
4
Page 572 of 660

5727-2. Steps to take in an emergency
RX450h_U_OM0E013U
WARNING
■Avoiding 12-volt battery fires or explosions
Observe the following precautions to prevent accidentally igniting the flammable gas
that may be emitted from the 12-volt battery:
●Make sure each jumper cable is connected to the correct terminal and that it is not
unintentionally in contact with any other than the intended terminal.
●Do not allow the other end of the jumper cab le connected to the “+” terminal to come
into contact with any other parts or metal surfaces in the area, such as brackets or
unpainted metal.
●Do not allow the + and - clamps of the jumper cables to come in to contact with each
other.
●Do not smoke, use matches, cigarette light ers or allow open flame near the 12-volt
battery.
■12-volt battery precautions
The 12-volt battery contains poisonous and co rrosive acidic electrolyte, while related
parts contain lead and lead compounds. Ob serve the following precautions when han-
dling the 12-volt battery:
●When working with the 12-volt battery, always wear safety glasses and take care not
to allow any battery fluids (acid) to come in to contact with skin, clothing or the vehicle
body.
●Do not lean over the 12-volt battery.
●In the event that battery fluid comes into contact with the skin or eyes, immediately
wash the affected area with water and seek medical attention.
Place a wet sponge or cloth over the affected area until medical attention can be
received.
●Always wash your hands after handling the 12-volt battery support, terminals, and
other battery-related parts.
●Do not allow children near the 12-volt battery.
■After recharging the 12-volt battery
Have the 12-volt battery inspected at yo ur Lexus dealer as soon as possible.
If the 12-volt battery is deteriorating, continued use may cause the 12-volt battery to
emit a malodorous gas, which may be de trimental to the health of passengers.
■When exchanging the 12-volt battery
After exchanging, securely attach the exhaust hose and exhaust hole plug to the
exhaust hole of the exchanged 12-volt batter y. If not properly installed, gases (hydro-
gen) may leak into the vehicle interior, and there is the possible danger of the gas ignit-
ing and exploding.