2016 LEXUS LS460L height
[x] Cancel search: heightPage 23 of 708

23Pictorial index
LS460/LS460L_GE (OM50G06E)
Snow mode switch . . . . . . . . . . . . . . . . . . . . . . . . . . . . . . . . . . . . . . . . . . . . . P. 266, 274
Driving mode select switch . . . . . . . . . . . . . . . . . . . . . . . . . . . . . . . . . . . . . . . . .P. 354
Vehicle height adjustment switch*2 . . . . . . . . . . . . . . . . . . . . . . . . . . . . . . . .P. 358
Remote Touch*1. . . . . . . . . . . . . . . . . . . . . . . . . . . . . . . . . . . . . . . . . . . . . . . . . . . . . P. 406
VSC (Vehicle Stability Control) OFF switch . . . . . . . . . . . . . . . . . . . . . . . P. 362
Seat and interior feature switches*3
Rear sunshade switch. . . . . . . . . . . . . . . . . . . . . . . . . . . . . . . . . . . . . . . . . . . . . . P. 486
Rear door sunshade switches*2 . . . . . . . . . . . . . . . . . . . . . . . . . . . . . . . . . . . P. 490
Front climate control seat switches . . . . . . . . . . . . . . . . . . . . . . . . . . . . . . . . .P. 478
Rear seat return switch*2. . . . . . . . . . . . . . . . . . . . . . . . . . . . . . . . . . . . . . . . . . P. 208
Front passenger’s power seat switches*2. . . . . . . . . . . . . . . . . . . . . . . . . . . P. 199
*1: Refer to “Navigation and Multimedia System Owner’s Manual”
or “Navigation System Owner’s Manual”.
*2: If equipped
*3: Location of the switches varies according to the vehicle grade level.
1
2
3
4
5
6
Page 31 of 708

31Pictorial index
LS460/LS460L_GE (OM50G06E)
Remote Touch*1. . . . . . . . . . . . . . . . . . . . . . . . . . . . . . . . . . . . . . . . . . . . . . . . . . . . . P. 406
Snow mode switch . . . . . . . . . . . . . . . . . . . . . . . . . . . . . . . . . . . . . . . . . . . . . P. 266, 274
Driving mode select switch . . . . . . . . . . . . . . . . . . . . . . . . . . . . . . . . . . . . . . . . .P. 354
Vehicle height adjustment switch*2 . . . . . . . . . . . . . . . . . . . . . . . . . . . . . . . .P. 358
VSC (Vehicle Stability Control) OFF switch . . . . . . . . . . . . . . . . . . . . . . . P. 362
Seat and interior feature switches*3
Rear sunshade switch. . . . . . . . . . . . . . . . . . . . . . . . . . . . . . . . . . . . . . . . . . . . . . P. 486
Rear door sunshade switches*2 . . . . . . . . . . . . . . . . . . . . . . . . . . . . . . . . . . . P. 490
Front climate control seat switches . . . . . . . . . . . . . . . . . . . . . . . . . . . . . . . . .P. 478
Rear seat return switch*2. . . . . . . . . . . . . . . . . . . . . . . . . . . . . . . . . . . . . . . . . . P. 208
Front passenger’s power seat switches*2. . . . . . . . . . . . . . . . . . . . . . . . . . . P. 199
*1: Refer to “Navigation and Multimedia System Owner’s Manual”
or “Navigation System Owner’s Manual”.
*2: If equipped
*3: Location of the switches varies according to the vehicle grade level.
1
2
3
4
5
6
Page 47 of 708

471-1. For safe use
1
For safety and security
LS460/LS460L_GE (OM50G06E)
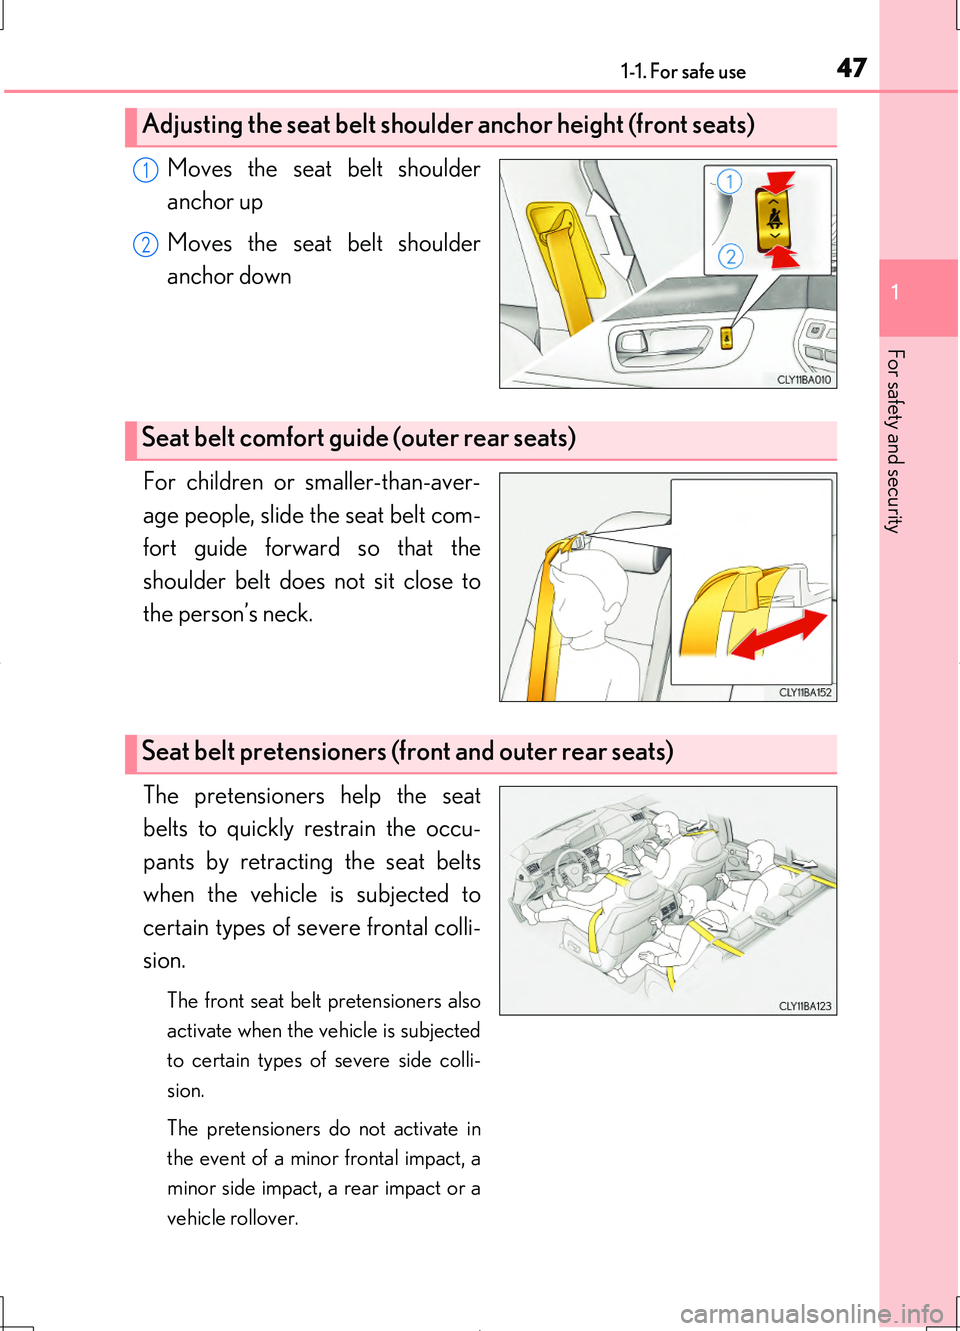
Moves the seat belt shoulder
anchor up
Moves the seat belt shoulder
anchor down
For children or smaller-than-aver-
age people, slide the seat belt com-
fort guide forward so that the
shoulder belt does not sit close to
the person’s neck.
The pretensioners help the seat
belts to quickly restrain the occu-
pants by retracting the seat belts
when the vehicle is subjected to
certain types of severe frontal colli-
sion.
The front seat belt pretensioners also
activate when the vehicle is subjected
to certain types of severe side colli-
sion.
The pretensioners do not activate in
the event of a minor frontal impact, a
minor side impact, a rear impact or a
vehicle rollover.
Adjusting the seat belt shoulder anchor height (front seats)
1
2
Seat belt comfort guide (outer rear seats)
Seat belt pretensioners (front and outer rear seats)
Page 48 of 708

481-1. For safe use
LS460/LS460L_GE (OM50G06E)
If the system determines that a collision is unavoidable, the front seat belts
will retract before the collision. ( P. 368)
■Child seat belt usage
The seat belts of your vehicle were principally designed for persons of adult size.
●Use a child restraint system appropriate for the child, until the child becomes large
enough to properly wear the vehicle’s seat belt. ( P. 72)
●When the child becomes large enough to properly wear the vehicle’s seat belt, fol-
low the instructions regarding seat belt usage. ( P. 46)
■Automatic adjustment of the seat belt shoulder anchor height (front seats)
A desired seat belt shoulder anchor height can be entered to memory and recalled
automatically by the driving position memory and seat position memory. ( P. 218)
■Emergency locking retractor (ELR)
The retractor will lock the belt during a su dden stop or on impact. It may also lock if
you lean forward too quickly. A slow, easy motion will allow the belt to extend so that
you can move around fully.
■Replacing the belt after the pretensioner has been activated
If the vehicle is involved in multiple collisions, the pretensioner will activate for the
first collision, but will not activate for the second or subsequent collisions.
■Seat belt regulations
If seat belt regulations exist in the country where you reside, please contact your
Lexus dealer for seat belt replacement or installation.
Pre-crash seat belts (front seats of vehicles with pre-crash safety
system)
Page 75 of 708

751-1. For safe use
1
For safety and security
LS460/LS460L_GE (OM50G06E)
Key of letters inserted in the above table:
U: Suitable for “universal” category ch ild restraint systems approved for
use in this mass group.
UF: Suitable for forward-facing “universal” category child restraint sys-
tems approved for use in this mass group.
L: Suitable for child restraint system s shown in the child restraint system
list.
X: Not suitable seat position for children in this mass group.
*1: Adjust the front seatback to the most upright position. Move the front seat to the
rearmost position.
If the head restraint interferes with your child restraint system, and the head
restraint can be removed, remove the head restraint.
If the passenger seat is equipped with a vertical height adjuster, it must be placed
in the upper most position.
Follow these procedures:
• For installing a baby seat with support base
If the baby seat interferes with the seatback when latching the baby seat into the
support base, adjust the seatback rearward until there is no interference.
• For installing a forward-facing child seat
If there is gap between the child seat and the seatback, tilt the seatback rear-
ward until good contact is achieved.
If the seat belt shoulder anchor is ahead of the child seat belt guide, move the
seat cushion forward.
• For installing a junior seat
If the child in your child restraint system is in a very upright position, adjust the
seatback to the most comfortable position.
If the seat belt shoulder anchor is ahead of the child seat belt guide, move the
seat cushion forward.
*2: If the ottoman interferes with your child restraint system and the child restraint
system cannot be installed correctly, move the rear seat to the rearmost position
and stow the ottoman.
If the head restraint interferes with your child restraint system, and the head
restraint can be removed, remove the head restraint.
The child restraint system mentioned in the table may not be available out-
side of the EU area.
Page 79 of 708

791-1. For safe use
1
For safety and security
LS460/LS460L_GE (OM50G06E)
Key of letters inserted in the above table:
U: Suitable for “universal” category ch ild restraint systems approved for
use in this mass group.
UF: Suitable for forward-facing “universal” category child restraint sys-
tems approved for use in this mass group.
L: Suitable for child restraint system s shown in the child restraint system
list.
X: Not suitable seat position for children in this mass group.
*1: Adjust the front seatback to the most upright position. Move the front seat to the
rearmost position.
If the head restraint interferes with your child restraint system, and the head
restraint can be removed, remove the head restraint.
If the passenger seat is equipped with a vertical height adjuster, it must be placed
in the upper most position.
Follow these procedures:
• For installing a baby seat with support base
If the baby seat interferes with the seatback when latching the baby seat into the
support base, adjust the seatback rearward until there is no interference.
• For installing a forward-facing child seat
If there is gap between the child seat and the seatback, tilt the seatback rear-
ward until good contact is achieved.
If the seat belt shoulder anchor is ahead of the child seat belt guide, move the
seat cushion forward.
• For installing a junior seat
If the child in your child restraint system is in a very upright position, adjust the
seatback to the most comfortable position.
If the seat belt shoulder anchor is ahead of the child seat belt guide, move the
seat cushion forward.
*2: If the ottoman interferes with your child restraint system and the child restraint
system cannot be installed correctly, move the rear seat to the rearmost position
and stow the ottoman.
If the head restraint interferes with your child restraint system, and the head
restraint can be removed, remove the head restraint.
The child restraint system mentioned in the table may not be available out-
side of the EU area.
Page 123 of 708

1232. Instrument cluster
2
Instrument cluster
LS460/LS460L_GE (OM50G06E)
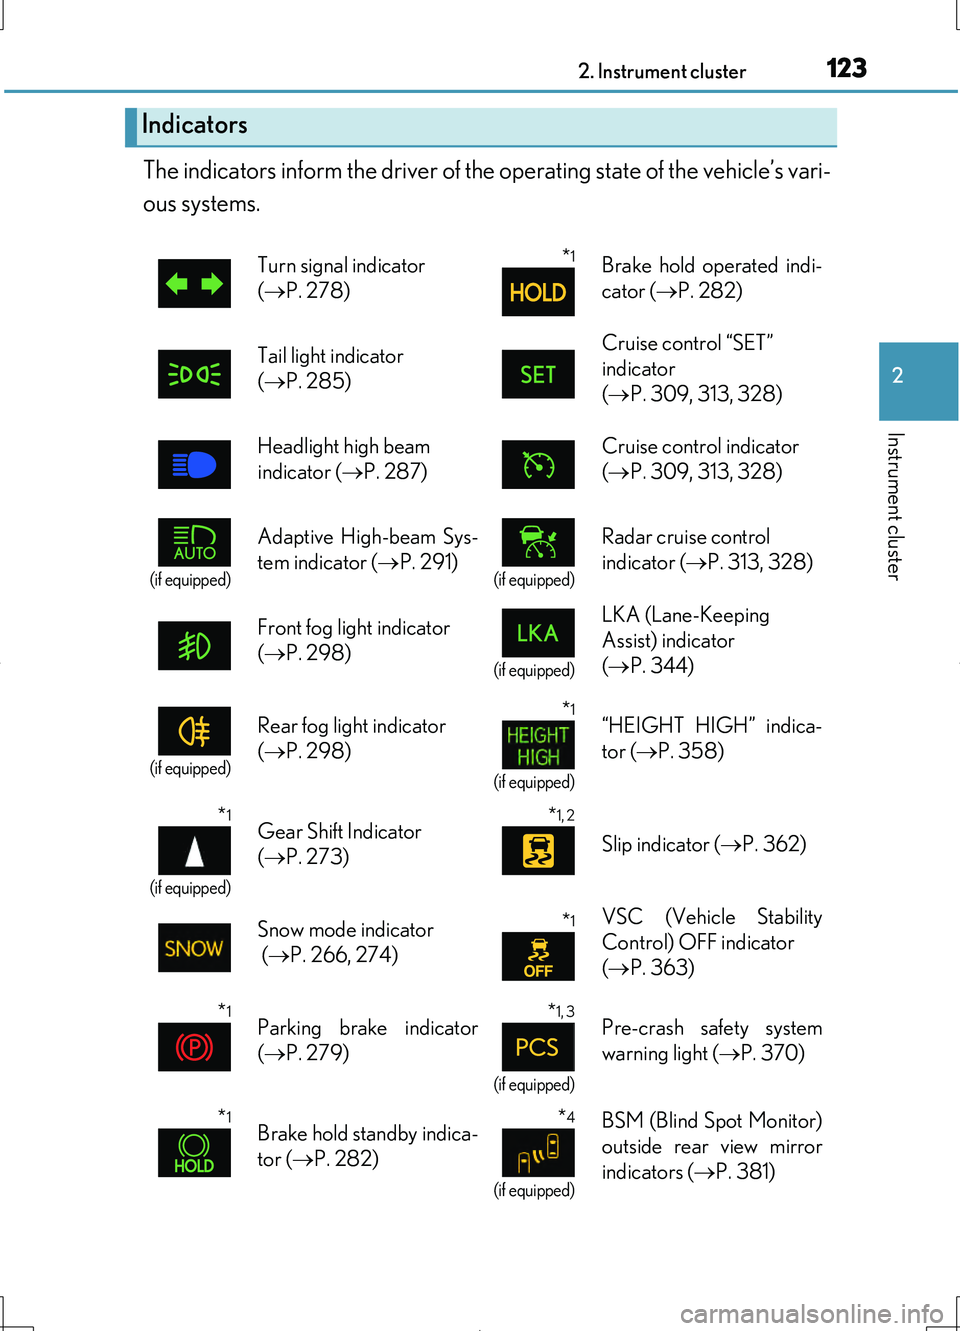
The indicators inform the driver of the operating state of the vehicle’s vari-
ous systems.
Indicators
Turn signal indicator
( P. 278)
*1Brake hold operated indi-
cator ( P. 282)
Tail light indicator
( P. 285)
Cruise control “SET”
indicator
( P. 309, 313, 328)
Headlight high beam
indicator ( P. 287)
Cruise control indicator
( P. 309, 313, 328)
(if equipped)
Adaptive High-beam Sys-
tem indicator ( P. 291)(if equipped)
Radar cruise control
indicator ( P. 313, 328)
Front fog light indicator
( P. 298)(if equipped)
LKA (Lane-Keeping
Assist) indicator
( P. 344)
(if equipped)
Rear fog light indicator
( P. 298)
*1
(if equipped)
“HEIGHT HIGH” indica-
tor ( P. 358)
*1
(if equipped)
Gear Shift Indicator
( P. 273)
*1, 2
Slip indicator (P. 362)
Snow mode indicator
( P. 266, 274)
*1VSC (Vehicle Stability
Control) OFF indicator
( P. 363)
*1Parking brake indicator
( P. 279)
*1, 3
(if equipped)
Pre-crash safety system
warning light ( P. 370)
*1Brake hold standby indica-
tor ( P. 282)
*4
(if equipped)
BSM (Blind Spot Monitor)
outside rear view mirror
indicators ( P. 381)
Page 198 of 708

198
LS460/LS460L_GE (OM50G06E)
3-3. Adjusting the seats
Front seats
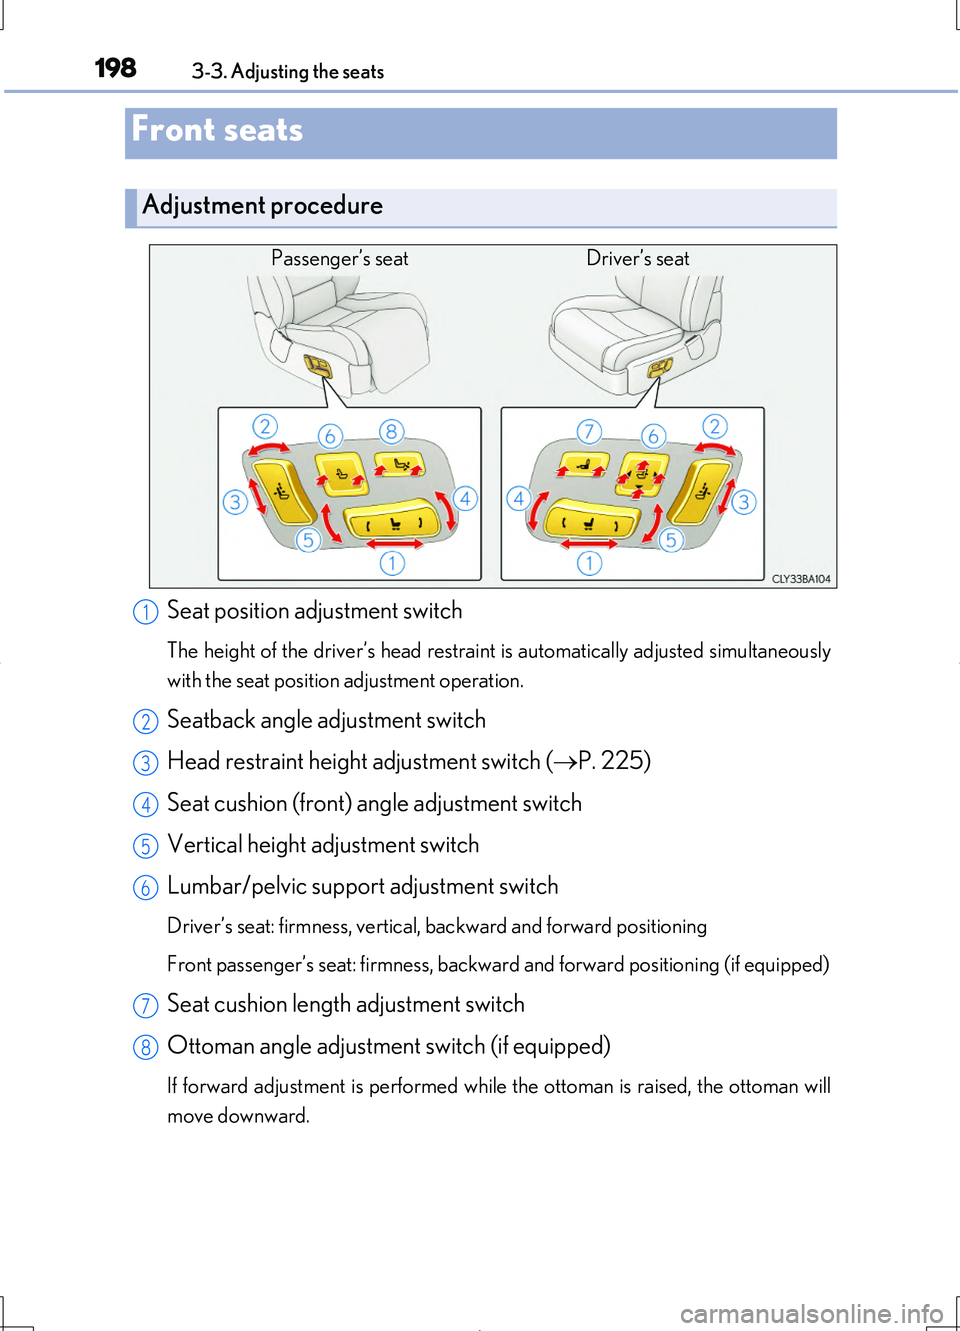
Adjustment procedure
Passenger’s seat Driver’s seat
Seat position adjustment switch
The height of the driver’s head restraint is automatically adjusted simultaneously
with the seat position adjustment operation.
Seatback angle adjustment switch
Head restraint height adjustment switch ( P. 225)
Seat cushion (front) angle adjustment switch
Vertical height adjustment switch
Lumbar/pelvic support adjustment switch
Driver’s seat: firmness, vertical, backward and forward positioning
Front passenger’s seat: firmness, backward and forward positioning (if equipped)
Seat cushion length adjustment switch
Ottoman angle adjustment switch (if equipped)
If forward adjustment is performed while the ottoman is raised, the ottoman will
move downward.
1
2
3
4
5
6
7
8