Page 77 of 668
771-1. For safe use
1
For safety and security
GS350_200t_GS F_OM_OM30E87E_(EE)
■Rear-facing Baby seat/child seat
Place the child restraint system
on the rear seat facing the rear of
the vehicle.
Run the seat belt through the
child restraint system and insert
the plate into the buckle. Make
sure that the belt is not twisted.
Install a locking clip near the tab
of the lap and shoulder belt by
inserting the lap and shoulder
webbing through the recesses of
the locking clip. Buckle the belt
again. If the belt has any slack,
release the buckle and reinstall
the locking clip.
Installing child restraints using a seat belt
1
2
3
Page 78 of 668
781-1. For safe use
GS350_200t_GS F_OM_OM30E87E_(EE)
■Forward-facing Child seat
Remove the head restraint if it
interferes with your child restraint
system.
Place the child restraint system
on the seat facing the front of the
vehicle.
Run the seat belt through the
child restraint system and insert
the plate into the buckle. Make
sure that the belt is not twisted.
Install a locking clip near the tab
of the lap and shoulder belt by
inserting the lap and shoulder
webbing through the recesses of
the locking clip. Buckle the belt
again. If the belt has any slack,
release the buckle and reinstall
the locking clip.
1
2
3
4
Page 79 of 668
791-1. For safe use
1
For safety and security
GS350_200t_GS F_OM_OM30E87E_(EE)
■Junior seatRemove the head restraint if it
interferes with your child restraint
system.
Place the child restraint system
on the seat facing the front of the
vehicle.
Sit the child in the child restraint
system. Fit the seat belt to the
child restraint system according
to the manufacturer’s instructions
and insert the plate into the
buckle. Make sure that the belt is
not twisted.
Check that the shoulder belt is cor-
rectly positioned over the child’s
shoulder and that the lap belt is as
low as possible. ( →P. 4 6 )
1
2
3
Page 80 of 668
801-1. For safe use
GS350_200t_GS F_OM_OM30E87E_(EE)
Push the buckle release button and fully
retract the seat belt. Remove the head restraint if it inter-
feres with your child restraint system.
Widen the gap between the seat cushion and seatback slightly.
Latch the buckles onto the exclusive
fixing bars.
If the child restraint has a top strap, the
top strap should be latched onto the
anchor bracket.
Removing a child restraint installed with a seat belt
Installation with ISOFIX rigid anchor
1
2
3
Page 81 of 668
811-1. For safe use
1
For safety and security
GS350_200t_GS F_OM_OM30E87E_(EE)
Remove the head restraint.
Secure the child restraint system
using the seat belt or ISOFIX rigid
anchors.
Open the anchor bracket cover,
latch the hook onto the anchor
bracket and tighten the top strap.
Make sure the top strap is securely
latched.
■When installing a child restraint system
You need a locking clip to install the child restraint system. Follow the instructions pro-
vided by the manufacturer of the system. If yo ur child restraint system does not provide a
locking clip, you can purchase the following item from any authorized Lexus dealer or
repairer, or another duly qualified and equipped professional:
Locking clip for child restraint system
(Part No. 73119-22010)
Child restraint systems with a top strap
1
2
3
Page 84 of 668

841-1. For safe use
GS350_200t_GS F_OM_OM30E87E_(EE)
WA R N I N G
■When installing a child restraint system
●If child restraint system regulations exist in the country where you reside, please con-
tact any authorized Lexus dealer or repair er, or another duly qualified and equipped
professional for the child restraint system installation.
●When a junior seat is installed, always en sure that the shoulder belt is positioned
across the center of the child’s shoulder. The belt should be kept away from the child’s
neck, but not so that it could fall off the child’s shoulder. Failing to do so may result in
death or serious injury in the event of su dden braking, sudden swerving or an acci-
dent.
●Ensure that the belt and plate are securely locked and the seat belt is not twisted.
●Shake the child restraint system left and right, and forward and backward to ensure
that it has been securely installed.
●After securing a child restraint system, never adjust the seat.
●Follow all installation instructions provided by the child restraint system manufacturer.
■To correctly attach a child restraint system to the anchors
When using the lower anchors, be sure that there are no foreign objects around the
anchors and that the seat belt is not caught behind the child restraint system. Make sure
the child restraint system is securely attached, or it may cause death or serious injury to
the child or other passengers in the event of sudden braking, sudden swerving or an
accident.
Page 102 of 668

1022. Instrument cluster
GS350_200t_GS F_OM_OM30E87E_(EE)
Warning lights inform the driver of malfunctions in the indicated vehicle systems.
*1: These lights turn on when the engine switch is turned to IGNITION ON mode toindicate that a system check is being perfor med. They will turn off after the engine is
started, or after a few seconds. There may be a malfunction in a system if a light does
not come on, or turn off. Have the vehicle inspected by any authorized Lexus dealer
or repairer, or another duly qualified and equipped professional.
Wa r n i n g l i g h t s
*1Brake system warning light
( → P. 5 1 2 )*1, 3, 4
(If equipped)
“AFS OFF” indicator
(→ P. 5 1 4 )
*1, 2Charging system warning
light ( →P. 5 1 2 )*1, 3, 4Brake hold operated
indicator ( →P. 5 1 4 )
*1Malfunction indicator
lamp ( →P. 5 1 2 )*3Parking brake indicator
(→ P. 5 1 4 )
*1SRS warning light
(→ P. 5 1 2 )*1Brake system warning light
(→ P. 5 1 4 )
*1ABS warning light
(→ P. 5 1 3 )*5Open door warning light
(→ P. 5 1 4 )
*1Electric power steering
system warning light
(→ P. 5 1 3 )Low fuel level warning light
(→ P. 5 1 4 )
*1, 3
(If equipped)
PCS (Pre-Crash Safety
system) warning light
(→ P. 5 1 3 )Seat belt reminder light
(→ P. 5 1 4 )
*1
Slip indicator ( →P. 5 1 3 )*1Master warning light
(→ P. 5 1 4 )
*1
(If equipped)
Tire pressure warning light
(→ P. 5 1 5 )
Page 196 of 668

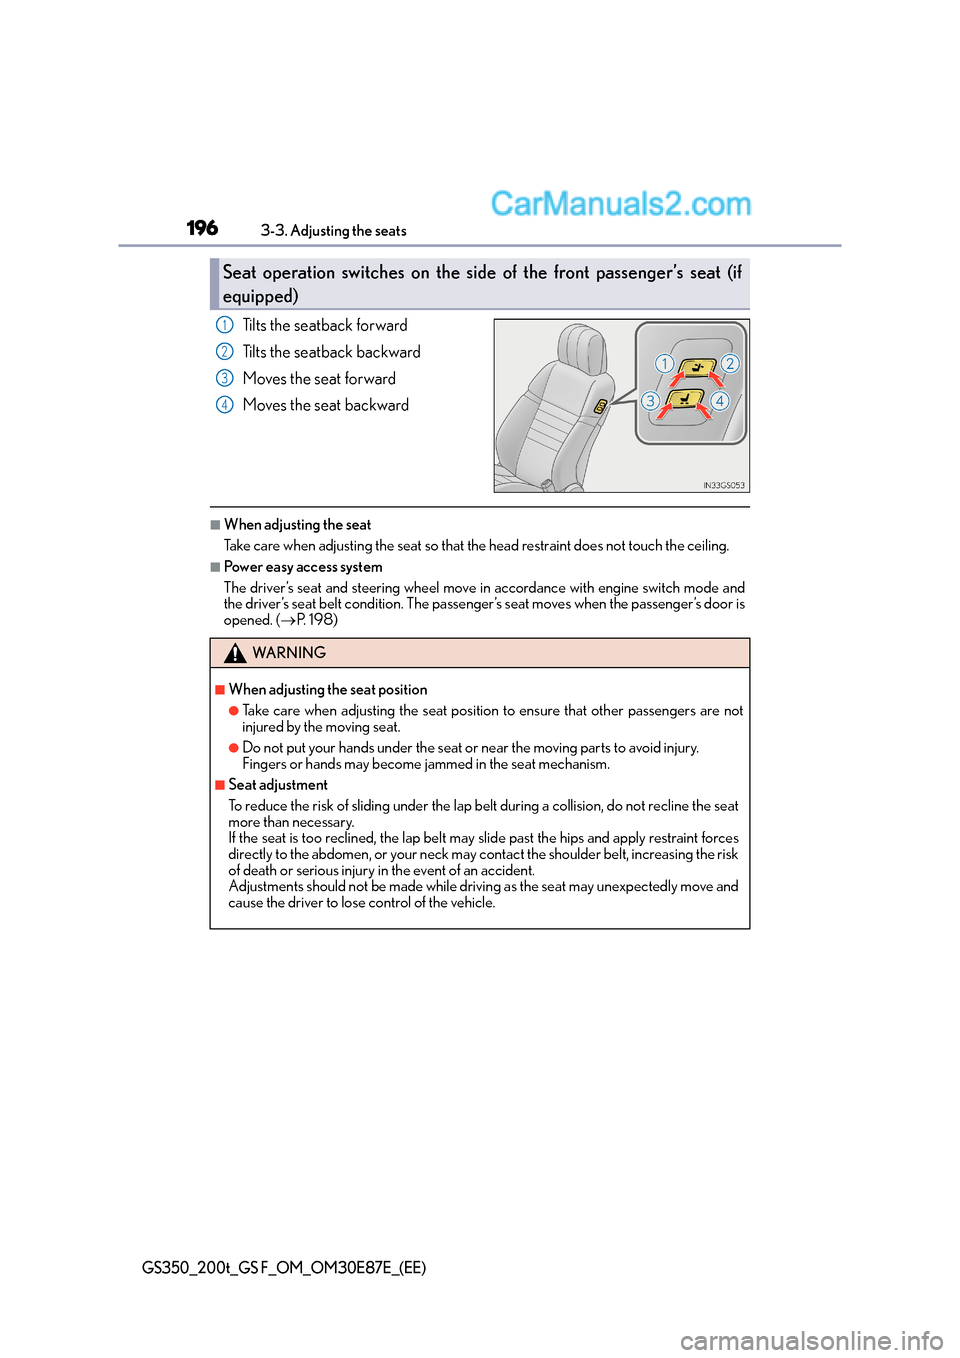
1963-3. Adjusting the seats
GS350_200t_GS F_OM_OM30E87E_(EE)
Tilts the seatback forward
Tilts the seatback backward
Moves the seat forward
Moves the seat backward
■When adjusting the seat
Take care when adjusting the seat so that the head restraint does not touch the ceiling.
■Power easy access system
The driver’s seat and steering wheel move in accordance with engine switch mode and
the driver’s seat belt condition. The passenger’s seat moves when the passenger’s door is
opened. (→P. 1 9 8 )
Seat operation switches on the side of the front passenger’s seat (if
equipped)
1
2
3
4
WA R N I N G
■When adjusting the seat position
●Take care when adjusting the seat position to ensure that other passengers are not
injured by the moving seat.
●Do not put your hands under the seat or near the moving parts to avoid injury.
Fingers or hands may become jammed in the seat mechanism.
■Seat adjustment
To reduce the risk of sliding under the lap be lt during a collision, do not recline the seat
more than necessary.
If the seat is too reclined, the lap belt may slide past the hips and apply restraint forces
directly to the abdomen, or your neck may contact the shoulder belt, increasing the risk
of death or serious injury in the event of an accident.
Adjustments should not be made while drivin g as the seat may unexpectedly move and
cause the driver to lose control of the vehicle.