Page 116 of 501
429
Features of your vehicle
D080102AAM
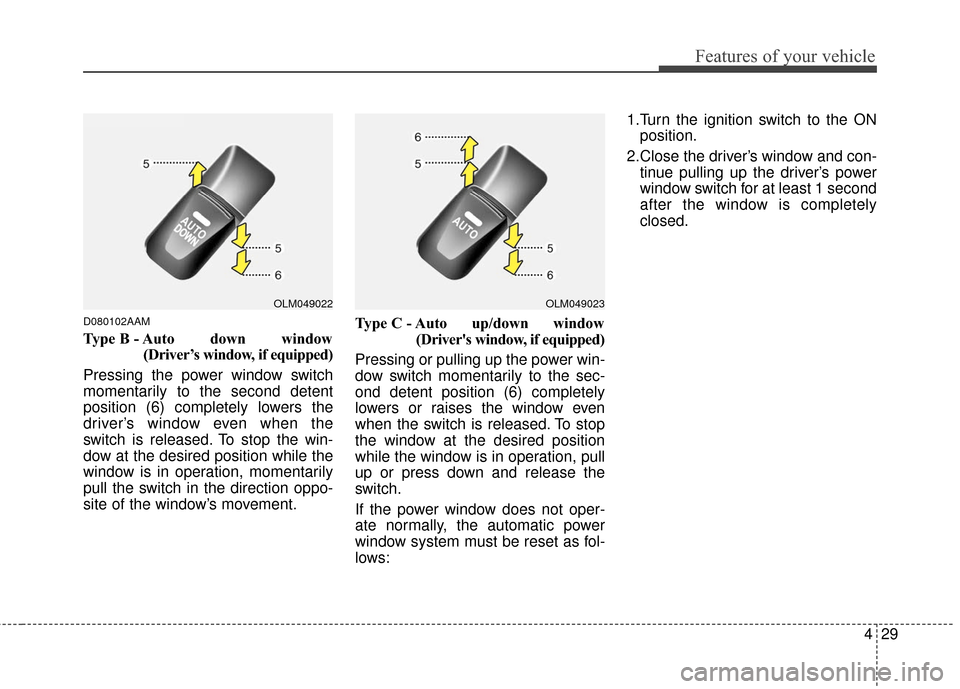
Type B - Auto down window(Driver’s window, if equipped)
Pressing the power window switch
momentarily to the second detent
position (6) completely lowers the
driver’s window even when the
switch is released. To stop the win-
dow at the desired position while the
window is in operation, momentarily
pull the switch in the direction oppo-
site of the window’s movement. Type C - Auto up/down window
(Driver's window, if equipped)
Pressing or pulling up the power win-
dow switch momentarily to the sec-
ond detent position (6) completely
lowers or raises the window even
when the switch is released. To stop
the window at the desired position
while the window is in operation, pull
up or press down and release the
switch.
If the power window does not oper-
ate normally, the automatic power
window system must be reset as fol-
lows: 1.Turn the ignition switch to the ON
position.
2.Close the driver’s window and con- tinue pulling up the driver’s power
window switch for at least 1 second
after the window is completely
closed.
OLM049023OLM049022
Page 127 of 501
Features of your vehicle
40
4
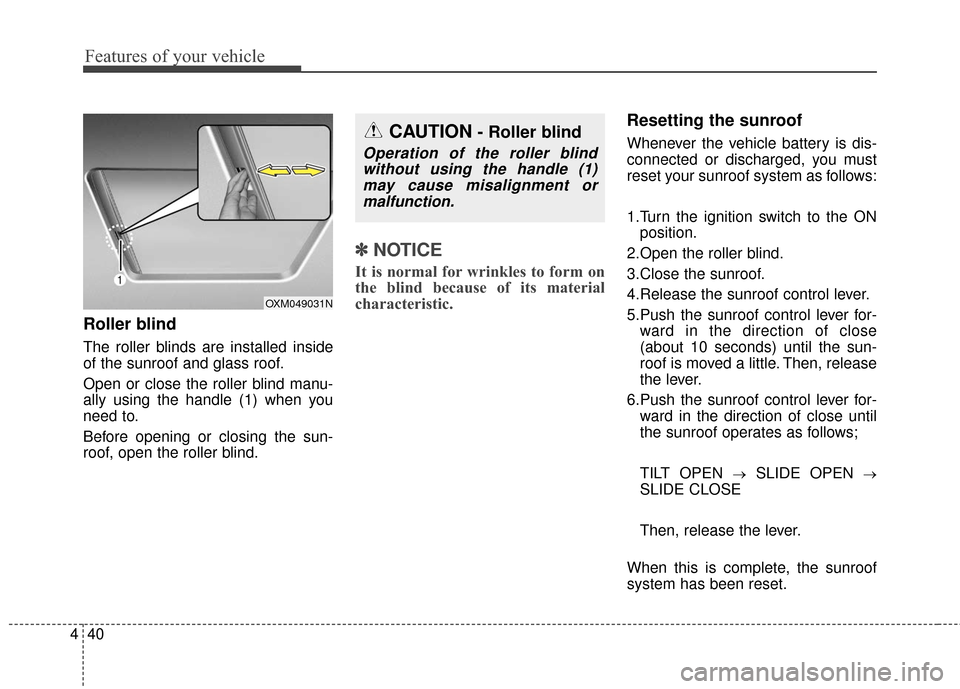
Roller blind
The roller blinds are installed inside
of the sunroof and glass roof.
Open or close the roller blind manu-
ally using the handle (1) when you
need to.
Before opening or closing the sun-
roof, open the roller blind.
✽ ✽
NOTICE
It is normal for wrinkles to form on
the blind because of its material
characteristic.
Resetting the sunroof
Whenever the vehicle battery is dis-
connected or discharged, you must
reset your sunroof system as follows:
1.Turn the ignition switch to the ON
position.
2.Open the roller blind.
3.Close the sunroof.
4.Release the sunroof control lever.
5.Push the sunroof control lever for- ward in the direction of close
(about 10 seconds) until the sun-
roof is moved a little. Then, release
the lever.
6.Push the sunroof control lever for- ward in the direction of close until
the sunroof operates as follows;
TILT OPEN
→SLIDE OPEN →
SLIDE CLOSE
Then, release the lever.
When this is complete, the sunroof
system has been reset.
OXM049031N
CAUTION- Roller blind
Operation of the roller blind without using the handle (1)may cause misalignment ormalfunction.
Page 147 of 501
Features of your vehicle
60
4
D150204BHM-EE
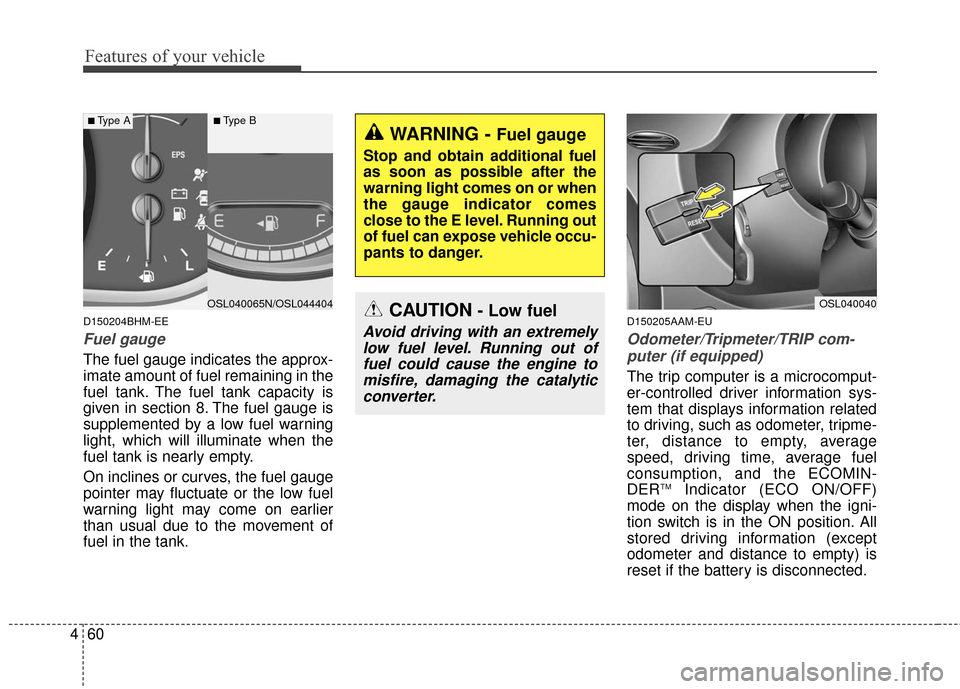
Fuel gauge
The fuel gauge indicates the approx-
imate amount of fuel remaining in the
fuel tank. The fuel tank capacity is
given in section 8. The fuel gauge is
supplemented by a low fuel warning
light, which will illuminate when the
fuel tank is nearly empty.
On inclines or curves, the fuel gauge
pointer may fluctuate or the low fuel
warning light may come on earlier
than usual due to the movement of
fuel in the tank.
D150205AAM-EU
Odometer/Tripmeter/TRIP com-
puter (if equipped)
The trip computer is a microcomput-
er-controlled driver information sys-
tem that displays information related
to driving, such as odometer, tripme-
ter, distance to empty, average
speed, driving time, average fuel
consumption, and the ECOMIN-
DER
TMIndicator (ECO ON/OFF)
mode on the display when the igni-
tion switch is in the ON position. All
stored driving information (except
odometer and distance to empty) is
reset if the battery is disconnected.
CAUTION- Low fuel
Avoid driving with an extremely low fuel level. Running out offuel could cause the engine tomisfire, damaging the catalyticconverter.
OSL040040OSL040065N/OSL044404
■Type A■Type B
WARNING - Fuel gauge
Stop and obtain additional fuel
as soon as possible after the
warning light comes on or when
the gauge indicator comes
close to the E level. Running out
of fuel can expose vehicle occu-
pants to danger.
Page 149 of 501
Features of your vehicle
62
4
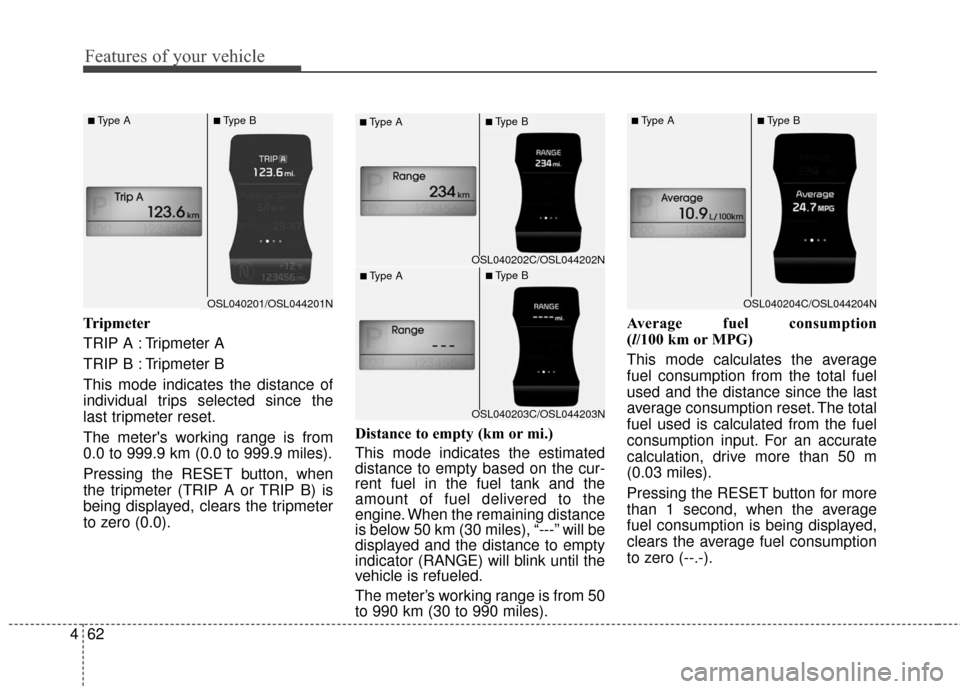
Tripmeter
TRIP A : Tripmeter A
TRIP B : Tripmeter B
This mode indicates the distance of
individual trips selected since the
last tripmeter reset.
The meter's working range is from
0.0 to 999.9 km (0.0 to 999.9 miles).
Pressing the RESET button, when
the tripmeter (TRIP A or TRIP B) is
being displayed, clears the tripmeter
to zero (0.0). Distance to empty (km or mi.)
This mode indicates the estimated
distance to empty based on the cur-
rent fuel in the fuel tank and the
amount of fuel delivered to the
engine. When the remaining distance
is below 50 km (30 miles), “---” will be
displayed and the distance to empty
indicator (RANGE) will blink until the
vehicle is refueled.
The meter’s working range is from 50
to 990 km (30 to 990 miles).Average fuel consumption
(l/100 km or MPG)
This mode calculates the average
fuel consumption from the total fuel
used and the distance since the last
average consumption reset. The total
fuel used is calculated from the fuel
consumption input. For an accurate
calculation, drive more than 50 m
(0.03 miles).
Pressing the RESET button for more
than 1 second, when the average
fuel consumption is being displayed,
clears the average fuel consumption
to zero (--.-).
OSL040204C/OSL044204N
■Type A■Type B
OSL040202C/OSL044202N
■Type A■Type B
OSL040203C/OSL044203N
■Type A■Type B
OSL040201/OSL044201N
■Type A■Type B
Page 151 of 501
Features of your vehicle
64
4
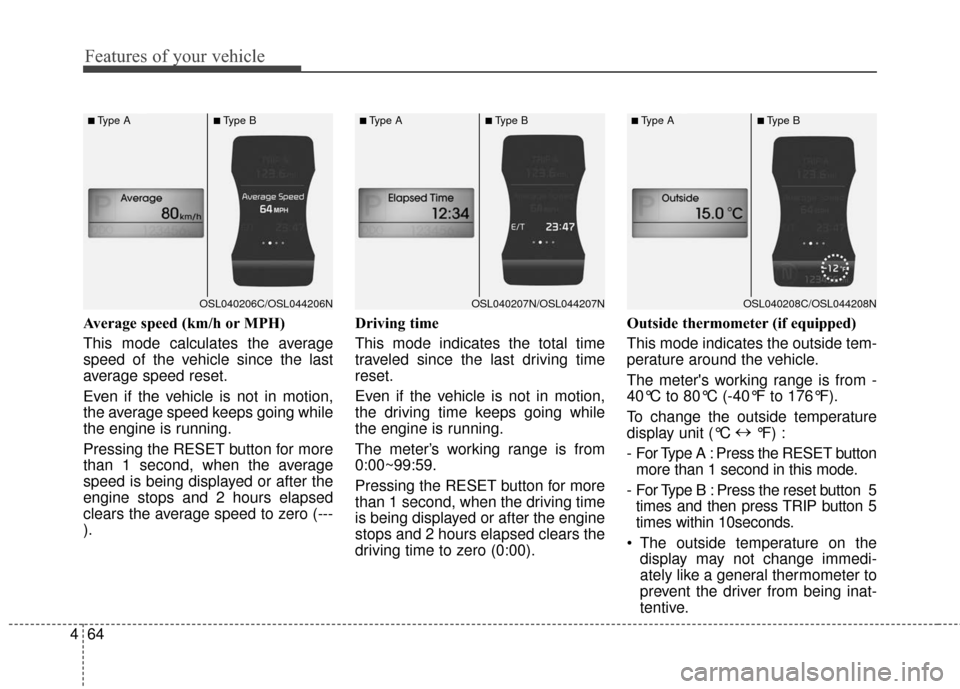
Average speed (km/h or MPH)
This mode calculates the average
speed of the vehicle since the last
average speed reset.
Even if the vehicle is not in motion,
the average speed keeps going while
the engine is running.
Pressing the RESET button for more
than 1 second, when the average
speed is being displayed or after the
engine stops and 2 hours elapsed
clears the average speed to zero (---
). Driving time
This mode indicates the total time
traveled since the last driving time
reset.
Even if the vehicle is not in motion,
the driving time keeps going while
the engine is running.
The meter’s working range is from
0:00~99:59.
Pressing the RESET button for more
than 1 second, when the driving time
is being displayed or after the engine
stops and 2 hours elapsed clears the
driving time to zero (0:00).Outside thermometer
(if equipped)
This mode indicates the outside tem-
perature around the vehicle.
The meter's working range is from -
40°C to 80°C (-40°F to 176°F).
To change the outside temperature
display unit (°C ↔
°F) :
- For Type A : Press the RESET button more than 1 second in this mode.
- For Type B : Press the reset button 5 times and then press TRIP button 5
times within 10seconds.
The outside temperature on the display may not change immedi-
ately like a general thermometer to
prevent the driver from being inat-
tentive.
OSL040207N/OSL044207N
■Type A■Type B
OSL040208C/OSL044208N
■Type A■Type B
OSL040206C/OSL044206N
■Type A■Type B
Page 199 of 501
Features of your vehicle
112
4
Temperature conversion
You can switch the temperature
mode from Centigrade to Fahrenheit
as follows:
While pressing the OFF button,
press the AUTO button for 3 seconds
or more.
The display will change from
Centigrade to Fahrenheit, or from
Fahrenheit to Centigrade.
If the battery has been discharged or
disconnected, the temperature mode
display will reset to Centigrade.
Air intake control
This is used to select the outside
(fresh) air position or recirculated air
position.
To change the air intake control posi-
tion, push the control button. Recirculated air position
With the recirculated airposition selected, air
from the passenger
compartment will be
drawn through the heat-
ing system and heated
or cooled according to
the function selected.
Outside (fresh) air position With the outside (fresh)
air position selected, air
enters the vehicle from
outside and is heated or
cooled according to the
function selected.
OSL040085
Page 204 of 501
4117
Features of your vehicle
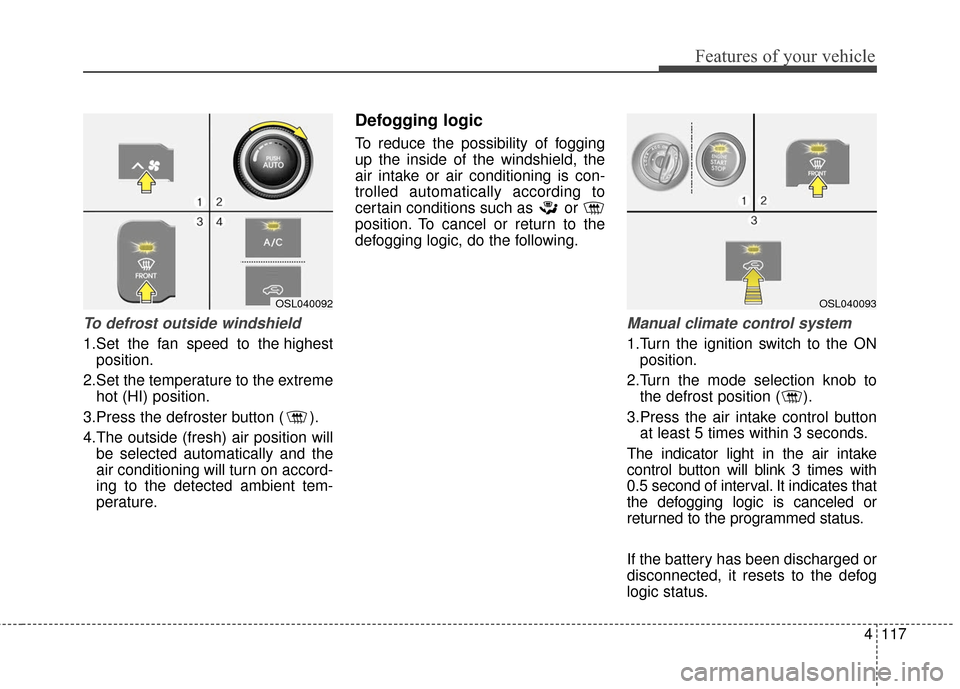
To defrost outside windshield
1.Set the fan speed to the highestposition.
2.Set the temperature to the extreme hot (HI) position.
3.Press the defroster button ( ).
4.The outside (fresh) air position will be selected automatically and the
air conditioning will turn on accord-
ing to the detected ambient tem-
perature.
Defogging logic
To reduce the possibility of fogging
up the inside of the windshield, the
air intake or air conditioning is con-
trolled automatically according to
certain conditions such as or
position. To cancel or return to the
defogging logic, do the following.
Manual climate control system
1.Turn the ignition switch to the ONposition.
2.Turn the mode selection knob to the defrost position ( ).
3.Press the air intake control button at least 5 times within 3 seconds.
The indicator light in the air intake
control button will blink 3 times with
0.5 second of interval. It indicates that
the defogging logic is canceled or
returned to the programmed status.
If the battery has been discharged or
disconnected, it resets to the defog
logic status.
OSL040093OSL040092
Page 205 of 501
Features of your vehicle
118
4
Automatic climate control system
1.Turn the ignition switch to the ON
position.
2.Select the defroster position press- ing the defroster button ( ).
3.While pressing the air conditioning button (A/C), press the air intake
control button at least 5 times with-
in 3 seconds.
The A/C display blinks 3 times with
0.5 second of interval. It indicates that
the defogging logic is canceled or
returned to the programmed status. If the battery has been discharged or
disconnected, it resets to the defog
logic status.
OSL040094