2016 KIA Sportage power steering
[x] Cancel search: power steeringPage 14 of 501
Your vehicle at a glance
42
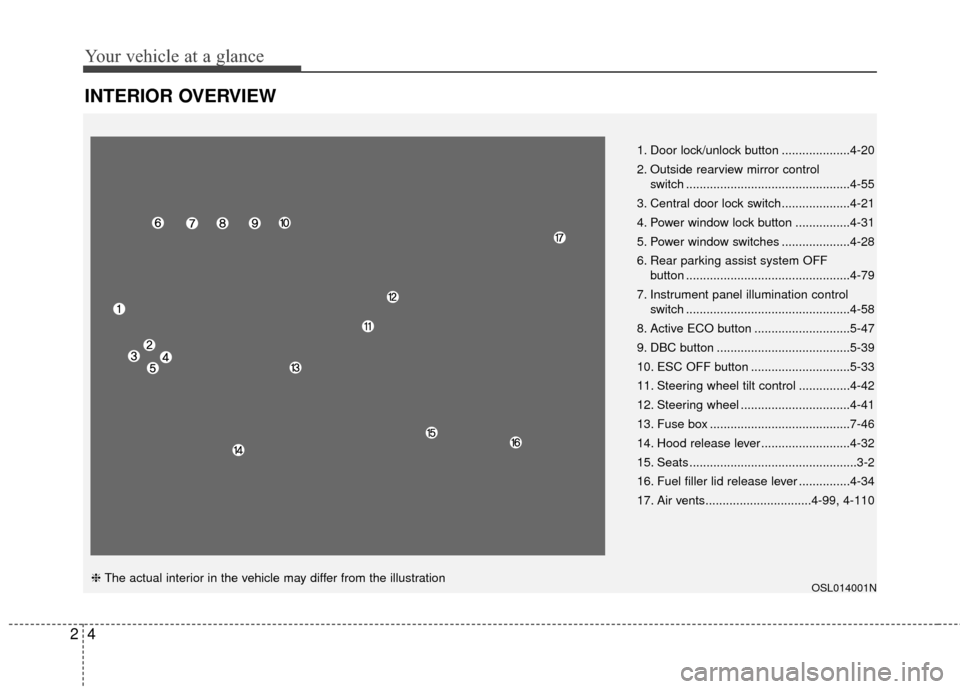
INTERIOR OVERVIEW
OSL014001N
1. Door lock/unlock button ....................4-20
2. Outside rearview mirror control switch ................................................4-55
3. Central door lock switch....................4-21
4. Power window lock button ................4-31
5. Power window switches ....................4-28
6. Rear parking assist system OFF button ................................................4-79
7. Instrument panel illumination control switch ................................................4-58
8. Active ECO button ............................5-47
9. DBC button .......................................5-39
10. ESC OFF button .............................5-33
11. Steering wheel tilt control ...............4-42
12. Steering wheel ................................4-41
13. Fuse box .........................................7-46
14. Hood release lever ..........................4-32
15. Seats .................................................3-2
16. Fuel filler lid release lever ...............4-34
17. Air vents...............................4-99, 4-110
❈ The actual interior in the vehicle may differ from the illustration
Page 15 of 501
25
Your vehicle at a glance
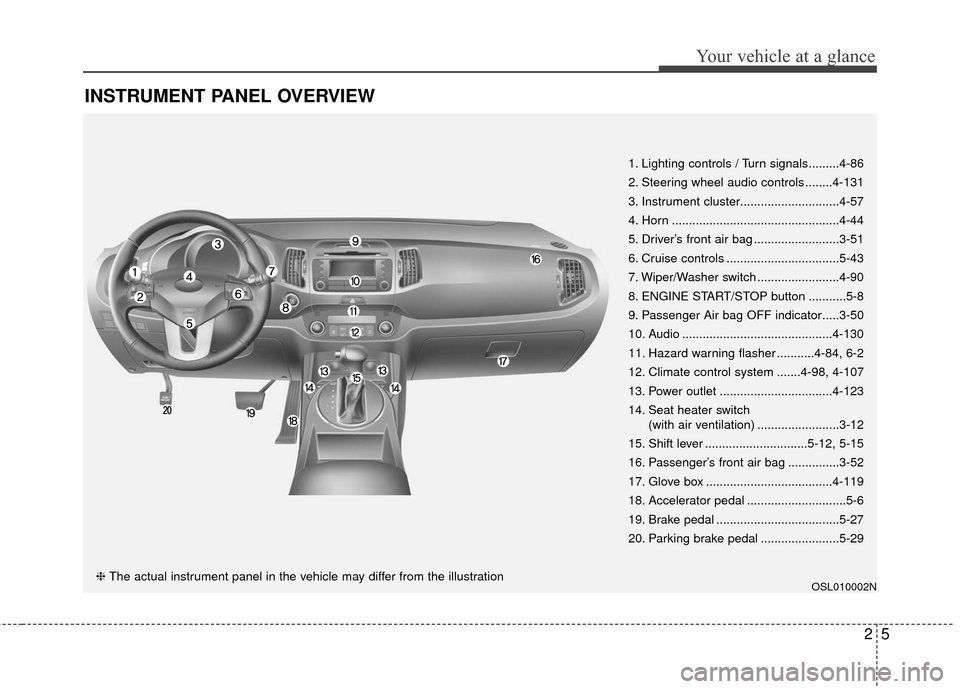
INSTRUMENT PANEL OVERVIEW
OSL010002N
1. Lighting controls / Turn signals.........4-86
2. Steering wheel audio controls ........4-131
3. Instrument cluster.............................4-57
4. Horn .................................................4-44
5. Driver’s front air bag .........................3-51
6. Cruise controls .................................5-43
7. Wiper/Washer switch ........................4-90
8. ENGINE START/STOP button ...........5-8
9. Passenger Air bag OFF indicator.....3-50
10. Audio ............................................4-130
11. Hazard warning flasher ...........4-84, 6-2
12. Climate control system .......4-98, 4-107
13. Power outlet .................................4-123
14. Seat heater switch(with air ventilation) ........................3-12
15. Shift lever ..............................5-12, 5-15
16. Passenger’s front air bag ...............3-52
17. Glove box .....................................4-119
18. Accelerator pedal .............................5-6
19. Brake pedal ....................................5-27
20. Parking brake pedal .......................5-29
❈ The actual instrument panel in the vehicle may differ from the illustration
Page 22 of 501
Safety features of your vehicle
63
C010103APB
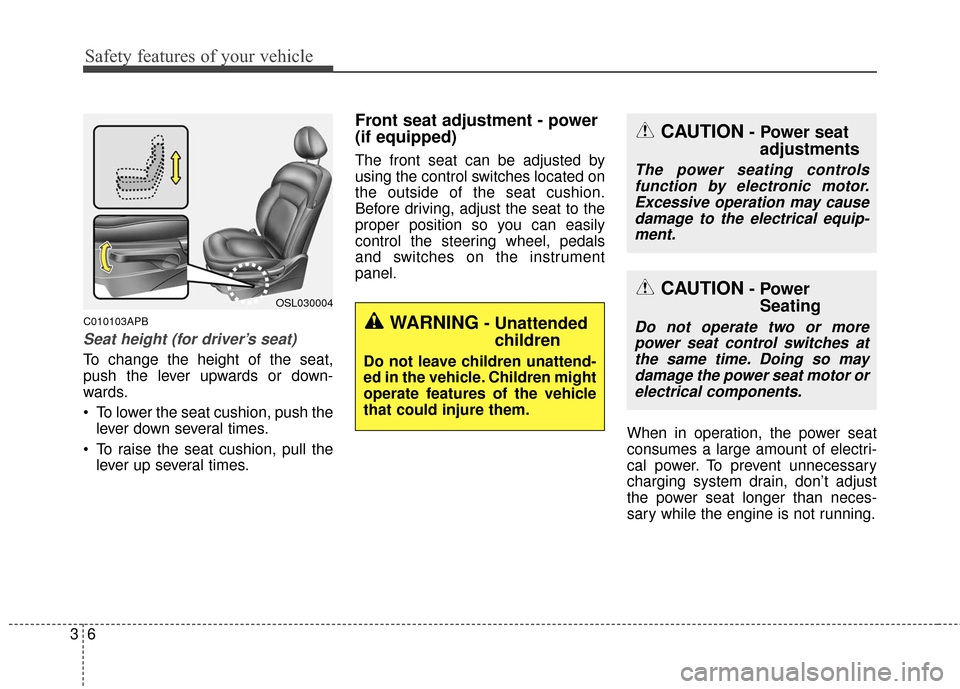
Seat height (for driver’s seat)
To change the height of the seat,
push the lever upwards or down-
wards.
To lower the seat cushion, push thelever down several times.
To raise the seat cushion, pull the lever up several times.
Front seat adjustment - power
(if equipped)
The front seat can be adjusted by
using the control switches located on
the outside of the seat cushion.
Before driving, adjust the seat to the
proper position so you can easily
control the steering wheel, pedals
and switches on the instrument
panel.
When in operation, the power seat
consumes a large amount of electri-
cal power. To prevent unnecessary
charging system drain, don’t adjust
the power seat longer than neces-
sary while the engine is not running.
OSL030004
CAUTION- Power seatadjustments
The power seating controls
function by electronic motor.Excessive operation may causedamage to the electrical equip-ment.
CAUTION- Power Seating
Do not operate two or more
power seat control switches atthe same time. Doing so maydamage the power seat motor orelectrical components.WARNING- Unattended children
Do not leave children unattend-
ed in the vehicle. Children might
operate features of the vehicle
that could injure them.
Page 128 of 501
441
Features of your vehicle
Electric power steering
Power steering uses the motor to
assist you in steering the vehicle. If
the engine is off or if the power steer-
ing system becomes inoperative, the
vehicle may still be steered, but it will
require increased steering effort.
The motor driven power steering is
controlled by the power steering con-
trol unit which senses the steering
wheel torque and vehicle speed to
command the motor.
The steering wheel becomes heavier
as the vehicle’s speed increases and
becomes lighter as the vehicle’s
speed decreases for better control of
the steering wheel.
Should you notice any change in the
effort required to steer during normal
vehicle operation, have the power
steering checked by an authorized
Kia dealer.
✽ ✽NOTICE
The following symptoms may occur
during normal vehicle operation:
• The steering effort is high immedi-
ately after turning the ignition
switch on. This happens as the sys-
tem performs the EPS system
diagnostics. When the diagnostics
is completed, the steering wheel
will return to its normal condition.
• A click noise may be heard from the EPS relay after the ignition
switch is turned to the ON or
LOCK position.
• Motor noise may be heard when the vehicle is at a stop or at a low
driving speed.
• The steering effort increases if the steering wheel is rotated continu-
ously when the vehicle is not in
motion. However, after a few min-
utes, it will return to its normal
conditions.
• When you operate the steering wheel in low temperature, abnor-
mal noise could occur. If tempera-
ture rises, the noise will disappear.
This is a normal condition.
STEERING WHEEL
CAUTION
If the EPS system does not
operate normally, the warninglight will illuminate on theinstrument cluster. The steeringwheel may become difficult tocontrol or operate abnormally.Take your vehicle to an author-ized Kia dealer and have thevehicle checked as soon aspossible.
Page 133 of 501
Features of your vehicle
46
4
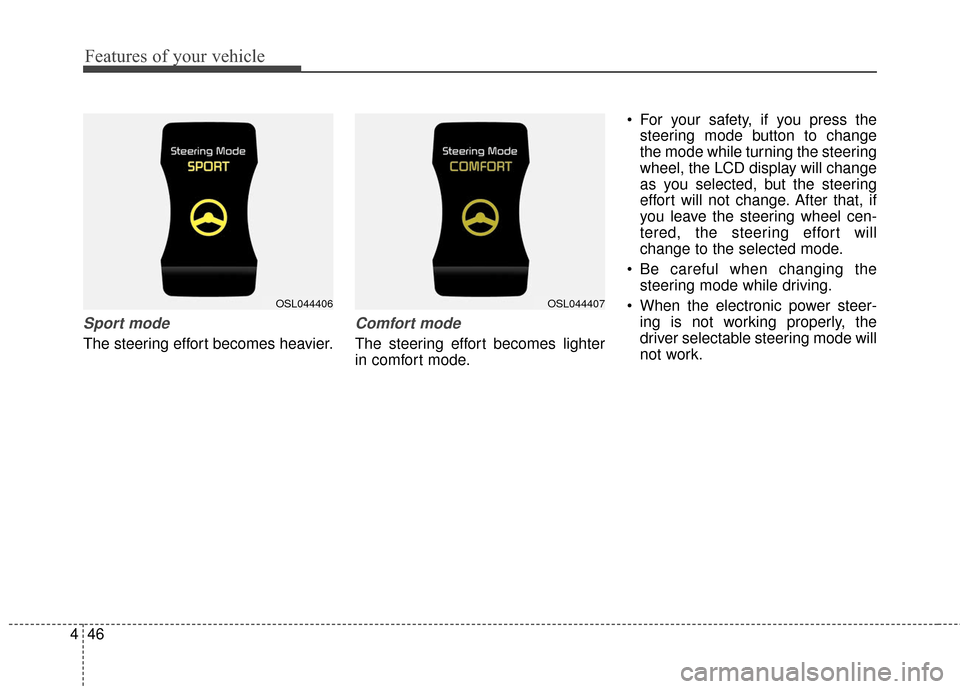
Sport mode
The steering effort becomes heavier.
Comfort mode
The steering effort becomes lighter
in comfort mode. For your safety, if you press the
steering mode button to change
the mode while turning the steering
wheel, the LCD display will change
as you selected, but the steering
effort will not change. After that, if
you leave the steering wheel cen-
tered, the steering effort will
change to the selected mode.
Be careful when changing the steering mode while driving.
When the electronic power steer- ing is not working properly, the
driver selectable steering mode will
not work.
OSL044407OSL044406
Page 159 of 501
Features of your vehicle
72
4
Electric power steering
(EPS) system warninglight
This indicator light comes on after
the ignition key is turned to the ON
position and then it will go out after
the engine is started.
This light also comes on when the
EPS has some troubles. If it comes
on while driving, have your vehicle
inspected by an authorized Kia deal-
er.
Immobilizer indicator
With smart key system
If any of the following occurs in a
vehicle equipped with the smart key,
the immobilizer indicator illuminates,
blinks or goes off.
When the smart key is in the vehicle, if the ENGINE START/STOP button
is in the ACC or ON position, the
indicator will illuminate for approxi-
mately 30 seconds to indicate that
you are able to start the engine.
However, when the smart key is not
in the vehicle, if the ENGINE
START/STOP button is pressed, the
indicator will blink for a few seconds
to indicate that you are not be able to
start the engine.
If the indicator illuminates only for 2 seconds and goes out when the
ENGINE START/STOP button is
turned to ON position with the smart
key in the vehicle, have the system
checked by an authorized Kia dealer. When the battery is weak, if the
ENGINE START/STOP button is
pressed, the indicator will blink and
you are not able to start the
engine. However, you can start the
engine if you press the Engine
Start/Stop Button with the smart
key. Also, if the smart key system
related parts have a problem, the
indicator will blink.
EPS
Page 240 of 501
![KIA Sportage 2016 QL / 4.G Owners Manual 4153
Features of your vehicle
CLOCK SETTINGS
Press the key Select [Clock]
through TUNE knob or key
Select menu through TUNE knob
Clock Settings
This menu is used to set the time.
Select [Clock Set KIA Sportage 2016 QL / 4.G Owners Manual 4153
Features of your vehicle
CLOCK SETTINGS
Press the key Select [Clock]
through TUNE knob or key
Select menu through TUNE knob
Clock Settings
This menu is used to set the time.
Select [Clock Set](/manual-img/2/2981/w960_2981-239.png)
4153
Features of your vehicle
CLOCK SETTINGS
Press the key Select [Clock]
through TUNE knob or key
Select menu through TUNE knob
Clock Settings
This menu is used to set the time.
Select [Clock Settings] Set throughTUNE knob Press TUNE knob
❈ Adjust the number currently in
focus to set the [hour] and press
the tune knob to set the [minute]
and [AM/PM].
Calendar Settings
This menu is used to set the date.
Select [Calendar Settings] Set
through TUNE knob Press
TUNE knob ❈
Adjust the number currently in
focus to make the settings and
press the tune knob to move to the
next setting.
Time Format
This function is used to set the
12/24 hour time format of the
audio system. Select [Time
Format] Set 12Hr / 24Hr through
TUNEknob
Clock Display when Power is OFF
Select [Clock Disp.(Pwr Off)] Set
/through TUNEknob
: Displays time/date on screen
: Turn off.Off
On
OffOn
3
SETUPCLOCK
WARNING- Clock Setting
Distraction
Do not adjust the clock while
driving. You may lose your
steering control and cause
severe personal injury or acci-
dents.
Page 256 of 501
4169
Features of your vehicle
PHONE
Before using theBluetooth®Wireless
Technology phone features
Bluetooth®Wireless
Technology phone, you must first
pair and connect the
Bluetooth®
Wireless Technology mobile phone.
connected, it is not possible to
enter Phone mode. Once a phone
is paired or connected, the guid-
ance screen will be displayed.
tion (IGN/ACC ON), the
Bluetooth®
Wireless Technology phone will be
automatically connected. Even if
you are outside, the
Bluetooth®
Wireless Technology phone will be
automatically connected once you
are in the vicinity of the vehicle. If
you do not want automatic
Bluetooth®Wireless Technology
phone connection, set the
Bluetooth®Wireless Technology
power to OFF
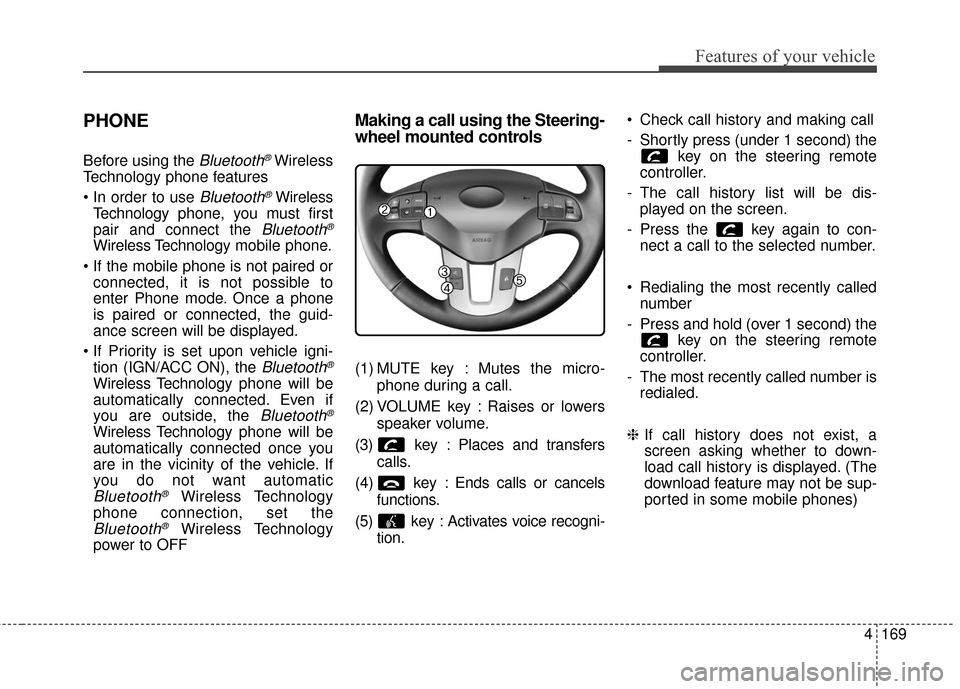
Making a call using the Steering-
wheel mounted controls
(1) MUTE key : Mutes the micro-
phone during a call.
(2) VOLUME key : Raises or lowers speaker volume.
(3) key : Places and transfers calls.
(4) key : Ends calls or cancels functions.
(5) key : Activates voice recogni- tion. Check call history and making call
- Shortly press (under 1 second) the
key on the steering remote
controller.
- The call history list will be dis- played on the screen.
- Press the key again to con- nect a call to the selected number.
Redialing the most recently called number
- Press and hold (over 1 second) the key on the steering remote
controller.
- The most recently called number is redialed.
❈ If call history does not exist, a
screen asking whether to down-
load call history is displayed. (The
download feature may not be sup-
ported in some mobile phones)