Page 137 of 501
Features of your vehicle
50
4
Retain the original transmitter for
future programming procedures (i.e.,
new vehicle purchase). It is also sug-
gested that upon the sale of the vehi-
cle, the programmed HomeLink
®but-
tons be erased for security purposes
(follow step 1 in the “Programming”
portion of this text).
Programming
Your vehicle may require the ignition
switch to be turned to the ACC posi-
tion for programming and/or opera-
tion of HomeLink
®. It is also recom-
mended that a new battery be
replaced in the hand-held transmitter
of the device being programmed to
HomeLink
®for quicker training and
accurate transmission of the radio-
frequency.
Follow these steps to train your
HomeLink
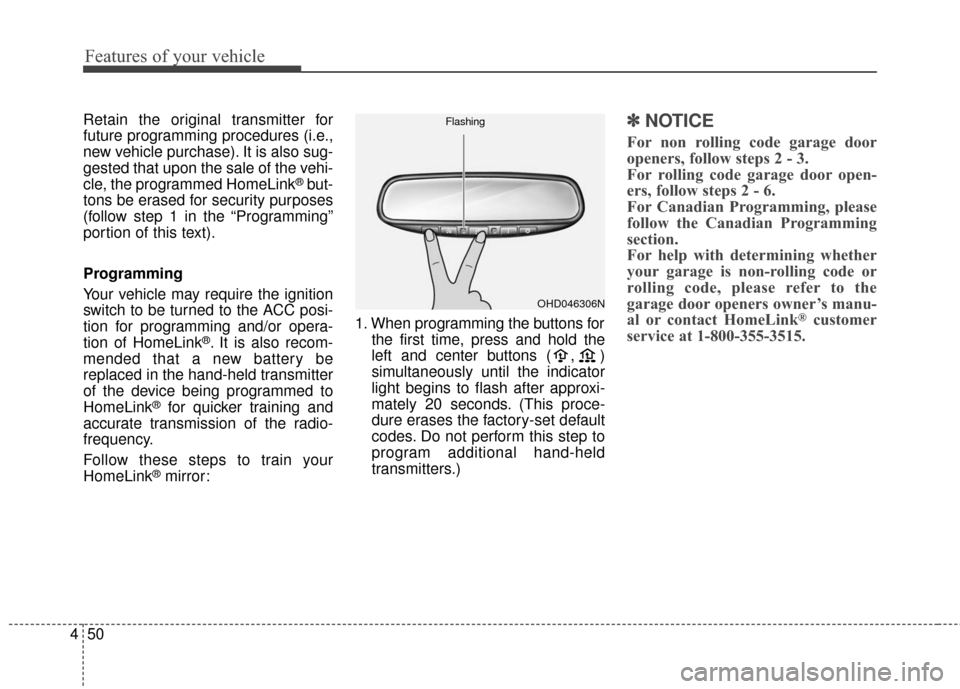
®mirror: 1. When programming the buttons for
the first time, press and hold the
left and center buttons ( , )
simultaneously until the indicator
light begins to flash after approxi-
mately 20 seconds. (This proce-
dure erases the factory-set default
codes. Do not perform this step to
program additional hand-held
transmitters.)
✽ ✽NOTICE
For non rolling code garage door
openers, follow steps 2 - 3.
For rolling code garage door open-
ers, follow steps 2 - 6.
For Canadian Programming, please
follow the Canadian Programming
section.
For help with determining whether
your garage is non-rolling code or
rolling code, please refer to the
garage door openers owner’s manu-
al or contact HomeLink
®customer
service at 1-800-355-3515.
OHD046306N
Flashing
Page 143 of 501
Features of your vehicle
56
4
D140202AHM-EU
Folding the outside rearview mir-
ror
Manual type (if equipped)
To fold the outside rearview mirror,
grasp the housing of the mirror and
then fold it toward the rear of the
vehicle. Electric type (if equipped)
To fold the outside rearview mirror,
press the button.
To unfold it, press the button again.
OSL040028OSL040029
CAUTION- Electric type
outside rearview mirror
The electric type outside
rearview mirror operates eventhough the ignition switch is inthe OFF position. However, toprevent unnecessary batterydischarge, do not adjust themirrors longer than necessarywhile the engine is not running.
In case it is an electric type out-side rearview mirror, don’t fold itby hand. It could cause motorfailure.
Page 147 of 501
Features of your vehicle
60
4
D150204BHM-EE
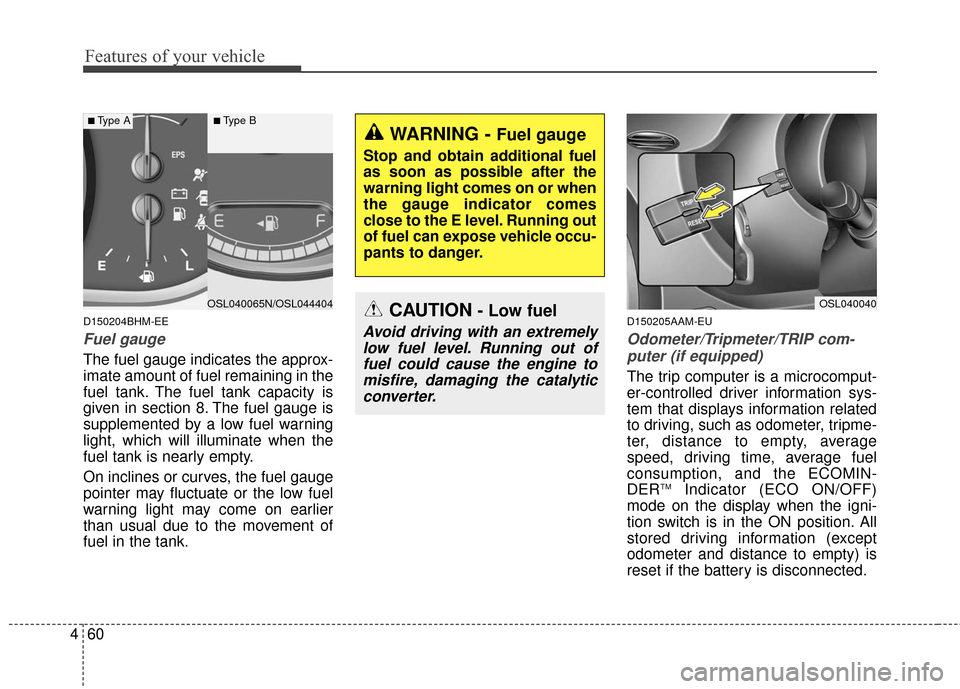
Fuel gauge
The fuel gauge indicates the approx-
imate amount of fuel remaining in the
fuel tank. The fuel tank capacity is
given in section 8. The fuel gauge is
supplemented by a low fuel warning
light, which will illuminate when the
fuel tank is nearly empty.
On inclines or curves, the fuel gauge
pointer may fluctuate or the low fuel
warning light may come on earlier
than usual due to the movement of
fuel in the tank.
D150205AAM-EU
Odometer/Tripmeter/TRIP com-
puter (if equipped)
The trip computer is a microcomput-
er-controlled driver information sys-
tem that displays information related
to driving, such as odometer, tripme-
ter, distance to empty, average
speed, driving time, average fuel
consumption, and the ECOMIN-
DER
TMIndicator (ECO ON/OFF)
mode on the display when the igni-
tion switch is in the ON position. All
stored driving information (except
odometer and distance to empty) is
reset if the battery is disconnected.
CAUTION- Low fuel
Avoid driving with an extremely low fuel level. Running out offuel could cause the engine tomisfire, damaging the catalyticconverter.
OSL040040OSL040065N/OSL044404
■Type A■Type B
WARNING - Fuel gauge
Stop and obtain additional fuel
as soon as possible after the
warning light comes on or when
the gauge indicator comes
close to the E level. Running out
of fuel can expose vehicle occu-
pants to danger.
Page 150 of 501
463
Features of your vehicle
If the vehicle speed exceeds 1 km/h
(1.6 MPH) after refueled more than 6
l(1.6 gallons), the average fuel con-
sumption will be cleared to zero (--.-).
Instant fuel consumption (if equipped)
(l/100 km or MPG)
This mode calculates the instant fuel
consumption during the last few sec-
onds. If the vehicle is not on level ground
or the battery power has been
interrupted, the “Distance to
empty” function may not operate
correctly.
The trip computer may not register
additional fuel if less than 6 liters
(1.6 gallons) of fuel are added to
the vehicle.
The fuel consumption and distance to empty values may vary signifi-
cantly based on driving conditions,
driving habits, and condition of the
vehicle.
The distance to empty value is an estimate of the available driving
distance. This value may differ from
the actual driving distance avail-
able.
OSL040205C/OSL044205N
■Type A■Type B
Page 159 of 501
Features of your vehicle
72
4
Electric power steering
(EPS) system warninglight
This indicator light comes on after
the ignition key is turned to the ON
position and then it will go out after
the engine is started.
This light also comes on when the
EPS has some troubles. If it comes
on while driving, have your vehicle
inspected by an authorized Kia deal-
er.
Immobilizer indicator
With smart key system
If any of the following occurs in a
vehicle equipped with the smart key,
the immobilizer indicator illuminates,
blinks or goes off.
When the smart key is in the vehicle, if the ENGINE START/STOP button
is in the ACC or ON position, the
indicator will illuminate for approxi-
mately 30 seconds to indicate that
you are able to start the engine.
However, when the smart key is not
in the vehicle, if the ENGINE
START/STOP button is pressed, the
indicator will blink for a few seconds
to indicate that you are not be able to
start the engine.
If the indicator illuminates only for 2 seconds and goes out when the
ENGINE START/STOP button is
turned to ON position with the smart
key in the vehicle, have the system
checked by an authorized Kia dealer. When the battery is weak, if the
ENGINE START/STOP button is
pressed, the indicator will blink and
you are not able to start the
engine. However, you can start the
engine if you press the Engine
Start/Stop Button with the smart
key. Also, if the smart key system
related parts have a problem, the
indicator will blink.
EPS
Page 163 of 501
Features of your vehicle
76
4
4WD LOCK indicator
(if equipped)
The 4WD LOCK indicator light is illu-
minated when the 4WD LOCK button
is pushed. The purpose of this 4WD
LOCK mode is to increase the drive
power when driving on wet pave-
ment, snow-covered roads and/or
off-road. The 4WD LOCK indicator
light is turned off by pushing the but-
ton again.
LCD display warning (if equipped)
Key not in vehicle
If the smart key is not in the vehicle
and if any door is opened or closed
with the ENGINE START/STOP but-
ton in the ACC, ON, or START posi-
tion, the warning illuminates on the
LCD display. Also, the chime sounds
for 5 seconds when the smart key is
not in the vehicle and the door is
closed.
Always have the smart key with you.
Key not detected
If the smart key is not in the vehicle
or is not detected and you press the
ENGINE START/STOP button, the
warning illuminates on the LCD dis-
play for 10 seconds. Also, the immo-
bilizer indicator light blinks for 10
seconds. Low key battery
If the ENGINE START/STOP button
turns to the OFF position when the
smart key in the vehicle discharges,
the warning illuminates on the LCD
display for about 10 seconds. Also,
the warning chime sounds once.
Replace the battery with a new one.
Press brake pedal to start engine
If the ENGINE START/STOP button
turns to the ACC position twice by
pressing the button repeatedly with-
out depressing the brake pedal, the
warning illuminates on the LCD dis-
play for about 10 seconds to indicate
that you should depress the brake
pedal to start the engine.
CAUTION- 4WD lock
mode
Do not use 4WD LOCK mode on
dry paved roads or highway, itcan cause noise, vibration ordamage of 4WD related parts.
Page 172 of 501
485
Features of your vehicle
D190100APB
Battery saver function
The purpose of this feature is toprevent the battery from being dis-
charged if the lights are left in the
ON position. The system automati-
cally turns off the parking lights
when the driver turns off the
engine and opens the driver-side
door.
With this feature, the parking lights will turn off automatically if the driv-
er parks on the side of the road at
night and opens the driver’s side
door.
If necessary, to keep the parking
lights on when the ignition key is
removed, perform the following:
1) Open the driver-side door.
2) Turn the parking lights OFF and ON again using the light switch
on the steering column.
Headlight escort function
(if equipped)
The headlights (and/or taillights)
remain on for approximately 5 min-
utes after the ignition key is removed
or turned to the ACC or LOCK posi-
tion. However, if the driver’s door
(and tailgate) is opened and closed,
the headlights are turned off after 15
seconds.
The headlights can be turned off by
pressing the lock button on the trans-
mitter (or smart key) twice or turning
off the light switch from the headlight
or Auto light position.
If the driver gets out of the vehicle
through other doors (except driver's
door), the battery saver function
does not operate and the headlight
escort function does not turn off
automatically. Therefore, It causes
the battery to be discharged. In this
case, make sure to turn off the lamp
before getting out of the vehicle.
Headlight welcome function
(if equipped)
When the headlight switch is in the
ON or AUTO position and all doors
(and tailgate) are closed and locked,
if you press the door unlock button
on the transmitter (or smart key), the
headlights will come on for about 15
seconds.
If the headlight switch is in the AUTO
position, the function can only oper-
ate at night.
At this time, if you press the door lock
button or unlock button (once or
twice) on the transmitter (or smart
key), the headlights will turn off
immediately.
LIGHTING
Page 174 of 501
487
Features of your vehicle
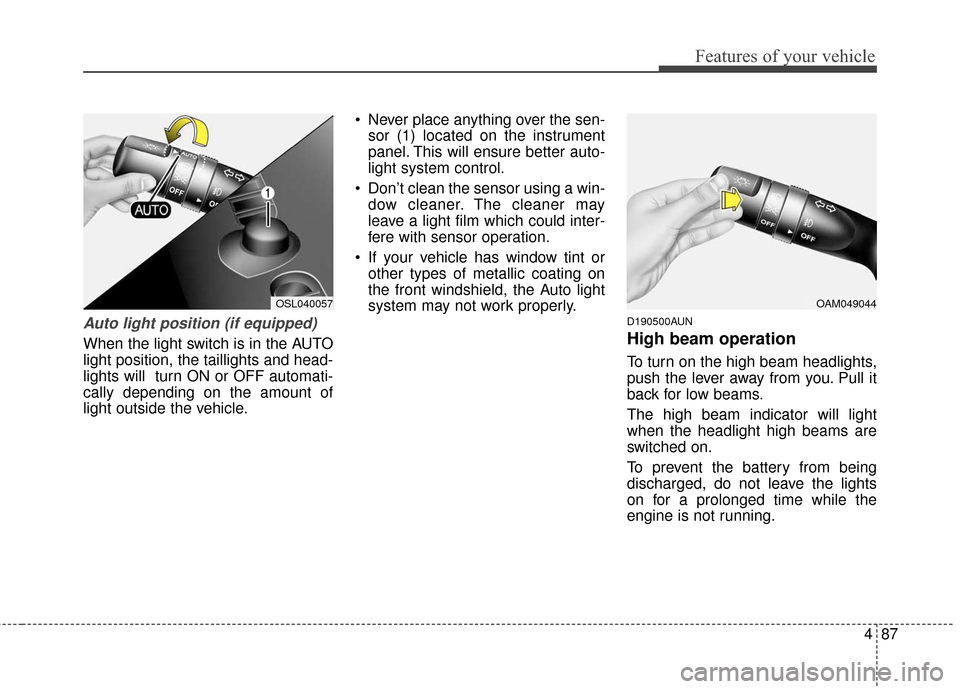
Auto light position (if equipped)
When the light switch is in the AUTO
light position, the taillights and head-
lights will turn ON or OFF automati-
cally depending on the amount of
light outside the vehicle. Never place anything over the sen-
sor (1) located on the instrument
panel. This will ensure better auto-
light system control.
Don’t clean the sensor using a win- dow cleaner. The cleaner may
leave a light film which could inter-
fere with sensor operation.
If your vehicle has window tint or other types of metallic coating on
the front windshield, the Auto light
system may not work properly.
D190500AUN
High beam operation
To turn on the high beam headlights,
push the lever away from you. Pull it
back for low beams.
The high beam indicator will light
when the headlight high beams are
switched on.
To prevent the battery from being
discharged, do not leave the lights
on for a prolonged time while the
engine is not running.
OAM049044OSL040057