Page 153 of 556
473
Features of your vehicle
Trip Modes (for Type B cluster)Trip A/BTripmeter (1)
The tripmeter is the total driving dis-tance since the last tripmeter reset.
- Distance range: 0.0 ~ 9999.9 mi. or km
To reset the tripmeter, press the RESET/ button on the steering
wheel for more than 1 second
when the tripmeter is displayed.
Average Vehicle Speed (2)
The average vehicle speed is cal-culated by the total driving dis-
tance and driving time since the
last average vehicle speed reset.
- Speed range: 160 MPH or 200km/h
To reset the average vehicle speed, press the RESET/ button on the
steering wheel for more than 1 sec-
ond when the average vehicle
speed is displayed.
TRIP A
TRIP B
FUEL ECONOMY
To change the trip mode, press the
MOVE button .
■Type A
OPS043125C
OPS043127C
■ Type B
Page 154 of 556

Features of your vehicle
74
4
✽
✽
NOTICE
• The average vehicle speed is not dis-
played if the driving distance is less
than 50 meters (0.03 miles) or the
driving time is less than 10 seconds
since the ignition switch or Engine
Start/Stop button is turned to ON.
• Even if the vehicle is not in motion, the average vehicle speed keeps
going while the engine is running.
Elapsed Time (3)
The elapsed time is the total driv-
ing time since the last elapsed time
reset.
- Time range (hh:mm): 00:00 ~ 99:59
To reset the elapsed time, press the RESET/ button on the steer-
ing wheel for more than 1 second
when the elapsed time is dis-
played.
✽ ✽ NOTICE
Even if the vehicle is not in motion,
the elapsed time keeps going while
the engine is running.
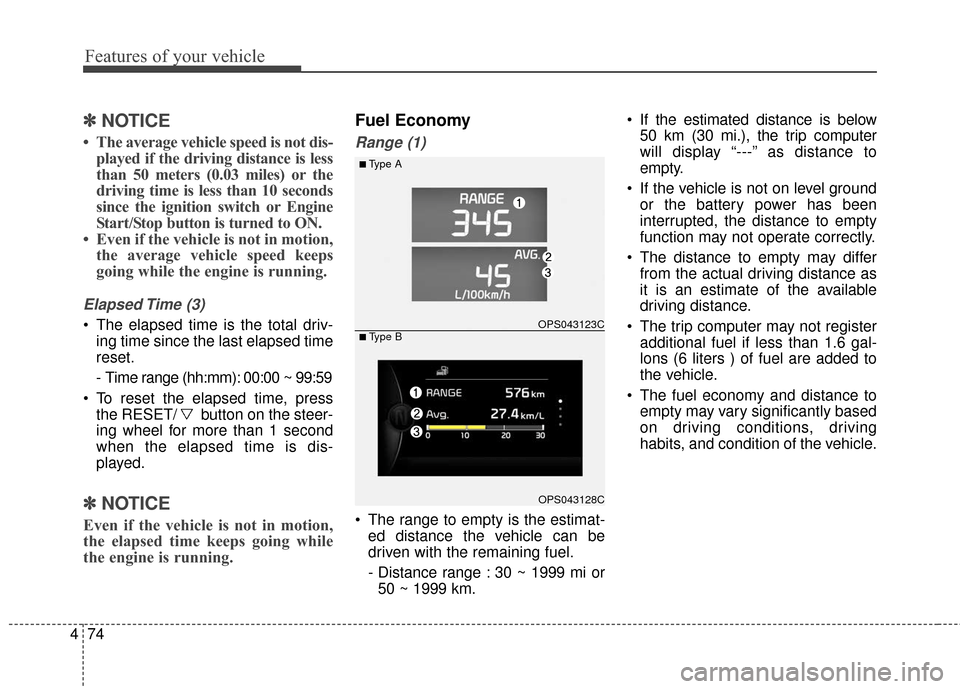
Fuel Economy
Range (1)
The range to empty is the estimat-
ed distance the vehicle can be
driven with the remaining fuel.
- Distance range : 30 ~ 1999 mi or50 ~ 1999 km. If the estimated distance is below
50 km (30 mi.), the trip computer
will display “---” as distance to
empty.
If the vehicle is not on level ground or the battery power has been
interrupted, the distance to empty
function may not operate correctly.
The distance to empty may differ from the actual driving distance as
it is an estimate of the available
driving distance.
The trip computer may not register additional fuel if less than 1.6 gal-
lons (6 liters ) of fuel are added to
the vehicle.
The fuel economy and distance to empty may vary significantly based
on driving conditions, driving
habits, and condition of the vehicle.
■Type A
OPS043123C
OPS043128C
■ Type B
Page 155 of 556

475
Features of your vehicle
Average Fuel Economy (2)
The average fuel economy is calcu-lated by the total driving distance
and fuel consumption since the last
average fuel economy reset.
- Fuel economy range: 0.0 ~ 99.9MPG or L/100km
The average fuel economy can be reset both manually and automati-
cally.
Manual reset
To clear the average fuel economy
manually, press the RESET/ but-
ton on the steering wheel for more
than 1 second when the average fuel
economy is displayed. Automatic reset
To make the average fuel economy
be reset automatically whenever refu-
eling, select the “Auto Reset” mode in
User Setting menu of the LCD display
(Refer to “LCD Display”).
Under “Auto Reset” mode, the aver-
age fuel economy will be cleared to
zero (---) when the vehicle speed
exceeds 1 km/h after refueling more
than 1.6 gallons (6 liters).
✽ ✽
NOTICE
The average fuel economy is not dis-
played for more accurate calculation
if the vehicle does not drive more
than 10 seconds or 0.03 miles (50
meters) since the ignition switch or
Engine Start/Stop button is turned
to ON.
Instant Fuel Economy (3)
This mode displays the instant fuel
economy during the last few sec-
onds when the vehicle speed is
more than 10 km/h (6.2 MPH).
- Fuel economy range: 0 ~ 99.9MPG or L/100km
Page 163 of 556

483
Features of your vehicle
Sunroof Open WarningLight (if equipped)
This warning light illuminates:
When the sunroof is not closed
securely.
Fuel cap open warningindicator (if equipped)
This warning light illuminates:
When the fuel filler cap is not tight- en securely.
Always make sure that the fuel
filler cap is tight.
Forward collision
warning (FCW) systemOFF/warning indicator (if equipped)
This warning light illuminates:
When you deactivate this system in the User settings mode in LCD
display.
If this indicator illuminates with warning message in LCD display,
there is a malfunction with the
Forward collision warning system.
In this case, have your vehicle
inspected by an authorized Kia
dealer.
Indicator Lights
Electronic Stability
Control (ESC) IndicatorLight
This indicator light illuminates:
Once you set the ignition switch or Engine Start/Stop Button to the ON
position.
- It illuminates for approximately 3seconds and then goes off.
When there is a malfunction with the ESC system.
In this case, have your vehicle
inspected by an authorized Kia
dealer.
This indicator light blinks:
While the ESC is operating.
For more details, refer to “Electronic
Stability Control (ESC)” in chapter 5.
Page 168 of 556

Features of your vehicle
88
4
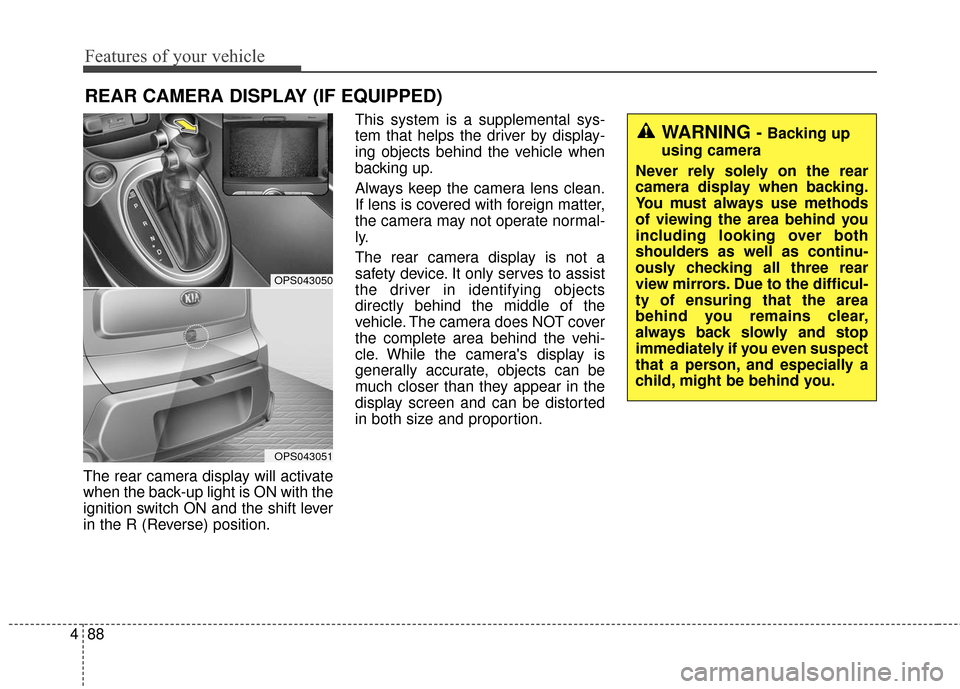
The rear camera display will activate
when the back-up light is ON with the
ignition switch ON and the shift lever
in the R (Reverse) position. This system is a supplemental sys-
tem that helps the driver by display-
ing objects behind the vehicle when
backing up.
Always keep the camera lens clean.
If lens is covered with foreign matter,
the camera may not operate normal-
ly.
The rear camera display is not a
safety device. It only serves to assist
the driver in identifying objects
directly behind the middle of the
vehicle. The camera does NOT cover
the complete area behind the vehi-
cle. While the camera's display is
generally accurate, objects can be
much closer than they appear in the
display screen and can be distorted
in both size and proportion.
REAR CAMERA DISPLAY (IF EQUIPPED)
OPS043050
OPS043051
WARNING - Backing up
using camera
Never rely solely on the rear
camera display when backing.
You must always use methods
of viewing the area behind you
including looking over both
shoulders as well as continu-
ously checking all three rear
view mirrors. Due to the difficul-
ty of ensuring that the area
behind you remains clear,
always back slowly and stop
immediately if you even suspect
that a person, and especially a
child, might be behind you.
Page 194 of 556
Features of your vehicle
114
4
AUTOMATIC CLIMATE CONTROL SYSTEM (IF EQUIPPED)
OPS043162/OPS043163
1. Temperature control button / knob
2. Front windshield defroster button
3. Rear windshield defroster button
4. Climate control display
5. Air intake control button
6. Air conditioning button (if equipped)
7. Fan speed control button
8. AUTO (automatic control) button
9. OFF button
10. Mode selection button
11. Climate control information screen
selection button
■ Type A
■ Type B
Page 195 of 556

4115
Features of your vehicle
Automatic heating and air con-
ditioning
1. Push the AUTO button. It is indi-cated by AUTO on the display. The
modes, fan speeds, air intake and
air-conditioning will be controlled
automatically by temperature set-
ting. 2. Push the temperature control but-
ton to set the desired temperature.
(Type A)
Turn the temperature control knob to set the desired temperature.
(Type B)
✽ ✽ NOTICE
• To turn the automatic operation
off, select any button or switch of
the following:
- Mode selection button
- Air conditioning button
- Front windshield defroster button(Press the button one more time
to deselect the front windshield
defroster function. The ‘AUTO’
sign will illuminate on the infor-
mation display once again.)
- Air intake control button
- Fan speed control switch
The selected function will be con-
trolled manually while other func-
tions operate automatically.
• Regardless of the temperature set- ting, when using automatic opera-
tion, the air conditioning system
can automatically turn on to
decrease the humidity inside the
vehicle, even if the temperature is
set to warm.
OPS043164
OPS043165
■ Type B
■Type A
OPS043170
OPS043171
■Type B
■Type A
Page 199 of 556

4119
Features of your vehicle
Temperature scale conversion
If the battery has been discharged or
disconnected, the temperature mode
display will reset to Centigrade.
This is normal condition. You can
switch the temperature scale as fol-
lows;
While pressing the AUTO button,
press the OFF button for 3 seconds
or more. The temperature scale will
change from Centigrade to
Fahrenheit, or from Fahrenheit to
Centigrade.
The temperature unit (from °C to °F
or from °F to °C) can be changed by
using the “User Settings” mode of the
LCD display.Air intake control
This is used to select outside (fresh)
air position or recirculated air posi-
tion.
To change the air intake control posi-
tion, push the control button.Recirculated air position
The indicator light on the
button illuminates when
the recirculated air posi-
tion is selected.
With the recirculated air position selected, air from
passenger compartment
will be drawn through the
heating system and heat-
ed or cooled according to
the function selected.
✽ ✽ NOTICE
• According to the outside tempera-
ture if the recirculation air posi-
tion is on for a long time, the air
intake position will automatically
change to the outside (fresh) air
position to ventilate the inside air.
• To cancel the automatic outside (fresh) air position, do the following.
1. Turn the ignition switch to the ON position.
2. Set the mode to the position.
3. While pressing the air condi- tioning button (A/C), press the
air intake control button at least
5 times within 3 seconds.
OPS043172
OPS043173
■Type B
■Type A