2016 KIA Soul EV steering wheel
[x] Cancel search: steering wheelPage 368 of 524
617
What to do in an emergency
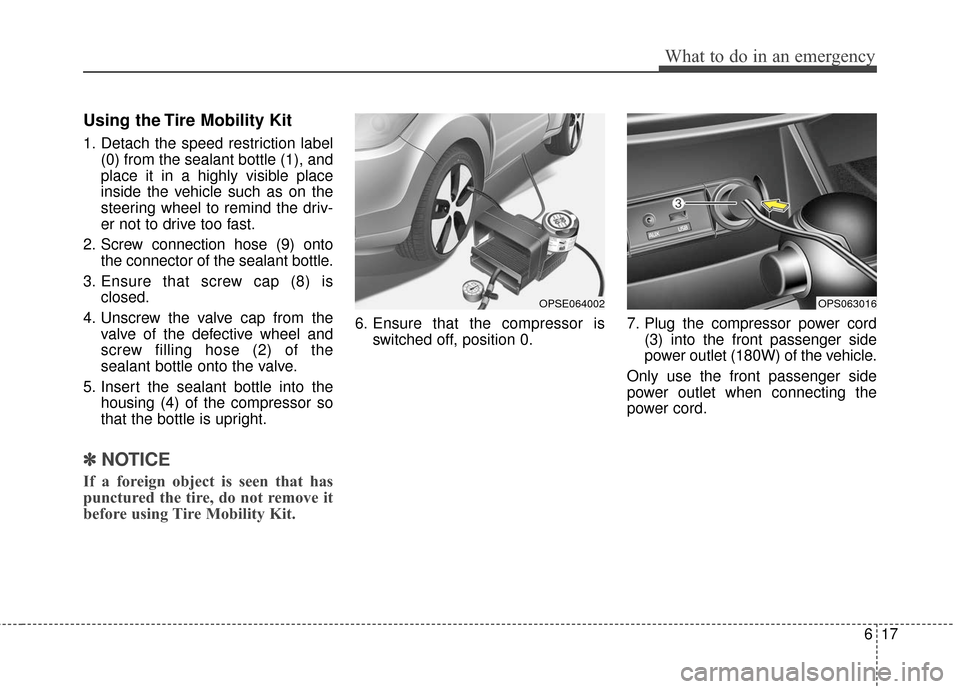
Using the Tire Mobility Kit
1. Detach the speed restriction label(0) from the sealant bottle (1), and
place it in a highly visible place
inside the vehicle such as on the
steering wheel to remind the driv-
er not to drive too fast.
2. Screw connection hose (9) onto the connector of the sealant bottle.
3. Ensure that screw cap (8) is closed.
4. Unscrew the valve cap from the valve of the defective wheel and
screw filling hose (2) of the
sealant bottle onto the valve.
5. Insert the sealant bottle into the housing (4) of the compressor so
that the bottle is upright.
✽ ✽NOTICE
If a foreign object is seen that has
punctured the tire, do not remove it
before using Tire Mobility Kit.
6. Ensure that the compressor is
switched off, position 0. 7. Plug the compressor power cord
(3) into the front passenger side
power outlet (180W) of the vehicle.
Only use the front passenger side
power outlet when connecting the
power cord.
OPSE064002OPS063016
Page 373 of 524
What to do in an emergency
22
6
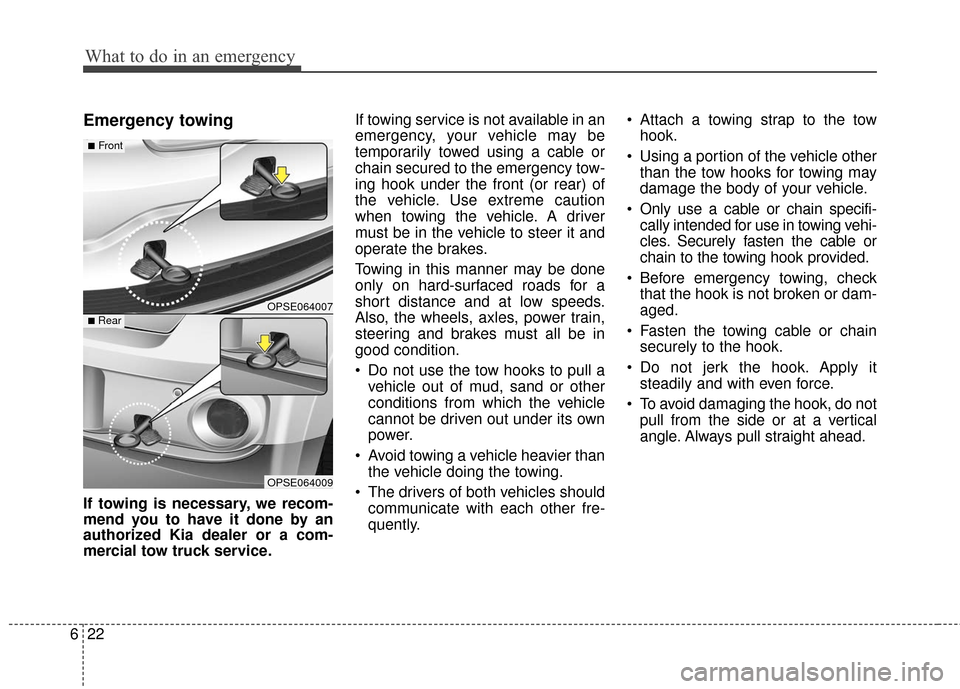
Emergency towing
If towing is necessary, we recom-
mend you to have it done by an
authorized Kia dealer or a com-
mercial tow truck service. If towing service is not available in an
emergency, your vehicle may be
temporarily towed using a cable or
chain secured to the emergency tow-
ing hook under the front (or rear) of
the vehicle. Use extreme caution
when towing the vehicle. A driver
must be in the vehicle to steer it and
operate the brakes.
Towing in this manner may be done
only on hard-surfaced roads for a
short distance and at low speeds.
Also, the wheels, axles, power train,
steering and brakes must all be in
good condition.
Do not use the tow hooks to pull a
vehicle out of mud, sand or other
conditions from which the vehicle
cannot be driven out under its own
power.
Avoid towing a vehicle heavier than the vehicle doing the towing.
The drivers of both vehicles should communicate with each other fre-
quently. Attach a towing strap to the tow
hook.
Using a portion of the vehicle other than the tow hooks for towing may
damage the body of your vehicle.
Only use a cable or chain specifi- cally intended for use in towing vehi-
cles. Securely fasten the cable or
chain to the towing hook provided.
Before emergency towing, check that the hook is not broken or dam-
aged.
Fasten the towing cable or chain securely to the hook.
Do not jerk the hook. Apply it steadily and with even force.
To avoid damaging the hook, do not pull from the side or at a vertical
angle. Always pull straight ahead.
OPSE064007
OPSE064009
■Front
■Rear
Page 374 of 524
623
What to do in an emergency
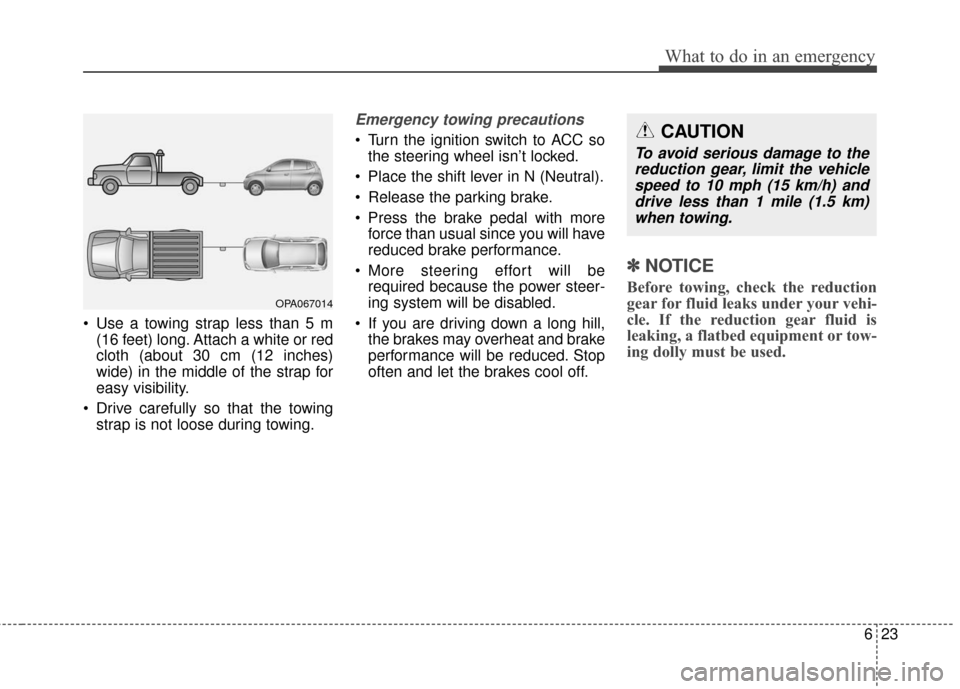
Use a towing strap less than 5 m(16 feet) long. Attach a white or red
cloth (about 30 cm (12 inches)
wide) in the middle of the strap for
easy visibility.
Drive carefully so that the towing strap is not loose during towing.
Emergency towing precautions
Turn the ignition switch to ACC sothe steering wheel isn’t locked.
Place the shift lever in N (Neutral).
Release the parking brake.
Press the brake pedal with more force than usual since you will have
reduced brake performance.
More steering effort will be required because the power steer-
ing system will be disabled.
If you are driving down a long hill, the brakes may overheat and brake
performance will be reduced. Stop
often and let the brakes cool off.
✽ ✽ NOTICE
Before towing, check the reduction
gear for fluid leaks under your vehi-
cle. If the reduction gear fluid is
leaking, a flatbed equipment or tow-
ing dolly must be used.OPA067014
CAUTION
To avoid serious damage to the
reduction gear, limit the vehiclespeed to 10 mph (15 km/h) anddrive less than 1 mile (1.5 km)when towing.
Page 379 of 524
75
Maintenance
OWNER MAINTENANCE
The following lists are vehicle checks
and inspections that should be per-
formed by the owner or an author-
ized Kia dealer at the frequencies
indicated to help ensure safe,
dependable operation of your vehi-
cle.
Any adverse conditions should be
brought to the attention of your deal-
er as soon as possible.
These Owner Maintenance Checks
are generally not covered by war-
ranties and you may be charged for
labor, parts and lubricants used.Owner maintenance schedule
When you stop for fuel:
Check the coolant level in thecoolant reservoir.
Check the windshield washer fluid level.
Look for low or under-inflated tires. Check if the front of the radiator
and condenser are clean and not
blocked with leaves, dirt or insects
etc. If any of the above parts are
extremely dirty or you are not sure
of their condition, take your vehicle
to an authorized Kia dealer.
While operating your vehicle:
Check for vibrations in the steeringwheel. Notice any increased steer-
ing effort or looseness in the steer-
ing wheel, or change in its straight-
ahead position.
Notice if your vehicle constantly turns slightly or “pulls” to one side
when traveling on smooth, level
road.
When stopping, listen and check for unusual sounds, pulling to one
side, increased brake pedal travel
or “hard-to-push” brake pedal.
If any slipping or changes in the operation of your transaxle occurs,
check the transaxle fluid level.
Check the reduction gear P (Park) function.
Check the parking brake.
Check for fluid leaks under your vehicle (water dripping from the air
conditioning system during or after
use is normal).
Page 393 of 524
719
Maintenance
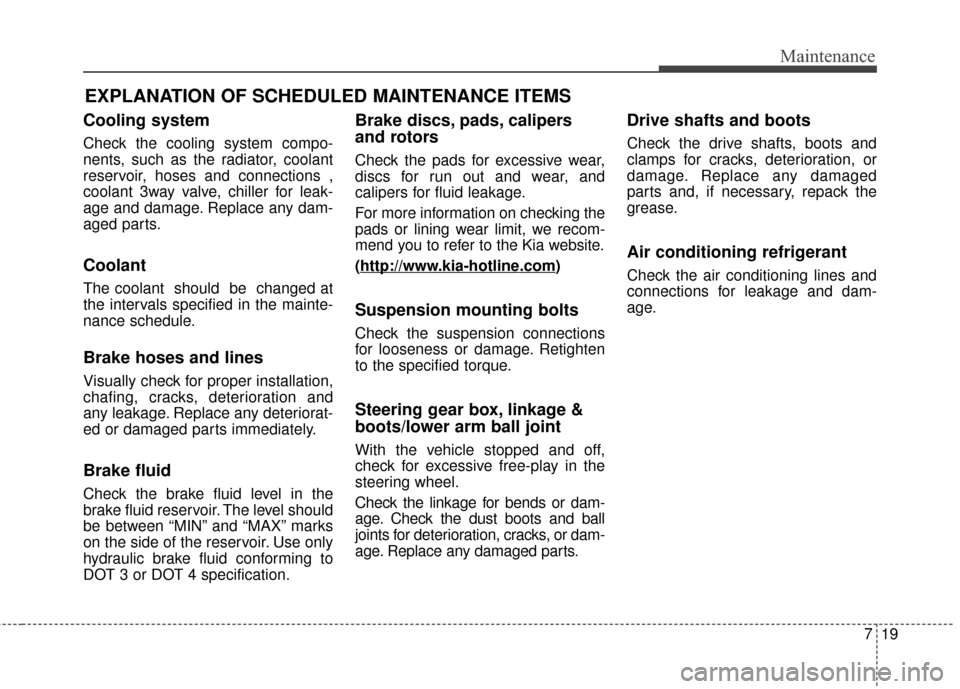
EXPLANATION OF SCHEDULED MAINTENANCE ITEMS
Cooling system
Check the cooling system compo-
nents, such as the radiator, coolant
reservoir, hoses and connections ,
coolant 3way valve, chiller for leak-
age and damage. Replace any dam-
aged parts.
Coolant
The coolant should be changed at
the intervals specified in the mainte-
nance schedule.
Brake hoses and lines
Visually check for proper installation,
chafing, cracks, deterioration and
any leakage. Replace any deteriorat-
ed or damaged parts immediately.
Brake fluid
Check the brake fluid level in the
brake fluid reservoir. The level should
be between “MIN” and “MAX” marks
on the side of the reservoir. Use only
hydraulic brake fluid conforming to
DOT 3 or DOT 4 specification.
Brake discs, pads, calipers
and rotors
Check the pads for excessive wear,
discs for run out and wear, and
calipers for fluid leakage.
For more information on checking the
pads or lining wear limit, we recom-
mend you to refer to the Kia website.
(http://www
.kia-hotline.com)
Suspension mounting bolts
Check the suspension connections
for looseness or damage. Retighten
to the specified torque.
Steering gear box, linkage &
boots/lower arm ball joint
With the vehicle stopped and off,
check for excessive free-play in the
steering wheel.
Check the linkage for bends or dam-
age. Check the dust boots and ball
joints for deterioration, cracks, or dam-
age. Replace any damaged parts.
Drive shafts and boots
Check the drive shafts, boots and
clamps for cracks, deterioration, or
damage. Replace any damaged
parts and, if necessary, repack the
grease.
Air conditioning refrigerant
Check the air conditioning lines and
connections for leakage and dam-
age.
Page 427 of 524
753
Maintenance
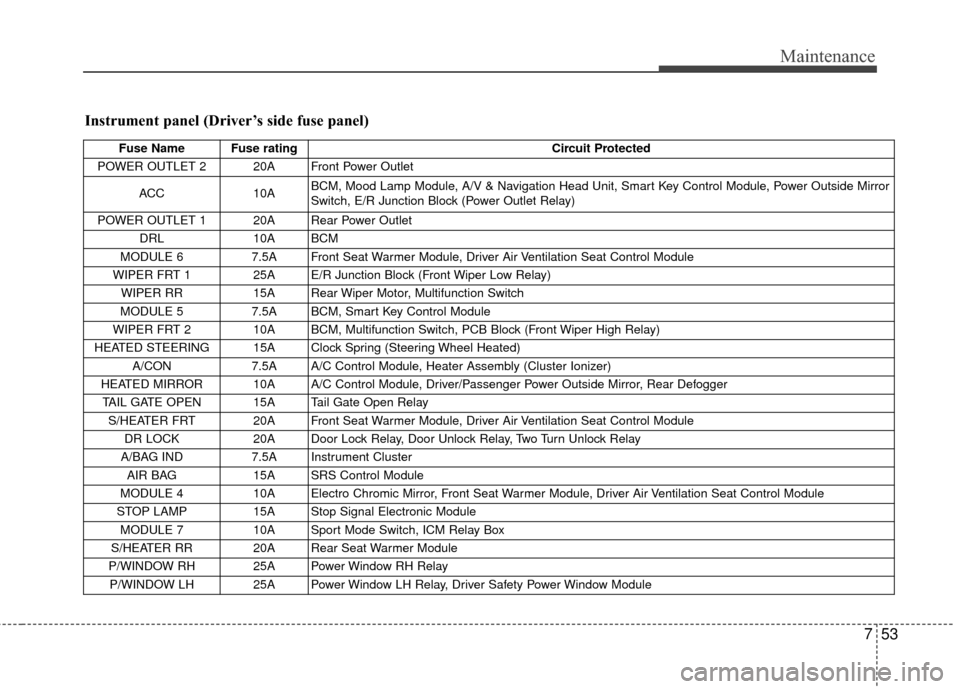
Instrument panel (Driver’s side fuse panel)
Fuse Name Fuse ratingCircuit Protected
POWER OUTLET 2 20A Front Power Outlet
ACC 10A BCM, Mood Lamp Module, A/V & Navigation Head Unit, Smart Key Control Module, Power Outside Mirror
Switch, E/R Junction Block (Power Outlet Relay)
POWER OUTLET 1 20A Rear Power Outlet DRL 10A BCM
MODULE 6 7.5A Front Seat Warmer Module, Driver Air Ventilation Seat Control Module
WIPER FRT 1 25A E/R Junction Block (Front Wiper Low Relay) WIPER RR 15A Rear Wiper Motor, Multifunction Switch
MODULE 5 7.5A BCM, Smart Key Control Module
WIPER FRT 2 10A BCM, Multifunction Switch, PCB Block (Front Wiper High Relay)
HEATED STEERING 15A Clock Spring (Steering Wheel Heated) A/CON 7.5A A/C Control Module, Heater Assembly (Cluster Ionizer)
HEATED MIRROR 10A A/C Control Module, Driver/Passenger Power Outside Mirror, Rear Defogger TAIL GATE OPEN 15A Tail Gate Open Relay S/HEATER FRT 20A Front Seat Warmer Module, Driver Air Ventilation Seat Control Module DR LOCK 20A Door Lock Relay, Door Unlock Relay, Two Turn Unlock Relay
A/BAG IND 7.5A Instrument Cluster
AIR BAG 15A SRS Control Module
MODULE 4 10A Electro Chromic Mirror, Front Seat Warmer Module, Driver Air Ventilation Seat Control Module
STOP LAMP 15A Stop Signal Electronic Module
MODULE 7 10A Sport Mode Switch, ICM Relay Box
S/HEATER RR 20A Rear Seat Warmer Module
P/WINDOW RH 25A Power Window RH Relay P/WINDOW LH 25A Power Window LH Relay, Driver Safety Power Window Module
Page 449 of 524
775
Maintenance
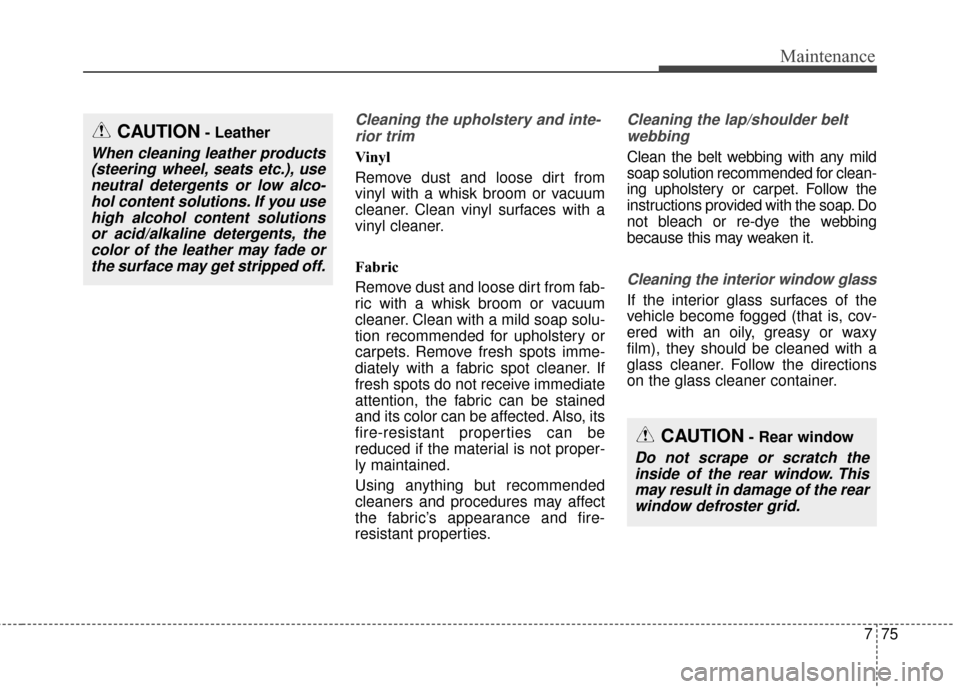
Cleaning the upholstery and inte-rior trim
Vinyl
Remove dust and loose dirt from
vinyl with a whisk broom or vacuum
cleaner. Clean vinyl surfaces with a
vinyl cleaner.
Fabric
Remove dust and loose dirt from fab-
ric with a whisk broom or vacuum
cleaner. Clean with a mild soap solu-
tion recommended for upholstery or
carpets. Remove fresh spots imme-
diately with a fabric spot cleaner. If
fresh spots do not receive immediate
attention, the fabric can be stained
and its color can be affected. Also, its
fire-resistant properties can be
reduced if the material is not proper-
ly maintained.
Using anything but recommended
cleaners and procedures may affect
the fabric’s appearance and fire-
resistant properties.
Cleaning the lap/shoulder beltwebbing
Clean the belt webbing with any mild
soap solution recommended for clean-
ing upholstery or carpet. Follow the
instructions provided with the soap. Do
not bleach or re-dye the webbing
because this may weaken it.
Cleaning the interior window glass
If the interior glass surfaces of the
vehicle become fogged (that is, cov-
ered with an oily, greasy or waxy
film), they should be cleaned with a
glass cleaner. Follow the directions
on the glass cleaner container.
CAUTION- Leather
When cleaning leather products(steering wheel, seats etc.), useneutral detergents or low alco-hol content solutions. If you usehigh alcohol content solutionsor acid/alkaline detergents, thecolor of the leather may fade orthe surface may get stripped off.
CAUTION- Rear window
Do not scrape or scratch theinside of the rear window. Thismay result in damage of the rearwindow defroster grid.
Page 463 of 524
Index
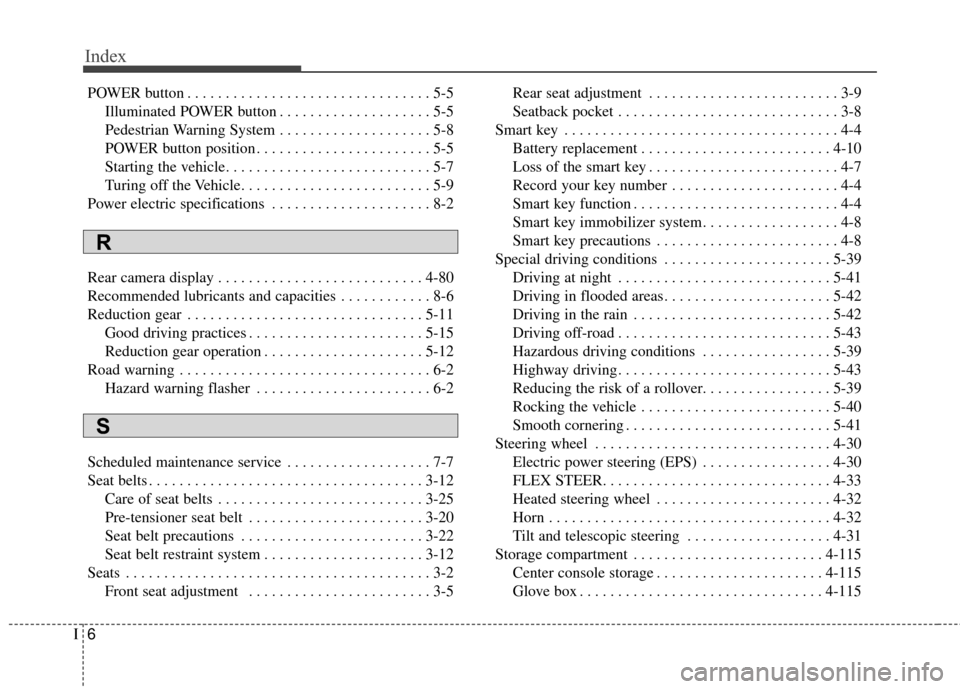
6I
POWER button . . . . . . . . . . . . . . . . . . . . . . . . . . . . . . . . 5-5Illuminated POWER button . . . . . . . . . . . . . . . . . . . . 5-5
Pedestrian Warning System . . . . . . . . . . . . . . . . . . . . 5-8
POWER button position . . . . . . . . . . . . . . . . . . . . . . . 5-5
Starting the vehicle. . . . . . . . . . . . . . . . . . . . . . . . . . . 5-7
Turing off the Vehicle. . . . . . . . . . . . . . . . . . . . . . . . . 5-9
Power electric specifications . . . . . . . . . . . . . . . . . . . . . 8-2
Rear camera display . . . . . . . . . . . . . . . . . . . . . . . . . . . 4-80
Recommended lubricants and capacities . . . . . . . . . . . . 8-6
Reduction gear . . . . . . . . . . . . . . . . . . . . . . . . . . . . . . . 5-11 Good driving practices . . . . . . . . . . . . . . . . . . . . . . . 5-15
Reduction gear operation . . . . . . . . . . . . . . . . . . . . . 5-12
Road warning . . . . . . . . . . . . . . . . . . . . . . . . . . . . . . . . . 6-2 Hazard warning flasher . . . . . . . . . . . . . . . . . . . . . . . 6-2
Scheduled maintenance service . . . . . . . . . . . . . . . . . . . 7-7
Seat belts . . . . . . . . . . . . . . . . . . . . . . . . . . . . . . . . . . . . \
3-12 Care of seat belts . . . . . . . . . . . . . . . . . . . . . . . . . . . 3-25
Pre-tensioner seat belt . . . . . . . . . . . . . . . . . . . . . . . 3-20
Seat belt precautions . . . . . . . . . . . . . . . . . . . . . . . . 3-22
Seat belt restraint system . . . . . . . . . . . . . . . . . . . . . 3-12
Seats . . . . . . . . . . . . . . . . . . . . . . . . . . . . . . . . . . . . \
. . . . 3-2 Front seat adjustment . . . . . . . . . . . . . . . . . . . . . . . . 3-5 Rear seat adjustment . . . . . . . . . . . . . . . . . . . . . . . . . 3-9
Seatback pocket . . . . . . . . . . . . . . . . . . . . . . . . . . . . . 3-8
Smart key . . . . . . . . . . . . . . . . . . . . . . . . . . . . . . . . . . . . \
4-4 Battery replacement . . . . . . . . . . . . . . . . . . . . . . . . . 4-10
Loss of the smart key . . . . . . . . . . . . . . . . . . . . . . . . . 4-7
Record your key number . . . . . . . . . . . . . . . . . . . . . . 4-4
Smart key function . . . . . . . . . . . . . . . . . . . . . . . . . . . 4-4
Smart key immobilizer system. . . . . . . . . . . . . . . . . . 4-8
Smart key precautions . . . . . . . . . . . . . . . . . . . . . . . . 4-8
Special driving conditions . . . . . . . . . . . . . . . . . . . . . . 5-39 Driving at night . . . . . . . . . . . . . . . . . . . . . . . . . . . . 5-41
Driving in flooded areas. . . . . . . . . . . . . . . . . . . . . . 5-42
Driving in the rain . . . . . . . . . . . . . . . . . . . . . . . . . . 5-42
Driving off-road . . . . . . . . . . . . . . . . . . . . . . . . . . . . 5-43
Hazardous driving conditions . . . . . . . . . . . . . . . . . 5-39
Highway driving . . . . . . . . . . . . . . . . . . . . . . . . . . . . 5-43
Reducing the risk of a rollover. . . . . . . . . . . . . . . . . 5-39
Rocking the vehicle . . . . . . . . . . . . . . . . . . . . . . . . . 5-40
Smooth cornering . . . . . . . . . . . . . . . . . . . . . . . . . . . 5-41
Steering wheel . . . . . . . . . . . . . . . . . . . . . . . . . . . . . . . 4-30 Electric power steering (EPS) . . . . . . . . . . . . . . . . . 4-30
FLEX STEER. . . . . . . . . . . . . . . . . . . . . . . . . . . . . . 4-33
Heated steering wheel . . . . . . . . . . . . . . . . . . . . . . . 4-32
Horn . . . . . . . . . . . . . . . . . . . . . . . . . . . . . . . . . . . . \
. 4-32
Tilt and telescopic steering . . . . . . . . . . . . . . . . . . . 4-31
Storage compartment . . . . . . . . . . . . . . . . . . . . . . . . . 4-115 Center console storage . . . . . . . . . . . . . . . . . . . . . . 4-115
Glove box . . . . . . . . . . . . . . . . . . . . . . . . . . . . . . . . 4-115
R
S