Page 476 of 565

Maintenance
32
7
Parking brake
Inspect the parking brake system
including the parking brake lever (or
pedal) and cables.
Brake discs, pads, calipers
and rotors
Check the pads for excessive wear,
discs for run out and wear, and
calipers for fluid leakage.
Exhaust pipe and muffler
Visually inspect the exhaust pipes,
muffler and hangers for cracks, dete-
rioration, or damage. Start the
engine and listen carefully for any
exhaust gas leakage. Tighten con-
nections or replace parts as neces-
sary.
Suspension mounting bolts
Check the suspension connections
for looseness or damage. Retighten
to the specified torque.
Steering gear box, linkage &
boots/lower arm ball joint
With the vehicle stopped and engine
off, check for excessive free-play in
the steering wheel.
Check the linkage for bends or dam-
age. Check the dust boots and ball
joints for deterioration, cracks, or
damage. Replace any damaged
parts.
Power steering pump, belt and
hoses (if equipped)
Check the power steering pump and
hoses for leakage and damage.
Replace any damaged or leaking
parts immediately. Inspect the power
steering belt (or drive belt) for evi-
dence of cuts, cracks, excessive
wear, oiliness and proper tension.
Replace or adjust it if necessary.
Drive shafts and boots
Check the drive shafts, boots and
clamps for cracks, deterioration, or
damage. Replace any damaged
parts and, if necessary, repack the
grease.
Air conditioning refrigerant
Check the air conditioning lines and
connections for leakage and dam-
age.
UM CAN (ENG) 7.qxp 12/1/2014 1:17 PM Page 32
Page 477 of 565
733
Maintenance
ENGINE OIL
Checking the engine oil level
1. Be sure the vehicle is on levelground.
2. Start the engine and allow it to reach normal operating tempera-
ture. 3. Turn the engine off and wait for a
few minutes (about 5 minutes) for
the oil to return to the oil pan.
4. Pull the dipstick out, wipe it clean, and re-insert it fully. 5. Pull the dipstick out again and
check the level. The level should
be between F and L.
WARNING - Radiator
hose
Be very careful not to touch the
radiator hose when checking or
adding the engine oil as it may
be hot enough to burn you.
CAUTION - Replacing
engine oil
Do not overfill the engine oil. It
may damage the engine.
OXM079004
OYP074062N
■ Type A
■Type B
UM CAN (ENG) 7.qxp 12/1/2014 1:17 PM Page 33
Page 479 of 565

735
Maintenance
ENGINE COOLANT
The high-pressure cooling system
has a reservoir filled with year round
antifreeze coolant. The reservoir is
filled at the factory.
Check the antifreeze protection and
coolant level at least once a year: at
the beginning of the winter season,
and before traveling to a colder cli-
mate.Checking the coolant level Turn the engine off and wait until itcools down. Use extreme care
when removing the radiator cap.
Wrap a thick towel around it, and
turn it counterclockwise slowly to
the first stop. Step back while the
pressure is released from the cool-
ing system.
When you are sure all the pressure
has been released, press down on
the cap, using a thick towel, and
continue turning counterclockwise
to remove it.
Even if the engine is not operating, do not remove the radiator cap or
the drain plug while the engine and
radiator are hot. Hot coolant and
steam may still blow out under
pressure, causing serious injury.
WARNING
Removing radiator
cap
Never attempt to remove the
radiator cap while the engine is
operating or hot. Doing so
might lead to cooling system
and engine damage and could
result in serious personal injury
from escaping hot coolant or
steam.
UM CAN (ENG) 7.qxp 12/1/2014 1:17 PM Page 35
Page 489 of 565
745
Maintenance
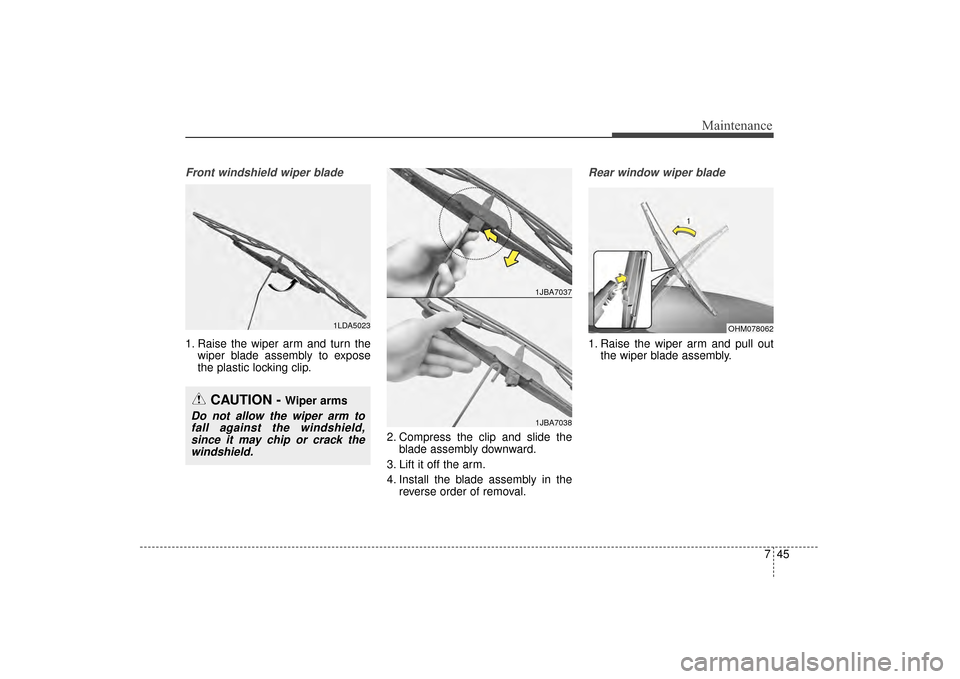
Front windshield wiper blade
1. Raise the wiper arm and turn thewiper blade assembly to expose
the plastic locking clip.
2. Compress the clip and slide theblade assembly downward.
3. Lift it off the arm.
4. Install the blade assembly in the reverse order of removal.
Rear window wiper blade
1. Raise the wiper arm and pull outthe wiper blade assembly.
1LDA5023
CAUTION - Wiper arms
Do not allow the wiper arm tofall against the windshield,since it may chip or crack thewindshield.
1JBA7037
1JBA7038
OHM078062
UM CAN (ENG) 7.qxp 12/1/2014 1:18 PM Page 45
Page 493 of 565

749
Maintenance
Recharging battery
When recharging the battery,
observe the following precautions:
The battery must be removed fromthe vehicle and placed in an area
with good ventilation.
Do not allow cigarettes, sparks, or flame near the battery.
Watch the battery during charging, and stop or reduce the charging
rate if the battery cells begin
gassing (boiling) violently or if the
temperature of the electrolyte of
any cell exceeds 49°C (120°F).
Wear eye protection when check- ing the battery during charging.
Disconnect the battery charger in the following order.
1. Turn off the battery charger main switch.
2. Unhook the negative clamp from the negative battery terminal.
3. Unhook the positive clamp from the positive battery terminal. Before performing maintenance or
recharging the battery, turn off all
accessories and stop the engine.
The negative battery cable must be removed first and installed last
when the battery is disconnected.
Reset items
Items should be reset after the bat-
tery has been discharged or the bat-
tery has been disconnected.
Auto up/down window (See chapter 4)
Sunroof (See chapter 4)
Trip computer (See chapter 4)
Climate control system (See chapter 4)
Integrated Memory System (See chapter 3)
Audio (See chapter 4)
UM CAN (ENG) 7.qxp 12/1/2014 1:18 PM Page 49
Page 499 of 565

755
Maintenance
Wheel replacement
When replacing the metal wheels for
any reason, make sure the new
wheels are equivalent to the original
factory units in diameter, rim width
and offset.
A wheel that is not the correct size
may adversely affect wheel and
bearing life, braking and stopping
abilities, handling characteristics,
ground clearance, body-to-tire clear-
ance, snow chain clearance,
speedometer and odometer calibra-
tion, headlamp aim and bumper
height.
Tire traction
Tire traction can be reduced if you
drive on worn tires, tires that are
improperly inflated or on slippery
road surfaces. Tires should be
replaced when tread wear indicators
appear. Slow down whenever there
is rain, snow or ice on the road to
reduce the possibility of losing con-
trol of the vehicle.
Tire maintenance
In addition to proper inflation, correct
wheel alignment helps to decrease
tire wear. If you find a tire is worn
unevenly, have your dealer check the
wheel alignment.
When you have new tires installed,
make sure they are balanced. This
will increase vehicle ride comfort and
tire life. Additionally, a tire should
always be rebalanced if it is removed
from the wheel.
Tire sidewall labeling
This information identifies and
describes the fundamental charac-
teristics of the tire and also provides
the Tire Identification Number (TIN)
for safety standard certification. The
TIN can be used to identify the tire in
case of a recall.
1. Manufacturer or brand name
Manufacturer or Brand name is
shown.
I030B04JM
1
1
2
34
5,6
7
UM CAN (ENG) 7.qxp 12/1/2014 1:18 PM Page 55
Page 507 of 565
763
Maintenance
Low aspect ratio tire
(if equipped)
Low aspect ratio tires, whose aspect
ratio is lower than 50, are provided
for sporty looks.
Because the low aspect ratio tires
are optimized for handling and brak-
ing, it may be more uncomfortable to
ride in and there is more noise com-
pare to normal tires.
CAUTION
Because the sidewall of the lowaspect ratio tire is shorter thanthe normal, the wheel and tire ofthe low aspect ratio tire is easi-er to be damaged. So, follow theinstructions below.
- When driving on a rough road or off road, drive cautiouslybecause tires and wheels maybe damaged. And after driving,inspect tires and wheels.
- When passing over a pothole, speed bump, manhole, or curbstone, drive slowly so that thetires and wheels are not dam-aged.
- If the tire is impacted, we rec- ommend that you inspect thetire condition or contact anauthorized Kia dealer.
- To prevent damage to the tire, inspect the tire condition andpressure every 3,000km.
CAUTION
It is not easy to recognize tire damage with your own eyes.But if there is the slightesthint of tire damage, eventhough you cannot see the tiredamage with your own eyes,have the tire checked orreplaced because the tiredamage may cause air leak-age from the tire.
If the tire is damaged by driv- ing on a rough road, off road,pothole, manhole, or curbstone, it will not be covered bythe warranty.
You can find out the tire infor- mation on the tire sidewall.
UM CAN (ENG) 7.qxp 12/1/2014 1:18 PM Page 63
Page 509 of 565
765
Maintenance
✽
✽NOTICE
• When replacing fuse, turn the
ignition “OFF” and turn off
switches of all electrical devices
then remove battery (-) terminal.
• The actual fuse/relay panel label may differ from equipped items.
Inner panel fuse replacement
1. Turn the ignition switch and all
other switches off.
2. Open the fuse panel cover.
If the switch is located in the “OFF”
position, a caution indicator will be
displayed in the cluster. 3. Pull the suspected fuse straight
out. Use the removal tool provided
on the engine compartment fuse
panel cover.
4. Check the removed fuse; replace it if it is blown.
Spare fuses are provided in theengine compartment fuse panel.
5. Push in a new fuse of the same rating, and make sure it fits tightly
in the clips.
If it fits loosely, consult an authorized
Kia dealer.
OUMA074015
OUM074016
UM CAN (ENG) 7.qxp 12/1/2014 1:18 PM Page 65