2016 KIA Sedona Latch
[x] Cancel search: LatchPage 51 of 644

335
Safety features of your vehicle
No modifications or additionsshould be made by the user which
will either prevent the seat belt
adjusting devices from operating to
remove slack, or prevent the seat
belt assembly from being adjusted
to remove slack.
When you fasten the seat belt, be careful not to latch the seat belt in
buckles of other seat. It's very dan-
gerous and you may not be pro-
tected by the seat belt properly.
Do not unfasten the seat belt and do not fasten and unfasten the seat
belt repeatedly while driving. This
could result in loss of control, and
an accident causing death, serious
injury, or property damage.
When fastening the seat belt, make sure that the seat belt does
not pass over objects that are hard
or can break easily.Seat belt warning (for driver’s seat)
The driver's seat belt warning light
and chime will activate pursuant to
the following table when the ignition
switch is in "ON" position.
1GQA2083
WARNING- Seat belt
buckle
Do not allow foreign material
(gum, crumbs, coins, etc.) to
obstruct the seat belt buckle.
This may prevent the seat belt
from fastening securely.
Page 57 of 644
341
Safety features of your vehicle
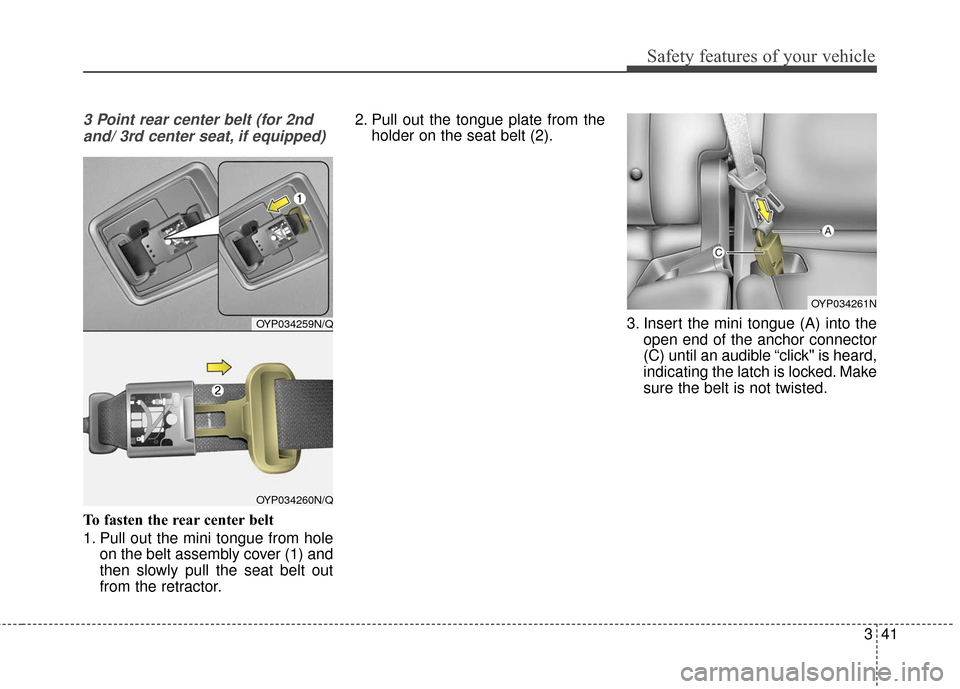
3 Point rear center belt (for 2ndand/ 3rd center seat, if equipped)
To fasten the rear center belt
1. Pull out the mini tongue from hole on the belt assembly cover (1) and
then slowly pull the seat belt out
from the retractor. 2. Pull out the tongue plate from the
holder on the seat belt (2).
3. Insert the mini tongue (A) into theopen end of the anchor connector
(C) until an audible “click" is heard,
indicating the latch is locked. Make
sure the belt is not twisted.
OYP034259N/Q
OYP034260N/Q
OYP034261N
Page 58 of 644
Safety features of your vehicle
42
3
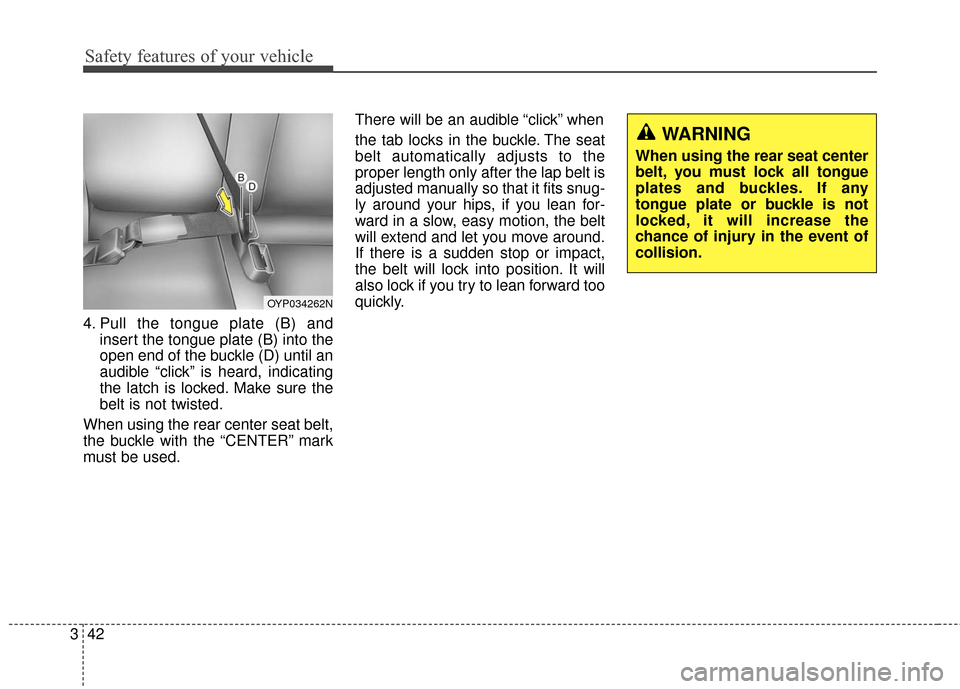
4. Pull the tongue plate (B) and
insert the tongue plate (B) into the
open end of the buckle (D) until an
audible “click” is heard, indicating
the latch is locked. Make sure the
belt is not twisted.
When using the rear center seat belt,
the buckle with the “CENTER” mark
must be used. There will be an audible “click” when
the tab locks in the buckle. The seat
belt automatically adjusts to the
proper length only after the lap belt is
adjusted manually so that it fits snug-
ly around your hips, if you lean for-
ward in a slow, easy motion, the belt
will extend and let you move around.
If there is a sudden stop or impact,
the belt will lock into position. It will
also lock if you try to lean forward too
quickly.
WARNING
When using the rear seat center
belt, you must lock all tongue
plates and buckles. If any
tongue plate or buckle is not
locked, it will increase the
chance of injury in the event of
collision.
OYP034262N
Page 67 of 644

351
Safety features of your vehicle
CHILD RESTRAINT SYSTEM
Children riding in the vehicle should
sit in the rear seat and must always
be properly restrained to minimize
the risk of injury in an accident, sud-
den stop or sudden maneuver.
According to accident statistics, chil-
dren are safer when properly
restrained in the rear seats than in
the front seat. Larger children not in
a child restraint should use one of
the seat belts provided.
You should be aware of the specific
requirements in your country. Child
and/or infant safety seats must be
properly placed and installed in the
rear seat. You must use a commer-
cially available child restraint system
that meets the requirements of the
Safety Standards of your country.
Child restraint systems are designed
to be secured in vehicle seats by the
lap belt portion of a lap/shoulder belt,
or by a tether anchor and/or LATCH
anchors (if equipped).Children could be injured or killed in
a crash if their restraints are not
properly secured. For small children
and babies, a child seat or infant seat
must be used. Before buying a par-
ticular child restraint system, make
sure it fits your vehicle seat and seat
belts, and fits your child.
Follow all the instructions provided
by the manufacturer when installing
the child restraint system.
When the child restraint system is
not in use, store it in the luggage
area or fasten it with a seat belt so
that it will not be thrown forward in
case of a sudden stop or an acci-
dent.
WARNING- Restraintlocation
Never install a child or infant
seat on the front passenger's
seat. A child riding in the front
passenger seat can be forceful-
ly struck by an inflating airbag.
WARNING- Hot child restraint
A child restraint system can
become very hot if it is left in a
closed vehicle on a sunny day.
Be sure to check the seat cover,
buckles and latches before
placing a child in the restraint
system.
Page 69 of 644
353
Safety features of your vehicle
For safety reasons, we recommend
that the child restraint system be
used in the rear seats.
Never place a rear-facing child
restraint in the front passenger seat,
because of the danger an inflating
passenger-side air bag could impact
the rear-facing child restraint and kill
the child.
Since all passenger seat belts move
freely under normal conditions and
only lock under extreme or emer-
gency conditions (emergency lock
mode), you must manually change
these seat belts to the auto lock
mode to secure a child restraint.
If the seat belt does not operate as
described in this section, have the
system checked immediately by your
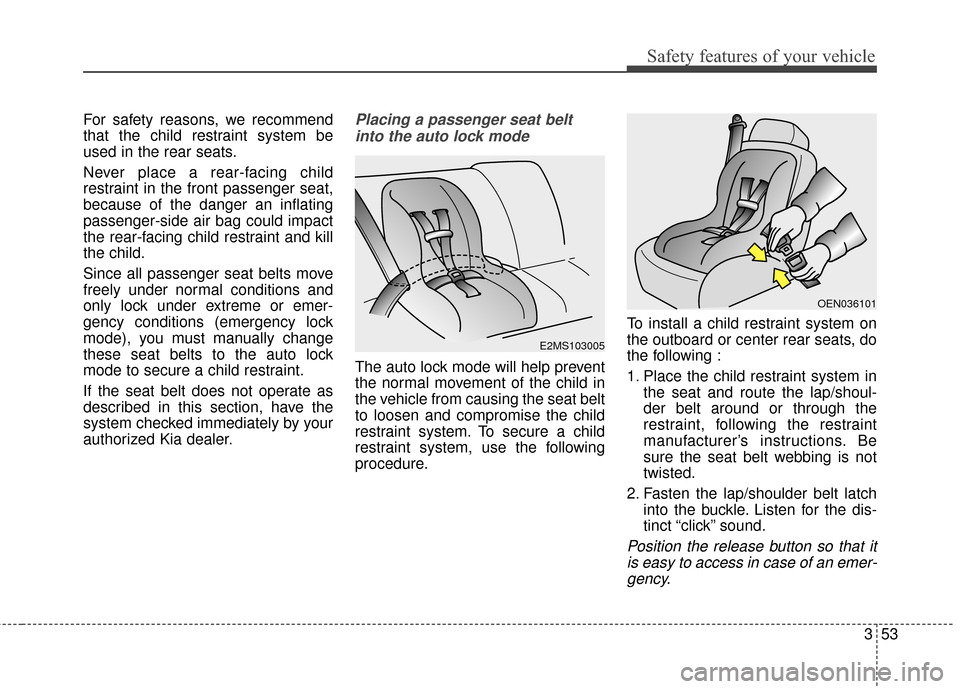
authorized Kia dealer.Placing a passenger seat beltinto the auto lock mode
The auto lock mode will help prevent
the normal movement of the child in
the vehicle from causing the seat belt
to loosen and compromise the child
restraint system. To secure a child
restraint system, use the following
procedure. To install a child restraint system on
the outboard or center rear seats, do
the following :
1. Place the child restraint system in
the seat and route the lap/shoul-
der belt around or through the
restraint, following the restraint
manufacturer’s instructions. Be
sure the seat belt webbing is not
twisted.
2. Fasten the lap/shoulder belt latch into the buckle. Listen for the dis-
tinct “click” sound.
Position the release button so that itis easy to access in case of an emer-gency.
E2MS103005
OEN036101
Page 73 of 644
357
Safety features of your vehicle
Securing a child restraint seat withchild seat lower anchor system
Some child seat manufacturers
make child restraint seats that are
labeled as LATCH or LATCH-com-
patible child restraint seats. LATCH
stands for "Lower Anchors and
Tethers for Children". These seats
include two rigid or webbing mount-
ed attachments that connect to two
LATCH anchors at specific seating
positions in your vehicle. This type of
child restraint seat eliminates the
need to use seat belts to attach the
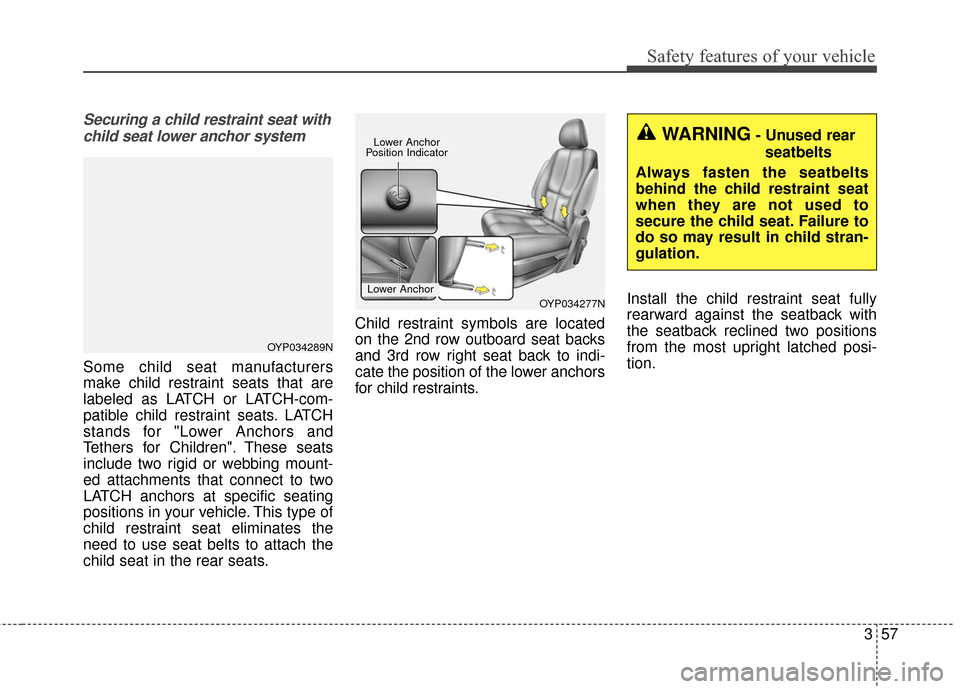
child seat in the rear seats. Child restraint symbols are located
on the 2nd row outboard seat backs
and 3rd row right seat back to indi-
cate the position of the lower anchors
for child restraints.
Install the child restraint seat fully
rearward against the seatback with
the seatback reclined two positions
from the most upright latched posi-
tion.
OYP034277NLower Anchor
WARNING- Unused rear
seatbelts
Always fasten the seatbelts
behind the child restraint seat
when they are not used to
secure the child seat. Failure to
do so may result in child stran-
gulation.
OYP034289N
Lower Anchor
Position Indicator
Page 74 of 644
Safety features of your vehicle
58
3
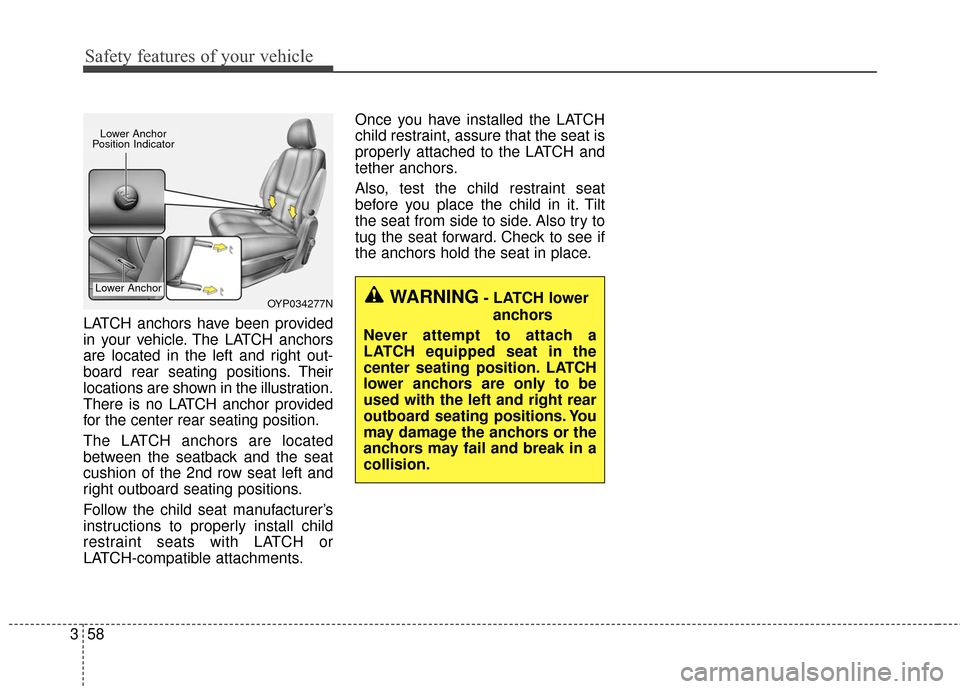
LATCH anchors have been provided
in your vehicle. The LATCH anchors
are located in the left and right out-
board rear seating positions. Their
locations are shown in the illustration.
There is no LATCH anchor provided
for the center rear seating position.
The LATCH anchors are located
between the seatback and the seat
cushion of the 2nd row seat left and
right outboard seating positions.
Follow the child seat manufacturer’s
instructions to properly install child
restraint seats with LATCH or
LATCH-compatible attachments. Once you have installed the LATCH
child restraint, assure that the seat is
properly attached to the LATCH and
tether anchors.
Also, test the child restraint seat
before you place the child in it. Tilt
the seat from side to side. Also try to
tug the seat forward. Check to see if
the anchors hold the seat in place.
WARNING- LATCH lower
anchors
Never attempt to attach a
LATCH equipped seat in the
center seating position. LATCH
lower anchors are only to be
used with the left and right rear
outboard seating positions. You
may damage the anchors or the
anchors may fail and break in a
collision.OYP034277N
Lower Anchor
Lower Anchor
Position Indicator
Page 124 of 644

Features of your vehicle
22
4
This system is designed to provide
protection from unauthorized entry
into the vehicle. This system is oper-
ated in three stages: the first is the
"Armed" stage, the second is the
"Theft-alarm" stage, and the third is
the "Disarmed" stage. If triggered,
the system provides an audible
alarm with blinking of the hazard
warning lights.
Armed stage
Park the vehicle and stop the engine.
Arm the system as described below.
1. Remove the ignition key from the
ignition switch and exit the vehicle.
2. Make sure that all doors (and tail- gate) and engine hood are closed
and latched.
3. Lock the doors using the transmit- ter of the keyless entry system (or
smart key) or ignition key.
After completion of the steps above,
the hazard warning lights will blink
(for smart key, the chime also
sounds) once to indicate that the
system is armed. If any door (or tailgate) or engine
hood remains open, the hazard
warning lights and the chime will not
operate and the theft-alarm will not
arm. If all doors (and tailgate) and
engine hood are closed after the lock
button is pressed, the hazard warn-
ing lights blink once.
The system can also be armed by
locking the doors with the key from
the front doors; however, the hazard
warning lights will not blink using this
method.
✽ ✽
NOTICE
The theft-alarm system can be deac-
tivated by an authorized Kia dealer.
If you want this feature, consult an
authorized Kia dealer.
THEFT-ALARM SYSTEM
Armed
stage
Theft-alarm stageDisarmedstage