2016 KIA Sedona lights
[x] Cancel search: lightsPage 575 of 644

747
Maintenance
✽
✽NOTICE
If you connect unauthorized elec-
tronic devices to the battery, the bat-
tery may be discharged. Never use
unauthorized devices.
Battery recharging
Your vehicle has a maintenance-free,
calcium-based battery.
If the battery becomes discharged
in a short time (because, for exam-
ple, the headlights or interior lights
were left on while the vehicle was
not in use), recharge it by slow
charging (trickle) for 10 hours.
If the battery gradually discharges because of high electric load while
the vehicle is being used, recharge
it at 20-30A for two hours. When recharging the battery,
observe the following precautions:
The battery must be removed from
the vehicle and placed in an area
with good ventilation.
Do not allow cigarettes, sparks, or flame near the battery.
Watch the battery during charging, and stop or reduce the charging
rate if the battery cells begin
gassing (boiling) violently or if the
temperature of the electrolyte of
any cell exceeds 49°C (120°F).
Wear eye protection when check- ing the battery during charging.
Disconnect the battery charger in the following order.
1. Turn off the battery charger main switch.
2. Unhook the negative clamp from the negative battery terminal.
3. Unhook the positive clamp from the positive battery terminal.WARNING- Risk of elec-
trocution
Never touch the electrical igni-
tion system while the vehicle is
running. This system works
with high voltage which can
"zap" you.
Page 592 of 644

Maintenance
64
7
FUSES
A vehicle’s electrical system is pro-
tected from electrical overload dam-
age by fuses.
This vehicle has 2 (or 3) fuse panels,
one located in the driver’s side panel
bolster, the other in the engine com-
partment near the battery.
If any of your vehicle’s lights, acces-
sories, or controls do not work, check
the appropriate circuit fuse. If a fuse
has blown, the element inside the
fuse will melt.
If the electrical system does not
work, first check the driver’s side
fuse panel.
Always replace a blown fuse with
one of the same rating.
If the replacement fuse blows, this
indicates an electrical problem. Avoid
using the system involved and imme-
diately consult an authorized Kia
dealer.
Three kinds of fuses are used: blade
type for lower amperage rating, car-tridge type, and multi fuse for higheramperage ratings.OYP074073N
Normal
Normal
■
Blade type
■ Cartridge type
■ Multi fuse Blown
Blown
Normal Blown
WARNING- Fuse replace- ment
Never replace a fuse with any- thing but another fuse of the
same rating.
A higher capacity fuse could cause damage and possibly a
fire.
Never install a wire or alu- minum foil instead of the
proper fuse - even as a tem-
porary repair. It may cause
extensive wiring damage and
a possible fire.
Do not arbitrarily modify or add-on electric wiring of the
vehicle.
Page 594 of 644

Maintenance
66
7
If you do not have a spare, use a
fuse of the same rating from a circuityou may not need for operating thevehicle, such as the power outletfuse.
If the headlights or other electrical
components do not work and the
fuses are OK, check the fuse panel
in the engine compartment. If a fuse
is blown, it must be replaced.
Fuse switch
Always, put the fuse switch at the ON
position.
If you move the switch to the OFF
position, some items such as audio
and digital clock must be reset and
transmitter (or smart key) may not
work properly. When the switch is
Off, the caution will be displayed on
the instrument cluster.
Always place the fuse switch in the
ON position while driving the vehicle.
Engine compartment fuse
replacement
1. Turn the ignition switch and all other switches off.
2. Remove the fuse panel cover by pressing the tab and pulling the
cover up.
When the blade type fuse is dis- connected, remove it by using the
clip designed for changing fuses
located in the engine room fuse
box. Upon removal, securely
insert reserve fuse of equal quan-
tity.
OYP074011K
OYP074012N
Page 602 of 644

Maintenance
74
7
LIGHT BULBS
Use only the bulbs of the specified
wattage.
✽
✽ NOTICE
• If the light bulb or lamp connector
is removed from an operating
lamp activated by electricity, the
fuse box’s electronic device may
scan it as a malfunction.
Therefore, a lamp malfunction
history may be recorded in
Diagnostic Trouble Code (DTC) in
the fuse box.
• It is normal for an operating lamp may blink temporarily. Since this
occurrence is due stabilization
function of the vehicle’s electronic
control device, if the lamp lights
up normally after temporary
blinking, there is no problem in
the vehicle.
However, if the lamp continues to
blink several times or turn off
completely, there may be an error
in the vehicle’s electronic control
device. So please have the vehicle
checked by an authorized Kia
dealer immediately.
If you don’t have necessary tools, the
correct bulbs and the expertise, con-
sult an authorized Kia dealer. In
many cases, it is difficult to replace
vehicle light bulbs because other
parts of the vehicle must be removed
before you can get to the bulb. This is
especially true if you have to remove
the headlight assembly to get to the
bulb(s).
Removing/installing the headlight
assembly can result in damage to
the vehicle.
WARNING - Working on
the lights
Prior to working on the light,
firmly apply the parking brake,
ensure that the ignition switch
is turned to the LOCK position
and turn off the lights to avoid
sudden movement of the vehi-
cle and burning your fingers or
receiving an electric shock.
CAUTION -Light replace-
ment
Be sure to replace the burned-
out bulb with one of the samewattage rating. Otherwise, itmay cause damage to the fuseor electric wiring system.
Page 609 of 644

781
Maintenance
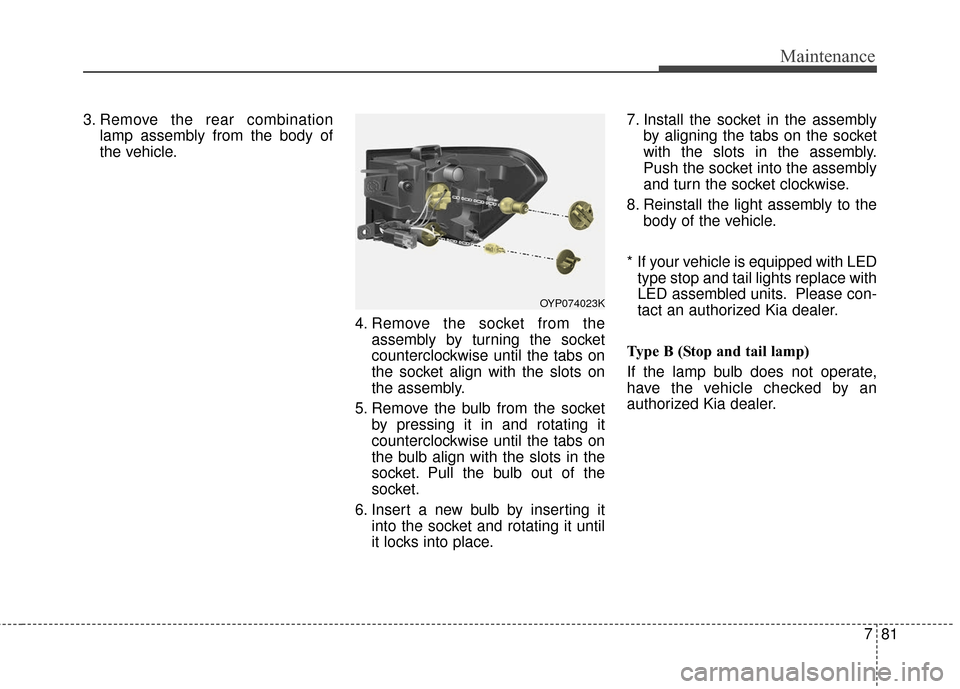
3. Remove the rear combinationlamp assembly from the body of
the vehicle.
4. Remove the socket from theassembly by turning the socket
counterclockwise until the tabs on
the socket align with the slots on
the assembly.
5. Remove the bulb from the socket by pressing it in and rotating it
counterclockwise until the tabs on
the bulb align with the slots in the
socket. Pull the bulb out of the
socket.
6. Insert a new bulb by inserting it into the socket and rotating it until
it locks into place. 7. Install the socket in the assembly
by aligning the tabs on the socket
with the slots in the assembly.
Push the socket into the assembly
and turn the socket clockwise.
8. Reinstall the light assembly to the body of the vehicle.
* If your vehicle is equipped with LED type stop and tail lights replace with
LED assembled units. Please con-
tact an authorized Kia dealer.
Type B (Stop and tail lamp)
If the lamp bulb does not operate,
have the vehicle checked by an
authorized Kia dealer.
OYP074023K
Page 610 of 644

Maintenance
82
7
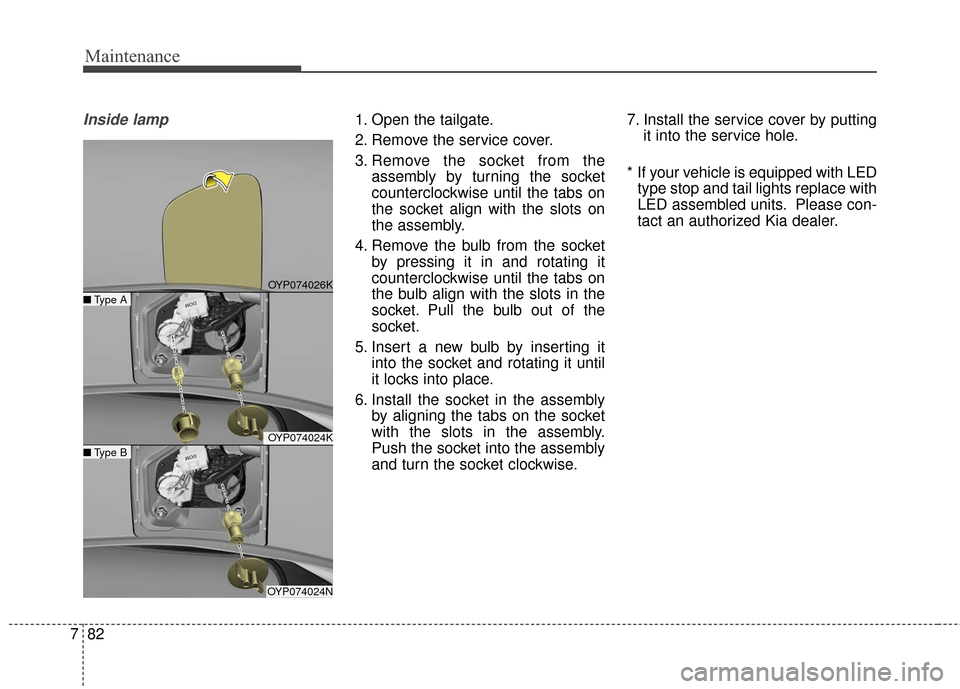
Inside lamp1. Open the tailgate.
2. Remove the service cover.
3. Remove the socket from the
assembly by turning the socket
counterclockwise until the tabs on
the socket align with the slots on
the assembly.
4. Remove the bulb from the socket by pressing it in and rotating it
counterclockwise until the tabs on
the bulb align with the slots in the
socket. Pull the bulb out of the
socket.
5. Insert a new bulb by inserting it into the socket and rotating it until
it locks into place.
6. Install the socket in the assembly by aligning the tabs on the socket
with the slots in the assembly.
Push the socket into the assembly
and turn the socket clockwise. 7. Install the service cover by putting
it into the service hole.
* If your vehicle is equipped with LED type stop and tail lights replace with
LED assembled units. Please con-
tact an authorized Kia dealer.
OYP074026K
OYP074024K
OYP074024N
■ Type A
■Type B
Page 612 of 644

Maintenance
84
7
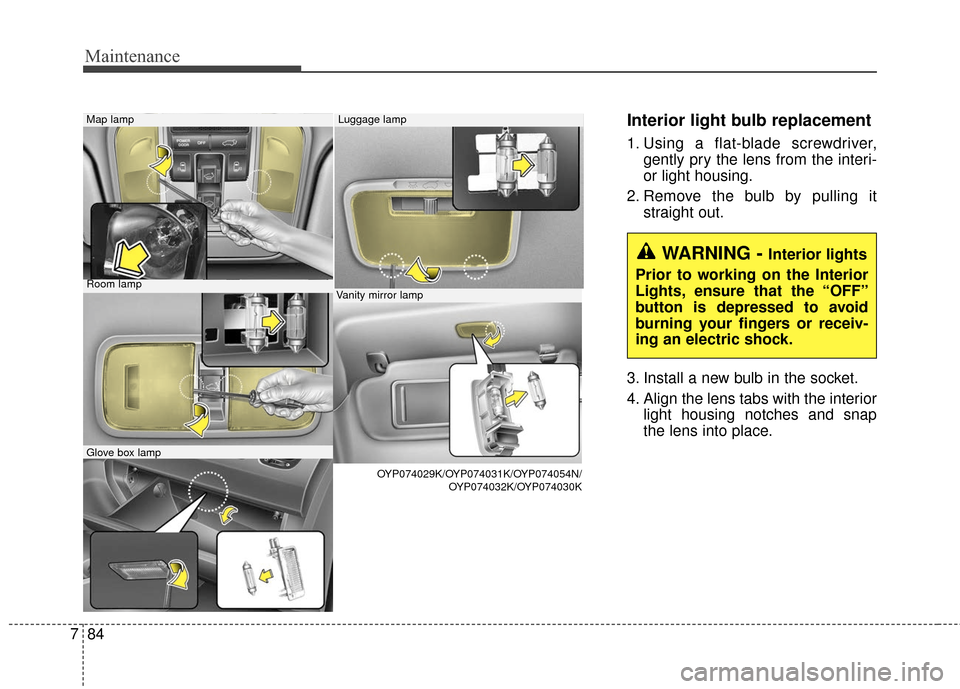
Interior light bulb replacement
1. Using a flat-blade screwdriver,
gently pry the lens from the interi-
or light housing.
2. Remove the bulb by pulling it straight out.
3. Install a new bulb in the socket.
4. Align the lens tabs with the interior light housing notches and snap
the lens into place.
Room lamp
Map lamp
Glove box lamp
Luggage lamp
Vanity mirror lamp
OYP074029K/OYP074031K/OYP074054N/ OYP074032K/OYP074030K
WARNING - Interior lights
Prior to working on the Interior
Lights, ensure that the “OFF”
button is depressed to avoid
burning your fingers or receiv-
ing an electric shock.
Page 639 of 644

I5
Index
Gross vehicle weight. . . . . . . . . . . . . . . . . . . . . . . . . . . . 8-5
Hood . . . . . . . . . . . . . . . . . . . . . . . . . . . . . . . . . . . . \
. . . 4-56Closing the hood . . . . . . . . . . . . . . . . . . . . . . . . . . . 4-57
Opening the hood . . . . . . . . . . . . . . . . . . . . . . . . . . 4-56
How to use this manual . . . . . . . . . . . . . . . . . . . . . . . . . 1-2
If the engine does not start . . . . . . . . . . . . . . . . . . . . . . . 6-4 If engine doesn’t turn over or turns over slowly . . . . 6-4
If engine turns over normally but does not start . . . . 6-4
If the engine overheats . . . . . . . . . . . . . . . . . . . . . . . . . . 6-7
If you have a flat tire . . . . . . . . . . . . . . . . . . . . . . . . . . . 6-8 Changing tires . . . . . . . . . . . . . . . . . . . . . . . . . . . . . 6-11
Jack and tools . . . . . . . . . . . . . . . . . . . . . . . . . . . . . . . 6-8
Removing the spare tire . . . . . . . . . . . . . . . . . . . . . . . 6-9
Storing the spare tire . . . . . . . . . . . . . . . . . . . . . . . . 6-10
Use of temporary compact spare tire . . . . . . . . . . . . 6-15
In case of an emergency while driving . . . . . . . . . . . . . . 6-3 If engine stalls while driving . . . . . . . . . . . . . . . . . . . 6-3
If the engine stalls at a crossroad or crossing . . . . . . 6-3
If you have a flat tire while driving . . . . . . . . . . . . . . 6-3 Instrument cluster . . . . . . . . . . . . . . . . . . . . . . . . . . . . . 4-82
Gauges . . . . . . . . . . . . . . . . . . . . . . . . . . . . . . . . . . . 4-\
84
Instrument cluster control . . . . . . . . . . . . . . . . . . . . 4-83
LCD display control . . . . . . . . . . . . . . . . . . . . . . . . . 4-83
Transaxle shift indicator . . . . . . . . . . . . . . . . . . . . . . 4-88
Instrument panel overview . . . . . . . . . . . . . . . . . . . . . . . 2-5
Interior features . . . . . . . . . . . . . . . . . . . . . . . . . . . . . 4-189 AC inverter . . . . . . . . . . . . . . . . . . . . . . . . . . . . . . . 4-193
Bottle holder . . . . . . . . . . . . . . . . . . . . . . . . . . . . . . 4-190
Clock . . . . . . . . . . . . . . . . . . . . . . . . . . . . . . . . . . . 4-\
196
Clothes hanger . . . . . . . . . . . . . . . . . . . . . . . . . . . . 4-196
Cup holder . . . . . . . . . . . . . . . . . . . . . . . . . . . . . . . 4-189
Floor mat anchor (s) . . . . . . . . . . . . . . . . . . . . . . . . 4-197
Power outlet . . . . . . . . . . . . . . . . . . . . . . . . . . . . . . 4-192
Seat cooler (air ventilation seat) . . . . . . . . . . . . . . 4-191
Seat warmer . . . . . . . . . . . . . . . . . . . . . . . . . . . . . . 4-190
Side curtain. . . . . . . . . . . . . . . . . . . . . . . . . . . . . . . 4-197
Sunvisor . . . . . . . . . . . . . . . . . . . . . . . . . . . . . . . . . 4-192
USB charger . . . . . . . . . . . . . . . . . . . . . . . . . . . . . . 4-195
Interior lights . . . . . . . . . . . . . . . . . . . . . . . . . . . . . . . 4-141 Automatic turn off function . . . . . . . . . . . . . . . . . . 4-141
Battery replacement . . . . . . . . . . . . . . . . . . . . . . . . 4-144
Luggage lamp . . . . . . . . . . . . . . . . . . . . . . . . . . . . . 4-143
Map lamp . . . . . . . . . . . . . . . . . . . . . . . . . . . . . . . 4-142
Portable lamp usage . . . . . . . . . . . . . . . . . . . . . . . . 4-143
Room lamp . . . . . . . . . . . . . . . . . . . . . . . . . . . . . . . 4-141
Vanity mirror lamp . . . . . . . . . . . . . . . . . . . . . . . . . 4-143
Interior overview. . . . . . . . . . . . . . . . . . . . . . . . . . . . . . . 2-4
G
H
I