Page 206 of 644

Features of your vehicle
104
4
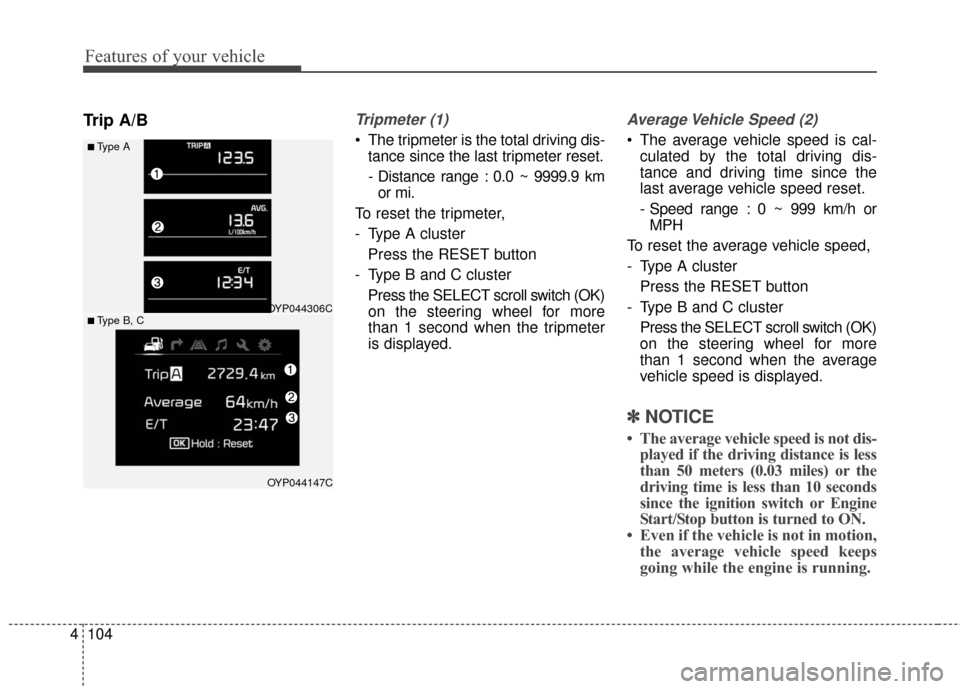
Trip A/BTripmeter (1)
The tripmeter is the total driving dis-
tance since the last tripmeter reset.
- Distance range : 0.0 ~ 9999.9 kmor mi.
To reset the tripmeter,
- Type A cluster Press the RESET button
- Type B and C cluster Press the SELECT scroll switch (OK)
on the steering wheel for more
than 1 second when the tripmeter
is displayed.
Average Vehicle Speed (2)
The average vehicle speed is cal-culated by the total driving dis-
tance and driving time since the
last average vehicle speed reset.
- Speed range : 0 ~ 999 km/h orMPH
To reset the average vehicle speed,
- Type A cluster Press the RESET button
- Type B and C cluster Press the SELECT scroll switch (OK)
on the steering wheel for more
than 1 second when the average
vehicle speed is displayed.
✽ ✽ NOTICE
• The average vehicle speed is not dis-
played if the driving distance is less
than 50 meters (0.03 miles) or the
driving time is less than 10 seconds
since the ignition switch or Engine
Start/Stop button is turned to ON.
• Even if the vehicle is not in motion, the average vehicle speed keeps
going while the engine is running.
■Type A
OYP044306C
OYP044147C
■ Type B, C
Page 207 of 644

4105
Features of your vehicle
Elapsed Time (3)
The elapsed time is the total driv-ing time since the last elapsed time
reset.
- Time range (hh:mm) : 00:00 ~99:59
To reset elapsed time,
- Type A cluster Press the RESET button
- Type B and C cluster Press the SELECT scroll switch (OK)
on the steering wheel for more
than 1 second when the elapsed
time is displayed.
✽ ✽ NOTICE
Even if the vehicle is not in motion,
the elapsed time keeps going while
the engine is running.
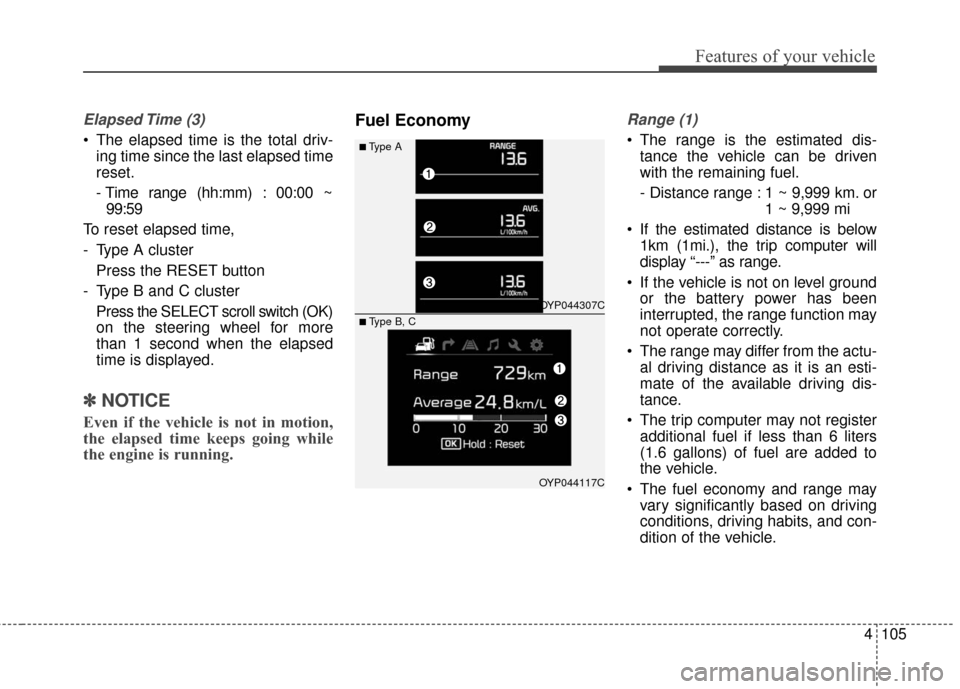
Fuel EconomyRange (1)
The range is the estimated dis-
tance the vehicle can be driven
with the remaining fuel.
- Distance range : 1 ~ 9,999 km. or 1 ~ 9,999 mi
If the estimated distance is below 1km (1mi.), the trip computer will
display “---” as range.
If the vehicle is not on level ground or the battery power has been
interrupted, the range function may
not operate correctly.
The range may differ from the actu- al driving distance as it is an esti-
mate of the available driving dis-
tance.
The trip computer may not register additional fuel if less than 6 liters
(1.6 gallons) of fuel are added to
the vehicle.
The fuel economy and range may vary significantly based on driving
conditions, driving habits, and con-
dition of the vehicle.■Type A
OYP044307C
OYP044117C
■ Type B, C
Page 208 of 644

Features of your vehicle
106
4
Average Fuel Economy (2)
The average fuel economy is calcu-
lated by the total driving distance
and fuel consumption since the last
average fuel economy reset.
- Fuel economy range : 0.0 ~ 99.9MPG or L/100km
The average fuel economy can be reset both manually and automati-
cally.
Manual reset
To reset average fuel economy manu-
ally,
- Type A cluster Press the RESET button
- Type B and C cluster Press the SELECT scroll switch (OK)
on the steering wheel for more
than 1 second when the average
fuel economy is displayed. Automatic reset
To make the average fuel economy
be reset automatically whenever refu-
eling, select the “Auto Reset” mode in
User Setting menu of the LCD display
(Refer to “LCD Display”).
Under “Auto Reset” mode, the aver-
age fuel economy will be cleared to
zero (---) when the vehicle speed
exceeds 1 km/h after refueling more
than 6 liters (1.6 gallons).
✽ ✽
NOTICE
The average fuel economy is not dis-
played for more accurate calculation
if the vehicle does not drive more
than 10 seconds or 50 meters (0.03
miles) since the ignition switch or
Engine Start/Stop button is turned
to ON.
Instant Fuel Economy (3)
This mode displays the instant fuel
economy during the last few sec-
onds when the vehicle speed is
more than 10 km/h (6.2 MPH).
- Fuel economy range : 0 ~ 30L/100km or 0 ~ 50 MPG
Page 211 of 644

4109
Features of your vehicle
Parking Brake & BrakeFluid Warning Light
This warning light illuminates :
Once you set the ignition switch or Engine Start/Stop Button to the ON
position.
- It illuminates for approximately 3seconds.
- It remains on if the parking brake is applied.
When the parking brake is applied.
When the brake fluid level in the reservoir is low.
- If the warning light illuminateswith the parking brake released, it
indicates the brake fluid level in
reservoir is low. If the brake fluid level in the reservoir
is low:
1. Drive carefully to the nearest safe
location and stop your vehicle.
2. With the engine stopped, check the brake fluid level immediately and add
fluid as required (For more details,
refer to “Brake Fluid” in chapter 7).
Then check all brake components
for fluid leaks. If any leaks in the
brake system is still found, the
warning light remains on, or the
brakes do not operate properly, do
not drive the vehicle.
In this case, have your vehicle
towed to an authorized Kia dealer
and inspected. Dual-diagonal braking system
Your vehicle is equipped with dual-
diagonal braking systems. This
means you still have braking on two
wheels even if one of the dual sys-
tems should fail.
With only one of the dual systems
working, more than normal pedal
travel and greater pedal pressure are
required to stop the vehicle.
Also, the vehicle will not stop in as
short a distance with only a portion
of the brake system working.
If the brakes fail while you are driv-
ing, shift to a lower gear for addition-
al engine braking and stop the vehi-
cle as soon as it is safe to do so.
Page 251 of 644
4149
Features of your vehicle
Instrument panel vents
The outlet vents can be opened or
closed separately using the thumb-
wheel (if equipped).
Also, you can adjust the direction of
air delivery from these vents using
the vent control lever as shown.
Temperature control
The temperature control knob allows
you to control the temperature of the
air flowing from the ventilation system.
To change the air temperature in the
passenger compartment, turn the
knob to the right position for warm and
hot air or left position for cooler air.
Air intake control
The air intake control is used to
select the outside (fresh) air position
or recirculated air position.
To change the air intake control posi-
tion, press the control button.
OYP044207K
OYP044206K
OYP044208K
■Type A
■ Type B
Page 268 of 644
Features of your vehicle
166
4
Defrost-Level
Most of the air flow is directed to the
windshield with a small amount of air
directed to the side window defrosters. Instrument panel vents
The outlet vents can be opened or
closed separately using the thumb-
wheel (if equipped).
Also, you can adjust the direction of
air delivery from these vents using
the vent control lever as shown.
Temperature control
The temperature will increase to the
maximum (HI) by turning the knob to
the extreme right.
The temperature will decrease to the
minimum (Lo) by turning the knob to
the extreme left.
When turning the knob, the tempera-
ture will increase or decrease by
0.5°C/1°F. When set to the lowest
temperature setting, the air condi-
tioning will operate continuously.
OYP044225K
■Type A■Type B
OYP044206K
OYP044226K
■Driver’s side■Passenger’s side
Page 303 of 644
4201
Features of your vehicle
✽
✽NOTICE
If you install an after market HID
head lamp, your vehicle’s audio and
electronic device may malfunction.
Antenna
Your vehicle uses a roof antenna to
receive AM or/and FM broadcast sig-
nals.
When reinstalling your roof antenna,
it is important that it is fully tightened
and adjusted to the upright position
to ensure proper reception.
Steering wheel remote
controller
(1) VOLUME
Used to control volume.
(2) SEEK
When pressed briefly (less than 1
second).
- FM, AM mode : searches broadcast
frequencies saved to presets.
- CD, USB, iPod
®, My Music, BT
Audio mode : changes the track, file.
AUDIO SYSTEM
OYP044249K
OYP044270N
Page 342 of 644

Features of your vehicle
240
4
PHONE (for Type A-1)
Before using the Bluetooth® Wireless
Technology phone features
Bluetooth®Wireless
Technology phone, you must first
pair and connect the
Bluetooth®
Wireless Technology mobile phone.
connected, it is not possible to
enter Phone mode. Once a phone
is paired or connected, the guid-
ance screen will be displayed.
tion (IGN/ACC ON), the
Bluetooth®
Wireless Technology phone will be
automatically connected. Even if
you are outside, the
Bluetooth®
Wireless Technology phone will be
automatically connected once you
are in the vicinity of the vehicle. If
you do not want automatic
Bluetooth®Wireless Technology
phone connection, set the
Bluetooth®Wireless Technology
power to OFF
Making a call using the
Steering-wheel mount controls
(1) key : Mutes the microphone during a call.
(2) ,key : Raises or lowers
speaker volume.
(3) key : Activates voice recogni- tion.
(4) key : Places and transfers calls.
(5) key : Ends calls or cancels functions. Check call history and making call
- Shortly press (less than 1 second)
the key on the steering
remote controller.
- The call history list will be dis- played on the screen.
- Press the key again to con- nect a call to the selected number.
number
- Press and hold (more than 1 sec- ond) the key on the steering
remote controller.
- The most recently called number is redialed.
❈ If call history does not exist, a
screen asking whether to down-
load call history is displayed. (The
download feature may not be sup-
ported in some mobile phones)
-+