2016 KIA Sedona ABS
[x] Cancel search: ABSPage 601 of 644

773
Maintenance
Fuse Name Fuse ratingCircuit Protected
BLOWER RR 40A Blower RR Relay BLOWER 40A Blower Relay
SENSOR (B+) 10A Battery Sensor
B/ALARM HORN 10A B/Alarm Horn Relay FUEL LID 10A Fuel Lid Relay DEICER 15A Deicer Relay
FUEL PUMP 15A Fuel Pump Relay HORN 15A Horn Relay
WIPER 25A Front Wiper (Low) Relay
ECU3 30A Engine Control Relay, Fuse - ECU1
REAR HEATED 40A Rear Heated Relay TCU 15A Transmission Range Switch
MDPS 10A MDPS Unit (Rack)
CRUISE 10A Smart Cruise Control Radar
B/UP LAMP 10A Audio, A/V & Navigation Head Unit, Rear Combination Lamp (IN) LH/RH, Electro Chromic \
Mirror A/CON 7.5A Rear A/C Control Switch, A/C Control Module
ECU1 15A PCM ABS3 7.5A ESC Module, Steering Angle Sensor
ECU2 10A Injector Drive Box
SENSOR1 15A Oxygen Sensor #1/#2/#3/#4, PCM, E/R Junction Box (Cooling Fan1 Relay)
SENSOR2 10A PCM, Canister Close Valve, Variable Intake Solenoid Valve #1/#2, Purge Control Solenoid Valve, Oil Control
Valve #1/#2 (Intake), Oil Control Valve #1/#2 (Exhaust)
SENSOR3 10A PCM, Fuel Pump Relay IGN COIL 20A Ignition Coil #1~#6, Condensor #1/#2
Page 605 of 644

777
Maintenance
1. Open the hood.
2. Remove the front cover(1) andheadlamp assembly nuts(2).
3. Remove the headlamp assembly from the body of the vehicle
4. Remove the headlamp bulb cover by turning it counterclockwise.
5. Remove the socket from the assembly by turning the socket
counterclockwise until the tabs on
the socket align with the slots on
the assembly.
6. Remove the bulb by pulling it out.
7. Inset a new bulb by inserting it into the socket.
8. Install the socket in the assembly by aligning the tabs on the socket
with the slots in the assembly.
Push the socket into the assembly
and turn the socket clockwise.
9. Install the headlamp bulb cover by turning it clockwise.Turn signal lamp/Position lamp
Follow the steps 1 to 3 from the pre-
vious page.
4. Remove the socket from theassembly by turning the socket
counterclockwise until the tabs on
the socket align with the slots on
the assembly.
5. Remove the bulb from the socket by pressing it in and rotating it
counterclockwise until the tabs on
the bulb align with the slots in the
socket. Pull the bulb out of the
socket 6. Insert a new bulb by inserting it
into the socket and rotating it until
it locks into place.
7. Install the socket in the assembly by aligning the tabs on the socket
with the slots in the assembly.
Push the socket into the assembly
and turn the socket clockwise.
✽ ✽NOTICE
If bulb will not rotate inside socket,
remove bulb, rotate 180°, and try
again.
OYP074056N
Page 606 of 644
Maintenance
78
7
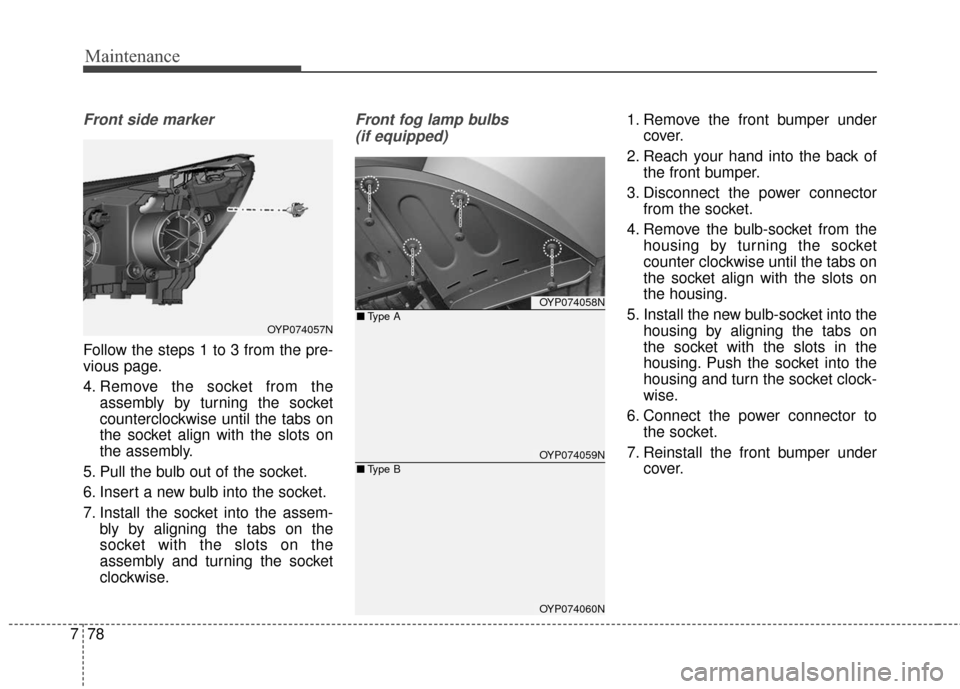
Front side marker
Follow the steps 1 to 3 from the pre-
vious page.
4. Remove the socket from the
assembly by turning the socket
counterclockwise until the tabs on
the socket align with the slots on
the assembly.
5. Pull the bulb out of the socket.
6. Insert a new bulb into the socket.
7. Install the socket into the assem- bly by aligning the tabs on the
socket with the slots on the
assembly and turning the socket
clockwise.
Front fog lamp bulbs
(if equipped)1. Remove the front bumper under cover.
2. Reach your hand into the back of the front bumper.
3. Disconnect the power connector from the socket.
4. Remove the bulb-socket from the housing by turning the socket
counter clockwise until the tabs on
the socket align with the slots on
the housing.
5. Install the new bulb-socket into the housing by aligning the tabs on
the socket with the slots in the
housing. Push the socket into the
housing and turn the socket clock-
wise.
6. Connect the power connector to the socket.
7. Reinstall the front bumper under cover.
OYP074057N
OYP074058N
OYP074059N
OYP074060N
■Type A
■ Type B
Page 609 of 644
781
Maintenance
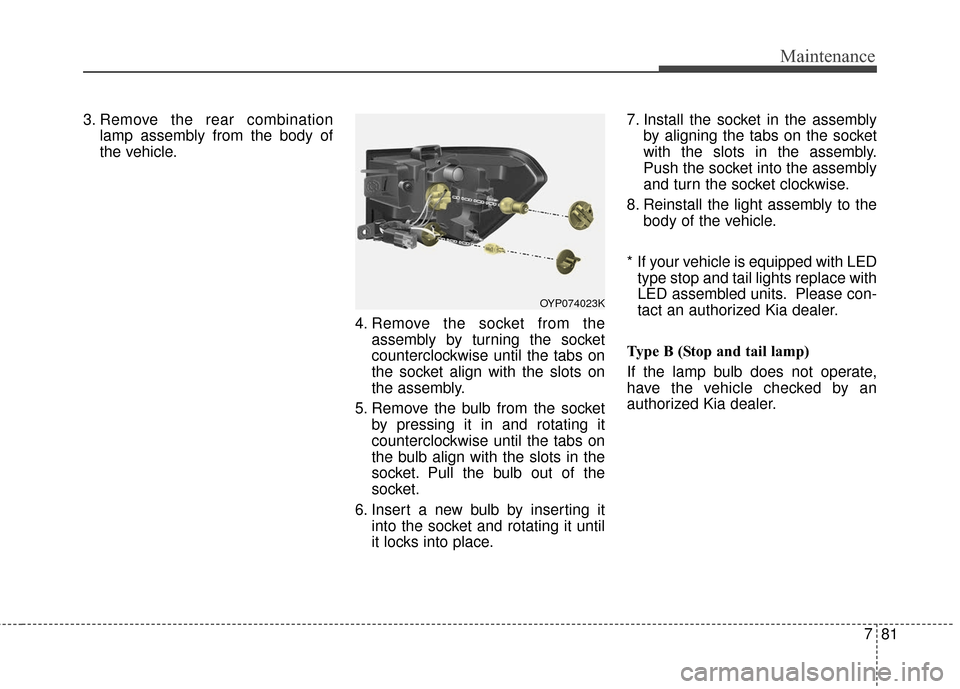
3. Remove the rear combinationlamp assembly from the body of
the vehicle.
4. Remove the socket from theassembly by turning the socket
counterclockwise until the tabs on
the socket align with the slots on
the assembly.
5. Remove the bulb from the socket by pressing it in and rotating it
counterclockwise until the tabs on
the bulb align with the slots in the
socket. Pull the bulb out of the
socket.
6. Insert a new bulb by inserting it into the socket and rotating it until
it locks into place. 7. Install the socket in the assembly
by aligning the tabs on the socket
with the slots in the assembly.
Push the socket into the assembly
and turn the socket clockwise.
8. Reinstall the light assembly to the body of the vehicle.
* If your vehicle is equipped with LED type stop and tail lights replace with
LED assembled units. Please con-
tact an authorized Kia dealer.
Type B (Stop and tail lamp)
If the lamp bulb does not operate,
have the vehicle checked by an
authorized Kia dealer.
OYP074023K
Page 610 of 644
Maintenance
82
7
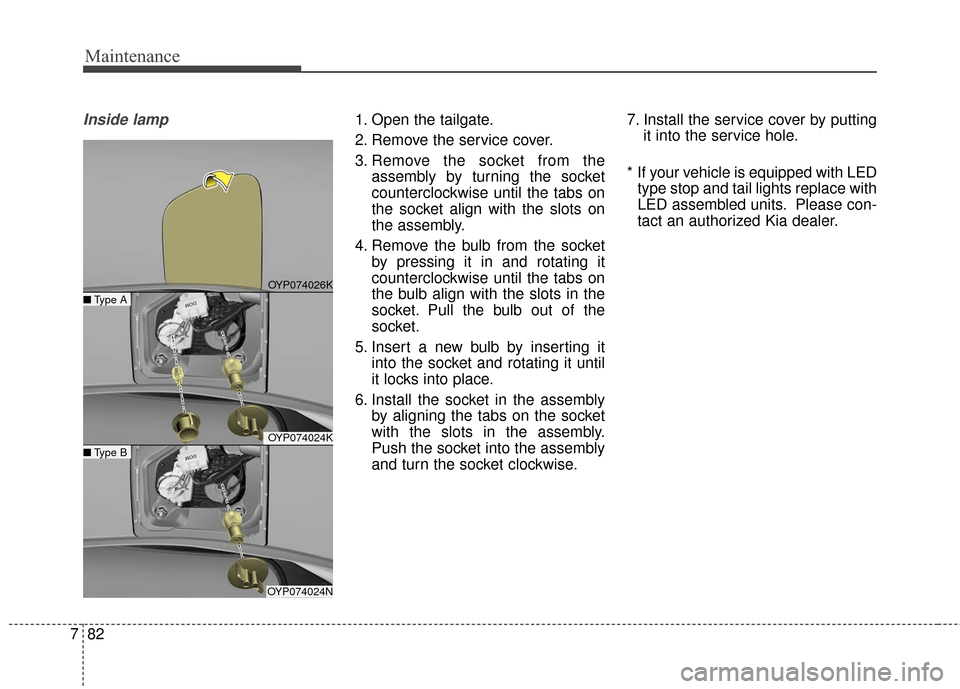
Inside lamp1. Open the tailgate.
2. Remove the service cover.
3. Remove the socket from the
assembly by turning the socket
counterclockwise until the tabs on
the socket align with the slots on
the assembly.
4. Remove the bulb from the socket by pressing it in and rotating it
counterclockwise until the tabs on
the bulb align with the slots in the
socket. Pull the bulb out of the
socket.
5. Insert a new bulb by inserting it into the socket and rotating it until
it locks into place.
6. Install the socket in the assembly by aligning the tabs on the socket
with the slots in the assembly.
Push the socket into the assembly
and turn the socket clockwise. 7. Install the service cover by putting
it into the service hole.
* If your vehicle is equipped with LED type stop and tail lights replace with
LED assembled units. Please con-
tact an authorized Kia dealer.
OYP074026K
OYP074024K
OYP074024N
■ Type A
■Type B
Page 612 of 644
Maintenance
84
7
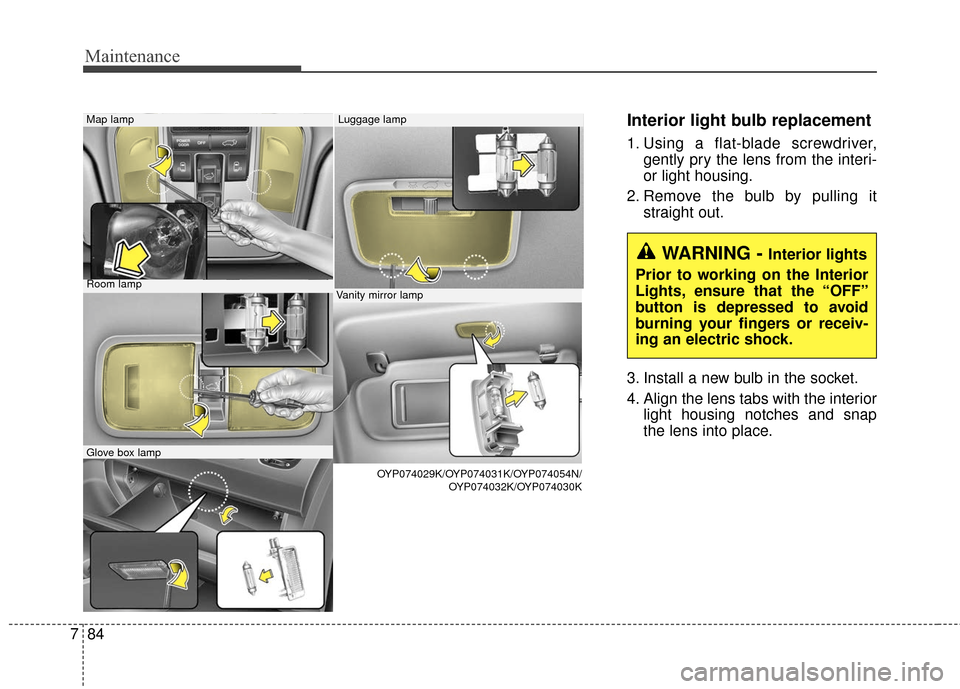
Interior light bulb replacement
1. Using a flat-blade screwdriver,
gently pry the lens from the interi-
or light housing.
2. Remove the bulb by pulling it straight out.
3. Install a new bulb in the socket.
4. Align the lens tabs with the interior light housing notches and snap
the lens into place.
Room lamp
Map lamp
Glove box lamp
Luggage lamp
Vanity mirror lamp
OYP074029K/OYP074031K/OYP074054N/ OYP074032K/OYP074030K
WARNING - Interior lights
Prior to working on the Interior
Lights, ensure that the “OFF”
button is depressed to avoid
burning your fingers or receiv-
ing an electric shock.
Page 623 of 644
795
Maintenance
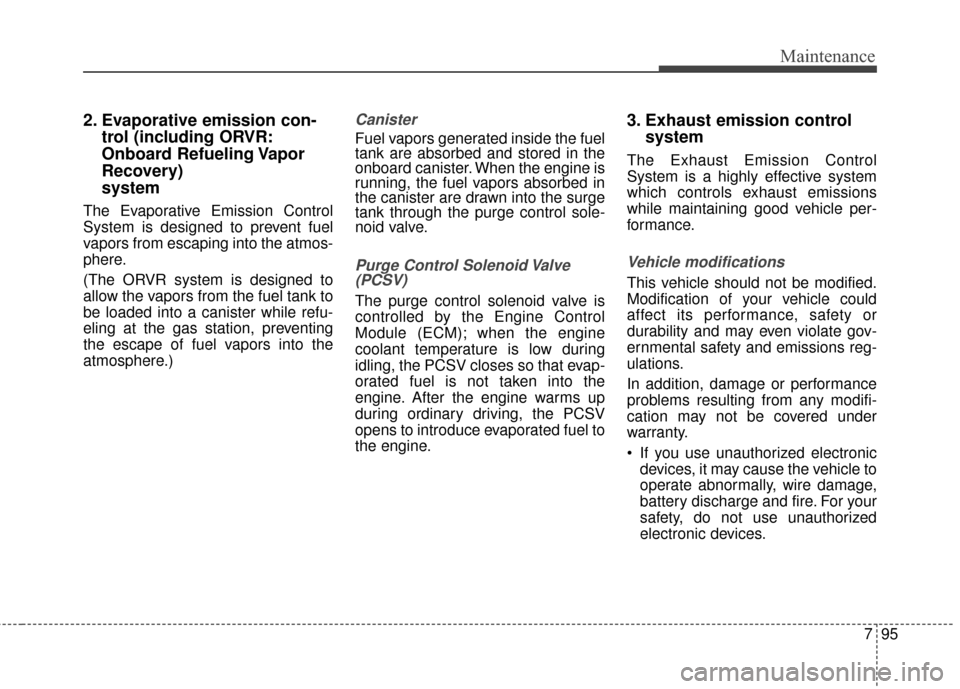
2. Evaporative emission con-trol (including ORVR:
Onboard Refueling Vapor
Recovery)
system
The Evaporative Emission Control
System is designed to prevent fuel
vapors from escaping into the atmos-
phere.
(The ORVR system is designed to
allow the vapors from the fuel tank to
be loaded into a canister while refu-
eling at the gas station, preventing
the escape of fuel vapors into the
atmosphere.)
Canister
Fuel vapors generated inside the fuel
tank are absorbed and stored in the
onboard canister. When the engine is
running, the fuel vapors absorbed in
the canister are drawn into the surge
tank through the purge control sole-
noid valve.
Purge Control Solenoid Valve(PCSV)
The purge control solenoid valve is
controlled by the Engine Control
Module (ECM); when the engine
coolant temperature is low during
idling, the PCSV closes so that evap-
orated fuel is not taken into the
engine. After the engine warms up
during ordinary driving, the PCSV
opens to introduce evaporated fuel to
the engine.
3. Exhaust emission control
system
The Exhaust Emission Control
System is a highly effective system
which controls exhaust emissions
while maintaining good vehicle per-
formance.
Vehicle modifications
This vehicle should not be modified.
Modification of your vehicle could
affect its performance, safety or
durability and may even violate gov-
ernmental safety and emissions reg-
ulations.
In addition, damage or performance
problems resulting from any modifi-
cation may not be covered under
warranty.
If you use unauthorized electronic
devices, it may cause the vehicle to
operate abnormally, wire damage,
battery discharge and fire. For your
safety, do not use unauthorized
electronic devices.
Page 637 of 644
I3
Index
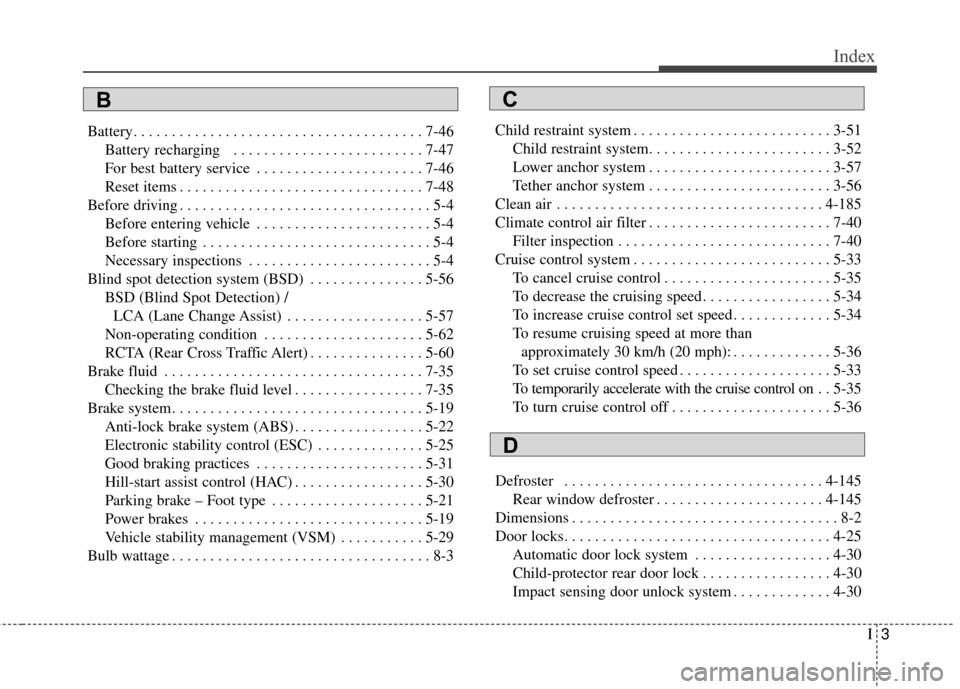
Battery. . . . . . . . . . . . . . . . . . . . . . . . . . . . . . . . . . . . \
. . 7-46Battery recharging . . . . . . . . . . . . . . . . . . . . . . . . . 7-47
For best battery service . . . . . . . . . . . . . . . . . . . . . . 7-46
Reset items . . . . . . . . . . . . . . . . . . . . . . . . . . . . . . . . 7-48
Before driving . . . . . . . . . . . . . . . . . . . . . . . . . . . . . . . . . 5-4 Before entering vehicle . . . . . . . . . . . . . . . . . . . . . . . 5-4
Before starting . . . . . . . . . . . . . . . . . . . . . . . . . . . . . . 5-4
Necessary inspections . . . . . . . . . . . . . . . . . . . . . . . . 5-4
Blind spot detection system (BSD) . . . . . . . . . . . . . . . 5-56 BSD (Blind Spot Detection) / LCA (Lane Change Assist) . . . . . . . . . . . . . . . . . . 5-57
Non-operating condition . . . . . . . . . . . . . . . . . . . . . 5-62
RCTA (Rear Cross Traffic Alert) . . . . . . . . . . . . . . . 5-60
Brake fluid . . . . . . . . . . . . . . . . . . . . . . . . . . . . . . . . . . 7-35\
Checking the brake fluid level . . . . . . . . . . . . . . . . . 7-35
Brake system. . . . . . . . . . . . . . . . . . . . . . . . . . . . . . . . . 5-19 Anti-lock brake system (ABS) . . . . . . . . . . . . . . . . . 5-22
Electronic stability control (ESC) . . . . . . . . . . . . . . 5-25
Good braking practices . . . . . . . . . . . . . . . . . . . . . . 5-31
Hill-start assist control (HAC) . . . . . . . . . . . . . . . . . 5-30
Parking brake – Foot type . . . . . . . . . . . . . . . . . . . . 5-21
Power brakes . . . . . . . . . . . . . . . . . . . . . . . . . . . . . . 5-19
Vehicle stability management (VSM) . . . . . . . . . . . 5-29
Bulb wattage . . . . . . . . . . . . . . . . . . . . . . . . . . . . . . . . . . 8-3 Child restraint system . . . . . . . . . . . . . . . . . . . . . . . . . . 3-51
Child restraint system. . . . . . . . . . . . . . . . . . . . . . . . 3-52
Lower anchor system . . . . . . . . . . . . . . . . . . . . . . . . 3-57
Tether anchor system . . . . . . . . . . . . . . . . . . . . . . . . 3-56
Clean air . . . . . . . . . . . . . . . . . . . . . . . . . . . . . . . . . . . 4-\
185
Climate control air filter . . . . . . . . . . . . . . . . . . . . . . . . 7-40 Filter inspection . . . . . . . . . . . . . . . . . . . . . . . . . . . . 7-40
Cruise control system . . . . . . . . . . . . . . . . . . . . . . . . . . 5-33 To cancel cruise control . . . . . . . . . . . . . . . . . . . . . . 5-35
To decrease the cruising speed . . . . . . . . . . . . . . . . . 5-34
To increase cruise control set speed . . . . . . . . . . . . . 5-34
To resume cruising speed at more than approximately 30 km/h (20 mph): . . . . . . . . . . . . . 5-36
To set cruise control speed . . . . . . . . . . . . . . . . . . . . 5-33
To temporarily accelerate with the cruise control on . . 5-35
To turn cruise control off . . . . . . . . . . . . . . . . . . . . . 5-36
Defroster . . . . . . . . . . . . . . . . . . . . . . . . . . . . . . . . . . 4-14\
5 Rear window defroster . . . . . . . . . . . . . . . . . . . . . . 4-145
Dimensions . . . . . . . . . . . . . . . . . . . . . . . . . . . . . . . . . . . 8-\
2
Door locks. . . . . . . . . . . . . . . . . . . . . . . . . . . . . . . . . . . 4-\
25 Automatic door lock system . . . . . . . . . . . . . . . . . . 4-30
Child-protector rear door lock . . . . . . . . . . . . . . . . . 4-30
Impact sensing door unlock system . . . . . . . . . . . . . 4-30
CB
D