Page 429 of 477

779
Maintenance
Always handle them carefully, and
avoid scratches and abrasions. If the
bulbs are lit, avoid contact with liq-
uids. Never touch the glass with bare
hands. Residual oil may cause the
bulb to overheat and burst when lit. A
bulb should be operated only when
installed in a headlight.
If a bulb becomes damaged or
cracked, replace it immediately and
carefully dispose of it.
Wear eye protection when changing
a bulb. Allow the bulb to cool down
before handling it.1.Turn off the engine and open the
hood. If you can reach the bulb
without removing the headlight
assembly, continue to step 4.
2.Remove the front bumper upper cover.
3.Remove the headlight assembly from the body of the vehicle.
4.Disconnect the power connector(s) from the back of the headlight
assembly.
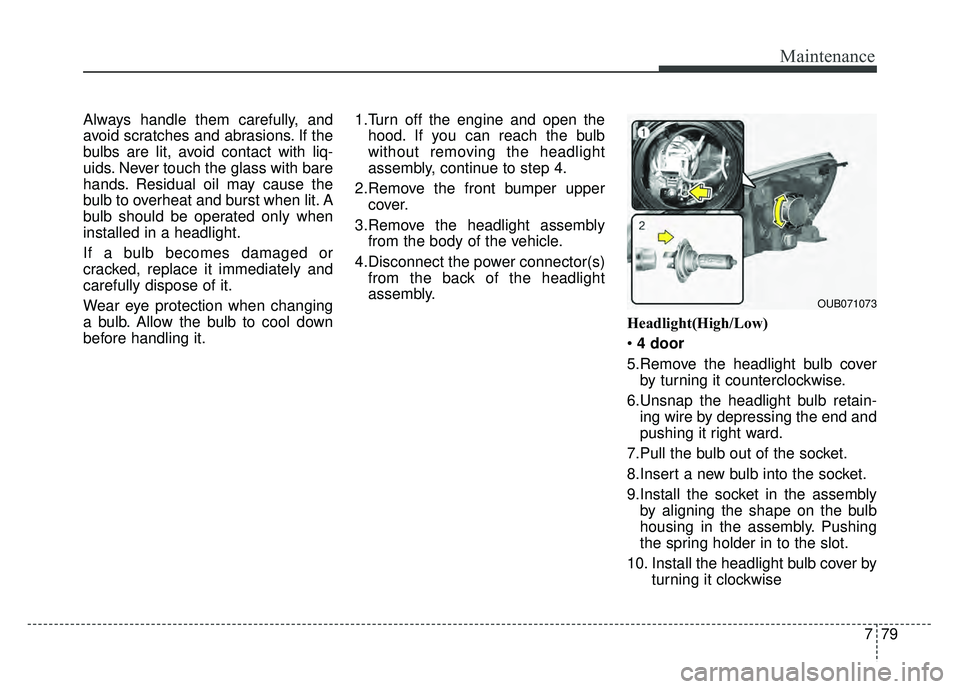
Headlight(High/Low)
4 door
5.Remove the headlight bulb cover by turning it counterclockwise.
6.Unsnap the headlight bulb retain- ing wire by depressing the end and
pushing it right ward.
7.Pull the bulb out of the socket.
8.Insert a new bulb into the socket.
9.Install the socket in the assembly by aligning the shape on the bulb
housing in the assembly. Pushing
the spring holder in to the slot.
10. Install the headlight bulb cover by turning it clockwise
OUB071073
Page 430 of 477

Maintenance
80
7
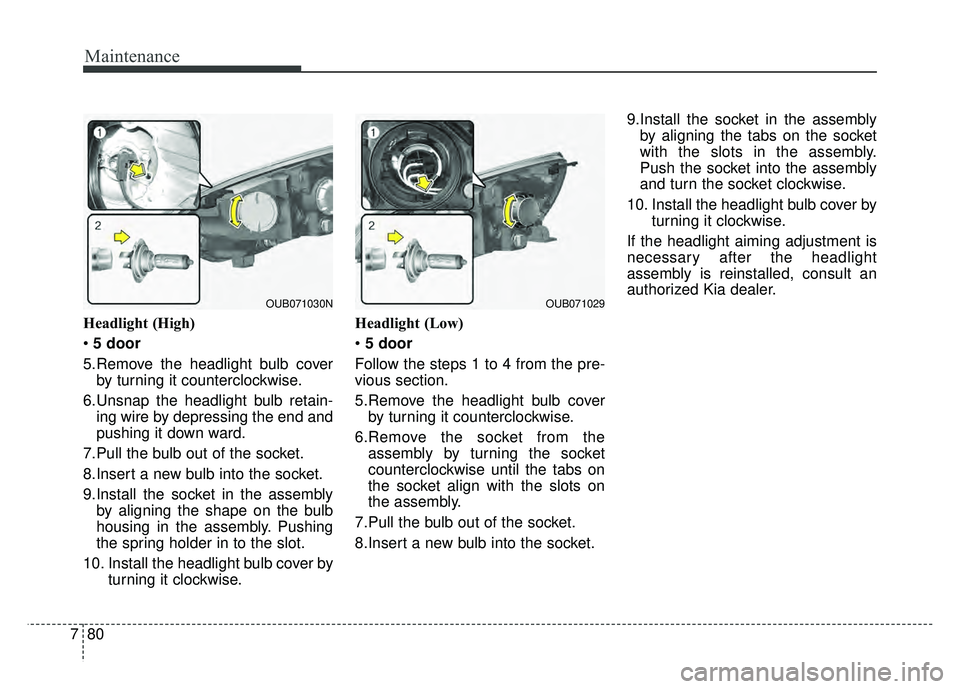
Headlight (High)
5 door
5.Remove the headlight bulb cover by turning it counterclockwise.
6.Unsnap the headlight bulb retain- ing wire by depressing the end and
pushing it down ward.
7.Pull the bulb out of the socket.
8.Insert a new bulb into the socket.
9.Install the socket in the assembly by aligning the shape on the bulb
housing in the assembly. Pushing
the spring holder in to the slot.
10. Install the headlight bulb cover by turning it clockwise. Headlight (Low)
5 door
Follow the steps 1 to 4 from the pre-
vious section.
5.Remove the headlight bulb cover by turning it counterclockwise.
6.Remove the socket from the assembly by turning the socket
counterclockwise until the tabs on
the socket align with the slots on
the assembly.
7.Pull the bulb out of the socket.
8.Insert a new bulb into the socket. 9.Install the socket in the assembly
by aligning the tabs on the socket
with the slots in the assembly.
Push the socket into the assembly
and turn the socket clockwise.
10. Install the headlight bulb cover by turning it clockwise.
If the headlight aiming adjustment is
necessary after the headlight
assembly is reinstalled, consult an
authorized Kia dealer.
OUB071030NOUB071029
Page 431 of 477
781
Maintenance
Turn signal light/Position light or Side
marker
Follow the steps 1 to 4 from the pre-
vious page.
5.Remove the socket from theassembly by turning the socket
counterclockwise until the tabs on
the socket align with the slots on
the assembly.
6.Remove the bulb from the socket by pressing it in and rotating it
counterclockwise until the tabs on
the bulb align with the slots in the
socket. Pull the bulb out of the
socket 7.Insert a new bulb by inserting it into
the socket and rotating it until it
locks into place.
8.Install the socket in the assembly by aligning the tabs on the socket
with the slots in the assembly.
Push the socket into the assembly
and turn the socket clockwise.
Position light (if equipped)
If the light bulb does not operate,
have the vehicle checked by an
authorized Kia dealer.OUB071031N
OUB071055
OUB071077
OUB071056
■ 4 door
■ 5 door
Page 432 of 477

Maintenance
82
7
Front fog light bulbs (if equipped)
1.Remove the under cover by rotat-
ing the screws.
2.Reach your hand into the back of the front bumper.
3.Disconnect the power connector from the socket.
4.Remove the bulb-socket from the housing by turning the socket
counter clockwise until the tabs on
the socket align with the slots on
the housing.
5.Install the new bulb-socket into the housing by aligning the tabs on the
socket with the slots in the hous-
ing. Push the socket into the hous-
ing and turn the socket clockwise.
6 Connect the power connector to the socket.
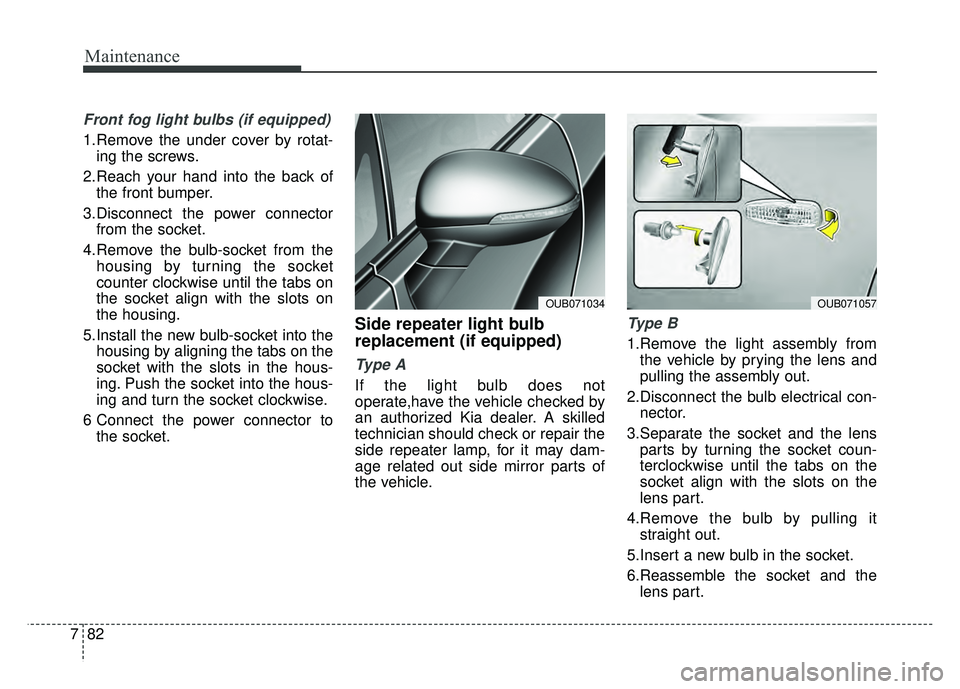
Side repeater light bulb
replacement (if equipped)
Type A
If the light bulb does not
operate,have the vehicle checked by
an authorized Kia dealer. A skilled
technician should check or repair the
side repeater lamp, for it may dam-
age related out side mirror parts of
the vehicle.
Ty p e B
1.Remove the light assembly fromthe vehicle by prying the lens and
pulling the assembly out.
2.Disconnect the bulb electrical con- nector.
3.Separate the socket and the lens parts by turning the socket coun-
terclockwise until the tabs on the
socket align with the slots on the
lens part.
4.Remove the bulb by pulling it straight out.
5.Insert a new bulb in the socket.
6.Reassemble the socket and the lens part.
OUB071034OUB071057
Page 433 of 477
783
Maintenance
7.Connect the bulb electrical con-nector.
8.Reinstall the light assembly to the body of the vehicle.
Rear combination light bulb
replacement
(1) Stop and tail light
(2) Rear turn signal light
(3) Back-up light
(4) Tail light
Stop and tail light
(LED type, if equipped)
If the light (LED) does not operate,
have the vehicle checked by an
authorized Kia dealer.
OUB071036
■ 4 door
■ 5 doorOUB075113
Page 434 of 477
Maintenance
84
7
Outside light
Rear turn signal light and tail/stop
light
4 door
1.Turn off the engine.
2.Open the trunk lid.
3.Remove the service cover by pulling out the service cover. 4.Remove the socket from the
assembly by turning the socket
counterclockwise until the tabs on
the socket align with the slots on
the assembly.
5.Remove the bulb from the socket by pressing it in and rotating it
counterclockwise until the tabs on
the bulb align with the slots in the
socket. Pull the bulb out of the
socket.
6.Insert a new bulb by inserting it into the socket and rotating it until it
locks into place. 7.Install the socket in the assembly
by aligning the tabs on the socket
with the slots in the assembly.
Push the socket into the assembly
and turn the socket clockwise.
8.Install the service cover by putting it into the service hole.
OUB071070KOUB071069K
Page 435 of 477
785
Maintenance
5 door
1.Turn off the engine.
2.Open the tailgate.
3.Loosen the light assembly retain- ing screws with a cross-tip screw-
driver.
4.Remove the rear combination light assembly from the body of the
vehicle. 5.Remove the socket from the
assembly by turning the socket
counterclockwise until the tabs on
the socket align with the slots on
the assembly.
6.Remove the bulb from the socket by pressing it in and rotating it
counterclockwise until the tabs on
the bulb align with the slots in the
socket. Pull the bulb out of the
socket.
7.Insert a new bulb by inserting it into the socket and rotating it until it
locks into place. 8.Install the socket in the assembly
by aligning the tabs on the socket
with the slots in the assembly.
Push the socket into the assembly
and turn the socket clockwise.
9.Reinstall the light assembly to the body of the vehicle.
OUB071038OUB071037
Page 436 of 477
Maintenance
86
7
Inside light
Back-up light/tail light
4 door
1.Turn off the engine.
2.Open the trunk.
3.Loosen the retaining screw of the trunk lid cover and then remove the
cover.
4.Remove the socket from the assembly by turning the socket
counter clockwise until the tabs on
the socket align with the slots on
the assembly. 5.Remove the bulb from the socket
by pressing it in and rotating it until
the tabs on the bulb align with the
slots in the socket. Pull the bulb out
of the socket.
6.Insert a new bulb by inserting it intothe socket and rotating it until it
locks into place.
7.Install the socket into the assembly by aligning the tabs on the socket
with the slots in the assembly.
Push the socket into the assembly
and turn the socket clockwise.
8.Reinstall the trunk lid cover by pushing in the screw.
OUB071072KOUB071071K