Page 11 of 488

23
Your vehicle at a glance
INSTRUMENT PANEL OVERVIEW
OTA010002
1. Instrument cluster.............................4-42
2. Horn .................................................4-37
3. Driver’s front air bag* .......................3-48
4. Light control/Turn signals .................4-76
5. Wiper/Washer ...................................4-83
6. Ignition switch* or ENGINE START/STOP button* ....5-5, 5-6
7. Hazard warning flasher switch ......4-74, 6-2
8. Audio* .............................................4-131
9. Climate control system* ........4-91, 4-100
10. Shift lever* .............................5-18, 5-21
11. Steering wheel audio control* ......4-120
12. Passenger’s front air bag* ..............3-48
13. Glove box .....................................4-110
14. Parking brake lever ........................5-28
15. Power outlet* ................................4-115
16. Cigarette lighter* ...........................4-112
17. Seat warmer* ....................................3-8
18. Driver’s knee air bag* .....................3-48
* : if equipped
Page 77 of 488
Storage compartments / 4-110Interior features / 4-112Audio system / 4-119
Features of your vehicle4
Page 190 of 488

4115
Features of your vehicle
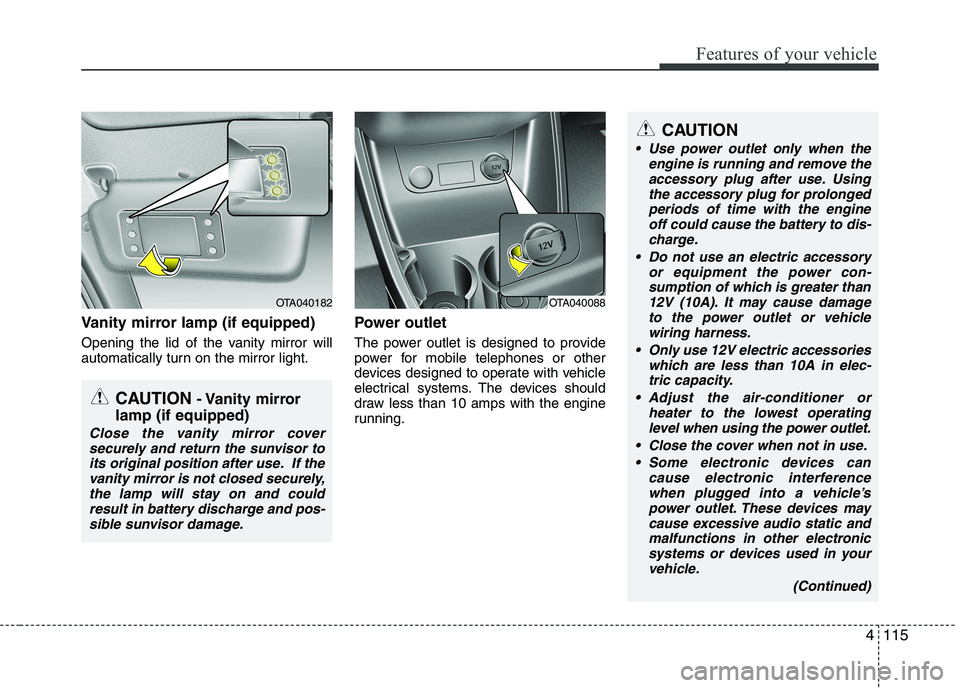
Vanity mirror lamp (if equipped)
Opening the lid of the vanity mirror will
automatically turn on the mirror light.Power outlet
The power outlet is designed to provide
power for mobile telephones or other
devices designed to operate with vehicle
electrical systems. The devices should
draw less than 10 amps with the engine
running.
OTA040182
CAUTION
- Vanity mirror
lamp (if equipped)
Close the vanity mirror cover securely and return the sunvisor to
its original position after use. If the vanity mirror is not closed securely,the lamp will stay on and couldresult in battery discharge and pos-
sible sunvisor damage.
OTA040088
CAUTION
Use power outlet only when the engine is running and remove the
accessory plug after use. Using the accessory plug for prolongedperiods of time with the engine off could cause the battery to dis-
charge.
Do not use an electric accessory or equipment the power con-sumption of which is greater than
12V (10A). It may cause damage to the power outlet or vehiclewiring harness.
Only use 12V electric accessories which are less than 10A in elec-
tric capacity.
Adjust the air-conditioner or heater to the lowest operatinglevel when using the power outlet.
Close the cover when not in use. Some electronic devices can cause electronic interferencewhen plugged into a vehicle’spower outlet. These devices maycause excessive audio static and
malfunctions in other electronicsystems or devices used in your vehicle.
(Continued)
Page 191 of 488
Features of your vehicle
116
4
Digital clock
Whenever the battery terminals or relat-
ed fuses are disconnected, you must
reset the time.
When the ignition switch is in the ACC or
ON position, the clock buttons operate as
follows:
Setup the clock (Type A)
With audio off
1. Press the [SETUP] or [Clock] button
until the clock of the display blinks.
2. Set the clock by turning the knob(1) and press it.
WARNING
Do not put a finger or a foreign ele-
ment (pin, etc.) into a power outlet
and do not touch with a wet hand.
You may get electrocuted or fire
may occur.
(Continued)
Make sure that the electric devices are plugged in securely. Ifnot, it could cause a malfunctionof electric systems.
If you use an electric device with a battery, electric current mayflow from the electric device intothe vehicle and may cause a mal-
function of electric systems. Onlyuse electric devices which couldprevent flowing of current into the vehicle.
OTA045089K
■ Type A
Page 192 of 488
4117
Features of your vehicle
With audio on
1. Press the [SETUP] or [Clock] buttonuntil the clock adjust mode displayed.
2. Set the clock by turning the knob(1) and press it.
Setup the clock (Type B)
Hour:
Turn the knob to the left (H), will advance
the time displayed by one hour.
Minute:
Turn the knob to the right (M), will
advance the time displayed by one
minute. Clothes hanger (if equipped)
To use the hanger, pull down the upper
portion of hanger.
OTA045522
■
Type B
WARNING
Do not adjust the clock while driv-
ing. You may lose your steering
control and cause an accident that
results in severe personal injury ordeath.
CAUTION
Do not hang heavy clothes, since those may damage the hook.
OUN026348
WARNING
Do not hang other objects except
clothes. In an accident it may cause
vehicle damage or personal injury.
Page 194 of 488
119
Features of your vehicle
4
✽✽NOTICE
If you install an aftermarket HID head
lamp, your vehicle’s audio and electron-
ic device may malfunction.
Antenna
Roof antenna
Your car uses a roof antenna to receive
both AM and FM broadcast signals. This
antenna is a removable type. To remove
the antenna, turn it counterclockwise. To
install the antenna, turn it clockwise.
AUDIO SYSTEM
CAUTION
• Before entering a place with a low
height clearance or a car wash,
remove surely the antenna by rotating it counter-clockwise. Ifnot, the antenna may be damaged.
When reinstalling your antenna, it is important that it is fully tight-ened and adjusted to the uprightposition to ensure proper recep- tion. But it could be removed
when parking the vehicle or when loading cargo on the roof rack.
When cargo is loaded on the roof rack, do not place the cargo nearthe antenna pole to ensure proper
reception.
OUB041162
OHM048154N
■ Type A
■Type B
Page 195 of 488
Features of your vehicle
120
Steering wheel audio controls (if equipped)
The steering wheel may incorporate
audio control buttons.VOLUME (VOL / VOL ) (1)
• Press the lever upward ( ) to increasethe volume.
Press the lever downward ( ) to decrease the volume.
MODE ( ) (2)
Press the button to change audio source. FM(1~2) ➟ AM ➟ CD ➟ USB AUX(iPod ®
)
➟ FM...
In addition to mode change, Power on/off
can be made by pressing this button
when the ignition switch is on ACC orON.
- Power ON : Press the button when the audio is off
- Power OFF : Press the button for more than 0.8 seconds when the audio is on.
4
CAUTION
Do not operate audio remote con-
trol buttons simultaneously.
■ Type A
OTA045090K
■Type B
OTA045540
■Type C
OTA045523
■Type D
OTA045539
Page 196 of 488

121
Features of your vehicle
SEEK/PRESET ( / ) (3)
The SEEK/PRESET lever has different
functions based on the system mode. For
the following functions the lever should
be pressed for 0.8 seconds or more.
RADIO mode
It will function as the AUTO SEEK select
button.
CD/USB / i Pod®
mode
It will function as the FF/REW button.
If the SEEK/PRESET button is pressed
for less than 0.8 seconds, it will work as
follows in each mode.
RADIO mode
It will function as the PRESET STATION
buttons.
CD/USB / i Pod ®
mode
It will function as TRACK UP/DOWN but- ton.
MUTE ( ) (4, if equipped)
Press the button to mute the sound.
Press the button to turn off the micro- phone during a telephone call.
Detailed information for audio control
buttons are described in the followingpages in this section.
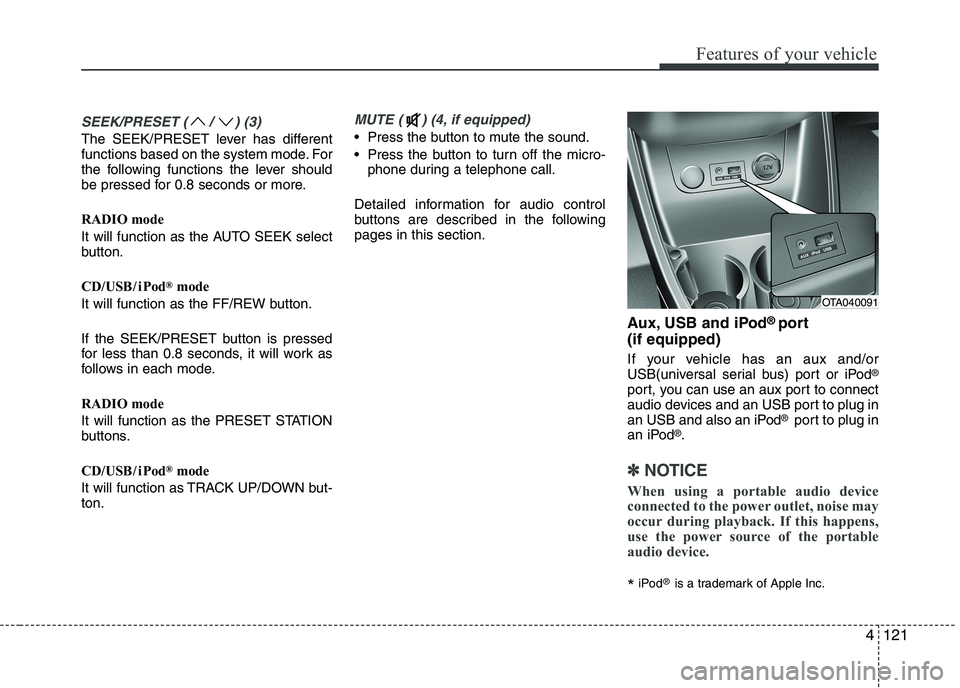
Aux, USB and iPod®
port
(if equipped)
If your vehicle has an aux and/or
USB(universal serial bus) port or iPod ®
port, you can use an aux port to connect
audio devices and an USB port to plug in
an USB and also an iPod ®
port to plug in
an iPod ®
.
✽✽ NOTICE
When using a portable audio device
connected to the power outlet, noise may
occur during playback. If this happens,
use the power source of the portable
audio device.
* iPod
®
is a trademark of Apple Inc.
4
OTA040091