Page 159 of 466

Features of your vehicle
84
4
The Rear Camera Display will acti-
vate when the back-up light is ON
with the ignition switch ON and the
shift lever in the R (Reverse) posi-
tion. Note- during initial start up, system
may not display instantly due to the
audio system booting up.
2 ~ 4 seconds may be required before
displaying during initial reverse selec-
tion. This occurs when starting and
immediately shifting to reverse.
This system is a supplemental sys-
tem that shows behind the vehicle
through the UVO audio or navigation
display backing-up.
Always keep the camera lens clean. If
lens is covered with foreign matter,
the camera may not operate normally.
The Rear Camera Display is not a
safety device. It only serves to assist
the driver in identifying objects direct-
ly behind the middle of the vehicle.
The camera does NOT cover the
complete area behind the vehicle.
Never rely solely on the rear camera
display when backing.
REAR CAMERA DISPLAY (IF EQUIPPED)
OTFH044102
OTFH044103N
WARNING - Backing Up &Using Camera
Never rely solely on the rear
view camera display when
backing up. Prior to entering
your vehicle always do a visual
check of the area behind your
vehicle, and before backing up
be aware of your surroundings
and supplement the rear view
camera by looking over your
shoulders and checking your
rear view mirrors. Due to the dif-
ficulty of ensuring that the area
behind you remains clear,
always back up slowly and stop
immediately if you even suspect
that a person, and especially a
child, might be behind you.
Page 175 of 466
Features of your vehicle
100
4
AUTOMATIC CLIMATE CONTROL SYSTEM
OTFH044322/OTFH044323
1. Driver’s temperature control knob
2. AUTO (automatic control) button
3. Front windshield defroster button
4. Rear window defroster button
5. Fan speed control button
6. OFF button
7. Mode selection button
8. Air conditioning button
9. Air intake control button
10. Passenger's temperature control knob
11. Dual temperature control selection button
12. Climate control display
13. Climate information screen selection button
14. ECON (economy air conditioning) button
■
■Type A
■
■Type B
Page 176 of 466
4101
Features of your vehicle
Automatic heating and air con-
ditioning
1. Push the AUTO button. Themodes, fan speeds, air intake and
air-conditioning will be controlled
automatically by temperature set-
ting. 2. Turn the temperature control knob
to set the desired temperature.
✽ ✽NOTICE
• To turn the automatic operation
off, select any button or switch of
the following:
- Mode selection button
- Air conditioning button
- Front windshield defroster button(Press the button one more time
to deselect the front windshield
defroster function. The 'AUTO'
sign will illuminate on the infor-
mation display once again.)
- Air intake control button
- Fan speed control button
The selected function will be con-
trolled manually while other func-
tions operate automatically.
• For your convenience and to improve the effectiveness of the
climate control, use the AUTO
button and set the temperature to
23°C (73°F°).
OTF044324L
OTF044328L
Page 181 of 466

Features of your vehicle
106
4
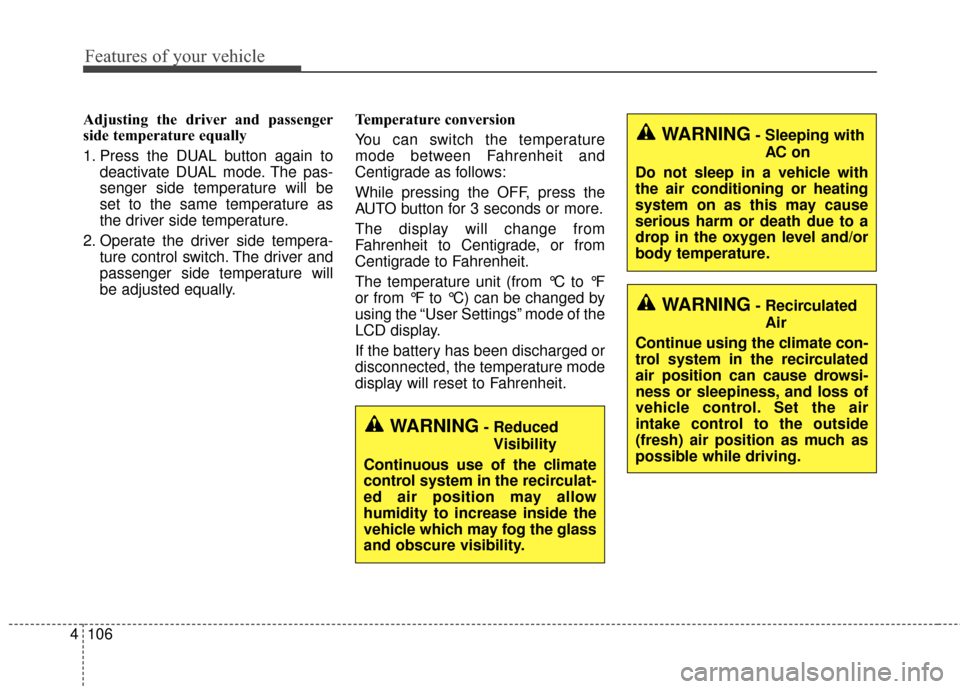
Adjusting the driver and passenger
side temperature equally
1. Press the DUAL button again to
deactivate DUAL mode. The pas-
senger side temperature will be
set to the same temperature as
the driver side temperature.
2. Operate the driver side tempera- ture control switch. The driver and
passenger side temperature will
be adjusted equally. Temperature conversion
You can switch the temperature
mode between Fahrenheit and
Centigrade as follows:
While pressing the OFF, press the
AUTO button for 3 seconds or more.
The display will change from
Fahrenheit to Centigrade, or from
Centigrade to Fahrenheit.
The temperature unit (from °C to °F
or from °F to °C) can be changed by
using the “User Settings” mode of the
LCD display.
If the battery has been discharged or
disconnected, the temperature mode
display will reset to Fahrenheit.
WARNING- Reduced
Visibility
Continuous use of the climate
control system in the recirculat-
ed air position may allow
humidity to increase inside the
vehicle which may fog the glass
and obscure visibility.
WARNING- Recirculated Air
Continue using the climate con-
trol system in the recirculated
air position can cause drowsi-
ness or sleepiness, and loss of
vehicle control. Set the air
intake control to the outside
(fresh) air position as much as
possible while driving.
WARNING- Sleeping with AC on
Do not sleep in a vehicle with
the air conditioning or heating
system on as this may cause
serious harm or death due to a
drop in the oxygen level and/or
body temperature.
Page 182 of 466
4107
Features of your vehicle
Outside thermometer
The current outside temperature is
displayed in 1°C (1°F) increments.
The temperature range is between -
-40°C ~ 60°C (40°F~140°F).
The outside temperature on thedisplay may not change immedi-
ately like a general thermometer to
prevent the driver from being inat-
tentive.
The outside temperature on the display will update as the vehicle is
driven.
Air intake control
The air intake control is used to
select outside (fresh) air position or
recirculated air position.
To change the air intake control posi-
tion, push the control button. Recirculated air position
With the recirculated airposition selected, air
from the passenger
compartment will be
drawn through the heat-
ing system and heated
or cooled according to
the function selected.
Outside (fresh) air position With the outside (fresh)air position selected, air
enters the vehicle from
outside and is heated or
cooled according to the
function selected.
OTFH044330
Page 184 of 466

4109
Features of your vehicle
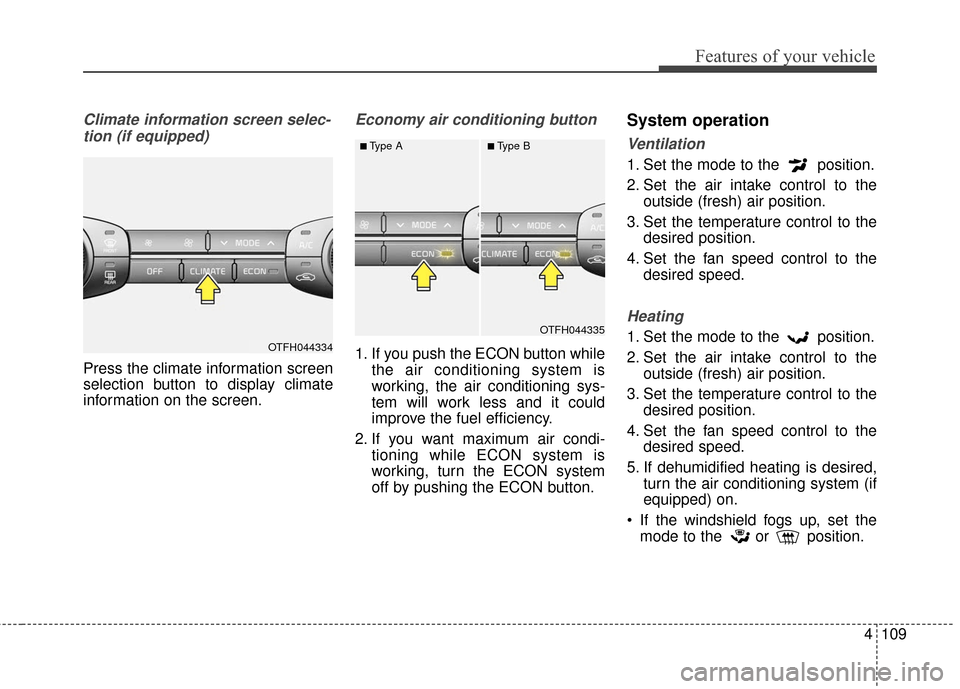
Climate information screen selec-tion (if equipped)
Press the climate information screen
selection button to display climate
information on the screen.
Economy air conditioning button
1. If you push the ECON button while the air conditioning system is
working, the air conditioning sys-
tem will work less and it could
improve the fuel efficiency.
2. If you want maximum air condi- tioning while ECON system is
working, turn the ECON system
off by pushing the ECON button.
System operation
Ventilation
1. Set the mode to the position.
2. Set the air intake control to theoutside (fresh) air position.
3. Set the temperature control to the desired position.
4. Set the fan speed control to the desired speed.
Heating
1. Set the mode to the position.
2. Set the air intake control to theoutside (fresh) air position.
3. Set the temperature control to the desired position.
4. Set the fan speed control to the desired speed.
5. If dehumidified heating is desired, turn the air conditioning system (if
equipped) on.
If the windshield fogs up, set the mode to the or position.OTFH044334
OTFH044335
■Type A■Type B
Page 197 of 466
Features of your vehicle
122
4
Digital clock
Whenever the battery terminals or
related fuses are disconnected, you
must reset the time.
When the ignition switch is in the
ACC or ON position, the clock but-
tons operate as follows:
Pressing the 'H" button will
advance the time display by one
hour.
Pressing the "M" button will
advance the time display by one
minute.
To change the 12 hour format to
the 24 hour format, press the "H"
and "M" button at the same time for
more than 5 seconds.
For example, if the time is 10:15
p.m., the display will change to
22:15.
Clothes hanger (if equipped)
To use the hanger, pull down the
upper portion of the hanger.
OTFH044356
CAUTION- Hanging
clothing
Do not hang heavy clothes,since those may damage thehook.
OUN026348
WARNING- Clock Setting
Distraction
Do not adjust the clock while
driving. Such adjustments may
distract you for too long from the
roadway and lead to a collision.
Page 204 of 466

4129
Features of your vehicle
Caring for disc
If the temperature inside the car is toohigh, open the car windows to venti-
late before using the system.
It is illegal to copy and use MP3/WMA files without permission.
Use CDs that are created only by
lawful means.
Do not apply volatile agents, such as benzene and thinner, normal
cleaners and magnetic sprays
made for analogue disc onto CDs.
To prevent the disc surface from getting damaged, hold CDs by the
edges or the center hole only.
Clean the disc surface with a piece of soft cloth before playback (wipe
it from the center to the outside
edge).
Do not damage the disc surface or attach pieces of sticky tape or
paper.
Make certain only CDs are insert- ed into the CD player (Do not insert
more than one CD at a time).
Keep CDs in their cases after use to protect them from scratches or dirt. Depending on the type of CD-
R/CD-RW CDs, certain CDs may
not operate normally according to
the manufacturing companies. In
such circumstances, continued
use may cause malfunctions to
your audio system.
✽ ✽ NOTICE
-
Playing an Incompatible
Copy Protected Audio CD
Some copy protected CDs, which do
not comply with international audio
CD standards (Red Book), may not
play on your car audio. Please note
that inabilities to properly play a
copy protected CD may indicate
that the CD is defective, not the CD
player.
NOTE:
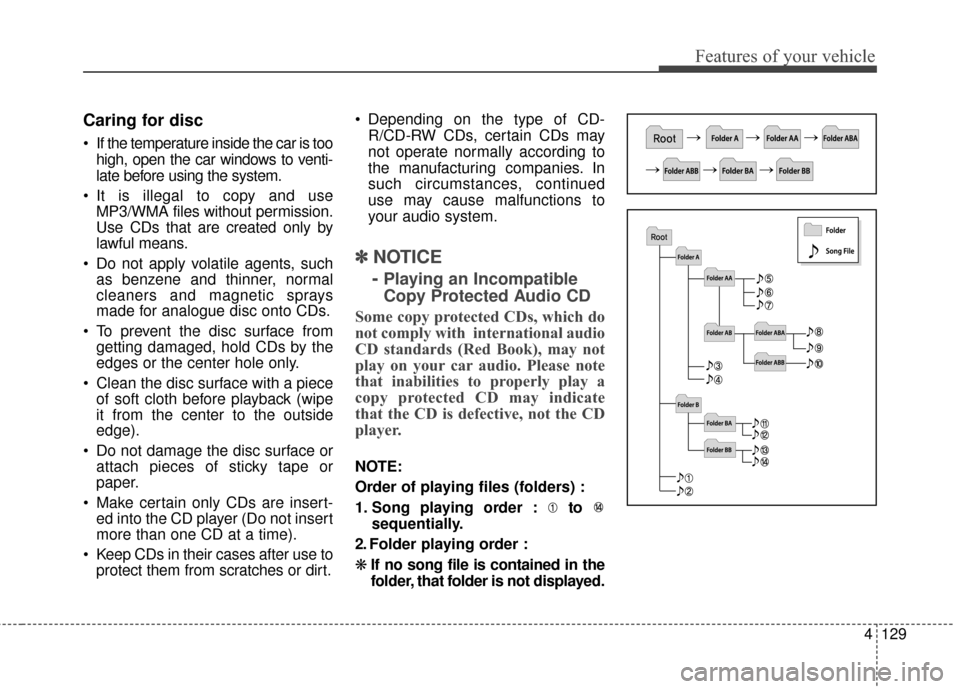
Order of playing files (folders) :
1. Song playing order : to sequentially.
2. Folder playing order :
❋ If no song file is contained in the
folder, that folder is not displayed.