2016 JEEP GRAND CHEROKEE spare tire
[x] Cancel search: spare tirePage 4 of 276

WHAT TO DO IN EMERGENCIES
ROADSIDE ASSISTANCE......... 189
INSTRUMENT CLUSTER WARNING
LIGHTS ................... 189
INSTRUMENT CLUSTER INDICATOR
LIGHTS ................... 195
IF YOUR ENGINE OVERHEATS ..... 197
JACKING AND TIRE CHANGING .... 198
JUMP-STARTING ............. 206
EMERGENCY TOW HOOKS —
IF EQUIPPED ............... 209
MANUAL PARK RELEASE ........ 210
TOWING A DISABLED VEHICLE .... 212
FREEING A STUCK VEHICLE ...... 214
CAP-LESS FUEL FILL FUNNEL ..... 216
ENHANCED ACCIDENT RESPONSE
SYSTEM (EARS) .............. 216
EVENT DATA RECORDER (EDR) .... 216
MAINTAINING YOUR VEHICLE
OPENING THE HOOD........... 217
ENGINE COMPARTMENT ........ 218
NON-SRT FLUID CAPACITIES ...... 226
NON-SRT FLUIDS, LUBRICANTS AND
GENUINE PARTS ............. 226
SRT FLUID CAPACITIES ......... 228
FLUIDS, LUBRICANTS, AND GENUINE
PARTS—SRT ............... 229
DIESEL FLUID CAPACITIES ....... 230
DIESEL FLUIDS, LUBRICANTS AND
GENUINE PARTS ............. 230 MAINTENANCE PROCEDURES
..... 232
MAINTENANCE SCHEDULE —
GASOLINE ENGINE ............ 232
MAINTENANCE SCHEDULE —
DIESEL ENGINE .............. 243
FUSES .................... 249
TIRE PRESSURES ............. 252
ADDING FUEL ............... 253
SPARE TIRES — IF EQUIPPED ..... 255
WHEEL AND WHEEL TRIM CARE . . . 256
REPLACEMENT BULBS ......... 257
CONSUMER ASSISTANCE
FCA US LLC CUSTOMER CENTER . . . 258
FCA CANADA INC. CUSTOMER
CENTER.................. 258
ASSISTANCE FOR THE HEARING
IMPAIRED ................. 258
PUBLICATIONS ORDERING ....... 258
REPORTING SAFETY DEFECTS IN THE
UNITEDSTATES .............. 259
MOPAR® ACCESSORIES
AUTHENTIC ACCESSORIES BY
MOPAR ................... 260
FAQ ’ s
FREQUENTLY ASKED QUESTIONS . . 261
INDEX.................. 263
TABLE OF CONTENTS
2
Page 160 of 276

Mud– Off road calibration for use on low traction surfaces such as mud. Driveline is
maximized for traction. Some binding may be felt on less forgiving surfaces. The
electronic brake controls are set to limit traction control management of throttle and
wheel spin. If equipped with air suspension, the level will change to Off-Road 1.
Rock – Off-road calibration only available in 4WD Low range. The vehicle is raised (if
equipped with Air Suspension) for improved ground clearance. Traction based tuning
with improved steer-ability for use on high traction off-road surfaces. Activate the Hill
Descent Control for steep downhill control. Use for low speed obstacles such as large
rocks, deep ruts, etc. If equipped with air suspension, the vehicle level will change
to Off-Road 2. If the Selec-Terrain switch is in ROCK mode, and the transfer case is
switched from 4WD Low to 4WD High, the Selec-Terrain system will return to AUTO.
QUADRA-LIFT
The Quadra-Lift air suspension system provides full time load leveling capability
along with the benefit of being able to adjust vehicle height by the push of a button.
Quadra-Lift is available with both Quadra-Trac II and Quadra-Drive II.
• The system requires that the engine be running for all changes. When lowering
the vehicle all of the doors, including
the liftgate, must be closed.
• The Quadra-Lift air suspension system uses a lifting and lowering pattern
which keeps the headlights from shin-
ing into oncoming traffic. When raising
the vehicle, the rear of the vehicle will
move up first and then the front. When
lowering the vehicle, the front will
move down first and then the rear.
• After the engine is turned off, you may notice that the air suspension system
operates briefly. This is normal. The
system is correcting the position of the
vehicle.
• To assist with changing a spare tire, the Quadra-Lift air suspension system
has a feature which allows the automatic leveling to be disabled. The feature
controls are located in the radio screen. Driving the vehicle over 5 mph (8 km/h)
will return the air suspension to normal operation.
• An audible chime will be heard whenever a system error has been detected.
Quadra-Lift Control
1 — UP Button
2 — DOWN Button
OFF-ROAD CAPABILITIES (4WD OPERATION)
158
Page 164 of 276

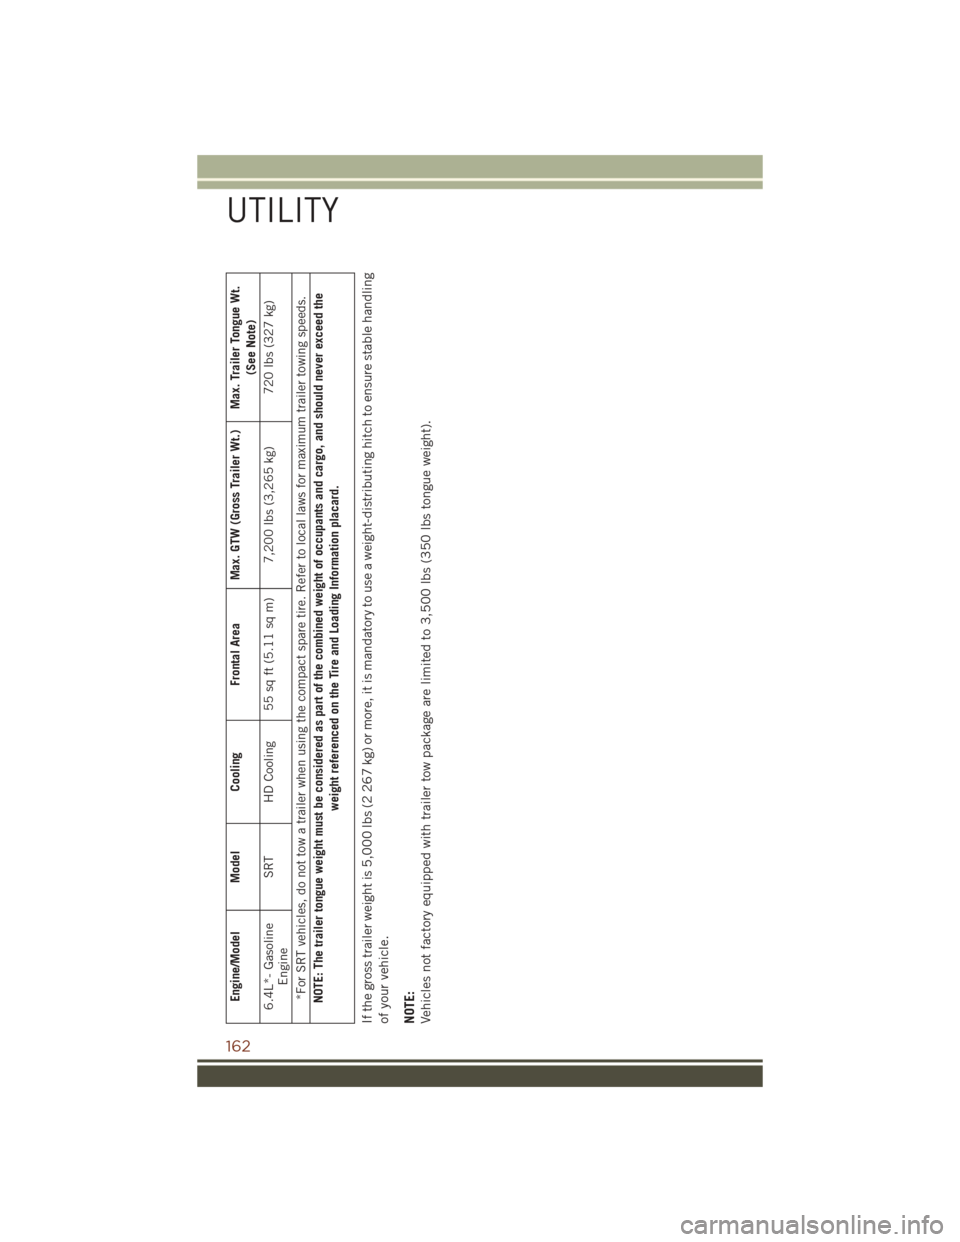
Engine/Model Model CoolingFrontal Area Max. GTW (Gross Trailer Wt.) Max. Trailer Tongue Wt.
(See Note)
6.4L*- Gasoline Engine SRT HD Cooling 55 sq ft (5.11 sq m) 7,200 lbs (3,265 kg) 720 lbs (327 kg)
*For SRT vehicles, do not tow a trailer when using the compact spare tire. Refer to local laws for maximum trailer towing speeds.
NOTE: The trailer tongue weight must be considered as part of the combined weight of occupants and cargo, and should never exceed the weight referenced on the Tire and Loading Information placard.
If the gross trailer weight is 5,000 lbs (2 267 kg) or more, it is mandatory to use a weight-distributing hitch to ensure stable handling
of your vehicle.
NOTE:
Vehicles not factory equipped with trailer tow package are limited to 3,500 lbs (350 lbs tongue weight).
UTILITY
162
Page 193 of 276

– Electronic Throttle Control (ETC) Light
This light informs you of a problem with the Electronic Throttle Control (ETC) system.
If a problem is detected, the light will come on while the engine is running. Cycle the
ignition when the vehicle has completely stopped and the gear selector is placed in
the PARK position; the light should turn off.
If the light remains lit with the engine running, your vehicle will usually be drivable;
however, see an authorized service center immediately. If the light is flashing when
the engine is running, immediate service is required and you may experience reduced
performance, an elevated/rough idle or engine stall and your vehicle may require
towing.
– Tire Pressure Monitoring System (TPMS) Light
Each tire, including the spare (if provided), should be checked monthly, when cold
and inflated to the inflation pressure recommended by the vehicle manufacturer on
the vehicle placard or tire inflation pressure label. (If your vehicle has tires of a
different size than the size indicated on the vehicle placard or tire inflation pressure
label, you should determine the proper tire inflation pressure for those tires.)
As an added safety feature, your vehicle has been equipped with a Tire Pressure
Monitoring System (TPMS) which display in the Electronic Vehicle Information
Center (EVIC) or Driver Information Display (DID) when one or more of your tires is
significantly under-inflated. Accordingly, when the low tire pressure EVIC or DID
display illuminates, you should stop and check your tires as soon as possible, and
inflate them to the proper pressure. Driving on a significantly under-inflated tire
causes the tire to overheat and can lead to tire failure. Under-inflation also reduces
fuel efficiency and tire tread life, and may affect the vehicle’s handling and stopping
ability.
IF THE LIGHT STARTS FLASHING INDICATING A LOW TIRE PRESSURE, ADJUST THE AIR
PRESSURE IN THE LOW TIRE TO THE AIR PRESSURE SHOWN ON THE VEHICLE PLACARD OR
TIRE INFLATION PRESSURE LABEL LOCATED ON THE DRIVER'S DOOR.
NOTE:
After inflation, the vehicle may need to be driven for 20 minutes before the flashing light
will turn off.
Please note that the TPMS is not a substitute for proper tire maintenance, and it is
the driver’s responsibility to maintain correct tire pressure, even if under-inflation
has not reached the level to trigger illumination of the TPMS low EVIC or DID display.
WHAT TO DO IN EMERGENCIES
191
Page 201 of 276

Jack Location
The scissor-type jack and tire changing tools are located in rear cargo area, below the
load floor.
Spare Tire Stowage
The spare tire is stowed under the load
floor in the rear cargo area and is secured
to the body with a special wing nut.
Spare Tire/Jack And Tools
1 — Cap-Less Fuel Fill Funnel
2 — Spare Tire
3 — Tire Changing Tools And Jack
WHAT TO DO IN EMERGENCIES
199
Page 202 of 276

Preparations For Jacking
CAUTION!
Always lift or jack the vehicle from the correct jacking points. Failure to follow this
information could cause damage to the vehicle or underbody components.
NOTE:
To assist with changing a spare tire, the air suspension system (if equipped) has a
feature which allows the automatic leveling to be disabled.
1. Park the vehicle on a firm, level surface. Avoid ice or slippery surfaces.
WARNING!
Do not attempt to change a tire on the side of the vehicle closest to moving traffic,
pull far enough off the road to avoid being hit when operating the jack or changing
the wheel.
2. Turn on the Hazard Warning flasher.
3. Set the parking brake.
4. Place the gear selector into PARK.
5. Turn the ignition OFF.
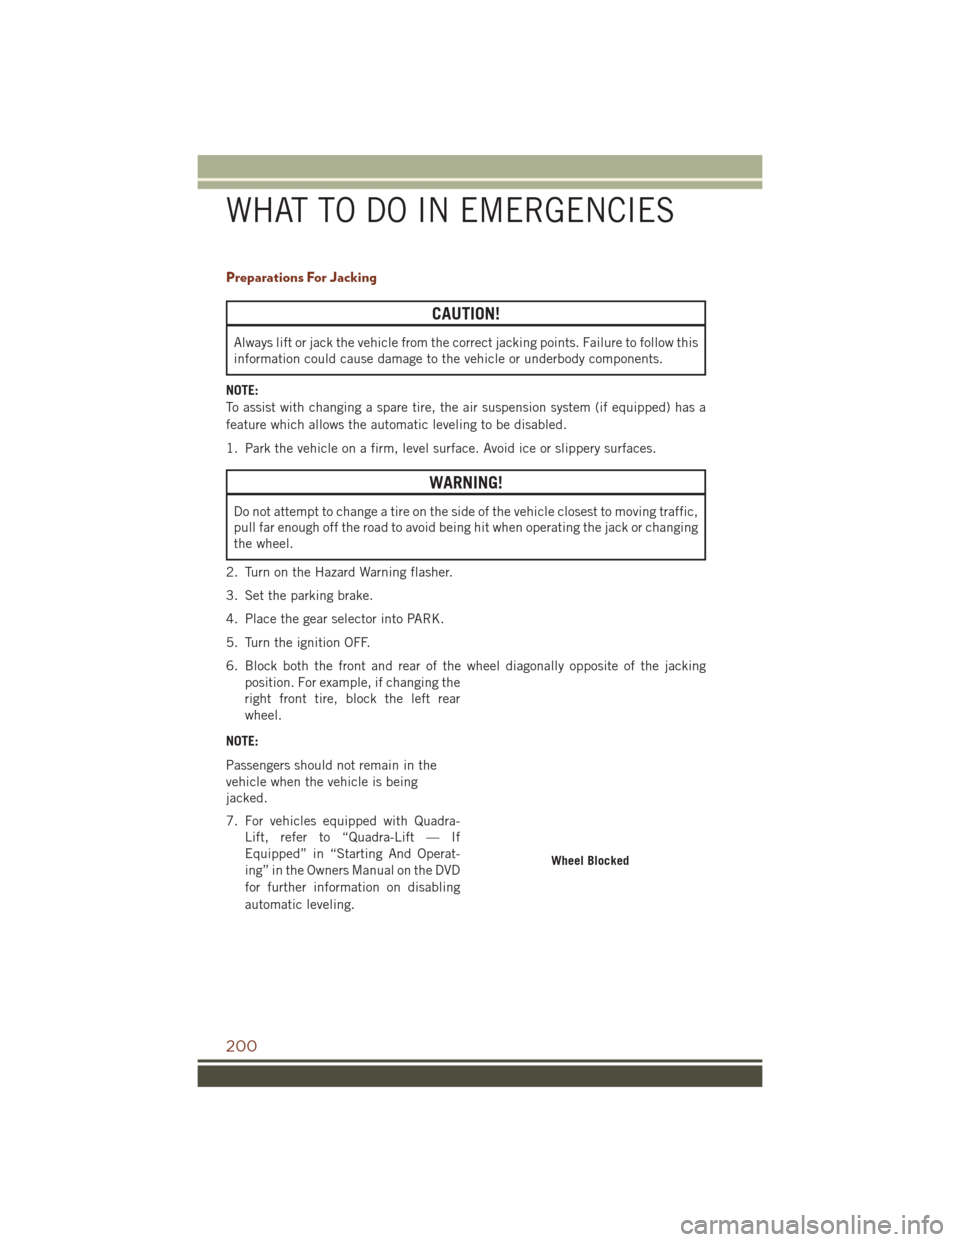
6. Block both the front and rear of the wheel diagonally opposite of the jacking position. For example, if changing the
right front tire, block the left rear
wheel.
NOTE:
Passengers should not remain in the
vehicle when the vehicle is being
jacked.
7. For vehicles equipped with Quadra- Lift, refer to “Quadra-Lift — If
Equipped” in “Starting And Operat-
ing” in the Owners Manual on the DVD
for further information on disabling
automatic leveling.
Wheel Blocked
WHAT TO DO IN EMERGENCIES
200
Page 203 of 276

Jacking Instructions
WARNING!
Carefully follow these tire changing warnings to help prevent personal injury or
damage to your vehicle:
• Always park on a firm, level surface as far from the edge of the roadway aspossible before raising the vehicle.
• Turn on the Hazard Warning flasher.
• Chock the wheel diagonally opposite the wheel to be raised.
• Set the parking brake firmly and set an automatic transmission in PARK.
• Never start or run the engine with the vehicle on a jack.
• Do not let anyone sit in the vehicle when it is on a jack.
• Do not get under the vehicle when it is on a jack. If you need to get under a
raised vehicle, take it to a service center where it can be raised on a lift.
• Only use the jack in the positions indicated and for lifting this vehicle during
a tire change.
• If working on or near a roadway, be extremely careful of motor traffic.
• To assure that spare tires, flat or inflated, are securely stowed, spares must be
stowed with the valve stem facing the ground.
CAUTION!
Do not attempt to raise the vehicle by jacking on locations other than those
indicated in the Jacking Instructions for this vehicle.
1. Remove the spare tire, jack, and tools from storage.
2. Loosen (but do not remove) the wheel lug nuts by turning them to the left, one turn, while the wheel is still on the ground.
Warning Label
WHAT TO DO IN EMERGENCIES
201
Page 205 of 276

4. For the front axle, place the jack on the body flange just behind the front tire asindicated by the triangular lift point symbol on the sill molding. Do not raise the
vehicle until you are sure the jack is fully engaged.
5. For a rear tire, place the jack in the slot on the rear tie-down bracket, just forward of the rear tire (as indicated by the triangular lift point symbol on the sill molding).
Do not raise the vehicle until you are sure the jack is fully engaged.
6. Raise the vehicle by turning the jack screw clockwise. Raise the vehicle
only until the tire just clears the sur-
face and enough clearance is ob-
tained to install the spare tire. Mini-
mum tire lift provides maximum
stability.
WARNING!
Raising the vehicle higher than necessary can make the vehicle less stable. It
could slip off the jack and hurt someone near it. Raise the vehicle only enough to
remove the tire.
Front Jacking Location
Rear Jacking Location
WHAT TO DO IN EMERGENCIES
203