Page 42 of 723
To Lock The Liftgate
With a valid Passive Entry RKE Key Fob within 3 ft (1.0
m) of the liftgate, push the passive entry lock button
located to the right of electronic liftgate release.
NOTE:If “Unlock All Doors 1st Press” is programmed
in Uconnect Settings, all doors will unlock when you
push the electronic liftgate release. If �Unlock Driver
Door 1st Press� is programmed in Uconnect, the liftgate
will only unlock when you push the electronic liftgate
release. For further information, refer to “Uconnect Set-
tings” in “Understanding Your Instrument Panel.”
To Lock The Vehicle’s Doors
With one of the vehicle’s Passive Entry RKE Key Fobs
within 5 ft (1.5 m) of the driver or passenger front door
handle, push the door handle LOCK button to lock all
four doors and liftgate.
Passive Entry/Lock Button Location
1 — Electronic Liftgate Release
2 — Lock Button Location 40 THINGS TO KNOW BEFORE STARTING YOUR VEHICLE
Page 43 of 723
NOTE:The key must be within 5 ft (1.5 m) of the handle
being used to lock the vehicle.
Do NOT grab the door handle, when pushing the door
handle button. This could unlock the door(s).
Push The Door Handle Button To Lock
Do NOT Grab The Door Handle When Locking
2
THINGS TO KNOW BEFORE STARTING YOUR VEHICLE 41
Page 44 of 723

NOTE:
•After pushing the door handle button, you must wait
two seconds before you can lock or unlock the doors,
using either Passive Entry door handle. This is done to
allow you to check if the vehicle is locked by pulling
the door handle without the vehicle reacting and
unlocking.
• The Passive Entry system will not operate if the RKE
Key Fob battery is dead.
• Closeness to mobile devices can have an effect on the
passive entry system.
The vehicle doors can also be locked by using the RKE
Key Fob lock button or the lock button located on the
vehicle’s interior door panel.General Information
The following regulatory statement applies to all radio
frequency (RF) devices equipped in this vehicle:
This device complies with Part 15 of the FCC Rules and
with Industry Canada licence-exempt RSS standard(s).
Operation is subject to the following two conditions:
1. This device may not cause harmful interference, and
2. This device must accept any interference received, including interference that may cause undesired op-
eration.
NOTE: Changes or modifications not expressly approved
by the party responsible for compliance could void the
user ’s authority to operate the equipment.
42 THINGS TO KNOW BEFORE STARTING YOUR VEHICLE
Page 48 of 723

Window Lockout Button
The Window Lockout button on the driver’s door allows
you to disable the window controls on the rear doors. To
disable the window controls on the rear doors, push the
Window Lockout button. To enable the window controls,
push the Window Lockout button again.
Wind Buffeting
Wind buffeting can be described as the perception of
pressure on the ears or a helicopter-type sound in the
ears. Your vehicle may exhibit wind buffeting with the
windows down, or the sunroof (if equipped) in certain
open or partially open positions. This is a normal occur-
rence and can be minimized. If the buffeting occurs with
the rear windows open, then open the front and rear
windows together to minimize the buffeting. If the
buffeting occurs with the sunroof open, adjust the sun-
roof opening to minimize the buffeting.
LIFTGATE
To Unlock/Enter The Liftgate
The liftgate passive entry unlock feature is built into the
electronic liftgate release. With a valid Passive Entry RKE
Key Fob within 3 ft (1.0 m) of the liftgate, push the
electronic liftgate release to open with one fluid motion.
Window Lockout Button
46 THINGS TO KNOW BEFORE STARTING YOUR VEHICLE
Page 49 of 723
NOTE:If “Unlock All Doors 1st Press” is programmed in
Uconnect Settings, all doors will unlock when you push
the electronic liftgate release. If �Unlock Driver Door 1st
Press� is programmed in Uconnect Settings, only the
liftgate will unlock when you push the electronic liftgate
release. For further information, refer to “Uconnect Set-
tings” in “Understanding Your Instrument Panel.”
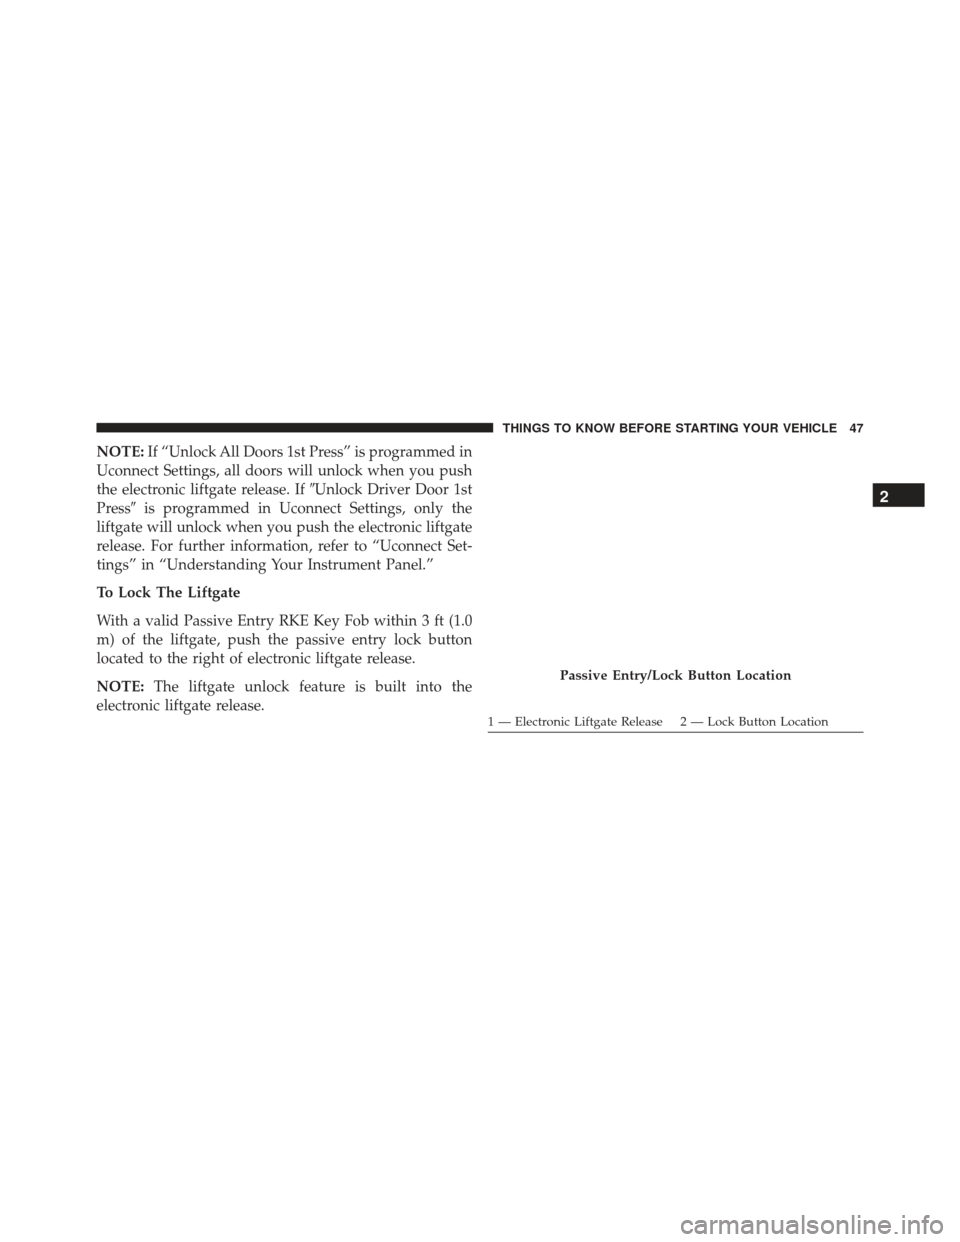
To Lock The Liftgate
With a valid Passive Entry RKE Key Fob within 3 ft (1.0
m) of the liftgate, push the passive entry lock button
located to the right of electronic liftgate release.
NOTE: The liftgate unlock feature is built into the
electronic liftgate release.
Passive Entry/Lock Button Location
1 — Electronic Liftgate Release 2 — Lock Button Location
2
THINGS TO KNOW BEFORE STARTING YOUR VEHICLE 47
Page 50 of 723

WARNING!
Driving with the liftgate open can allow poisonous
exhaust gases into your vehicle. You and your pas-
sengers could be injured by these fumes. Keep the
liftgate closed when you are operating the vehicle.
Power Liftgate — If Equipped
The power liftgate may be opened by pushing
the electronic liftgate release (refer to “Keyless
Enter-N-Go — Passive Entry” located in
“Things To Know Before Starting Your Ve-
hicle”) or by pushing the LIFTGATE button on the RKE
Key Fob. Push the LIFTGATE button on the RKE Key Fob
twice within five seconds to open the power liftgate.
Once the liftgate is open, pushing the button twice within
five seconds a second time will close the liftgate. The power liftgate may also be opened or closed by
pushing the LIFTGATE button located on the front
overhead console. If the liftgate is fully open, the liftgate
can be closed by pushing the LIFTGATE button located
on left rear trim panel, near the liftgate opening. If the
liftgate is in motion, pushing the LIFTGATE button
located on left rear trim panel will reverse the liftgate.
When the LIFTGATE button on the RKE Key Fob is
pushed two times, the turn signals will flash twice to
signal that the liftgate is opening or closing (if Flash
Lamps with Lock is enabled in the Uconnect settings),
and the liftgate chime will be audible. For further infor-
mation, refer to
�Uconnect Settings� in�Understanding
Your Instrument Panel.�
48 THINGS TO KNOW BEFORE STARTING YOUR VEHICLE
Page 56 of 723

The outboard front passenger seat BeltAlert is not active
when the outboard front passenger seat is unoccupied.
BeltAlert may be triggered when an animal or other items
are placed on the outboard front passenger seat or when
the seat is folded flat (if equipped). It is recommended
that pets be restrained in the rear seat (if equipped) in pet
harnesses or pet carriers that are secured by seat belts,
and cargo is properly stowed.
BeltAlert can be activated or deactivated by your autho-
rized dealer. FCA US LLC does not recommend deacti-
vating BeltAlert.
NOTE:If BeltAlert has been deactivated and the driver
or outboard front seat passenger (if equipped with out-
board front passenger seat BeltAlert) is unbuckled the
Seat Belt Reminder Light will turn on and remain on until
the driver and outboard front seat passenger seat belts
are buckled.Lap/Shoulder Belts
All seating positions in your vehicle are equipped with
lap/shoulder belts.
The seat belt webbing retractor will lock only during very
sudden stops or collisions. This feature allows the shoul-
der part of the seat belt to move freely with you under
normal conditions. However, in a collision the seat belt
will lock and reduce your risk of striking the inside of the
vehicle or being thrown out of the vehicle.
WARNING!
•Relying on the air bags alone could lead to more
severe injuries in a collision. The air bags work with
your seat belt to restrain you properly. In some colli-
sions, the air bags won’t deploy at all. Always wear
your seat belt even though you have air bags.
(Continued)
54 THINGS TO KNOW BEFORE STARTING YOUR VEHICLE
Page 62 of 723

As a guide, if you are shorter than average, you will
prefer the shoulder belt anchorage in a lower position,
and if you are taller than average, you will prefer the
shoulder belt anchorage in a higher position. After you
release the anchorage button, try to move it up or down
to make sure that it is locked in position.NOTE:
The adjustable upper shoulder belt anchorage is
equipped with an Easy Up feature. This feature allows
the shoulder belt anchorage to be adjusted in the upward
position without pushing or squeezing the release but-
ton. To verify the shoulder belt anchorage is latched, pull
downward on the shoulder belt anchorage until it is
locked into position.
Seat Belt Extender
If a seat belt is not long enough to fit properly, even when
the webbing is fully extended and the adjustable upper
shoulder belt anchorage (if equipped) is in its lowest
position, your authorized dealer can provide you with a
Seat Belt Extender. The Seat Belt Extender should be used
only if the existing seat belt is not long enough. When the
Seat Belt Extender is not required for a different occu-
pant, it must be removed.
Adjustable Anchorage
60 THINGS TO KNOW BEFORE STARTING YOUR VEHICLE
 of the liftgate, push the passive entry lock button
located to the right of electronic liftgate release.
NOTE:If “Unlo")
 of the handle
being used to lock the vehicle.
Do NOT grab the door handle, when pushing the door
handle button. This could unlock the door(s).
Push The Door Ha")